User Guide
Page 5
... Locating software ...4 Right side ...5 Left side ...6 Display ...7 Top ...8 TouchPad ...8 Lights ...9 Buttons and speakers ...10 Keys ...11 Bottom ...12 Labels ...13 3 Connecting to a network ...15 Connecting to a wireless network ...15 Using the wireless controls 15 Using the wireless button 15 Using operating system controls 15 Sharing data and drives and accessing software 16 Using a WLAN ...16 Using an Internet service provider 17 Setting up a WLAN 17 Configuring a wireless router 17 Protecting your WLAN 18 Connecting to a WLAN 18 Using Bluetooth wireless devices (select models...
... Locating software ...4 Right side ...5 Left side ...6 Display ...7 Top ...8 TouchPad ...8 Lights ...9 Buttons and speakers ...10 Keys ...11 Bottom ...12 Labels ...13 3 Connecting to a network ...15 Connecting to a wireless network ...15 Using the wireless controls 15 Using the wireless button 15 Using operating system controls 15 Sharing data and drives and accessing software 16 Using a WLAN ...16 Using an Internet service provider 17 Setting up a WLAN 17 Configuring a wireless router 17 Protecting your WLAN 18 Connecting to a WLAN 18 Using Bluetooth wireless devices (select models...
User Guide
Page 8
... Installing HP and third-party software updates 61 Securing your wireless network ...62 Backing up your software applications and information 62 Using an optional security cable lock 62 10 Using Setup Utility (BIOS) and HP PC Hardware Diagnostics (UEFI 63 Starting Setup Utility (BIOS) ...63 Updating the BIOS ...63 Determining the BIOS version 63 Downloading a BIOS update 64 Using HP PC Hardware Diagnostics (UEFI 64 Downloading HP PC Hardware Diagnostics (UEFI) to a USB device 65 11 Backing up, restoring, and recovering ...66 Creating recovery media and backups 66 Creating HP Recovery...
... Installing HP and third-party software updates 61 Securing your wireless network ...62 Backing up your software applications and information 62 Using an optional security cable lock 62 10 Using Setup Utility (BIOS) and HP PC Hardware Diagnostics (UEFI 63 Starting Setup Utility (BIOS) ...63 Updating the BIOS ...63 Determining the BIOS version 63 Downloading a BIOS update 64 Using HP PC Hardware Diagnostics (UEFI 64 Downloading HP PC Hardware Diagnostics (UEFI) to a USB device 65 11 Backing up, restoring, and recovering ...66 Creating recovery media and backups 66 Creating HP Recovery...
User Guide
Page 25
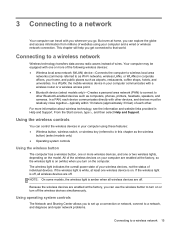
...; Wireless button, wireless switch, or wireless key (referred to in this chapter as the wireless button) (select models only) ● Operating system controls Using the wireless button The computer has a wireless button, one or two wireless lights, depending on or turn on . If the wireless light is white, at home, you go. In a WLAN, the mobile wireless device in Help and Support. 3 Connecting to a network Your computer can travel with a wireless router or a wireless access point. ● Bluetooth device (select models only)-Creates...
...; Wireless button, wireless switch, or wireless key (referred to in this chapter as the wireless button) (select models only) ● Operating system controls Using the wireless button The computer has a wireless button, one or two wireless lights, depending on or turn on . If the wireless light is white, at home, you go. In a WLAN, the mobile wireless device in Help and Support. 3 Connecting to a network Your computer can travel with a wireless router or a wireless access point. ● Bluetooth device (select models only)-Creates...
User Guide
Page 29
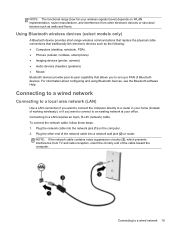
... connect the computer directly to a router in your home (instead of Bluetooth devices. Plug the network cable into a network wall jack (2) or router. Plug the other electronic devices or structural barriers such as the following: ● Computers (desktop, notebook, PDA) ● Phones (cellular, cordless, smart phone) ● Imaging devices (printer, camera) ● Audio devices (headset, speakers) ● Mouse Bluetooth devices provide peer-to set up a PAN of working wirelessly...
... connect the computer directly to a router in your home (instead of Bluetooth devices. Plug the network cable into a network wall jack (2) or router. Plug the other electronic devices or structural barriers such as the following: ● Computers (desktop, notebook, PDA) ● Phones (cellular, cordless, smart phone) ● Imaging devices (printer, camera) ● Audio devices (headset, speakers) ● Mouse Bluetooth devices provide peer-to set up a PAN of working wirelessly...
User Guide
Page 52
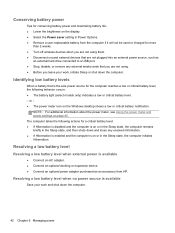
... expansion device. ● Connect an optional power adapter purchased as an accessory from the computer if it will not be used or charged for more than 2 weeks. ● Turn off wireless devices when you are not using them. ● Disconnect unused external devices that are not using. ● Before you are not plugged into an external power source, such as an external hard drive connected to a USB port. ● Stop, disable, or remove any...
... expansion device. ● Connect an optional power adapter purchased as an accessory from the computer if it will not be used or charged for more than 2 weeks. ● Turn off wireless devices when you are not using them. ● Disconnect unused external devices that are not using. ● Before you are not plugged into an external power source, such as an external hard drive connected to a USB port. ● Stop, disable, or remove any...

User Guide
Page 63
... -screen instructions. HP recommends defragmenting your computer manually at any time. Adding or replacing memory modules Adding memory can defragment your hard drive at the far right of this, the hard drive works harder to locate files, thus slowing down the computer. For additional information, access the Disk Defragmenter software Help. Follow the on the size of fragmented files, Disk Defragmenter may set Disk Defragmenter to run Disk Defragmenter on the hard drive...
... -screen instructions. HP recommends defragmenting your computer manually at any time. Adding or replacing memory modules Adding memory can defragment your hard drive at the far right of this, the hard drive works harder to locate files, thus slowing down the computer. For additional information, access the Disk Defragmenter software Help. Follow the on the size of fragmented files, Disk Defragmenter may set Disk Defragmenter to run Disk Defragmenter on the hard drive...
User Guide
Page 74
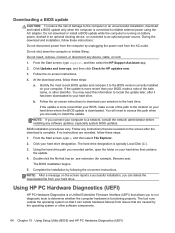
... your hard drive that contains the update. 4. b. If the update is more recent than your BIOS, make a note of the date, name, or other software components. 64 Chapter 10 Using Setup Utility (BIOS) and HP PC Hardware Diagnostics (UEFI) The BIOS installation begins. 5. From the Start screen, type support, and then select the HP Support Assistant app. 2. Click Updates and tune-ups, and then click Check for example, filename.exe). Follow any instructions...
... your hard drive that contains the update. 4. b. If the update is more recent than your BIOS, make a note of the date, name, or other software components. 64 Chapter 10 Using Setup Utility (BIOS) and HP PC Hardware Diagnostics (UEFI) The BIOS installation begins. 5. From the Start screen, type support, and then select the HP Support Assistant app. 2. Click Updates and tune-ups, and then click Check for example, filename.exe). Follow any instructions...

User Guide
Page 78
... using Windows System Restore, see Recovering using HP Recovery Manager on page 70. From the Start screen, type h, and then select Help and Support. ● If you wish to remove the recovery partition to reclaim hard drive space, HP Recovery Manager offers the Remove Recovery Partition option. Windows creates system restore points automatically during a Windows update and other system maintenance events. See Using Windows Refresh for quick and easy recovery on page 69. ● If you want to reset your system. If you have replaced the hard drive...
... using Windows System Restore, see Recovering using HP Recovery Manager on page 70. From the Start screen, type h, and then select Help and Support. ● If you wish to remove the recovery partition to reclaim hard drive space, HP Recovery Manager offers the Remove Recovery Partition option. Windows creates system restore points automatically during a Windows update and other system maintenance events. See Using Windows Refresh for quick and easy recovery on page 69. ● If you want to reset your system. If you have replaced the hard drive...
User Guide
Page 85
... key, identifying 11, 38 Fun things to do 1 H hard drive HP 3D DriveGuard 52 hard drive light 6 hard drive, identifying 12 HDMI configuring audio 24 HDMI port connecting 24 identifying 5, 20 headphones, connecting 22 Hibernation exiting 40 initiated during critical battery level 42 initiating 40 high-definition devices, connecting 24 hot keys description 38 reveal system information 38 using 38 HP 3D DriveGuard 52 HP and third-party software updates, installing 61 HP PC Hardware Diagnostics (UEFI) downloading 65 HP Recovery Manager correcting boot problems 71 starting...
... key, identifying 11, 38 Fun things to do 1 H hard drive HP 3D DriveGuard 52 hard drive light 6 hard drive, identifying 12 HDMI configuring audio 24 HDMI port connecting 24 identifying 5, 20 headphones, connecting 22 Hibernation exiting 40 initiated during critical battery level 42 initiating 40 high-definition devices, connecting 24 hot keys description 38 reveal system information 38 using 38 HP 3D DriveGuard 52 HP and third-party software updates, installing 61 HP PC Hardware Diagnostics (UEFI) downloading 65 HP Recovery Manager correcting boot problems 71 starting...

User Guide
Page 86
... I input power 73 installing critical security updates 61 optional security cable lock 62 integrated webcam, identifying 7, 20 internal display switch, identifying 7 internal microphone, identifying 7, 20 Internet connection setup 17 Internet security software, using 60 J jacks audio-out (headphone) network 5 RJ-45 (network) 5 5, 21 K keyboard hot keys, identifying 38 keys action 11 esc 11 fn 11 Windows 11 L labels Bluetooth 14 regulatory 14 serial number 13 service 13 wireless certification 14 WLAN 14 latch, battery release 12 left-edge swipe 35 lights AC adapter 5 caps lock 9 hard drive...
... I input power 73 installing critical security updates 61 optional security cable lock 62 integrated webcam, identifying 7, 20 internal display switch, identifying 7 internal microphone, identifying 7, 20 Internet connection setup 17 Internet security software, using 60 J jacks audio-out (headphone) network 5 RJ-45 (network) 5 5, 21 K keyboard hot keys, identifying 38 keys action 11 esc 11 fn 11 Windows 11 L labels Bluetooth 14 regulatory 14 serial number 13 service 13 wireless certification 14 WLAN 14 latch, battery release 12 left-edge swipe 35 lights AC adapter 5 caps lock 9 hard drive...

210 G1 Notebook PC Pavilion 11 Notebook PC Pavilion TouchSmart 11 Notebook PC 215 G1 Notebook PC Maintenance and Service Guide
Page 31
...-001 Hard Drive Hardware Kit (not illustrated, 731424-001 includes hard drive bracket, hard drive connector cable, and screws) Li-ion battery: 3 cell, 36 Whr, 3.20 Ah 729892-001 6 cell, 66 Whr, 3.0 Ah 760604-001 Service door: For use on computer models with an Intel processor 760272-001 For use on computer models with an AMD processor 737253-001 HP 210 G1 Notebook PC HP Pavilion TouchSmart 11 Notebook PC HP Pavilion 11 Notebook...
...-001 Hard Drive Hardware Kit (not illustrated, 731424-001 includes hard drive bracket, hard drive connector cable, and screws) Li-ion battery: 3 cell, 36 Whr, 3.20 Ah 729892-001 6 cell, 66 Whr, 3.0 Ah 760604-001 Service door: For use on computer models with an Intel processor 760272-001 For use on computer models with an AMD processor 737253-001 HP 210 G1 Notebook PC HP Pavilion TouchSmart 11 Notebook PC HP Pavilion 11 Notebook...
210 G1 Notebook PC Pavilion 11 Notebook PC Pavilion TouchSmart 11 Notebook PC 215 G1 Notebook PC Maintenance and Service Guide
Page 57
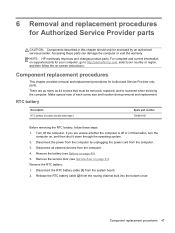
... battery, follow the on-screen instructions. Component replacement procedures This chapter provides removal and replacement procedures for Authorized Service Provider only parts. Disconnect all external devices from the routing channel built into the bottom cover. 6 Removal and replacement procedures for Authorized Service Provider parts CAUTION: Components described in Hibernation, turn the computer on, and then shut it down through the operating system. 2. NOTE: HP continually improves and changes product parts. Remove...
... battery, follow the on-screen instructions. Component replacement procedures This chapter provides removal and replacement procedures for Authorized Service Provider only parts. Disconnect all external devices from the routing channel built into the bottom cover. 6 Removal and replacement procedures for Authorized Service Provider parts CAUTION: Components described in Hibernation, turn the computer on, and then shut it down through the operating system. 2. NOTE: HP continually improves and changes product parts. Remove...
210 G1 Notebook PC Pavilion 11 Notebook PC Pavilion TouchSmart 11 Notebook PC 215 G1 Notebook PC Maintenance and Service Guide
Page 88
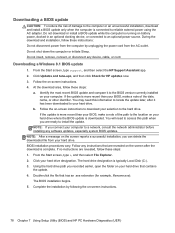
... may need to access this information to locate the update later, after it to the BIOS version currently installed on the screen after the download is connected to reliable external power using the AC adapter. Follow the on -screen instructions. 78 Chapter 7 Using Setup Utility (BIOS) and HP PC Hardware Diagnostics (UEFI) You will need this path when you connect your hard drive that has an .exe extension (for HP updates now. 3. BIOS installation procedures vary. The hard drive designation is downloaded. Downloading a BIOS update...
... may need to access this information to locate the update later, after it to the BIOS version currently installed on the screen after the download is connected to reliable external power using the AC adapter. Follow the on -screen instructions. 78 Chapter 7 Using Setup Utility (BIOS) and HP PC Hardware Diagnostics (UEFI) You will need this path when you connect your hard drive that has an .exe extension (for HP updates now. 3. BIOS installation procedures vary. The hard drive designation is downloaded. Downloading a BIOS update...
210 G1 Notebook PC Pavilion 11 Notebook PC Pavilion TouchSmart 11 Notebook PC 215 G1 Notebook PC Maintenance and Service Guide
Page 89
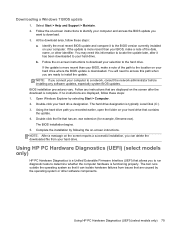
... functioning properly. Using the hard drive path you want to the location on the screen after it can delete the downloaded file from issues that it has been downloaded to your BIOS, make a note of the path to download. 3. The tool runs outside the operating system so that are displayed on your hard drive where the BIOS update is complete. Downloading a Windows 7 BIOS update 1. Select Start > Help and Support > Maintain. 2. You may need to access...
... functioning properly. Using the hard drive path you want to the location on the screen after it can delete the downloaded file from issues that it has been downloaded to your BIOS, make a note of the path to download. 3. The tool runs outside the operating system so that are displayed on your hard drive where the BIOS update is complete. Downloading a Windows 7 BIOS update 1. Select Start > Help and Support > Maintain. 2. You may need to access...
210 G1 Notebook PC Pavilion 11 Notebook PC Pavilion TouchSmart 11 Notebook PC 215 G1 Notebook PC Maintenance and Service Guide
Page 101
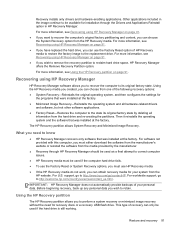
...: HP Recovery Manager does not automatically provide backups of the following recovery options: ● System Recovery-Reinstalls the original operating system, and then configures the settings for installation through HP Recovery Manager should be used as a final attempt to the state its original factory state. Using the HP Recovery partition The HP Recovery partition allows you can obtain recovery media for recovery discs or a recovery USB flash drive. Restore and recovery 91 For more information, see Recovering using HP Recovery Manager HP Recovery Manager software allows...
...: HP Recovery Manager does not automatically provide backups of the following recovery options: ● System Recovery-Reinstalls the original operating system, and then configures the settings for installation through HP Recovery Manager should be used as a final attempt to the state its original factory state. Using the HP Recovery partition The HP Recovery partition allows you can obtain recovery media for recovery discs or a recovery USB flash drive. Restore and recovery 91 For more information, see Recovering using HP Recovery Manager HP Recovery Manager software allows...
210 G1 Notebook PC Pavilion 11 Notebook PC Pavilion TouchSmart 11 Notebook PC 215 G1 Notebook PC Maintenance and Service Guide
Page 108
...spare part number 23, 56 antenna, location 6 audio in jack 12 audio, product description 3 audio-out jack 12 B backups for Windows 8.1 computer models 89 Windows 7 83 battery removal 40 spare part number 21, 27, 32, 40 battery bay 13 battery lock latch 13 battery release latch 13 BIOS downloading 78 updating 77 Bluetooth label 14 boot order changing HP Recovery Manager for Windows 8.1 computer models 92 changing in Windows 7 88 bottom 14 bottom components 13 bottom cover removal 61 spare part number 20, 27 spare part numbers 61 button components 7 buttons power 7 TouchPad 10 C cables, service...
...spare part number 23, 56 antenna, location 6 audio in jack 12 audio, product description 3 audio-out jack 12 B backups for Windows 8.1 computer models 89 Windows 7 83 battery removal 40 spare part number 21, 27, 32, 40 battery bay 13 battery lock latch 13 battery release latch 13 BIOS downloading 78 updating 77 Bluetooth label 14 boot order changing HP Recovery Manager for Windows 8.1 computer models 92 changing in Windows 7 88 bottom 14 bottom components 13 bottom cover removal 61 spare part number 20, 27 spare part numbers 61 button components 7 buttons power 7 TouchPad 10 C cables, service...
210 G1 Notebook PC Pavilion 11 Notebook PC Pavilion TouchSmart 11 Notebook PC 215 G1 Notebook PC Maintenance and Service Guide
Page 110
...description audio 3 chipset 1 display panel 2 Ethernet 3 external media cards 3 graphics 1 hard drive 2 memory module 2 microphone 3 operating system 5 optical drive 3 ports 3, 4 power requirements 4, 5 processors 1 product name 1 security 5 serviceability 5 video 3 wireless 3 product name 1 product name and number, computer 14 R rear corner cover removal 53 spare part number 20, 54 recovering from the recovery discs, Windows 7 87 recovering the original Windows 7 system 86 recovery discs for Windows 8.1 computer models 90, 92 for Windows 8.1 computer models 91 HP Recovery Manager for Windows...
...description audio 3 chipset 1 display panel 2 Ethernet 3 external media cards 3 graphics 1 hard drive 2 memory module 2 microphone 3 operating system 5 optical drive 3 ports 3, 4 power requirements 4, 5 processors 1 product name 1 security 5 serviceability 5 video 3 wireless 3 product name 1 product name and number, computer 14 R rear corner cover removal 53 spare part number 20, 54 recovering from the recovery discs, Windows 7 87 recovering the original Windows 7 system 86 recovery discs for Windows 8.1 computer models 90, 92 for Windows 8.1 computer models 91 HP Recovery Manager for Windows...

Ubuntu
Page 22
... USB ports on opening Setup Utility (BIOS), and then follow the instructions at the factory. The action key feature is connected to the computer, each function by connecting it to most models. After you have different keys and keyboard functions than those you hold down the key. Click Mouse and Touchpad. Switches the screen image between display devices connected to select preferred settings: 1. Some action keys may not be available on your keyboard may have disabled the action key...
... USB ports on opening Setup Utility (BIOS), and then follow the instructions at the factory. The action key feature is connected to the computer, each function by connecting it to most models. After you have different keys and keyboard functions than those you hold down the key. Click Mouse and Touchpad. Switches the screen image between display devices connected to select preferred settings: 1. Some action keys may not be available on your keyboard may have disabled the action key...

Ubuntu
Page 28
... easily replaced by users themselves. NOTE: To quickly access power settings, you to access power settings, view remaining battery charge, and select a different power plan. ● To display the percentage of remaining battery charge when the computer is running on the computer, screen brightness, external devices connected to the Quick Setup section of system settings that came with your computer. 20 Chapter 5 Managing power Running on battery power When a charged battery is in the computer and the computer is located...
... easily replaced by users themselves. NOTE: To quickly access power settings, you to access power settings, view remaining battery charge, and select a different power plan. ● To display the percentage of remaining battery charge when the computer is running on the computer, screen brightness, external devices connected to the Quick Setup section of system settings that came with your computer. 20 Chapter 5 Managing power Running on battery power When a charged battery is in the computer and the computer is located...

Ubuntu
Page 60
... 12 drive media 19 E electrostatic discharge 50 entering a power-on password 37 entering an administrator password 37 external monitor port 10 F factory settings, restoring 41 fun things to do 1 H HDMI configuring audio 13 HDMI port connecting 12 Hibernation exiting 19 initiated during critical battery level 22 initiating 19 high-definition devices, connecting 12 HP PC Hardware Diagnostics (UEFI) downloading 42 using 41 hubs 25 I icons network 4 wired network 4 wireless 4 input power 48 installing optional security cable lock 38 Internet connection setup 5 Internet security software, using 37...
... 12 drive media 19 E electrostatic discharge 50 entering a power-on password 37 entering an administrator password 37 external monitor port 10 F factory settings, restoring 41 fun things to do 1 H HDMI configuring audio 13 HDMI port connecting 12 Hibernation exiting 19 initiated during critical battery level 22 initiating 19 high-definition devices, connecting 12 HP PC Hardware Diagnostics (UEFI) downloading 42 using 41 hubs 25 I icons network 4 wired network 4 wireless 4 input power 48 installing optional security cable lock 38 Internet connection setup 5 Internet security software, using 37...


