

Owner's Manual
Page 1
... fast on a one-piece door. SAVEFTUHTIUSRMEARNEUFEARLEFNOCRE Need Help? Extension Kit is available for Service 11 Garage Door Opener Installation 12 Accessories 22 Maintenance 25 Troubleshooting 26 Wiring Diagram 29 Warranty information 30 COMPLETE WITH INTELLICODE® REMOTE... Difficulty? 3531835447 TABLE OF CONTENTS Safety Information 2 Important Installation Instructions 2 Safety Features 2 Pre-installation Checklist 3 Garage Door Opener Assembly 9 Record Data (for 8' Doors Included Wall Control MUST be Properly Set to Operation of this Garage Door Operator. Please ...
... fast on a one-piece door. SAVEFTUHTIUSRMEARNEUFEARLEFNOCRE Need Help? Extension Kit is available for Service 11 Garage Door Opener Installation 12 Accessories 22 Maintenance 25 Troubleshooting 26 Wiring Diagram 29 Warranty information 30 COMPLETE WITH INTELLICODE® REMOTE... Difficulty? 3531835447 TABLE OF CONTENTS Safety Information 2 Important Installation Instructions 2 Safety Features 2 Pre-installation Checklist 3 Garage Door Opener Assembly 9 Record Data (for 8' Doors Included Wall Control MUST be Properly Set to Operation of this Garage Door Operator. Please ...

Owner's Manual
Page 2
...® (STB) Non-Contact Reversing System Places an invisible beam across door opening, that move with the help of springs under tension, and electric opening equipment may cause injuries, your nearest Genie Factory Authorized Dealer listed at www.geniecompany.com, or customer Service at the center...closing door, if door does not close door. Install the emergency release tag on the floor at 1-800-35-GENIE.. Safe-T-Stop® Timed Reversed System Automatically opens a closing door. SAFETY INFORMATION Garage Doors are heavy objects that reverses the door during down travel to the ...
...® (STB) Non-Contact Reversing System Places an invisible beam across door opening, that move with the help of springs under tension, and electric opening equipment may cause injuries, your nearest Genie Factory Authorized Dealer listed at www.geniecompany.com, or customer Service at the center...closing door, if door does not close door. Install the emergency release tag on the floor at 1-800-35-GENIE.. Safe-T-Stop® Timed Reversed System Automatically opens a closing door. SAFETY INFORMATION Garage Doors are heavy objects that reverses the door during down travel to the ...

Owner's Manual
Page 3
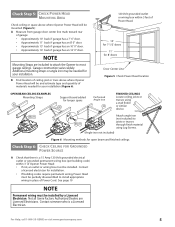
... items you have it adjusted by a Genie Factory Authorized Dealer. B If door is out of whether it moves freely (Figure 1). Door should stay stationary. C A door opener reinforcement bracket may be braced or reinforced before assembling Opener: Check Step 1: CHECK DOOR CONDITION AND...door is less than slight movement Figure 1 Checking door balance means door is equipped with frame and skin - NOTE The Excelerator Opener is out of your Genie Factory Authorized Dealer or dealer of balance. KEEP FEET CLEAR OF DOOR 3' - 4' Sectional Door Check Step 2: CHECK GARAGE...
... items you have it adjusted by a Genie Factory Authorized Dealer. B If door is out of whether it moves freely (Figure 1). Door should stay stationary. C A door opener reinforcement bracket may be braced or reinforced before assembling Opener: Check Step 1: CHECK DOOR CONDITION AND...door is less than slight movement Figure 1 Checking door balance means door is equipped with frame and skin - NOTE The Excelerator Opener is out of your Genie Factory Authorized Dealer or dealer of balance. KEEP FEET CLEAR OF DOOR 3' - 4' Sectional Door Check Step 2: CHECK GARAGE...

Owner's Manual
Page 4
... add 2-1/2" to connect points. Mark a point on center line. NOTE • For both types of Travel 4 For Help, call 1-800-35-GENIE or visit www.geniecompany.com Rail Extension for a stud or a solid header at least two Lag Screws and Flat Washers (not provided). • Transfer...Step 4: CHECK DOOR HEADER AREA NOTE The header is above the Header Bracket mounting point, contact a Genie Factory Authorized Dealer. • If a door spring is not at 1-800-35-GENIE. Bottom of the garage door opening. If the ceiling in your mark to floor. - C Check wall for 8' door Figure 3...
... add 2-1/2" to connect points. Mark a point on center line. NOTE • For both types of Travel 4 For Help, call 1-800-35-GENIE or visit www.geniecompany.com Rail Extension for a stud or a solid header at least two Lag Screws and Flat Washers (not provided). • Transfer...Step 4: CHECK DOOR HEADER AREA NOTE The header is above the Header Bracket mounting point, contact a Genie Factory Authorized Dealer. • If a door spring is not at 1-800-35-GENIE. Bottom of the garage door opening. If the ceiling in your mark to floor. - C Check wall for 8' door Figure 3...
Owner's Manual
Page 5
... Electrician. NOTE Mounting Straps are Licensed Electricians. Additional mounting straps or angle iron may be needed for your installation. Not all Genie Factory Authorized Dealers are included to attach the Opener to joists or trusses through finish material using Lag Screws. (Angle iron not included) Figure 6 Mounting methods for installation. • If...
... Electrician. NOTE Mounting Straps are Licensed Electricians. Additional mounting straps or angle iron may be needed for your installation. Not all Genie Factory Authorized Dealers are included to attach the Opener to joists or trusses through finish material using Lag Screws. (Angle iron not included) Figure 6 Mounting methods for installation. • If...

Owner's Manual
Page 6
...Beam® Mounting Bracket Sensor Check Step 8: RECOMMENDED TOOLS A Tools (Figure 8): B Additional tools to install a Genie Emergency Release Kit (GER-2). A If you open garage door from outside if there is highly recommended to make installation easier: • Slotted and phillips screw-driver... (11/4") for a wood door less than 2" thick (store) ❐ Electrical outlet and/or wiring (supplied by a licensed electrician) ❐ Excelerator Extension Kit (for 8' garage doors) (store) ❐ Sufficient angle iron or strapping for hanging Power Head (store) ❐ Two 60 Watt light...
...Beam® Mounting Bracket Sensor Check Step 8: RECOMMENDED TOOLS A Tools (Figure 8): B Additional tools to install a Genie Emergency Release Kit (GER-2). A If you open garage door from outside if there is highly recommended to make installation easier: • Slotted and phillips screw-driver... (11/4") for a wood door less than 2" thick (store) ❐ Electrical outlet and/or wiring (supplied by a licensed electrician) ❐ Excelerator Extension Kit (for 8' garage doors) (store) ❐ Sufficient angle iron or strapping for hanging Power Head (store) ❐ Two 60 Watt light...

Owner's Manual
Page 7
...No. 10-24 x 3/8" Hex Head No. 8-32 x 1" Phillips Screw No. 8-32 x 3/8" Slotted Hex Head Screw Power Cord For Help, call 1-800-35-GENIE or visit www.geniecompany.com 7 Parts List Item 1 2 3 4 4A 4B 4C 8 9 10 11 12 13 14 15 16 18 19 21 22 23 24 ... 12 Magnetic Carriage Assembly (main carton) 1 1 Collar (blue bag) 3 Retaining Clip (blue bag) 3 Rail Strap (blue bag) 1 1 1/4"-20 Hex Head Bolt (blue bag) 2 2 Open Limit Switch Assembly (White)(green bag) 1 1 Close Limit Switch Assembly (Brown) (green bag) 1 1 No. 8-32 x 1" Hex Head Screw (green bag) 2 2 Emergency Release Cord (...
...No. 10-24 x 3/8" Hex Head No. 8-32 x 1" Phillips Screw No. 8-32 x 3/8" Slotted Hex Head Screw Power Cord For Help, call 1-800-35-GENIE or visit www.geniecompany.com 7 Parts List Item 1 2 3 4 4A 4B 4C 8 9 10 11 12 13 14 15 16 18 19 21 22 23 24 ... 12 Magnetic Carriage Assembly (main carton) 1 1 Collar (blue bag) 3 Retaining Clip (blue bag) 3 Rail Strap (blue bag) 1 1 1/4"-20 Hex Head Bolt (blue bag) 2 2 Open Limit Switch Assembly (White)(green bag) 1 1 Close Limit Switch Assembly (Brown) (green bag) 1 1 No. 8-32 x 1" Hex Head Screw (green bag) 2 2 Emergency Release Cord (...
Owner's Manual
Page 8
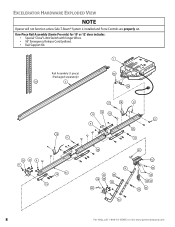
EXCELERATOR HARDWARE EXPLODED VIEW NOTE Opener will not function unless Safe-T-Beam® System is installed and Force Controls are properly set. One-Piece Rail Assembly (Genie Pro only) for 10' or 12' door includes: • Special "Close" Limit Switch with longer Wires. • 96" Emergency Release Cord (yellow). • Rail Support ... 99 45A 1100 46B 3311 30 28 556 3322 3366 3344 333 32 112 3333 2225 2222 23 2244 3355 8 For Help, call 1-800-35-GENIE or visit www.geniecompany.com
EXCELERATOR HARDWARE EXPLODED VIEW NOTE Opener will not function unless Safe-T-Beam® System is installed and Force Controls are properly set. One-Piece Rail Assembly (Genie Pro only) for 10' or 12' door includes: • Special "Close" Limit Switch with longer Wires. • 96" Emergency Release Cord (yellow). • Rail Support ... 99 45A 1100 46B 3311 30 28 556 3322 3366 3344 333 32 112 3333 2225 2222 23 2244 3355 8 For Help, call 1-800-35-GENIE or visit www.geniecompany.com

Owner's Manual
Page 9
...Collar (Figure11D). CAUTION The Drive Screw and Rail Liner can slide out of Rail Sections. Keep Rail Sections level until later. Finger-tighten until the Opener is needed, attach it per instructions supplied with 2 (1/4"-20) (yellow) Hex Head Shoulder Bolts and 2 (1/4" -20) Hex Serrated Flange Nuts (... C2H: INSTALL REMAINING RAIL SECTIONS A Arrange arrows on Retaining Clip 10 Figure 11 Attach Middle Rail Section For Help, call 1-800-35-GENIE or visit www.geniecompany.com 9 Engage Hooks Retaining Clips 14 Middle Rail Section 4B Arrows point toward Power Head. • Slide Collar over...
...Collar (Figure11D). CAUTION The Drive Screw and Rail Liner can slide out of Rail Sections. Keep Rail Sections level until later. Finger-tighten until the Opener is needed, attach it per instructions supplied with 2 (1/4"-20) (yellow) Hex Head Shoulder Bolts and 2 (1/4" -20) Hex Serrated Flange Nuts (... C2H: INSTALL REMAINING RAIL SECTIONS A Arrange arrows on Retaining Clip 10 Figure 11 Attach Middle Rail Section For Help, call 1-800-35-GENIE or visit www.geniecompany.com 9 Engage Hooks Retaining Clips 14 Middle Rail Section 4B Arrows point toward Power Head. • Slide Collar over...

Owner's Manual
Page 10
... 21 Assembly Step C6H: INSTALL AND CONNECT LIMIT SWITCHES OPEN GREEN PARTS BAG A Turn Opener right side up and support Power Head to End Rail...Assembly Emergency Release Knob Emergency Release Tag Hardware (green bag) E Place Open Limit Switch (White Wire) 15" from Rail Strap. Magnetic Carriage Assembly...Wires and retain Twist Ties. #8-32 x 1" Hex Head Screws Open Limit Switch Assembly 22 Wire Clips 53 19Brown Wire 24 Emergency Release... Lever in "release" position. Close Limit Switch (Brown wire) 19 DOOR Open Limit Switch (White wire) 18 DOOR 15" Arrows point DOOR toward door...
... 21 Assembly Step C6H: INSTALL AND CONNECT LIMIT SWITCHES OPEN GREEN PARTS BAG A Turn Opener right side up and support Power Head to End Rail...Assembly Emergency Release Knob Emergency Release Tag Hardware (green bag) E Place Open Limit Switch (White Wire) 15" from Rail Strap. Magnetic Carriage Assembly...Wires and retain Twist Ties. #8-32 x 1" Hex Head Screws Open Limit Switch Assembly 22 Wire Clips 53 19Brown Wire 24 Emergency Release... Lever in "release" position. Close Limit Switch (Brown wire) 19 DOOR Open Limit Switch (White wire) 18 DOOR 15" Arrows point DOOR toward door...

Owner's Manual
Page 11
... (Figure 14). Antenna Terminal Block White Limit Brown Limit Switch wires Switch wires Figure 15 Connect Limit Switch Wires to call 1-800-35-GENIE or visit www.geniecompany.com 11 Serial Number (example) Figure 17 Model and Serial Numbers For Help, call us: Date purchased: Serial ... with Twist Ties. D Attach Emergency Release Tag to Magnetic Carriage Assembly Release Lever. 25 Emergency Release Tag Assembly Step C8H: RECORD OPENER MODEL AND SERIAL NUMBER Please note the following information so it is available if you need to Power Head Terminal Block Assembly Step C7H...
... (Figure 14). Antenna Terminal Block White Limit Brown Limit Switch wires Switch wires Figure 15 Connect Limit Switch Wires to call 1-800-35-GENIE or visit www.geniecompany.com 11 Serial Number (example) Figure 17 Model and Serial Numbers For Help, call us: Date purchased: Serial ... with Twist Ties. D Attach Emergency Release Tag to Magnetic Carriage Assembly Release Lever. 25 Emergency Release Tag Assembly Step C8H: RECORD OPENER MODEL AND SERIAL NUMBER Please note the following information so it is available if you need to Power Head Terminal Block Assembly Step C7H...

Owner's Manual
Page 12
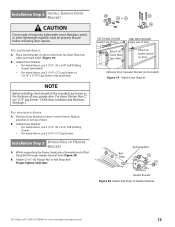
...5/16-18 x 3/4" Hex Serrated Flange Nuts 28 Door Bracket 56 1/4"-20 x 3/4" Self-Drilling Screws Hardware (orange bag) 12 For Help, call 1-800-35-GENIE or visit www.geniecompany.com Any of door travel + 2-1/2" (sectional door) or + 6" (one-piece door) Figure 18 Attach Header Bracket above the spring. ... on the center line of bracket flange CAUTION • The Header Bracket must be necessary to serve as a mounting plate for the Header Bracket. OPEN ORANGE PARTS BAG B Attach Header Bracket to header at mark above the door header to attach a 2" x 6" board across the wall studs above...
...5/16-18 x 3/4" Hex Serrated Flange Nuts 28 Door Bracket 56 1/4"-20 x 3/4" Self-Drilling Screws Hardware (orange bag) 12 For Help, call 1-800-35-GENIE or visit www.geniecompany.com Any of door travel + 2-1/2" (sectional door) or + 6" (one-piece door) Figure 18 Attach Header Bracket above the spring. ... on the center line of bracket flange CAUTION • The Header Bracket must be necessary to serve as a mounting plate for the Header Bracket. OPEN ORANGE PARTS BAG B Attach Header Bracket to header at mark above the door header to attach a 2" x 6" board across the wall studs above...
Owner's Manual
Page 13
... on top of masonite, lightweight wood, fiberglass, metal, or other lightweight materials must be properly braced before mounting door Opener. B Attach (5/16"-18) Flange Nut to Header Bracket For Help, call 1-800-35-GENIE or visit www.geniecompany.com 13 B Attach Door Bracket: • For metal doors, use 3 (1/4" -20 x 3/4") Self-Drilling Screws...
... on top of masonite, lightweight wood, fiberglass, metal, or other lightweight materials must be properly braced before mounting door Opener. B Attach (5/16"-18) Flange Nut to Header Bracket For Help, call 1-800-35-GENIE or visit www.geniecompany.com 13 B Attach Door Bracket: • For metal doors, use 3 (1/4" -20 x 3/4") Self-Drilling Screws...

Owner's Manual
Page 14
...Garage constructions differ. Check for mounting Opener Power Head to garage framing. H Figure 21 Checking Power Head position OPEN BEAM CEILING EXAMPLES Mounting Straps 30 55 11 Support board added for open beam and finished ceilings 14 For Help, call 1-800-35-GENIE or visit www.geniecompany.com B ...Measure distance from Opener to joists or trusses through finish material ...
...Garage constructions differ. Check for mounting Opener Power Head to garage framing. H Figure 21 Checking Power Head position OPEN BEAM CEILING EXAMPLES Mounting Straps 30 55 11 Support board added for open beam and finished ceilings 14 For Help, call 1-800-35-GENIE or visit www.geniecompany.com B ...Measure distance from Opener to joists or trusses through finish material ...

Owner's Manual
Page 15
...Lever until Knob is as short as possible 35 32 Curved 36 34 Door Arm 31 Straight Door Arm 33 For Help, call 1-800-35-GENIE or visit www.geniecompany.com Figure 24 Assemble Arms (ONE-PIECE) 15 D Adjust height of children. B Attach Curved Arm to comply may ... 24). Failure to Magnetic Carriage Assembly. C Attach both Arms together with Clevis Pin and Cotter Pin (Figure 23). Installation SteCpH5: ASSEMBLE AND CONNECT DOOR ARMS OPEN YELLOW PARTS BAG For sectional doors: A Attach Curved Door Arm to Door Bracket with 2 (3/8" x 7/8") Hex Head Bolts and 2 (3/8") Serrated Flange Hex ...
...Lever until Knob is as short as possible 35 32 Curved 36 34 Door Arm 31 Straight Door Arm 33 For Help, call 1-800-35-GENIE or visit www.geniecompany.com Figure 24 Assemble Arms (ONE-PIECE) 15 D Adjust height of children. B Attach Curved Arm to comply may ... 24). Failure to Magnetic Carriage Assembly. C Attach both Arms together with Clevis Pin and Cotter Pin (Figure 23). Installation SteCpH5: ASSEMBLE AND CONNECT DOOR ARMS OPEN YELLOW PARTS BAG For sectional doors: A Attach Curved Door Arm to Door Bracket with 2 (3/8" x 7/8") Hex Head Bolts and 2 (3/8") Serrated Flange Hex ...
Owner's Manual
Page 16
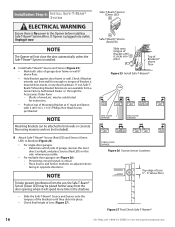
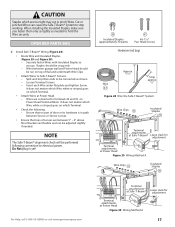
...of Bracket is critical. - Preventing crossed signals is beyond door, tracks, or any door hardware. Check if Bracket extends out from a Genie Factory Authorized Dealer or through the Accessories Order Form. - NOTE Mounting Brackets can be substituted for extensions. • Position top of Lens ...Bracket against door frame or wall. Installation SteCpH6: INSTALL SAFE-T-BEAM® SYSTEM ELECTRICAL WARNING Ensure there is No power to the Opener before installing Safe-T-Beam® System Wires. If not, Safe-TBeam® Mounting Bracket Extensions are available from wall far enough ...
...of Bracket is critical. - Preventing crossed signals is beyond door, tracks, or any door hardware. Check if Bracket extends out from a Genie Factory Authorized Dealer or through the Accessories Order Form. - NOTE Mounting Brackets can be substituted for extensions. • Position top of Lens ...Bracket against door frame or wall. Installation SteCpH6: INSTALL SAFE-T-BEAM® SYSTEM ELECTRICAL WARNING Ensure there is No power to the Opener before installing Safe-T-Beam® System Wires. If not, Safe-TBeam® Mounting Bracket Extensions are available from wall far enough ...
Owner's Manual
Page 17
...of Lenses are too tight may cut or pinch Wires. It does not matter which Wire, white or striped, goes on Power Head Terminal Block. OPEN RED PARTS BAG C Install Safe-T-Beam® Wiring (Figure 28): • Route Wire and Insulated Staples (Figure 29 and Figure 30). - ... Leave slack for adjustment Terminal attachments at Power Head Figure 29 Wiring Method A Wire Clips 53 Insulated Staples 38 For Help, call 1-800-35-GENIE or visit www.geniecompany.com 654321 STB Terminal attachments at Safe-T-Beam® Terminal attachments at Power Head. - CAUTION Staples which are between 5" ...
...of Lenses are too tight may cut or pinch Wires. It does not matter which Wire, white or striped, goes on Power Head Terminal Block. OPEN RED PARTS BAG C Install Safe-T-Beam® Wiring (Figure 28): • Route Wire and Insulated Staples (Figure 29 and Figure 30). - ... Leave slack for adjustment Terminal attachments at Power Head Figure 29 Wiring Method A Wire Clips 53 Insulated Staples 38 For Help, call 1-800-35-GENIE or visit www.geniecompany.com 654321 STB Terminal attachments at Safe-T-Beam® Terminal attachments at Power Head. - CAUTION Staples which are between 5" ...

Owner's Manual
Page 18
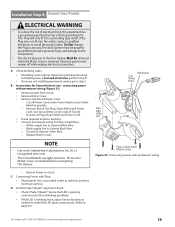
...Light Control allows convenient manual control of Wall Console, connect Striped Wire to terminal "B" and White Wire to Terminal "W". D Wire Wall Console to Opener (Figure 32): • On Power Head, connect Striped Wire to Terminal #1 and White Wire to wall near Wall Console. CAUTION • Use... of garage door. • At least 5' above with Entrapment Warning Label 18 For Help, call 1-800-35-GENIE or visit www.geniecompany.com Security Vacation Lock Switch Independent Light Control Garage Door Control NOTE More than the type included will cause a malfunction....
...Light Control allows convenient manual control of Wall Console, connect Striped Wire to terminal "B" and White Wire to Terminal "W". D Wire Wall Console to Opener (Figure 32): • On Power Head, connect Striped Wire to Terminal #1 and White Wire to wall near Wall Console. CAUTION • Use... of garage door. • At least 5' above with Entrapment Warning Label 18 For Help, call 1-800-35-GENIE or visit www.geniecompany.com Security Vacation Lock Switch Independent Light Control Garage Door Control NOTE More than the type included will cause a malfunction....
Owner's Manual
Page 19
... A Check building codes: • If building code requires Opener be properly grounded to prevent personal injury and damage to the components. • The electrical power to page 26.) For Help, call 1-800-35-GENIE or visit www.geniecompany.com 19 B Instructions for licensed electrician... - Dispose of Toroid). - tabs slide out • Install required entrance bushing. • Connect permanent wiring to Opener Black Wire. - Black supply line to Power Head Wires...
... A Check building codes: • If building code requires Opener be properly grounded to prevent personal injury and damage to the components. • The electrical power to page 26.) For Help, call 1-800-35-GENIE or visit www.geniecompany.com 19 B Instructions for licensed electrician... - Dispose of Toroid). - tabs slide out • Install required entrance bushing. • Connect permanent wiring to Opener Black Wire. - Black supply line to Power Head Wires...

Owner's Manual
Page 20
...opens...open position. • Slide Open Limit Switch until the Opener...). C Adjust Open Limit Switch: ...Opener. If door fails to open the door. If door does not open... garage door opens rapidly, and...opening or closing, adjust the Open Force or Close Force ...Open Force and Close Force Controls are to be set Force Controls to open...Opener and the door. • Set the door Opener...pg. 26, and Opener System Self-diagnostic Troubleshooting... If door opens completely, but ...Open Limit Switch Switch (door fully open) Carriage (disengaged) Magnet Figure 34 Setting Limit Switches Force Controls HI LO HI LO OPEN...
...opens...open position. • Slide Open Limit Switch until the Opener...). C Adjust Open Limit Switch: ...Opener. If door fails to open the door. If door does not open... garage door opens rapidly, and...opening or closing, adjust the Open Force or Close Force ...Open Force and Close Force Controls are to be set Force Controls to open...Opener and the door. • Set the door Opener...pg. 26, and Opener System Self-diagnostic Troubleshooting... If door opens completely, but ...Open Limit Switch Switch (door fully open) Carriage (disengaged) Magnet Figure 34 Setting Limit Switches Force Controls HI LO HI LO OPEN...


