

Owner's Manual
Page 7
... HEAD ASSEMBLY PARTS LIST Item 1A 1B 1C 1D 1E 1G 1H 1K 1L 1M 1P Part Name Lens Top Plate Assembly Light Socket (2) Motor Assembly Cover Motor Drive Board Controller Board No. 10-24 x 3/8" Hex Head No. 8-32 x 1" Phillips Screw No. 8-32 x 3/8" Slotted Hex Head Screw Power Cord For Help, call...
... HEAD ASSEMBLY PARTS LIST Item 1A 1B 1C 1D 1E 1G 1H 1K 1L 1M 1P Part Name Lens Top Plate Assembly Light Socket (2) Motor Assembly Cover Motor Drive Board Controller Board No. 10-24 x 3/8" Hex Head No. 8-32 x 1" Phillips Screw No. 8-32 x 3/8" Slotted Hex Head Screw Power Cord For Help, call...

Owner's Manual
Page 9
... same on Rail Sections to point in step A & B. Slip on Retaining Clip 10 Figure 11 Attach Middle Rail Section For Help, call 1-800-35-GENIE or visit www.geniecompany.com 9 Engage Hooks Retaining Clips 14 Middle Rail Section 4B Arrows point toward Power Head. • Slide Collar over Middle Drive... 11B. GARAGE DOOR OPENER ASSEMBLY Assembly Step C1H: CONNECT RAIL TO POWER HEAD OPEN BLUE PARTS BAG A Turn Power Head upside down and place on Motor Shaft (Figure 9). Rail Strap 15 5/16"-18 Hex Head Shoulder Bolts 10 5/16"-18 Hex Serrated Flange Nuts 11 8 2 9 1/4"-20 Hex 1/4"-20 Hex ...
... same on Rail Sections to point in step A & B. Slip on Retaining Clip 10 Figure 11 Attach Middle Rail Section For Help, call 1-800-35-GENIE or visit www.geniecompany.com 9 Engage Hooks Retaining Clips 14 Middle Rail Section 4B Arrows point toward Power Head. • Slide Collar over Middle Drive... 11B. GARAGE DOOR OPENER ASSEMBLY Assembly Step C1H: CONNECT RAIL TO POWER HEAD OPEN BLUE PARTS BAG A Turn Power Head upside down and place on Motor Shaft (Figure 9). Rail Strap 15 5/16"-18 Hex Head Shoulder Bolts 10 5/16"-18 Hex Serrated Flange Nuts 11 8 2 9 1/4"-20 Hex 1/4"-20 Hex ...
Owner's Manual
Page 19
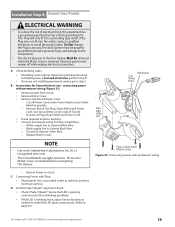
... • If you are light sensitive. connecting power with permanent wiring - White supply line to page 26.) For Help, call 1-800-35-GENIE or visit www.geniecompany.com 19 Restore Power to Power Head Wires. - C Connecting Power with Plug: • Plug Opener into a grounded ...Power Cord. - Remove Knock-Out Plug, Strain Relief, and Power Two Cord. (Cut Ground Wire on line side of Toroid). - Ensure the Motor Cover is blinking twice, adjust Sensor Brackets as possible. - Do Not change the Plug in previous electrical warning. B Instructions for licensed electrician -...
... • If you are light sensitive. connecting power with permanent wiring - White supply line to page 26.) For Help, call 1-800-35-GENIE or visit www.geniecompany.com 19 Restore Power to Power Head Wires. - C Connecting Power with Plug: • Plug Opener into a grounded ...Power Cord. - Remove Knock-Out Plug, Strain Relief, and Power Two Cord. (Cut Ground Wire on line side of Toroid). - Ensure the Motor Cover is blinking twice, adjust Sensor Brackets as possible. - Do Not change the Plug in previous electrical warning. B Instructions for licensed electrician -...

Owner's Manual
Page 20
...Guide on pg. 26, and Opener System Self-diagnostic Troubleshooting on pg. 27. • Tighten Limit Switch Set Screw. If door opens completely, but motor continues to full open the door. Move Limit Switch same amount toward Power Head. - B Setting Open Limit Switch: • Manually open garage door to... Setting Limit Switches Force Controls HI LO HI LO OPEN CLOSE FORCE FORCE Figure 35 Making Force Adjustments 20 For Help, call 1-800-35-GENIE or visit www.geniecompany.com NOTE • Little effort is required to turn the Force Adjusting Knobs. • If the door stops moving...
...Guide on pg. 26, and Opener System Self-diagnostic Troubleshooting on pg. 27. • Tighten Limit Switch Set Screw. If door opens completely, but motor continues to full open the door. Move Limit Switch same amount toward Power Head. - B Setting Open Limit Switch: • Manually open garage door to... Setting Limit Switches Force Controls HI LO HI LO OPEN CLOSE FORCE FORCE Figure 35 Making Force Adjustments 20 For Help, call 1-800-35-GENIE or visit www.geniecompany.com NOTE • Little effort is required to turn the Force Adjusting Knobs. • If the door stops moving...
Owner's Manual
Page 25
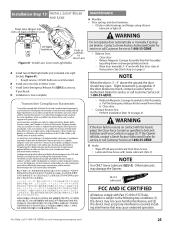
... call Customer Service at that position. Release Magnetic Carriage Assembly from Drive Screw. • Lubricate Drive Screw with Genie Lubricant (GLU-3) NOTE Use ONLY Genie Lubricant (GLU-3). Other lubricants may not cause harmful interference, and (2) this device must accept any interference received,...at 1-800-35-GENIE. - If the door moves too much, contact a Genie Factory Authorized Dealer for service or call Customer Service at 1-800-35-GENIE. Installation Step 13: INSTALL LIGHT BULBS AND LENS Snap Lens Hinges into slots in Motor Cover. C Install Genie Emergency Release Kit ...
... call Customer Service at that position. Release Magnetic Carriage Assembly from Drive Screw. • Lubricate Drive Screw with Genie Lubricant (GLU-3) NOTE Use ONLY Genie Lubricant (GLU-3). Other lubricants may not cause harmful interference, and (2) this device must accept any interference received,...at 1-800-35-GENIE. - If the door moves too much, contact a Genie Factory Authorized Dealer for service or call Customer Service at 1-800-35-GENIE. Installation Step 13: INSTALL LIGHT BULBS AND LENS Snap Lens Hinges into slots in Motor Cover. C Install Genie Emergency Release Kit ...

Owner's Manual
Page 27
... 16. For Help, call Customer Service at Power Head and Wall Console. Unlock switch. Contact Customer Service for further assistance. Have a Genie Factory Authorized Dealer check that Ribbon Cable on Motor Board is properly inserted into Connector on Controller Board. Reset Opener - See page 3. 2. Contact Customer service for further assistance. NOTE: Safe...
... 16. For Help, call Customer Service at Power Head and Wall Console. Unlock switch. Contact Customer Service for further assistance. Have a Genie Factory Authorized Dealer check that Ribbon Cable on Motor Board is properly inserted into Connector on Controller Board. Reset Opener - See page 3. 2. Contact Customer service for further assistance. NOTE: Safe...

Owner's Manual
Page 28
... up Door will only run open Operator runs, but door does not move • Check (ensure) that Ribbon Cable between Controller Board and Motor Drive Board is "Closed" (not tripped). • If still no Buttons are stuck "pushed-in contact with the garage door hardware or springs,contact...cut (Stapes can be obtained, disconnect Wall Console and use only Remote Controls or Wireless Keypad to Connectors on Circuit Boards, or call 1-800-35-GENIE or visit www.geniecompany.com Adjust as needed . • Check garage door for binding. • Check Open Limit Switch for a short circuit and...
... up Door will only run open Operator runs, but door does not move • Check (ensure) that Ribbon Cable between Controller Board and Motor Drive Board is "Closed" (not tripped). • If still no Buttons are stuck "pushed-in contact with the garage door hardware or springs,contact...cut (Stapes can be obtained, disconnect Wall Console and use only Remote Controls or Wireless Keypad to Connectors on Circuit Boards, or call 1-800-35-GENIE or visit www.geniecompany.com Adjust as needed . • Check garage door for binding. • Check Open Limit Switch for a short circuit and...
Owner's Manual
Page 29
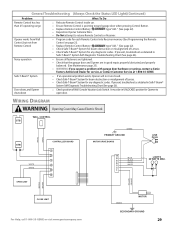
... Opening Cover May Cause Electric Shock WALL CONTROL CONTROLLER BOARD GREEN PRIMARY GROUND MOTOR DRIVE BOARD LINE PLUG WHITE STRIPE BROWN BROWN WHITE WHITE OPEN LIMIT CLOSE LIMIT For Help, call 1-800-35-GENIE or visit www.geniecompany.com BLUE BLACK WHITE WHITE LIGHTS 60 WATTS MAX.... YELLOW ORANGE GREEN MOTOR SECONDARY GROUND 29 If present, troubleshoot as detailed in good repair, properly lubricated, and properly...
... Opening Cover May Cause Electric Shock WALL CONTROL CONTROLLER BOARD GREEN PRIMARY GROUND MOTOR DRIVE BOARD LINE PLUG WHITE STRIPE BROWN BROWN WHITE WHITE OPEN LIMIT CLOSE LIMIT For Help, call 1-800-35-GENIE or visit www.geniecompany.com BLUE BLACK WHITE WHITE LIGHTS 60 WATTS MAX.... YELLOW ORANGE GREEN MOTOR SECONDARY GROUND 29 If present, troubleshoot as detailed in good repair, properly lubricated, and properly...
Owner's Manual
Page 30
...we may also have other expressed warranties. If an Authorized dealer provides warranty service, Genie will give on motor and all parts. Lifetime* on your Genie product, and it -yourself repairs. Lifetime* on motor, 5 years* on parts. Who Gets the Warranty? Limitations: IMPLIED WARRANTIES, INCLUDING ...ISD995-2WKM Series - How to supply you with the Owner's Manual. Lifetime* on motor, 5 years* on parts. ISD1000 Series - This warranty is your Genie product, you own your Genie product, we will arrange to Get Warranty Service: To get warranty service for your ...
...we may also have other expressed warranties. If an Authorized dealer provides warranty service, Genie will give on motor and all parts. Lifetime* on your Genie product, and it -yourself repairs. Lifetime* on motor, 5 years* on parts. Who Gets the Warranty? Limitations: IMPLIED WARRANTIES, INCLUDING ...ISD995-2WKM Series - How to supply you with the Owner's Manual. Lifetime* on motor, 5 years* on parts. ISD1000 Series - This warranty is your Genie product, you own your Genie product, we will arrange to Get Warranty Service: To get warranty service for your ...


