

Owner's Manual
Page 7
... (yellow bag) 2 2 Coupler (blue bag) 1 1 No.10 x1 1/4" Phillips Hex Head Screw (yellow bag) 1 Button Remote Control (main carton) 3 Button Remote Control (main carton) Wireless Keypad (main carton) 2 Button Remote Control (main carton) Safety & Maintenance Guide (manual)(main carton) 4 4 varies/model varies/model varies/model varies/model varies/model varies/model... Board Controller Board No. 10-24 x 3/8" Hex Head No. 8-32 x 1" Phillips Screw No. 8-32 x 3/8" Slotted Hex Head Screw Power Cord For Help, call 1-800-35-GENIE or visit www.geniecompany.com 7
... (yellow bag) 2 2 Coupler (blue bag) 1 1 No.10 x1 1/4" Phillips Hex Head Screw (yellow bag) 1 Button Remote Control (main carton) 3 Button Remote Control (main carton) Wireless Keypad (main carton) 2 Button Remote Control (main carton) Safety & Maintenance Guide (manual)(main carton) 4 4 varies/model varies/model varies/model varies/model varies/model varies/model... Board Controller Board No. 10-24 x 3/8" Hex Head No. 8-32 x 1" Phillips Screw No. 8-32 x 3/8" Slotted Hex Head Screw Power Cord For Help, call 1-800-35-GENIE or visit www.geniecompany.com 7
Owner's Manual
Page 22
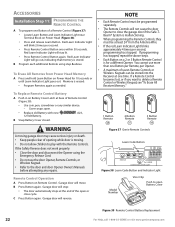
... must be at one Button of seven Remote Controls or Wireless Keypads can be programmed separately. • The Remote Controls will reverse. 1 Button Remote 48 2 Button Remote 51 3 Button Remote 49 Figure 37 Genie Remote Controls Learn Code Button STATUS LEARN LEARN INDICATOR LIGHT Figure 38... Learn Code Button and Indicator Light Model Number Visor Clip Push to delete a Remote Control or Wireless Keypad, see "To Erase All Receiver Memory." Red ...
... must be at one Button of seven Remote Controls or Wireless Keypads can be programmed separately. • The Remote Controls will reverse. 1 Button Remote 48 2 Button Remote 51 3 Button Remote 49 Figure 37 Genie Remote Controls Learn Code Button STATUS LEARN LEARN INDICATOR LIGHT Figure 38... Learn Code Button and Indicator Light Model Number Visor Clip Push to delete a Remote Control or Wireless Keypad, see "To Erase All Receiver Memory." Red ...

Owner's Manual
Page 23
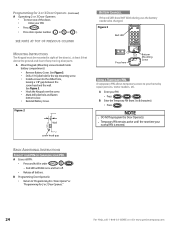
...• Press . - Learn Code Indicator LED (on next page) For Help, call 1-800-35-GENIE or visit www.geniecompany.com 23 B Repeat step A above for 2 or 3 Door Openers A Set Wireless Keypad PIN (Personal ID Number): • Activate programming mode. - Red LED blinks - If your PIN ... - once per second and turns off . Press . Red LED blinks - twice per second. • Enter your PIN (3 to "Mounting Wireless Keypad." If Safety Reverse does not work properly 1 Close door and disconnect the Opener using Emergency Release Cord. 2 Do not use the same PIN. •...
...• Press . - Learn Code Indicator LED (on next page) For Help, call 1-800-35-GENIE or visit www.geniecompany.com 23 B Repeat step A above for 2 or 3 Door Openers A Set Wireless Keypad PIN (Personal ID Number): • Activate programming mode. - Red LED blinks - If your PIN ... - once per second and turns off . Press . Red LED blinks - twice per second. • Enter your PIN (3 to "Mounting Wireless Keypad." If Safety Reverse does not work properly 1 Close door and disconnect the Opener using Emergency Release Cord. 2 Do not use the same PIN. •...
Owner's Manual
Page 24
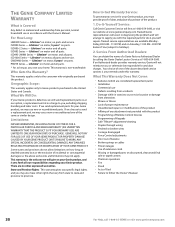
... during use,the battery needs to your PIN • Press . Programming for 2 or 3 Door Openers." 24 For Help, call 1-800-35-GENIE or visit www.geniecompany.com Figure 2 1" 8 Wall screw head gap BATTERY CHANGES. A temporary PIN allows temporary access to be mounted in order ...will blink once and turn off. • Release all buttons. A Enter your home by repair persons, meter readers, etc. A Mount Keypad.(Mounting screws located inside battery compartment.) • Remove Battery Cover. Figure 3 Red LED PROG DEF 123 GHI JKL MNO 456 PQRS TUV WXYZ...
... during use,the battery needs to your PIN • Press . Programming for 2 or 3 Door Openers." 24 For Help, call 1-800-35-GENIE or visit www.geniecompany.com Figure 2 1" 8 Wall screw head gap BATTERY CHANGES. A temporary PIN allows temporary access to be mounted in order ...will blink once and turn off. • Release all buttons. A Enter your home by repair persons, meter readers, etc. A Mount Keypad.(Mounting screws located inside battery compartment.) • Remove Battery Cover. Figure 3 Red LED PROG DEF 123 GHI JKL MNO 456 PQRS TUV WXYZ...

Owner's Manual
Page 27
... Service for further assistance. Contact Customer Service for internal clock to provide additional cycles. See Door Safety Guide See page 16. Have a Genie Factory Authorized Dealer check: - Fuse on Power Head. Wait 10 minutes for further assistance. Check Force Settings. See Door Safety Guide 1.... on Controller Board. See page 20. 2. NOTE: Safe-T-Beam® System must be closed . • The Remote Controls and Wireless Keypad will not work • • Limit Switches • not working Safe-T-Beam® System. Check Wall Console Wiring for further assistance....
... Service for further assistance. Contact Customer Service for internal clock to provide additional cycles. See Door Safety Guide See page 16. Have a Genie Factory Authorized Dealer check: - Fuse on Power Head. Wait 10 minutes for further assistance. Check Force Settings. See Door Safety Guide 1.... on Controller Board. See page 20. 2. NOTE: Safe-T-Beam® System must be closed . • The Remote Controls and Wireless Keypad will not work • • Limit Switches • not working Safe-T-Beam® System. Check Wall Console Wiring for further assistance....

Owner's Manual
Page 28
... or reconnect. • Until a replacement Wall Console can cut (Stapes can be obtained, disconnect Wall Console and use only Remote Controls or Wireless Keypad to operate Opener. If not: - If Opener is connected to a wiring box: • Check fuse is not blown, or circuit breaker is... position of garage door and door spring(s). • WARNING: If you suspect a problem with the garage door hardware or springs,contact a Genie Factory Authorized De aler for service,or contact Customer Service at Power Head Terminals (see Set Limit Switches and Force Controls on page 20). ...
... or reconnect. • Until a replacement Wall Console can cut (Stapes can be obtained, disconnect Wall Console and use only Remote Controls or Wireless Keypad to operate Opener. If not: - If Opener is connected to a wiring box: • Check fuse is not blown, or circuit breaker is... position of garage door and door spring(s). • WARNING: If you suspect a problem with the garage door hardware or springs,contact a Genie Factory Authorized De aler for service,or contact Customer Service at Power Head Terminals (see Set Limit Switches and Force Controls on page 20). ...
Owner's Manual
Page 30
... Rights: This warranty gives you specific legal rights, and you with the product • Programming of Remote Control Devices • Programming of Keypads • Safe-T-Beam® adjustment/cleaning • Staples through wiring • Pinched or broken wires • Carriage disengaged • Force...Lifetime* on parts and service. CMD9900 Series - For How Long: H8000D Series - Geographic Scope: This warranty applies only to Genie products purchased in diagnosing the problem and will arrange to supply you may use new or reconditioned parts. Some states and provinces do...
... Rights: This warranty gives you specific legal rights, and you with the product • Programming of Remote Control Devices • Programming of Keypads • Safe-T-Beam® adjustment/cleaning • Staples through wiring • Pinched or broken wires • Carriage disengaged • Force...Lifetime* on parts and service. CMD9900 Series - For How Long: H8000D Series - Geographic Scope: This warranty applies only to Genie products purchased in diagnosing the problem and will arrange to supply you may use new or reconditioned parts. Some states and provinces do...


