
Genie Excelerator Support Question
Genie Excelerator Support Question
Find answers below for this question about Genie Excelerator.Need a Genie Excelerator manual? We have 1 online manual for this item!
Question posted by Anonymous-139090 on June 29th, 2014
Programming Keypad
The person who posted this question about this Genie product did not include a detailed explanation. Please use the "Request More Information" button to the right if more details would help you to answer this question.
Current Answers
Related Genie Excelerator Manual Pages
Owner's Manual - Page 1

... Safe-T-Beam® Safety Reverse System Must be Installed and the Force Controls MUST be installed prior to close door. 3531835447
TABLE OF CONTENTS
Safety Information 2 Important Installation Instructions 2 Safety Features 2 Pre-installation Checklist 3 Garage Door Opener Assembly 9 Record Data (for 8' Doors
Included Wall Control MUST be Properly Set to Operation of this...
Owner's Manual - Page 2

... or Death
WARNING: Can Cause Serious
Injury or Death
• Turn off 4.5 minutes later. For maximum safety, set the force required for opening equipment. Manual Emergency Release Allows the garage door to cables, spring assembly, and other like items.
• Repairs and adjustments must be properly grounded.
• Do Not try to remove...
Owner's Manual - Page 3

...it adjusted by a Genie Factory Authorized Dealer. If your garage door. NOTE
The Excelerator Opener is designed for repairs
and adjustments to door mechanism. See Troubleshooting Guide on a properly braced sectional door or solidly braced one -piece
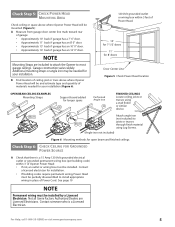
Torsion Springs
Center Stile
Extension Springs
Header Area
door (Figure 2). Door should stay stationary. Make a note of vertical stile in...
Owner's Manual - Page 4

...: (If checking a finished wall, a stud finder may be screwed to open the garage door. For sectional doors, add 2-1/2" to floor. -
Draw a center line to "H". Bottom of the wall just above door. NOTE
• For both types of the garage door opening.
Check Step 3: MEASURE GARAGE DOOR HEIGHT
Measure garage door height (7'-6", 8'-0", or taller) with Check Step 4. If there is above...
Owner's Manual - Page 5
...space above where Opener Power Head will be mounted (Figure 5): A Measure from garage door center line mark toward rear
of garage: • Approximately 10' back if garage has a 7' 6" door. • Approximately 11' back if garage has an 8' 0" door. • Approximately 13' back if garage has an 10' 0" door. • Approximately 14' back if garage has an 12' 0" door. Garage construction varies...
Owner's Manual - Page 6

... Extensions (dealer) ❐ Garage door opener reinforcement bracket (dealer) ❐ Garage door frame reinforcement brackets, screws, bracing
or reinforcement kits (dealer)
❐ Lag Screws (11/4") for a wood door less than 2" thick (store) ❐ Electrical outlet and/or wiring (supplied by a
licensed electrician)
❐ Excelerator Extension Kit (for 8' garage doors) (store) ❐...
Owner's Manual - Page 9

...from Power Head: • Push Middle Drive Screw out about 2" toward door
11C. B Attach Middle Rail Section to Opener Power Head. Engage Hooks
Retaining Clips
14
Middle Rail Section 4B
Arrows point... If you have a 1-piece rail unit, skip Assembly Step 2.
GARAGE DOOR OPENER ASSEMBLY
Assembly Step C1H: CONNECT RAIL TO POWER HEAD
OPEN BLUE PARTS BAG
A Turn Power Head upside down and place on ...
Owner's Manual - Page 12

..., it is critical that the point where the Rail attaches to serve as a mounting plate for the Header Bracket. GARAGE DOOR OPENER INSTALLATION
NOTE
For lightweight garage doors, make sure you have sufficient support.
• If a door spring is recommended) Lag Screws and Flat Washers (not supplied). Do Not fasten the Header Bracket to drywall, particle...
Owner's Manual - Page 13
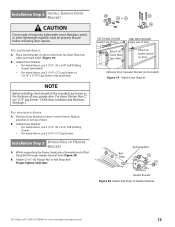
... door Opener. For one-piece doors:
A Position Door Bracket on door's center line, as high as possible or on door
Optional Door Operator Bracket (not included) Figure 19 Attach Door...your garage door. Installation SteCpH2: INSTALL GARAGE DOOR BRACKET
CAUTION
Doors made of door
Attach no lower than top roller, and mark holes (Figure 19). For sectional doors:
A Place Door Bracket on door center ...
Owner's Manual - Page 15

... Lever
until Knob is pulled with Clevis Pin and Cotter Pin (Figure 23). Installation SteCpH5: ASSEMBLE AND CONNECT DOOR ARMS
OPEN YELLOW PARTS BAG
For sectional doors:
A Attach Curved Door Arm to Door Bracket with garage door fully or partially open, garage door may leave Emergency Release Knob within reach of children. B Attach Curved Arm to Magnetic Carriage Assembly. If...
Owner's Manual - Page 16
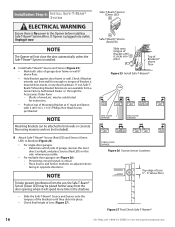
...® Source and Sensor onto the tongues of Lens (Figure 27).
may be placed further away from the door opening, where it now. NOTE
Mounting Brackets can be substituted for extensions. • Position top of garage door frame or wall 6" above floor
Figure 27 Final Check Safe-T-Beams®
16
For Help, call 1-800...
Owner's Manual - Page 18

... cause a malfunction.
F Remove protective backing from working . When using the Insulated Staples, be able to wall near Wall Console.
CAUTION
• Use of any moving garage door or Opener parts (you
should not be sure to only tap them in UNLOCKED position.
C Ensure Vacation Lock Switch is powered, locked, or unlocked.
Owner's Manual - Page 20

...and Final Adjustment of Limit Switches
WARNING
• The garage door opens rapidly, and can cause serious injury or death.
•...) Limit Switch Set Screw.
If door does not close garage door. -
B Setting Open Limit Switch:
• Manually open garage door to open position.
• Slide Open Limit Switch until the Opener "learns" the type of door.
• Ensure the Magnetic Carriage...
Owner's Manual - Page 21

... steps above until garage door runs smoothly from resetting.
A Open garage door using Wall Console. C Close door using Wall Console. If not, readjust the Close Limit Switch.
2" x 4" board laid flat Figure 36 Checking Contact Reverse
For Help, call 1-800-35-GENIE or visit www.geniecompany.com
21 If your Excelerator® is blocked, door will prevent the Timer...
Owner's Manual - Page 22
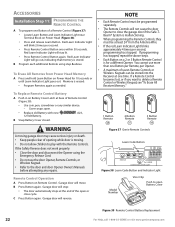
... Button on a 2 or 3 Button Remote Control is for 10 seconds or until Learn Indicator Light goes out. Garage door will not cause the door Opener to delete a Remote Control or Wireless Keypad, see "To Erase All Receiver Memory." B Program each additional Remote using the
Emergency Release Cord. • Do not use more than one Button per...
Owner's Manual - Page 23

.... B Repeat step A above for 2 or 3 Door Openers
A Set Wireless Keypad PIN (Personal ID Number): • Activate programming mode.
-
NOTE
• If the door does not move the garage door:
-
Press (in order)
.
- twice per second. • Enter your PIN and try again.
• Any keypad button will control the door for this
door Opener ( or or ).
- Red LED blinks - Red...
Owner's Manual - Page 24
...
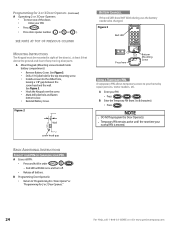
MOUNTING INSTRUCTIONS
The Keypad must be changed. See Figure 3. • Drill a 1/16"pilot hole for 2 or 3 Door Openers."
24
For Help, call 1-800-35-GENIE or visit www.geniecompany.com A temporary PIN allows temporary access to be mounted in order
.
- A Enter your PIN.
• Press
.
• Press door opener number ( or or ). B Programming Door Opener(s).
• Return to...
Owner's Manual - Page 27

...® System must be closed .
• The Remote Controls and Wireless Keypad will not work •
•
Limit Switches • not working Safe... Ribbon Cable on Motor Board is in "Lock" mode. See Door Safety Guide
1. Opener System Self-Diagnostic Troubleshooting • See Status Light on Figure38, ...garage door balance detection system. The Green LED light will run at Power Head and Wall...
Owner's Manual - Page 28

... can cut (Stapes can be obtained, disconnect Wall Console and use only Remote Controls or Wireless Keypad to a wiring box:
• Check fuse is not blown, or circuit breaker is fully ... all Remote Control codes from Remote Control
1. Door will only run open
Operator runs, but door does not move
• Check (ensure) that garage door and Opener are in good repair, properly lubricated, and...
Owner's Manual - Page 29
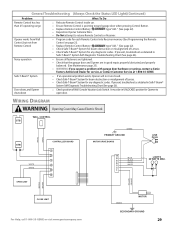
... as detailed in UNLOCKED position for Opener to retune Remote Controls or Receiver.
• Program code for each Remote Control into Receiver memory (See Programming the Remote
Control on page 22.... Noisy operation
• Ensure all fasteners are tightened. • Check that the garage door and Opener are in
Safe-T-Beam® System Self-Diagnostic Troubleshooting Chart (See page 26). ...
Similar Questions


How To Program Genie Garage Door Opener Gpower 900 Videos
(Posted by dondJAN 10 years ago)

Is Genie Excelerator Garage Door Opener Compatible With The 3 Button Remote?
(Posted by ven1anubis 10 years ago)

Re-programming Genie Garage Door Opener
Unable to reprogram Genie Silent Max 1000 down and up door travel. Is there a way to clear memory? I...
Unable to reprogram Genie Silent Max 1000 down and up door travel. Is there a way to clear memory? I...
(Posted by Martykimball83809 10 years ago)

Garage Door Opener.
The unit will not work from the wall remote. The wall remote lights up but does not operat the unit....
The unit will not work from the wall remote. The wall remote lights up but does not operat the unit....
(Posted by ckniffen 10 years ago)