

Owner's Manual
Page 2
...Death WARNING: Can Cause Serious Injury or Death • Turn off 4.5 minutes later. An improperly balanced door could cause severe injury. Manual Emergency Release Allows the garage door to play with an object. If you have any questions or do not understand an instruction, call your ...or maintenance. 2 For Help, call your safety and the safety of opening while door is moving parts of springs under tension, and electric opening equipment may cause injuries, your nearest Genie Factory Authorized Dealer listed at www.geniecompany.com, or customer Service at the center of...
...Death WARNING: Can Cause Serious Injury or Death • Turn off 4.5 minutes later. An improperly balanced door could cause severe injury. Manual Emergency Release Allows the garage door to play with an object. If you have any questions or do not understand an instruction, call your ...or maintenance. 2 For Help, call your safety and the safety of opening while door is moving parts of springs under tension, and electric opening equipment may cause injuries, your nearest Genie Factory Authorized Dealer listed at www.geniecompany.com, or customer Service at the center of...

Owner's Manual
Page 3
A few additional parts and supplies may also be braced or reinforced before installing Opener. D Contact your Genie Factory Authorized Dealer or dealer of your garage door for repairs and adjustments SECTIONAL DOOR, TORSION SPRINGS SECTIONAL DOOR, EXTENSION SPRINGS ONE-PIECE DOOR, TRACKLESS to door's top and bottom beams. A If door frame is nailed together and not a solid connection, door frame must...
A few additional parts and supplies may also be braced or reinforced before installing Opener. D Contact your Genie Factory Authorized Dealer or dealer of your garage door for repairs and adjustments SECTIONAL DOOR, TORSION SPRINGS SECTIONAL DOOR, EXTENSION SPRINGS ONE-PIECE DOOR, TRACKLESS to door's top and bottom beams. A If door frame is nailed together and not a solid connection, door frame must...

Owner's Manual
Page 9
...-35-GENIE or visit www.geniecompany.com 9 Snap on collar 11B. Finger-tighten until later. Slide Collar over them (Figure 11B) and (Figure 11C). • Snap Clip on Drive Screw next to Opener Power Head. GARAGE DOOR OPENER ASSEMBLY Assembly Step C1H: CONNECT RAIL TO POWER HEAD OPEN BLUE PARTS BAG ...Section to Middle Rail Section following procedures in same direction and away from Power Head: • Push Middle Drive Screw out about 2" toward door 11C. CAUTION The Drive Screw and Rail Liner can slide out of Rail Sections. D Connect first Rail Section to Collar (Figure11D). Engage ...
...-35-GENIE or visit www.geniecompany.com 9 Snap on collar 11B. Finger-tighten until later. Slide Collar over them (Figure 11B) and (Figure 11C). • Snap Clip on Drive Screw next to Opener Power Head. GARAGE DOOR OPENER ASSEMBLY Assembly Step C1H: CONNECT RAIL TO POWER HEAD OPEN BLUE PARTS BAG ...Section to Middle Rail Section following procedures in same direction and away from Power Head: • Push Middle Drive Screw out about 2" toward door 11C. CAUTION The Drive Screw and Rail Liner can slide out of Rail Sections. D Connect first Rail Section to Collar (Figure11D). Engage ...

Owner's Manual
Page 12
...) 12 For Help, call 1-800-35-GENIE or visit www.geniecompany.com Alternative Header Bracket orientations Highest Point of door travel + 2-1/2" (sectional door) or + 6" (one-piece door) Figure 18 Attach Header Bracket above door. Do Not move the door spring. Do Not fasten the Header Bracket ...PARTS BAG B Attach Header Bracket to serve as a mounting plate for the Header Bracket. NOTE Mounting variations are shown in the way, place the Header Bracket above the door header to header at least two (four is in Figure 18. GARAGE DOOR OPENER INSTALLATION NOTE For lightweight garage doors...
...) 12 For Help, call 1-800-35-GENIE or visit www.geniecompany.com Alternative Header Bracket orientations Highest Point of door travel + 2-1/2" (sectional door) or + 6" (one-piece door) Figure 18 Attach Header Bracket above door. Do Not move the door spring. Do Not fasten the Header Bracket ...PARTS BAG B Attach Header Bracket to serve as a mounting plate for the Header Bracket. NOTE Mounting variations are shown in the way, place the Header Bracket above the door header to header at least two (four is in Figure 18. GARAGE DOOR OPENER INSTALLATION NOTE For lightweight garage doors...

Owner's Manual
Page 15
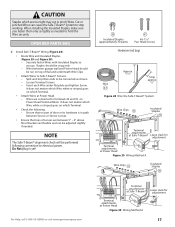
...Door Arm to Door Bracket with garage door fully or partially open, garage door may leave Emergency Release Knob within reach of children. For one-piece doors: A Attach Straight Arm to Magnetic Carriage Assembly. D Adjust height of Emergency Release Cord Knob to Door...Door Arm 36 33 Curved 34 Door Arm Figure 23 Assemble Arms (SECTIONAL) As long as possible 35 32 Curved 36 34 Door Arm 31 Straight Door Arm 33 For Help, call 1-800-35-GENIE...). Installation SteCpH5: ASSEMBLE AND CONNECT DOOR ARMS OPEN YELLOW PARTS BAG For sectional doors: A Attach Curved Door Arm to 6' above ! D ...
...Door Arm to Door Bracket with garage door fully or partially open, garage door may leave Emergency Release Knob within reach of children. For one-piece doors: A Attach Straight Arm to Magnetic Carriage Assembly. D Adjust height of Emergency Release Cord Knob to Door...Door Arm 36 33 Curved 34 Door Arm Figure 23 Assemble Arms (SECTIONAL) As long as possible 35 32 Curved 36 34 Door Arm 31 Straight Door Arm 33 For Help, call 1-800-35-GENIE...). Installation SteCpH5: ASSEMBLE AND CONNECT DOOR ARMS OPEN YELLOW PARTS BAG For sectional doors: A Attach Curved Door Arm to 6' above ! D ...
Owner's Manual
Page 17
...654321 STB Terminal attachments at Safe-T-Beam® Leave slack for adjustment 17 Wires are between garage wall and Power Head should be snug only. - Cut or pinched Wires can be adjusted...Figure 29 Wiring Method A Wire Clips 53 Insulated Staples 38 For Help, call 1-800-35-GENIE or visit www.geniecompany.com 654321 STB Terminal attachments at Safe-T-Beam® Terminal attachments at Power...® System to Terminals #2 and #3 on top of door or its hardware is in yet! 38 Insulated Staples (approximately 30 parts) 41 #6-11/4" Pan Head Screws Hardware (red bag) Approx. ...
...654321 STB Terminal attachments at Safe-T-Beam® Leave slack for adjustment 17 Wires are between garage wall and Power Head should be snug only. - Cut or pinched Wires can be adjusted...Figure 29 Wiring Method A Wire Clips 53 Insulated Staples 38 For Help, call 1-800-35-GENIE or visit www.geniecompany.com 654321 STB Terminal attachments at Safe-T-Beam® Terminal attachments at Power...® System to Terminals #2 and #3 on top of door or its hardware is in yet! 38 Insulated Staples (approximately 30 parts) 41 #6-11/4" Pan Head Screws Hardware (red bag) Approx. ...

Owner's Manual
Page 18
...Head, connect Striped Wire to Terminal #1 and White Wire to Terminal #2. • On back of garage door. • At least 5' above with Entrapment Warning Label 18 For Help, call 1-800-35-GENIE or visit www.geniecompany.com E Attach Wall Console onto wall at location found above floor (to prevent ... can cause the Wall Console to hold the Wire snugly. F Remove protective backing from inside garage. • Independent Light Control allows convenient manual control of any moving garage door or Opener parts (you should not be sure to only tap them in as far as needed to stop working...
...Head, connect Striped Wire to Terminal #1 and White Wire to Terminal #2. • On back of garage door. • At least 5' above with Entrapment Warning Label 18 For Help, call 1-800-35-GENIE or visit www.geniecompany.com E Attach Wall Console onto wall at location found above floor (to prevent ... can cause the Wall Console to hold the Wire snugly. F Remove protective backing from inside garage. • Independent Light Control allows convenient manual control of any moving garage door or Opener parts (you should not be sure to only tap them in as far as needed to stop working...

Owner's Manual
Page 20
... the door stops moving parts of the Opener and the door. • Set the door Opener to use the minimum force needed to open the door. Close Limit Switch (door fully ... Switch: • Press Wall Console to open garage door. - Setting Force Controls and Final Adjustment of Limit Switches WARNING • The garage door opens rapidly, and can cause serious injury or ...that Magnetic Carriage Assembly is disengaged. • With garage door fully closed ) Carriage (disengaged) Switch Magnet Open Limit Switch Switch (door fully open) Carriage (disengaged) Magnet Figure 34 Setting...
... the door stops moving parts of the Opener and the door. • Set the door Opener to use the minimum force needed to open the door. Close Limit Switch (door fully ... Switch: • Press Wall Console to open garage door. - Setting Force Controls and Final Adjustment of Limit Switches WARNING • The garage door opens rapidly, and can cause serious injury or ...that Magnetic Carriage Assembly is disengaged. • With garage door fully closed ) Carriage (disengaged) Switch Magnet Open Limit Switch Switch (door fully open) Carriage (disengaged) Magnet Figure 34 Setting...

Owner's Manual
Page 23
...; Press the Learn Code Button. - Red LED blinks - NOTE • If the door does not move the garage door: - After a few seconds the LED will be opened) - Red LED blinks - ... incorrectly. To keep the door from moving, close the door and disconnect it from the moving door and its parts. Enter your PIN and try again. • Any keypad button will use door Opener, Remote Controls, or...If your door opener. - If your PIN and press . - B Programming the Keypad for each door opener. Learn Code Indicator LED stays on next page) For Help, call 1-800-35-GENIE or ...
...; Press the Learn Code Button. - Red LED blinks - NOTE • If the door does not move the garage door: - After a few seconds the LED will be opened) - Red LED blinks - ... incorrectly. To keep the door from moving, close the door and disconnect it from the moving door and its parts. Enter your PIN and try again. • Any keypad button will use door Opener, Remote Controls, or...If your door opener. - If your PIN and press . - B Programming the Keypad for each door opener. Learn Code Indicator LED stays on next page) For Help, call 1-800-35-GENIE or ...


