

Owner's Manual
Page 2
... are fastened, such as, wood blocks, steel brackets, cables or other hardware must be opened or closed manually for emergencies or maintenance. 2 For Help, call 1-800-35-GENIE or visit www.geniecompany.com POTENTIAL HAZARD EFFECT PREVENTION MOVING DOOR WARNING: Can Cause Serious Injury or Death &#... down travel to the wall button or console. If you reading and understanding the information in this manual. Install the emergency release tag on the floor at 1-800-35-GENIE.. IMPORTANT INSTALLATION INSTRUCTIONS WARNING: TO REDUCE THE RISK OF SEVERE INJURY OR DEATH: 1 READ AND ...
... are fastened, such as, wood blocks, steel brackets, cables or other hardware must be opened or closed manually for emergencies or maintenance. 2 For Help, call 1-800-35-GENIE or visit www.geniecompany.com POTENTIAL HAZARD EFFECT PREVENTION MOVING DOOR WARNING: Can Cause Serious Injury or Death &#... down travel to the wall button or console. If you reading and understanding the information in this manual. Install the emergency release tag on the floor at 1-800-35-GENIE.. IMPORTANT INSTALLATION INSTRUCTIONS WARNING: TO REDUCE THE RISK OF SEVERE INJURY OR DEATH: 1 READ AND ...

Owner's Manual
Page 7
... x 1" Phillips Screw No. 8-32 x 3/8" Slotted Hex Head Screw Power Cord For Help, call 1-800-35-GENIE or visit www.geniecompany.com 7 These items will be illustrated throughout the manual as required. Parts List Item 1 2 3 4 4A 4B 4C 8 9 10 11 12 13 14 15 16...Roll 1 Roll Insulated Staple (red bag) approx. 30 approx. 30 Wall Console (main carton) 1 1 #6 x 1-1/4" Pan Head Screw (red bag) 2 2 Entrapment Warning Label (manual)(main carton) 1 1 Safe-T-Beam (STB) Sensor (Green LED)(main carton) 1 1 Safe-T-Beam (STB) Source (Red LED)(main carton) 1 1 Safe-T-Beam (STB) Bracket ...
... x 1" Phillips Screw No. 8-32 x 3/8" Slotted Hex Head Screw Power Cord For Help, call 1-800-35-GENIE or visit www.geniecompany.com 7 These items will be illustrated throughout the manual as required. Parts List Item 1 2 3 4 4A 4B 4C 8 9 10 11 12 13 14 15 16...Roll 1 Roll Insulated Staple (red bag) approx. 30 approx. 30 Wall Console (main carton) 1 1 #6 x 1-1/4" Pan Head Screw (red bag) 2 2 Entrapment Warning Label (manual)(main carton) 1 1 Safe-T-Beam (STB) Sensor (Green LED)(main carton) 1 1 Safe-T-Beam (STB) Source (Red LED)(main carton) 1 1 Safe-T-Beam (STB) Bracket ...

Owner's Manual
Page 11
... Switch Wires to Power Head Terminal Block Assembly Step C7H: ATTACH EMERGENCY RELEASE KNOB, CORD, AND TAG A Tie overhand knot at this manual for future reference should service ever be done later. B Thread opposite end of Power Head with Wire Clips (Figure 14). C Tie overhand...and CLOSE Limit Switch Wire (brown). • Terminal 6: CLOSE Limit Switch Wire (brown). Leave just enough Wire to call 1-800-35-GENIE or visit www.geniecompany.com 11 D Attach Emergency Release Tag to Magnetic Carriage Assembly Release Lever. 25 Emergency Release Tag Assembly Step C8H: RECORD...
... Switch Wires to Power Head Terminal Block Assembly Step C7H: ATTACH EMERGENCY RELEASE KNOB, CORD, AND TAG A Tie overhand knot at this manual for future reference should service ever be done later. B Thread opposite end of Power Head with Wire Clips (Figure 14). C Tie overhand...and CLOSE Limit Switch Wire (brown). • Terminal 6: CLOSE Limit Switch Wire (brown). Leave just enough Wire to call 1-800-35-GENIE or visit www.geniecompany.com 11 D Attach Emergency Release Tag to Magnetic Carriage Assembly Release Lever. 25 Emergency Release Tag Assembly Step C8H: RECORD...

Owner's Manual
Page 18
...found above floor (to prevent small children from operating garage door). • Away from inside garage. • Independent Light Control allows convenient manual control of any moving garage door or Opener parts (you should not be sure to wall near Wall Console. C Ensure Vacation Lock Switch is... to Terminal #2. • On back of garage door. • At least 5' above with Entrapment Warning Label 18 For Help, call 1-800-35-GENIE or visit www.geniecompany.com CAUTION • Use of Opener Lighting System. D Wire Wall Console to Opener (Figure 32): • On Power Head,...
...found above floor (to prevent small children from operating garage door). • Away from inside garage. • Independent Light Control allows convenient manual control of any moving garage door or Opener parts (you should not be sure to wall near Wall Console. C Ensure Vacation Lock Switch is... to Terminal #2. • On back of garage door. • At least 5' above with Entrapment Warning Label 18 For Help, call 1-800-35-GENIE or visit www.geniecompany.com CAUTION • Use of Opener Lighting System. D Wire Wall Console to Opener (Figure 32): • On Power Head,...

Owner's Manual
Page 20
...34 Setting Limit Switches Force Controls HI LO HI LO OPEN CLOSE FORCE FORCE Figure 35 Making Force Adjustments 20 For Help, call 1-800-35-GENIE or visit www.geniecompany.com Do not over -tighten (strip) Limit Switch Set Screw. If door reverses after contacting floor, move , check... 34): • Check that Magnetic Carriage Assembly is between fully counter clockwise and fully clockwise (Figure 35). B Setting Open Limit Switch: • Manually open position. • Slide Open Limit Switch until it is clear of all moving while opening or closing, adjust the Open Force or Close Force...
...34 Setting Limit Switches Force Controls HI LO HI LO OPEN CLOSE FORCE FORCE Figure 35 Making Force Adjustments 20 For Help, call 1-800-35-GENIE or visit www.geniecompany.com Do not over -tighten (strip) Limit Switch Set Screw. If door reverses after contacting floor, move , check... 34): • Check that Magnetic Carriage Assembly is between fully counter clockwise and fully clockwise (Figure 35). B Setting Open Limit Switch: • Manually open position. • Slide Open Limit Switch until it is clear of all moving while opening or closing, adjust the Open Force or Close Force...
Owner's Manual
Page 22
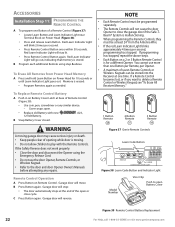
.... B Press Button again. Red Learn Indicator Light will reverse. 1 Button Remote 48 2 Button Remote 51 3 Button Remote 49 Figure 37 Genie Remote Controls Learn Code Button STATUS LEARN LEARN INDICATOR LIGHT Figure 38 Learn Code Button and Indicator Light Model Number Visor Clip Push to play..., see "To Erase All Receiver Memory." If a Remote Control becomes lost, or if you want to the door and door Opener Owner's Manuals before attempting any similar device. - B Program each additional Remote using the Emergency Release Cord. • Do not use more than one Button...
.... B Press Button again. Red Learn Indicator Light will reverse. 1 Button Remote 48 2 Button Remote 51 3 Button Remote 49 Figure 37 Genie Remote Controls Learn Code Button STATUS LEARN LEARN INDICATOR LIGHT Figure 38 Learn Code Button and Indicator Light Model Number Visor Clip Push to play..., see "To Erase All Receiver Memory." If a Remote Control becomes lost, or if you want to the door and door Opener Owner's Manuals before attempting any similar device. - B Program each additional Remote using the Emergency Release Cord. • Do not use more than one Button...

Owner's Manual
Page 23
... the door from moving, close the door and disconnect it from the Wireless Keypad. (continued on next page) For Help, call 1-800-35-GENIE or visit www.geniecompany.com 23 NOTE FOR CONVENIENCE - Program Keypad BEFORE mounting. Red LED blinks - If your PIN (3 to 8 characters). ... press . - Proceed to control ( or ). • Press . - Learn Code Indicator LED (on Opener Housing removed to Door and Door Opener Owner's Manuals before attempting any repairs. Learn Code Indicator LED turns off . B Repeat step A above for this door Opener ( or or ). - NOTE • If...
... the door from moving, close the door and disconnect it from the Wireless Keypad. (continued on next page) For Help, call 1-800-35-GENIE or visit www.geniecompany.com 23 NOTE FOR CONVENIENCE - Program Keypad BEFORE mounting. Red LED blinks - If your PIN (3 to 8 characters). ... press . - Proceed to control ( or ). • Press . - Learn Code Indicator LED (on Opener Housing removed to Door and Door Opener Owner's Manuals before attempting any repairs. Learn Code Indicator LED turns off . B Repeat step A above for this door Opener ( or or ). - NOTE • If...
Owner's Manual
Page 25
...-3). Transmitter Compliance Statement Do not operate door automatically or manually if springs are recommended. Raise door manually 3'- 4' and verify that door stays at 1-800-35-GENIE. If the door moves too much, contact a Genie Factory Authorized Dealer for service or call Customer Service at 1-800-35-GENIE. • Balance Door. - Close door. • Contact Reverse...
...-3). Transmitter Compliance Statement Do not operate door automatically or manually if springs are recommended. Raise door manually 3'- 4' and verify that door stays at 1-800-35-GENIE. If the door moves too much, contact a Genie Factory Authorized Dealer for service or call Customer Service at 1-800-35-GENIE. • Balance Door. - Close door. • Contact Reverse...
Owner's Manual
Page 26
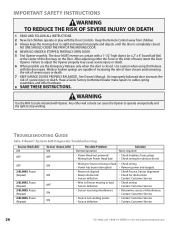
... severe injury or death. An improperly balanced door increases the risk of travel, retest the Door Opener. Have a Genie Factory Authorized Dealer make repairs to cables, spring assemblies, and other wall console can cause the Opener to operate unexpectedly...A STOPPED, PARTIALLY OPEN DOOR. 5 Test Opener monthly. Any other hardware. 8 SAVE THESE INSTRUCTIONS. The door MUST reverse on the floor. See Owner's Manual. TROUBLESHOOTING GUIDE Safe-T-Beam® System Self-Diagnostic Troubleshooting Source (Red LED) ON OFF OFF 2 BLINKS, Pause (Repeat) 2 BLINKS, Pause (Repeat) ...
... severe injury or death. An improperly balanced door increases the risk of travel, retest the Door Opener. Have a Genie Factory Authorized Dealer make repairs to cables, spring assemblies, and other wall console can cause the Opener to operate unexpectedly...A STOPPED, PARTIALLY OPEN DOOR. 5 Test Opener monthly. Any other hardware. 8 SAVE THESE INSTRUCTIONS. The door MUST reverse on the floor. See Owner's Manual. TROUBLESHOOTING GUIDE Safe-T-Beam® System Self-Diagnostic Troubleshooting Source (Red LED) ON OFF OFF 2 BLINKS, Pause (Repeat) 2 BLINKS, Pause (Repeat) ...
Owner's Manual
Page 30
... considered replacement parts) • Installation • Commercial use • Defects resulting from accidents • Damage while in accordance with the Owner's Manual. CMD9900 Series - If we send replacement parts for your Genie product, and it -yourself repairs. ISD990 Series - ISD995 Series - Lifetime* on motor and all parts. * for any attachment not provided...
... considered replacement parts) • Installation • Commercial use • Defects resulting from accidents • Damage while in accordance with the Owner's Manual. CMD9900 Series - If we send replacement parts for your Genie product, and it -yourself repairs. ISD990 Series - ISD995 Series - Lifetime* on motor and all parts. * for any attachment not provided...

