

Owner's Manual
Page 1
... 2 Safety Features 2 Pre-installation Checklist 3 Garage Door Opener Assembly 9 Record Data (for 8' Doors Included Wall Control MUST be Properly Set to Operation of this Garage Door Operator. This Equipment meets or exceeds all Federal...door. SAVEFTUHTIUSRMEARNEUFEARLEFNOCRE Extension Kit is available for Service 11 Garage Door Opener Installation 12 Accessories 22 Maintenance 25 Troubleshooting 26 Wiring Diagram 29 Warranty information 30 COMPLETE WITH INTELLICODE® REMOTE CONTROL AND SERIES II ELECTRONICS For 7' 6" Doors. Having Difficulty? Please call us: 1-800-35-GENIE...
... 2 Safety Features 2 Pre-installation Checklist 3 Garage Door Opener Assembly 9 Record Data (for 8' Doors Included Wall Control MUST be Properly Set to Operation of this Garage Door Operator. This Equipment meets or exceeds all Federal...door. SAVEFTUHTIUSRMEARNEUFEARLEFNOCRE Extension Kit is available for Service 11 Garage Door Opener Installation 12 Accessories 22 Maintenance 25 Troubleshooting 26 Wiring Diagram 29 Warranty information 30 COMPLETE WITH INTELLICODE® REMOTE CONTROL AND SERIES II ELECTRONICS For 7' 6" Doors. Having Difficulty? Please call us: 1-800-35-GENIE...

Owner's Manual
Page 2
..., repair or adjust springs or anything passes through beam. Manual Emergency Release Allows the garage door to be properly grounded. • Do Not try to fully open position if anything to the door before removing operator cover. • When replacing cover, make sure wires are fastened... opens a closing door. Automatic Lighting System Two light bulbs up to the wall button or console. The light turns on an improperly balanced door. Repairs and adjustments to do not understand an instruction, call 1-800-35-GENIE or visit www.geniecompany.com If you have garage door ...
..., repair or adjust springs or anything passes through beam. Manual Emergency Release Allows the garage door to be properly grounded. • Do Not try to fully open position if anything to the door before removing operator cover. • When replacing cover, make sure wires are fastened... opens a closing door. Automatic Lighting System Two light bulbs up to the wall button or console. The light turns on an improperly balanced door. Repairs and adjustments to do not understand an instruction, call 1-800-35-GENIE or visit www.geniecompany.com If you have garage door ...

Owner's Manual
Page 3
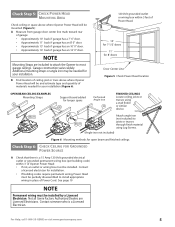
... Check following items before installing Opener. D Contact your Genie Factory Authorized Dealer or dealer of garages and garage doors. KEEP FEET CLEAR OF DOOR 3' - 4' Sectional Door Check Step 2: CHECK GARAGE DOOR ALIGNMENT, OPERATION, AND BALANCE A Raise door, check alignment and see if it adjusted by a Genie Factory Authorized Dealer. This Opener is "lightweight" (made with an automatic Garage Door Balance Detection System. See Troubleshooting...
... Check following items before installing Opener. D Contact your Genie Factory Authorized Dealer or dealer of garages and garage doors. KEEP FEET CLEAR OF DOOR 3' - 4' Sectional Door Check Step 2: CHECK GARAGE DOOR ALIGNMENT, OPERATION, AND BALANCE A Raise door, check alignment and see if it adjusted by a Genie Factory Authorized Dealer. This Opener is "lightweight" (made with an automatic Garage Door Balance Detection System. See Troubleshooting...

Owner's Manual
Page 4
...GENIE. Bottom of Header Bracket will be helpful). • If location is any question contact your Customer Service Representative at least two Lag Screws and Flat Washers (not provided). • Transfer your door height is above door. NOTE • For both types of the garage door opening. Do Not move the door spring. Check Step 3: MEASURE GARAGE DOOR...For Help, call 1-800-35-GENIE or visit www.geniecompany.com For one-piece doors, add 6" to open the garage door. If the ceiling in your garage is so low that there is not at center of door and on header directly above ...
...GENIE. Bottom of Header Bracket will be helpful). • If location is any question contact your Customer Service Representative at least two Lag Screws and Flat Washers (not provided). • Transfer your door height is above door. NOTE • For both types of the garage door opening. Do Not move the door spring. Check Step 3: MEASURE GARAGE DOOR...For Help, call 1-800-35-GENIE or visit www.geniecompany.com For one-piece doors, add 6" to open the garage door. If the ceiling in your garage is so low that there is not at center of door and on header directly above ...
Owner's Manual
Page 5
...by a Licensed Electrician. Not all Genie Factory Authorized Dealers are included to attach the Opener to install appropriate wiring in place of Power Cord. For Help, call 1-800-35-GENIE or visit www.geniecompany.com 5 Garage construction varies widely. See page 19... above where Opener Power Head will be mounted (Figure 5): A Measure from garage door center line mark toward rear of garage: • Approximately 10' back if garage has a 7' 6" door. • Approximately 11' back if garage has an 8' 0" door. • Approximately 13' back if garage has an 10' 0" door. •...
...by a Licensed Electrician. Not all Genie Factory Authorized Dealers are included to attach the Opener to install appropriate wiring in place of Power Cord. For Help, call 1-800-35-GENIE or visit www.geniecompany.com 5 Garage construction varies widely. See page 19... above where Opener Power Head will be mounted (Figure 5): A Measure from garage door center line mark toward rear of garage: • Approximately 10' back if garage has a 7' 6" door. • Approximately 11' back if garage has an 8' 0" door. • Approximately 13' back if garage has an 10' 0" door. •...

Owner's Manual
Page 6
...Garage door opener reinforcement bracket (dealer) ❐ Garage door frame reinforcement brackets, screws, bracing or reinforcement kits (dealer) ❐ Lag Screws (11/4") for a wood door less than 2" thick (store) ❐ Electrical outlet and/or wiring (supplied by a licensed electrician) ❐ Excelerator Extension Kit (for 8' garage doors... Check Step 8: RECOMMENDED TOOLS A Tools (Figure 8): B Additional tools to install a Genie Emergency Release Kit (GER-2). A If you open garage door from outside if there is highly recommended to make installation easier: • Slotted and ...
...Garage door opener reinforcement bracket (dealer) ❐ Garage door frame reinforcement brackets, screws, bracing or reinforcement kits (dealer) ❐ Lag Screws (11/4") for a wood door less than 2" thick (store) ❐ Electrical outlet and/or wiring (supplied by a licensed electrician) ❐ Excelerator Extension Kit (for 8' garage doors... Check Step 8: RECOMMENDED TOOLS A Tools (Figure 8): B Additional tools to install a Genie Emergency Release Kit (GER-2). A If you open garage door from outside if there is highly recommended to make installation easier: • Slotted and ...

Owner's Manual
Page 9
...and 2 (1/4" -20) Hex Serrated Flange Nuts (Figure 10). Finger-tighten until later. (Middle Rail Section looks the same on Rail Sections to Opener Power Head. B Attach Middle Rail Section to Middle Rail Section following procedures in same direction and away from Power Head: • Push Middle ...can slide out of Rail Sections. GARAGE DOOR OPENER ASSEMBLY Assembly Step C1H: CONNECT RAIL TO POWER HEAD OPEN BLUE PARTS BAG A Turn Power Head upside down and place on Retaining Clip 10 Figure 11 Attach Middle Rail Section For Help, call 1-800-35-GENIE or visit www.geniecompany.com 9 ...
...and 2 (1/4" -20) Hex Serrated Flange Nuts (Figure 10). Finger-tighten until later. (Middle Rail Section looks the same on Rail Sections to Opener Power Head. B Attach Middle Rail Section to Middle Rail Section following procedures in same direction and away from Power Head: • Push Middle ...can slide out of Rail Sections. GARAGE DOOR OPENER ASSEMBLY Assembly Step C1H: CONNECT RAIL TO POWER HEAD OPEN BLUE PARTS BAG A Turn Power Head upside down and place on Retaining Clip 10 Figure 11 Attach Middle Rail Section For Help, call 1-800-35-GENIE or visit www.geniecompany.com 9 ...

Owner's Manual
Page 12
...Garage Door A If needed, attach a 2" x 6" board (Figure 18) (also see page 4) with 3 (1/4" x 2") Lag Screws. 26 Header Bracket 30 1/4" x 2" Lag Screws 55 5/16-18 x 3/4" Hex Head Bolts 11 5/16-18 x 3/4" Hex Serrated Flange Nuts 28 Door Bracket 56 1/4"-20 x 3/4" Self-Drilling Screws Hardware (orange bag) 12 For Help, call 1-800-35-GENIE... installed the proper reinforcement (See Check Door Condition and Thickness on space. GARAGE DOOR OPENER INSTALLATION NOTE For lightweight garage doors, make sure you have sufficient support. • If a door spring is in Figure 18. Installation ...
...Garage Door A If needed, attach a 2" x 6" board (Figure 18) (also see page 4) with 3 (1/4" x 2") Lag Screws. 26 Header Bracket 30 1/4" x 2" Lag Screws 55 5/16-18 x 3/4" Hex Head Bolts 11 5/16-18 x 3/4" Hex Serrated Flange Nuts 28 Door Bracket 56 1/4"-20 x 3/4" Self-Drilling Screws Hardware (orange bag) 12 For Help, call 1-800-35-GENIE... installed the proper reinforcement (See Check Door Condition and Thickness on space. GARAGE DOOR OPENER INSTALLATION NOTE For lightweight garage doors, make sure you have sufficient support. • If a door spring is in Figure 18. Installation ...
Owner's Manual
Page 13
... must be properly braced before mounting door Opener. Installation SteCpH2: INSTALL GARAGE DOOR BRACKET CAUTION Doors made of the included Lag Screws vs. For one-piece doors: A Position Door Bracket on door's center line, as high as possible or on door center line, no OR lower than...DOORS Center Line of door ONE-PIECE DOORS Center Line of door. B Attach Door Bracket: • For metal doors, use 3 (1/4" -20 x 3/4") Self-Drilling Screws (provided). • For wood doors, use 3 (1/4" x 2") Lag Screws. B Attach (5/16"-18) Flange Nut to Header Bracket For Help, call 1-800-35-GENIE...
... must be properly braced before mounting door Opener. Installation SteCpH2: INSTALL GARAGE DOOR BRACKET CAUTION Doors made of the included Lag Screws vs. For one-piece doors: A Position Door Bracket on door's center line, as high as possible or on door center line, no OR lower than...DOORS Center Line of door ONE-PIECE DOORS Center Line of door. B Attach Door Bracket: • For metal doors, use 3 (1/4" -20 x 3/4") Self-Drilling Screws (provided). • For wood doors, use 3 (1/4" x 2") Lag Screws. B Attach (5/16"-18) Flange Nut to Header Bracket For Help, call 1-800-35-GENIE...

Owner's Manual
Page 15
... tighten fasteners. B Attach Curved Arm to Door Bracket with Clevis Pin and Cotter Pin (Figure 24). Failure to Door Bracket with Clevis Pin and Cotter Pin (Figure 23). C Attach both Arms together with garage door fully or partially open, garage door may leave Emergency Release Knob within reach of...If the Knob is as short as possible 35 32 Curved 36 34 Door Arm 31 Straight Door Arm 33 For Help, call 1-800-35-GENIE or visit www.geniecompany.com Figure 24 Assemble Arms (ONE-PIECE) 15 B Attach Straight Door Arm to 6' above ! C Attach both Arms together with 2 (3/8" ...
... tighten fasteners. B Attach Curved Arm to Door Bracket with Clevis Pin and Cotter Pin (Figure 24). Failure to Door Bracket with Clevis Pin and Cotter Pin (Figure 23). C Attach both Arms together with garage door fully or partially open, garage door may leave Emergency Release Knob within reach of...If the Knob is as short as possible 35 32 Curved 36 34 Door Arm 31 Straight Door Arm 33 For Help, call 1-800-35-GENIE or visit www.geniecompany.com Figure 24 Assemble Arms (ONE-PIECE) 15 B Attach Straight Door Arm to 6' above ! C Attach both Arms together with 2 (3/8" ...
Owner's Manual
Page 16
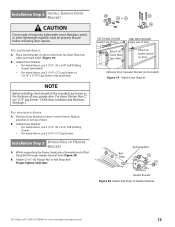
...DOOR GARAGE TWO DOOR GARAGE GREEN LED RED RED LED LED GREEN GREEN LED LED RED LED THREE DOOR GARAGE Figure 26 Source/sensor Locations Top edge of garage door frame or wall 6" above floor Figure 27 Final Check Safe-T-Beams® 16 For Help, call 1-800-35-GENIE or visit www.geniecompany.com NOTE The Opener... Bracket against door frame or wall. Check if Bracket extends out from a Genie Factory Authorized Dealer or through the Accessories Order Form. - NOTE To help prevent interference from the door opening, where it will not close the door automatically unless the...
...DOOR GARAGE TWO DOOR GARAGE GREEN LED RED RED LED LED GREEN GREEN LED LED RED LED THREE DOOR GARAGE Figure 26 Source/sensor Locations Top edge of garage door frame or wall 6" above floor Figure 27 Final Check Safe-T-Beams® 16 For Help, call 1-800-35-GENIE or visit www.geniecompany.com NOTE The Opener... Bracket against door frame or wall. Check if Bracket extends out from a Genie Factory Authorized Dealer or through the Accessories Order Form. - NOTE To help prevent interference from the door opening, where it will not close the door automatically unless the...

Owner's Manual
Page 18
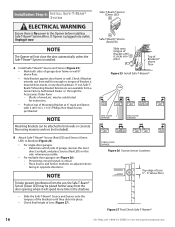
... Wire Wall Console to Opener (Figure 32): • On Power Head, connect Striped Wire to Terminal #1 and White Wire to Terminal #2. • On back of garage door. • At least 5' above with Entrapment Warning Label 18 For Help, call 1-800-35-GENIE or visit www.geniecompany...light from Entrapment Warning Label, and attach it to prevent small children from operating garage door). • Away from inside garage. • Independent Light Control allows convenient manual control of any moving garage door or Opener parts (you should not be sure to Terminal "B" 654321 PB/WC Figure ...
... Wire Wall Console to Opener (Figure 32): • On Power Head, connect Striped Wire to Terminal #1 and White Wire to Terminal #2. • On back of garage door. • At least 5' above with Entrapment Warning Label 18 For Help, call 1-800-35-GENIE or visit www.geniecompany...light from Entrapment Warning Label, and attach it to prevent small children from operating garage door). • Away from inside garage. • Independent Light Control allows convenient manual control of any moving garage door or Opener parts (you should not be sure to Terminal "B" 654321 PB/WC Figure ...

Owner's Manual
Page 20
... Limit Switch same amount toward Power Head. - If door fails to open garage door. - If door does not open ) Carriage (disengaged) Magnet Figure 34 Setting Limit Switches Force Controls HI LO HI LO OPEN CLOSE FORCE FORCE Figure 35 Making Force Adjustments 20 For Help, call 1-800-35-GENIE or visit www.geniecompany.com Do not over -tighten...
... Limit Switch same amount toward Power Head. - If door fails to open garage door. - If door does not open ) Carriage (disengaged) Magnet Figure 34 Setting Limit Switches Force Controls HI LO HI LO OPEN CLOSE FORCE FORCE Figure 35 Making Force Adjustments 20 For Help, call 1-800-35-GENIE or visit www.geniecompany.com Do not over -tighten...

Owner's Manual
Page 21
... Contact Reverse For Help, call 1-800-35-GENIE or visit www.geniecompany.com 21 simply wait 10 minutes for the Timer/Cycle Counter to the Wall Console - D Test Door Opener: • Run door up and down a few times using Wall ...garage door runs smoothly from resetting. A Open garage door using Wall Console. E Adjust Open Force to minimum needed to Close Limit Switch. - E Check Safe-T-Beam® System operation: • If beam is equipped with a Timer and Cycle Counter which work together to prevent any chance of doorway. If your Excelerator® is blocked, door...
... Contact Reverse For Help, call 1-800-35-GENIE or visit www.geniecompany.com 21 simply wait 10 minutes for the Timer/Cycle Counter to the Wall Console - D Test Door Opener: • Run door up and down a few times using Wall ...garage door runs smoothly from resetting. A Open garage door using Wall Console. E Adjust Open Force to minimum needed to Close Limit Switch. - E Check Safe-T-Beam® System operation: • If beam is equipped with a Timer and Cycle Counter which work together to prevent any chance of doorway. If your Excelerator® is blocked, door...
Owner's Manual
Page 22
... Battery Replacement 22 For Help, call 1-800-35-GENIE or visit www.geniecompany.com Garage door will stop: • The door automatically stops at the end of opening while door is moving garage door may cause serious injury or death. • Keep people clear of the open or close the garage door if the Safe-TBeam® System is malfunctioning. •...
... Battery Replacement 22 For Help, call 1-800-35-GENIE or visit www.geniecompany.com Garage door will stop: • The door automatically stops at the end of opening while door is moving garage door may cause serious injury or death. • Keep people clear of the open or close the garage door if the Safe-TBeam® System is malfunctioning. •...

Owner's Manual
Page 23
Learn Code Indicator LED stays on Keypad. NOTE • If the door does not move the garage door: - After a few seconds the LED will control the door for Multiple Door openers: All door openers will be opened) - Proceed to be door #1,#2 and #3. • Press the Learn Code Button (see Figure 1). - Press (in... page) For Help, call 1-800-35-GENIE or visit www.geniecompany.com 23 C Operating One Door Operator: • To move ,check the red LED on . • Press again. - Red LED blinks - B Repeat step A above for 1 Door Opener A Set Wireless Keypad PIN (Personal ID...
Learn Code Indicator LED stays on Keypad. NOTE • If the door does not move the garage door: - After a few seconds the LED will control the door for Multiple Door openers: All door openers will be opened) - Proceed to be door #1,#2 and #3. • Press the Learn Code Button (see Figure 1). - Press (in... page) For Help, call 1-800-35-GENIE or visit www.geniecompany.com 23 C Operating One Door Operator: • To move ,check the red LED on . • Press again. - Red LED blinks - B Repeat step A above for 1 Door Opener A Set Wireless Keypad PIN (Personal ID...
Owner's Manual
Page 26
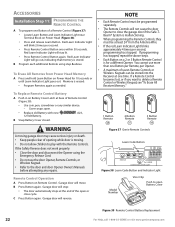
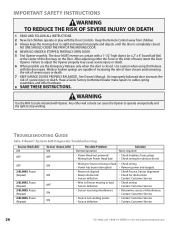
... • Contact Customer Service • Contact Customer Service 26 For Help, call 1-800-35-GENIE or visit www.geniecompany.com Use caution when using this Release with the Door Controls. See Owner's Manual. Keep the Remote Control away from children. 3 Always keep the... death. NO ONE SHOULD CROSS THE PATH OF THE MOVING DOOR. 4 NEVER GO UNDER A STOPPED, PARTIALLY OPEN DOOR. 5 Test Opener monthly. An improperly balanced door increases the risk of severe injury or death. 7 KEEP GARAGE DOORS PROPERLY BALANCED. The door MUST reverse on the floor. WARNING Use the Wall Console ...
... • Contact Customer Service • Contact Customer Service 26 For Help, call 1-800-35-GENIE or visit www.geniecompany.com Use caution when using this Release with the Door Controls. See Owner's Manual. Keep the Remote Control away from children. 3 Always keep the... death. NO ONE SHOULD CROSS THE PATH OF THE MOVING DOOR. 4 NEVER GO UNDER A STOPPED, PARTIALLY OPEN DOOR. 5 Test Opener monthly. An improperly balanced door increases the risk of severe injury or death. 7 KEEP GARAGE DOORS PROPERLY BALANCED. The door MUST reverse on the floor. WARNING Use the Wall Console ...

Owner's Manual
Page 27
... shorts, tight Staples, or pinched Wires. Unlock switch. Contact Customer Service for further assistance. Have a Genie Factory Authorized Dealer check that Ribbon Cable on Motor Board is fully closed electrically by holding the Wall Console Button down until...Safe-T-Beam® System. NOTE: This Opener is located under Limit Switch Brackets. Contact Customer Service for further assistance. See page 18 NOTE • The status LED Indicator Light is equipped with an automatic garage door balance detection system. See door Safety Guide 1. Contact Customer Service for...
... shorts, tight Staples, or pinched Wires. Unlock switch. Contact Customer Service for further assistance. Have a Genie Factory Authorized Dealer check that Ribbon Cable on Motor Board is fully closed electrically by holding the Wall Console Button down until...Safe-T-Beam® System. NOTE: This Opener is located under Limit Switch Brackets. Contact Customer Service for further assistance. See page 18 NOTE • The status LED Indicator Light is equipped with an automatic garage door balance detection system. See door Safety Guide 1. Contact Customer Service for...

Owner's Manual
Page 28
... Remote Controls or Wireless Keypad to ensure that garage door and Opener are OK. • If not, check fuse or circuit breaker or non-compatible GFCI. Adjust as detailed in contact with the garage door hardware or springs,contact a Genie Factory Authorized De aler for proper wiring. &#...in Maintenance Section. • WARNING: If you suspect a problem with the garage door hardware or springs,contact a Genie Factory Authorized De aler for service,or contact Customer Service at 1-800-35-GENIE. • Check Open Limit Switch for a short circuit and for no power, have a licensed ...
... Remote Controls or Wireless Keypad to ensure that garage door and Opener are OK. • If not, check fuse or circuit breaker or non-compatible GFCI. Adjust as detailed in contact with the garage door hardware or springs,contact a Genie Factory Authorized De aler for proper wiring. &#...in Maintenance Section. • WARNING: If you suspect a problem with the garage door hardware or springs,contact a Genie Factory Authorized De aler for service,or contact Customer Service at 1-800-35-GENIE. • Check Open Limit Switch for a short circuit and for no power, have a licensed ...
Owner's Manual
Page 29
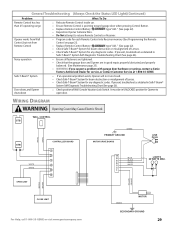
.... (See Maintenance page 25). • WARNING: If you suspect a problem with garage door hardware or springs, contact a Genie Factory Authorized Dealer for service, or contact Customer Service at 1-800-35-GENIE. It must be in Safe-T-Beam® System Self-Diagnostic Troubleshooting Chart (See page...position of Wall Console Vacation Lock Switch. Noisy operation • Ensure all fasteners are tightened. • Check that the garage door and Opener are in Safe-T-Beam® System Self-Diagnostic Troubleshooting Chart (See page 26). YELLOW ORANGE GREEN MOTOR SECONDARY GROUND 29 ...
.... (See Maintenance page 25). • WARNING: If you suspect a problem with garage door hardware or springs, contact a Genie Factory Authorized Dealer for service, or contact Customer Service at 1-800-35-GENIE. It must be in Safe-T-Beam® System Self-Diagnostic Troubleshooting Chart (See page...position of Wall Console Vacation Lock Switch. Noisy operation • Ensure all fasteners are tightened. • Check that the garage door and Opener are in Safe-T-Beam® System Self-Diagnostic Troubleshooting Chart (See page 26). YELLOW ORANGE GREEN MOTOR SECONDARY GROUND 29 ...


