
Owner's Manual
Page 1
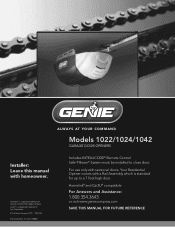
Car2U® is a registered trademark of Lear Corporation. © The Genie Company 2010. ALWAYS AT YOUR COMMAND Models 1022/1024/1042 GARAGE DOOR OPENERS Installer: Leave this manual with sectional doors. For use only with homeowner. X900-745 PN# 3642036534, 5/18/2011 REV.2 Includes INTELLICODE® Remote Control Safe-T-Beam® System must be installed to a 7 ...
Car2U® is a registered trademark of Lear Corporation. © The Genie Company 2010. ALWAYS AT YOUR COMMAND Models 1022/1024/1042 GARAGE DOOR OPENERS Installer: Leave this manual with sectional doors. For use only with homeowner. X900-745 PN# 3642036534, 5/18/2011 REV.2 Includes INTELLICODE® Remote Control Safe-T-Beam® System must be installed to a 7 ...
Owner's Manual
Page 2
...in death or serious injury. SAFETY INFORMATION OVERVIEW OF POTENTIAL HAZARDS READ THIS SAFETY INFORMATION Garage doors are large, heavy objects that has a broken spring. Do NOT allow children to...safety and the safety of others depend on the owner or user of opening while door is placed next to signal words and messages to be properly grounded. ... the information presented, contact The Genie Company or an authorized Genie® Dealer. This is used throughout this manual. WARNING indicates a potentially hazardous situation which door spring parts are fastened, such...
...in death or serious injury. SAFETY INFORMATION OVERVIEW OF POTENTIAL HAZARDS READ THIS SAFETY INFORMATION Garage doors are large, heavy objects that has a broken spring. Do NOT allow children to...safety and the safety of others depend on the owner or user of opening while door is placed next to signal words and messages to be properly grounded. ... the information presented, contact The Genie Company or an authorized Genie® Dealer. This is used throughout this manual. WARNING indicates a potentially hazardous situation which door spring parts are fastened, such...
Owner's Manual
Page 3
... . . . . 28 TRANSMITTER COMPLIANCE STATEMENT 29 WARRANTY 30 *Opener MUST be installed to close completely within 2 seconds of door. (Refer to allow manual opening . Puts an invisible beam across the door opening and closing door if it fails to Section 6.) Safe-T-Stop® Timed Reversed ... 25 WIRING DIAGRAM 26 TROUBLESHOOTING GUIDE - The door stops and reverses to section 3) and Car2U® compatible. OPENER 27 TROUBLESHOOTING GUIDE - Lighted Wall Console* Operates door opener from inside garage. (Refer to the full open position if anything passes through the beam. One...
... . . . . 28 TRANSMITTER COMPLIANCE STATEMENT 29 WARRANTY 30 *Opener MUST be installed to close completely within 2 seconds of door. (Refer to allow manual opening . Puts an invisible beam across the door opening and closing door if it fails to Section 6.) Safe-T-Stop® Timed Reversed ... 25 WIRING DIAGRAM 26 TROUBLESHOOTING GUIDE - The door stops and reverses to section 3) and Car2U® compatible. OPENER 27 TROUBLESHOOTING GUIDE - Lighted Wall Console* Operates door opener from inside garage. (Refer to the full open position if anything passes through the beam. One...

Owner's Manual
Page 6
...;s co f era de a c dena Fo low nst uct ons n he nsta la ion Manual for a sembly teps Proc der se on l s in sight. • If person is pinned, push control button or use door opener controls. •Always keep moving door in tru t ons s ipu ées da s le m nuel d nst l at east 5 eet.... • Never let ch ld walk or run under automatic garage door. Death or serious injury can be pinned under moving do.or. • Never let ch ld use emergency release. • Test door opener monthly: Re e to eve se doo epai o ep ace opene Do not emove o paint ove h s label Mount wa l cont ol...
...;s co f era de a c dena Fo low nst uct ons n he nsta la ion Manual for a sembly teps Proc der se on l s in sight. • If person is pinned, push control button or use door opener controls. •Always keep moving door in tru t ons s ipu ées da s le m nuel d nst l at east 5 eet.... • Never let ch ld walk or run under automatic garage door. Death or serious injury can be pinned under moving do.or. • Never let ch ld use emergency release. • Test door opener monthly: Re e to eve se doo epai o ep ace opene Do not emove o paint ove h s label Mount wa l cont ol...

Owner's Manual
Page 13
...header bracket using clevis pin and cotter pin (Fig. 2-5). • Support power head on the garage construction, extra framing material (not provided) which may attach directly to scale) NOTE: For header ...door's highest point of power head to prevent interference with header mounted (torsion) spring. Depending on step-ladder to following (Fig. 2-6). PN# 3642036534, 02/26/2010 REV. 1 13 Getting started. • Position assembled rail on floor under power head to header bracket (Fig. 2-4). - MOUNTING THE OPENER... nuts. • Carefully raise and lower door manually.
...header bracket using clevis pin and cotter pin (Fig. 2-5). • Support power head on the garage construction, extra framing material (not provided) which may attach directly to scale) NOTE: For header ...door's highest point of power head to prevent interference with header mounted (torsion) spring. Depending on step-ladder to following (Fig. 2-6). PN# 3642036534, 02/26/2010 REV. 1 13 Getting started. • Position assembled rail on floor under power head to header bracket (Fig. 2-4). - MOUNTING THE OPENER... nuts. • Carefully raise and lower door manually.
Owner's Manual
Page 16
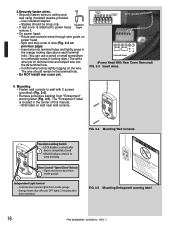
...Power Head With Rear Cover Removed) FIG. 3-3 Insert wires. 4. Open and closes door from 2 inside garage - Controls door opener lights from "Entrapment" warning label (Fig. 3-5). Insert wire into ...Open/Close" Button - 3.Securely fasten wires. • Securely fasten wires to wall with 2 screws (provided) (Fig. 3-4). • Remove protective backing from inside garage 3 Independent Light Control - Vacation Locking Switch - Use insulated staples. - Staples should remain in the center of wire (Fig. 3-2 on wall near wall console. Split and strip ends of this manual...
...Power Head With Rear Cover Removed) FIG. 3-3 Insert wires. 4. Open and closes door from 2 inside garage - Controls door opener lights from "Entrapment" warning label (Fig. 3-5). Insert wire into ...Open/Close" Button - 3.Securely fasten wires. • Securely fasten wires to wall with 2 screws (provided) (Fig. 3-4). • Remove protective backing from inside garage 3 Independent Light Control - Vacation Locking Switch - Use insulated staples. - Staples should remain in the center of wire (Fig. 3-2 on wall near wall console. Split and strip ends of this manual...

Owner's Manual
Page 20
... the ground. 4. Unless limits are : • Close Travel Limit, • Open Travel Limit, Maximum Closing Force Maximum Opening Force Transmitter Programming ENGAGE CHAIN/BELT CONNECTOR TO CARRIAGE 1. LED Indicator Light Open Open Set Limit Travel Limit Button Up Force OPEN Control Adjustment To Garage Door SET LEARN MANUAL LIMIT FORCE SET Learn Code CODE Button Close Travel Limit...
... the ground. 4. Unless limits are : • Close Travel Limit, • Open Travel Limit, Maximum Closing Force Maximum Opening Force Transmitter Programming ENGAGE CHAIN/BELT CONNECTOR TO CARRIAGE 1. LED Indicator Light Open Open Set Limit Travel Limit Button Up Force OPEN Control Adjustment To Garage Door SET LEARN MANUAL LIMIT FORCE SET Learn Code CODE Button Close Travel Limit...
Owner's Manual
Page 21
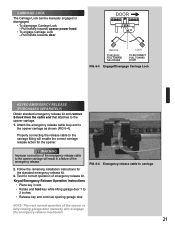
... end to carriage. Follow the remaining installation instructions for the opener. FIG. 6-4 Emergency release cable to the opener carriage as shown (FIG 6-4). Pull handle towards opener power head. • To engage Carriage Lock - NOTE: The next normal operation of the opener or fully closing garage door manually will enable the correct carriage release action for the standard...
... end to carriage. Follow the remaining installation instructions for the opener. FIG. 6-4 Emergency release cable to the opener carriage as shown (FIG 6-4). Pull handle towards opener power head. • To engage Carriage Lock - NOTE: The next normal operation of the opener or fully closing garage door manually will enable the correct carriage release action for the standard...

Owner's Manual
Page 23
... • Press remote control button again. - This equipment has been tested and found to comply with 1 door. To Garage Door SET LOST OR STOLEN REMOTE LEARN MANUAL LIMIT FORCE 1. To keep people and objects away from the missing remote control, or any signal received from...program a Homelink® and Car2U® device follow the Homelink® or Car2U® instructions in a residential installation. Your door opener will no guarantee that to provide reasonable protection against harmful interference in your local dealer. Single Button Remote Programming. Multi Button Remote ...
... • Press remote control button again. - This equipment has been tested and found to comply with 1 door. To Garage Door SET LOST OR STOLEN REMOTE LEARN MANUAL LIMIT FORCE 1. To keep people and objects away from the missing remote control, or any signal received from...program a Homelink® and Car2U® device follow the Homelink® or Car2U® instructions in a residential installation. Your door opener will no guarantee that to provide reasonable protection against harmful interference in your local dealer. Single Button Remote Programming. Multi Button Remote ...
Owner's Manual
Page 25
... garage door automatically or manually if door is improperly balanced or springs are capable of increasing the rate of door closure and increasing the risk of severe injury or death. Contact reverse. • Place a 2" x 4" board laid flat on contact with the door open. Safe-T-Beam® System. Opener still fails CONTACT THE GENIE COMPANY OR AN AUTHORIZED GENIE® DEALER. 3. Door...
... garage door automatically or manually if door is improperly balanced or springs are capable of increasing the rate of door closure and increasing the risk of severe injury or death. Contact reverse. • Place a 2" x 4" board laid flat on contact with the door open. Safe-T-Beam® System. Opener still fails CONTACT THE GENIE COMPANY OR AN AUTHORIZED GENIE® DEALER. 3. Door...


