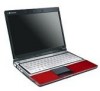
8512565 - Component Replacement Manual R1
Page 5
...Screw 13 Remove the bracket from CD or DVD" appears, press any key on your keyboard and follow the on the bottom of the notebook for important safety, regulatory, and legal information. © 2007 Gateway, Inc. Screw Screw 11 Using the plastic tab, slide the old hard drive, then ...2 12 Remove the four screws that secure the hard drive to boot from the old drive. All rights reserved. Gateway and eMachines are trademarks or registered trademarks of Gateway, Inc. Replacing the hard drive 10 Remove the two screws connecting the hard drive to insert your Drivers and Applications ...
8512565 - Component Replacement Manual R1
Page 6
...United States and other grounded object. 1 8 With a small Phillips screwdriver, remove the optional keyboard cover screw from the inside of their respective companies. See your notebook. Gateway and eMachines are extremely sensitive to use them in your Reference Guide for Customer Care Information. ...electrostatic discharge-sensitive components in a safe place. Before working with a K. To replace the keyboard: 1 Follow the guidelines under the left end of Gateway, Inc. Screw Important The keyboard screw hole is facing up. 10 Open the LCD panel to the fully opened position....
8512565 - Component Replacement Manual R1
Page 7
...into their respective companies. Press down until it is not twisted. 20 Gently press the keyboard down on the bottom of the notebook for important safety, regulatory, and legal information. © 2007 Gateway, Inc. Technical Support See the label on the cover in several places until it ...flat all peripheral devices and replace any other components. 2 19 Insert the tabs on the front edge of the keyboard into the slots under the palm rest. Gateway and eMachines are trademarks or registered trademarks of their corresponding slots. See your notebook over so the bottom is facing...
8512565 - Component Replacement Manual R1
Page 10
... Support See the label on your notebook over so the bottom is connected to release the keyboard retaining tabs located on the outside of antistatic bags because only the inside of Gateway, Inc. All rights reserved. All other brands and product names are extremely sensitive to a... trademarks or registered trademarks of the notebook for important safety, regulatory, and legal information. © 2007 Gateway, Inc. Avoid touching the edge connectors. Screw Important The keyboard screw hole is facing up. 10 Open the LCD panel to use them in your notebook and unplug...
8512565 - Component Replacement Manual R1
Page 11
... the bottom is connected to your notebook, then slide the cable out of the clips. Press down on the keyboard keys along the cover and find no loose spots. Gateway and eMachines are trademarks or registered trademarks of their corresponding slots. The cover is not twisted. 20 Gently press ...all the way across . You may need to press down on the front edge of Gateway, Inc. in place. The cover should easily fall into place. Replacing the Multimedia Keyboard Cover 15 Slowly rotate the keyboard toward the back of your notebook, insert the cable from your notebook. 16 Slide ...
8512919 - Gateway Notebook Reference Guide R2
Page 3
... 1: About This Reference 1 About this guide 2 Accessing your online User Guide 2 Gateway contact information 2 Contacting Gateway Customer Care 2 Gateway model and serial number 3 Microsoft Certificate of Authenticity 3 For more information 3 Chapter 2: Checking Out Your Notebook . . . . . 5 Front 6 Left 7 Right 9 Back 10 Bottom 11 Keyboard area 12 LCD panel 14 Chapter 3: Setting Up and Getting Started... your notebook 21 Waking up your notebook 23 Turning off your notebook 23 Restarting (rebooting) your notebook 24 Using the status indicators 25 Using the keyboard 26 i
8512919 - Gateway Notebook Reference Guide R2
Page 5
www.gateway.com Recalibrating the battery 68 Extending battery life 69 Maximizing battery performance 69 Conserving battery power 69 Using alternate power sources 70 Changing power modes ... frequency wireless connections 79 Files 79 Security 80 Power 81 Additional tips 81 Chapter 7: Maintaining Your Notebook . . . . . 83 Caring for your notebook 84 Cleaning your notebook 84 Cleaning the exterior 85 Cleaning the keyboard 85 Cleaning the notebook screen 85 Maintaining the battery 86 Storing batteries 86 Cleaning CDs or DVDs 87...
8512919 - Gateway Notebook Reference Guide R2
Page 6
... Diskette drive (external 115 Display 116 DVD drives 117 Ethernet 119 Express Cards 119 File management 119 Fingerprint reader 120 Hard drive 120 Internet 121 Keyboard 122 Media Center 123 Memory 126 Memory card reader 127 Modem (cable or DSL 127 Modem (dial-up 127 Mouse 130 Networks (wired 131 Networks... (wireless 133 Passwords 135 Power 135 Printer 136 Sound 137 Status indicators 137 Touchpad 138 Video 138 Telephone support 138 Before calling Gateway Customer Care 138 iv
8512919 - Gateway Notebook Reference Guide R2
Page 15
... the memory card reader" on page 59. Plug an HDMI device, such as a diskette drive, flash drive, printer, scanner, camera, keyboard, or mouse) into these ports. 7 Left Ethernet jack www.gateway.com Memory card reader HDMI out jack (optional) USB ports Ventilation fan Wireless network switch Express Card slot Component Ethernet jack...
8512919 - Gateway Notebook Reference Guide R2
Page 17
Plug a USB device (such as a diskette drive, flash drive, printer, scanner, camera, keyboard, or mouse) into this port. 9 For more information, see "Using the DVD drive" on page 52. Right www.gateway.com Component DVD drive USB port DVD drive Icon Description USB port Insert CDs or DVDs into this drive. To determine the type of drive in your notebook, examine the drive tray's plastic cover and compare the logo to those listed in "Identifying drive types" on page 52.
8512919 - Gateway Notebook Reference Guide R2
Page 20
...(optional) Use to turn the power on page 26. Touchpad Provides all the features of a full-sized, computer keyboard. For more information, see "Using the EZ Pad touchpad" on page 40. The panel includes a capacitive volume control. CHAPTER... 2: Checking Out Your Notebook Keyboard area Speaker Multimedia panel (optional) Power button Keyboard Speaker Status indicators Fingerprint reader Touchpad (optional) Component Icon Description Keyboard Provides all the functionality of a mouse. For more information on configuring ...
8512919 - Gateway Notebook Reference Guide R2
Page 21
For more information, see "Using the optional fingerprint reader" on page 25. 13 www.gateway.com Component Fingerprint reader (optional) Status indicators Icon Description Provides enhanced security. For more information, see "Using the status indicators" on page 31. Inform you when a drive is in use or when a button has been pressed that affects how the keyboard is used.
8512919 - Gateway Notebook Reference Guide R2
Page 23
... dial-up modem • Starting your notebook • Turning off your notebook • Restarting (rebooting) your notebook • Using the status indicators • Using the keyboard • Using the optional fingerprint reader • Using the EZ Pad touchpad • Using the optional multimedia panel • Using the optional webcam • Adjusting...
8512919 - Gateway Notebook Reference Guide R2
Page 24
... a safe and comfortable work area. Reducing eye strain Sunlight or bright indoor lighting should not reflect on your unprotected lap. Do not use an external keyboard, raise the notebook so the top of time. Instead, place your lap, a blanket, carpet, or a sofa. CHAPTER 3: Setting Up and Getting Started Working safely and...
8512919 - Gateway Notebook Reference Guide R2
Page 25
... chair helps you maintain good posture. • Select a flat surface for your computer desk. • Adjust the height of tasks. 17 www.gateway.com Setting up your computer desk and chair When you are setting up the work . • Take breaks to provide extra back support. You ...can use the keyboard and touchpad. Avoiding discomfort and injury from repetitive strain • Vary your activities to avoid excessive repetition. • Take breaks to change your ...
8512919 - Gateway Notebook Reference Guide R2
Page 30
... and turn on using Windows, see "Using Windows" and "Customizing Windows" in your notebook: 1 Lift the LCD panel. 2 Press the power button located above the keyboard. CHAPTER 3: Setting Up and Getting Started To start your online User Guide. 22 For more information on any peripheral devices, such as printers, scanners, and...
8512919 - Gateway Notebook Reference Guide R2
Page 32
... Started To turn off immediately, complete the following steps until the notebook turns off . Restarting (rebooting) your notebook If your notebook does not respond to keyboard, touchpad, or mouse input, you may have to turn off your notebook does not turn off your notebook: 1 Press CTRL+ALT+DEL. 2 Click Start Task...
8512919 - Gateway Notebook Reference Guide R2
Page 33
... . ■ LED blinking - Numeric keypad is turned off - Hard drive is used or when a button has been pressed that affects how the keyboard is not being accessed. 25 www.gateway.com Using the status indicators Important If none of the indicators are located below the touchpad. Status indicators inform you may need...
8512919 - Gateway Notebook Reference Guide R2
Page 34
... key FN key Application key Arrow keys Tip You can attach an external keyboard to connect a USB keyboard. 26 CHAPTER 3: Setting Up and Getting Started Using the keyboard Your notebook features a full-size keyboard that functions the same as a desktop computer keyboard. You do not need to shut down the notebook to the notebook using...
8512919 - Gateway Notebook Reference Guide R2
Page 35
..., or left. 27 This key can also be used in Windows. Press FN+ 1 to open utilities like F (Search utility), R (Run utility), and E (Computer window). www.gateway.com Key types The keyboard has several different types of a document. Application key Press this key to turn on .