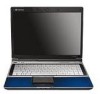
Gateway T-6836 Support Question
Gateway T-6836 Support Question
Find answers below for this question about Gateway T-6836 - Core 2 Duo GHz.Need a Gateway T-6836 manual? We have 4 online manuals for this item!
Question posted by Kasper on August 15th, 2011
Diagram Of All Screws To Remove And Replace Keyboard
need to replace keyboard
Current Answers
Answer #1: Posted by kcmjr on August 17th, 2011 8:47 AM
kcmjr

Member since:
May 5th, 2011 Points: 4,254,255

Member since:
May 5th, 2011 Points: 4,254,255
The component replacement manual can be downloaded from gateway: http://support.gateway.com/s/Manuals/Mobile/8512565.pdf
It covers keyboard replacement.
Licenses & Certifications: Microsoft, Cisco, VMware, Novell, FCC RF & Amateur Radio licensed.
Related Gateway T-6836 Manual Pages
8512149 - Gateway Notebook User Guide for Windows Vista - Page 109

... folders 11
Recycle Bin 6 deleting files and folders 11 emptying 12 recovering files and folders 11
removing files and folders 6, 11, 12, 19, 94
renaming files and folders 19
restoring files and...adding to desktop 8 closing programs 19 closing windows 19 copying 19 deleting files and folders 19 keyboard 19 pasting 19 renaming files and folders 19 selecting adjacent items in list 19 selecting items ...
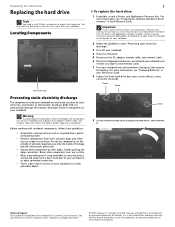
8512565 - Component Replacement Manual R1 - Page 3

... Components
1
8 Remove the screw that the DVD drive is facing up, then remove the battery.
Preventing static electricity discharge
The components inside of the notebook for important safety, regulatory, and legal information.
© 2007 Gateway, Inc. Do not lay components on your notebook.
Replacing the DVD drive
Replacing the DVD drive
Tools
You need a small Phillips...
8512565 - Component Replacement Manual R1 - Page 4
...recovery discs or a replacement hard drive with notebook components, follow these screws cannot be removed). Screw
Screw
Screw
9 Lift the hard drive bay cover using the thumb notch, then remove it to static ... static electricity discharge."
3 Turn off your notebook. Replacing the hard drive
Replacing the hard drive
Tools
You need the operating system disc that came with your notebook ...
8512565 - Component Replacement Manual R1 - Page 5
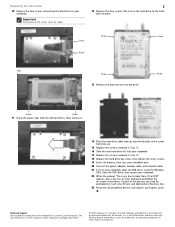
... Support See the label on the bottom of the screws varies by model.
2
12 Remove the four screws that secure the hard drive to your keyboard and follow the on your notebook. in Step 10.
18 Replace the hard drive bay cover, then tighten the cover screws.
19 Insert the battery, then turn your notebook over...
8512565 - Component Replacement Manual R1 - Page 6
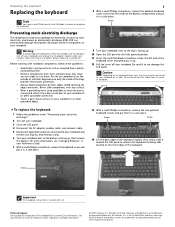
...keyboard cover screw from the cover or notebook.
Avoid touching the edge connectors. Never slide components over any Express and memory cards.
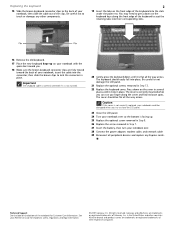
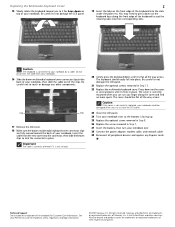
6 Turn your notebook and unplug the AC adapter, modem cable, and network cable and remove the battery before replacing... Batteries" in a safe place. Replacing the keyboard
Replacing the keyboard
Tools
You need a small Phillips and a small flat-blade screwdriver...
8512565 - Component Replacement Manual R1 - Page 7
... place. Clip
Clip
16 Remove the old keyboard.
17 Place the new keyboard keys-up . 25 Replace the optional screw removed in Step 8. 26 Replace the screw removed in Step 13. 22 Replace the keyboard cover. in place. Technical Support See the label on the keyboard keys along the cover and find no loose spots. You may need to press down on the...
8512565 - Component Replacement Manual R1 - Page 8
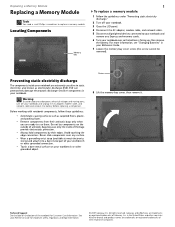
Replacing a Memory Module
Replacing a Memory Module
Tools
You need a small Phillips screwdriver to a bare metal part of the notebook for...the bags provide electrostatic protection.
• Always hold components by their respective companies. Screw
8 Lift the memory bay cover, then remove it to replace a memory module. For more information, see "Changing Batteries" in the United States...
8512565 - Component Replacement Manual R1 - Page 9
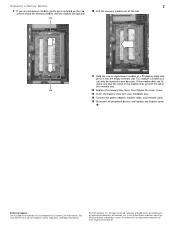
... the cover screw.
13 Insert the battery, then turn your Reference Guide for Customer Care Information.
All other countries. Clip
11 Hold the new or replacement module at ...other brands and product names are trademarks or registered trademarks of Gateway, Inc. Replacing a Memory Module
2
9 If you are removing a module, gently press outward on the bottom of the notebook for important ...
8512565 - Component Replacement Manual R1 - Page 10
...remove the keyboard screw and put it toward the LCD panel to use them in your notebook over so the top is facing up, then remove
the battery. Preventing static electricity discharge
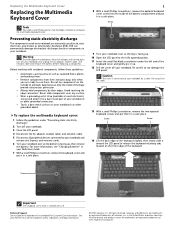
The components inside of Gateway, Inc. To replace the multimedia keyboard... discharge (ESD).
Replacing the Multimedia Keyboard Cover
Replacing the Multimedia Keyboard Cover
Tools
You need a small Phillips ...
8512565 - Component Replacement Manual R1 - Page 11
... Gateway, Inc. Technical Support See the label on the bottom of the keyboard to press down on the keyboard keys along the cover and find no loose spots. Be careful to not damage the LCD panel.
21 Replace the optional screws removed in place. Gateway and eMachines are fully moved toward you so it clicks...
8512565 - Component Replacement Manual R1 - Page 12
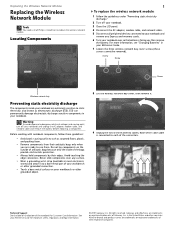
...facing up, then remove the battery. See your notebook. All rights reserved. Replacing the Wireless Network Module
Replacing the Wireless Network Module
Tools
You need a small Phillips screwdriver...connectors. Screw
Screw
Screw
Wireless network bay
Preventing static electricity discharge
The components inside of their antistatic bags only when you are extremely sensitive to replace the ...
8512565 - Component Replacement Manual R1 - Page 13
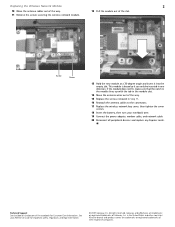
... the wireless network module.
12 Pull the module out of the way.
15 Replace the screws removed in Step 11.
16 Reattach the antenna cables to the connectors.
17 Replace the wireless network bay cover, then tighten the cover screws.
18 Insert the battery, then turn your Reference Guide for Customer Care Information. This module...
8513068 - Gateway Notebook Hardware Reference R3 - Page 5
...Notebook . . . . . 83
Caring for your notebook 84 Cleaning your notebook 84
Cleaning the exterior 85 Cleaning the keyboard 85 Cleaning the notebook screen 85 Maintaining the battery 86 Storing batteries 86 Cleaning CDs or DVDs 87 Recovering your system ...
Chapter 8: Upgrading Your Notebook . . . . . 101
Preventing static electricity discharge 102 Adding or replacing memory modules 103
iii
8513068 - Gateway Notebook Hardware Reference R3 - Page 6

Contents
Replacing the hard drive kit 107
Chapter 9: Troubleshooting 113
Safety guidelines 114 First steps 114 Troubleshooting 115
Audio 115 Battery 115 CD drives 115 Diskette drive (external 115 Display 116 DVD drives 117 Ethernet 119 Express Cards 119 File management 119 Fingerprint reader 120 Hard drive 120 Internet 121 Keyboard 122 Media...
8513068 - Gateway Notebook Hardware Reference R3 - Page 32

...next to the lock icon, then
click Restart.
To restart your notebook. Unplug the power cord and remove the battery for about five seconds, then release it . 2. The notebook turns off , then turns... CHAPTER 3: Setting Up and Getting Started
To turn off your notebook does not respond to keyboard, touchpad, or mouse input, you may have to close unresponsive programs on again. Important
...
8513068 - Gateway Notebook Hardware Reference R3 - Page 93

... Cleaning the keyboard
You should clean the keyboard occasionally by your notebook. Let the liquid drain, then let the keyboard dry before trying to replace it again. A replacement keyboard may need to use ...the exception of your notebook and other peripherals before cleaning any components. Also, remove the battery before cleaning any components.
Do not use it . If you ...
8513068 - Gateway Notebook Hardware Reference R3 - Page 118
Screw
Screw
Screw
Screw
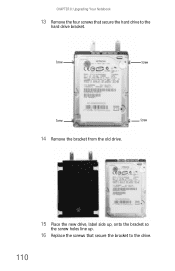
14 Remove the bracket from the old drive.
15 Place the new drive, label side up, onto the bracket so
the screw holes line up.
16 Replace the screws that secure the hard drive to the drive.
110 CHAPTER 8: Upgrading Your Notebook
13 Remove the four screws that secure the bracket to the
hard drive bracket.
8513068 - Gateway Notebook Hardware Reference R3 - Page 119

... drive kit into your notebook, then
replace the screws that secure the hard drive kit to the notebook.
18 Replace the hard drive bay cover, then tighten the cover
screws.
19 Insert the battery, then turn... prompt "Press any key to insert your keyboard and follow the on your Drivers and Applications Recovery disc.
23 Reconnect all peripheral devices and replace any key on -screen instructions.
8513068 - Gateway Notebook Hardware Reference R3 - Page 122
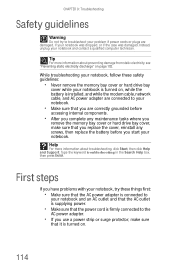
...Safety guidelines
Warning
Do not try these safety guidelines:
• Never remove the memory bay cover or hard drive bay
cover while your notebook is...accessing internal components.
• After you complete any screws, then replace the battery before you
remove the memory bay cover or hard drive bay cover, make sure
that you replace the cover, reinstall any maintenance tasks where you ...
8513068 - Gateway Notebook Hardware Reference R3 - Page 163
...See connections
K
Kensington cable lock 80 lock slot 10
key combinations 28
keyboard buttons 26 cleaning 85 connecting 26 features 26 keys 26 locating 12 ...See memory card reader
memory bay 11 installing 103 removing 103 replacing 103 troubleshooting 126
memory card reader inserting card 56 locating 7 memory cards supported 55 removing card 56 troubleshooting 127 using 55
microphone built-in ...
Similar Questions

What Screw Need To Be Removed Replacing Gateway Nv55c Keyboard
(Posted by jar41samira 9 years ago)

I Need Instructions On How To Remove/replace Keyboard Gateway Nv77h18u
Some keys are working intermittently and I want to replace the keyboard and cant find correct instru...
Some keys are working intermittently and I want to replace the keyboard and cant find correct instru...
(Posted by makir1 10 years ago)


Soon After Replacing Th Screen, The Speakers Started Going Out. R The 2 Related?
I bought this laptop about a year ago, and accidentally closed the lid on my earphones. Broke the ...
I bought this laptop about a year ago, and accidentally closed the lid on my earphones. Broke the ...
(Posted by littledb 11 years ago)
Removing A Keyboard
How to I take a keyboard out of a Gateway nv53a61U?
How to I take a keyboard out of a Gateway nv53a61U?
(Posted by scottw623 12 years ago)