
User Manual
Page 3
Contents Introduction 1 Apex80 Features 1 About This Manual 2 Where to Get Help 2 Chapter 1 Setting Up Identifying Printer Parts 1-1 Selecting a Place for the Printer 1-2 Installing the Paper Feed Knob 1-3 Installing the Ribbon 1-3 Replacing the Ribbon 1-6 Plugging in the Printer 1-7 Using Continuous-feed Paper 1-7 Using Single-sheet Paper 1-15 Operating the Control Panel 1-19 Connecting the Apex80 to Your...
Contents Introduction 1 Apex80 Features 1 About This Manual 2 Where to Get Help 2 Chapter 1 Setting Up Identifying Printer Parts 1-1 Selecting a Place for the Printer 1-2 Installing the Paper Feed Knob 1-3 Installing the Ribbon 1-3 Replacing the Ribbon 1-6 Plugging in the Printer 1-7 Using Continuous-feed Paper 1-7 Using Single-sheet Paper 1-15 Operating the Control Panel 1-19 Connecting the Apex80 to Your...

User Manual
Page 6
...second in pica and 180 in elite. Introduction 1 Introduction The Epson Apex80 printer combines low price with the control panel. l A ribbon cassette for charts, diagrams, and illustrations. l Easy paper loading. l The Epson Character Graphics set, which includes character graphics that are used on .... l Near Letter Quality (NLQ) mode for quick printing. When you have perfected a document, you can switch to expect from Epson printers, the Apex80 offers the following: l Draft mode for top quality printing. The speed of print styles, including emphasized, double-strike,...
...second in pica and 180 in elite. Introduction 1 Introduction The Epson Apex80 printer combines low price with the control panel. l A ribbon cassette for charts, diagrams, and illustrations. l Easy paper loading. l The Epson Character Graphics set, which includes character graphics that are used on .... l Near Letter Quality (NLQ) mode for quick printing. When you have perfected a document, you can switch to expect from Epson printers, the Apex80 offers the following: l Draft mode for top quality printing. The speed of print styles, including emphasized, double-strike,...

User Manual
Page 7
...the back of your Apex80 printer, just call the 800 number for the location of the manual is a pull-out Quick Reference card containing the information you need most. To purchase accessories such as ribbons and option cards, check with your nearest Epson Service Center. The appendixes ...contain reference information, including all the details you need to use any of the printer's commands, and some advice on setting up your dealer. ...
...the back of your Apex80 printer, just call the 800 number for the location of the manual is a pull-out Quick Reference card containing the information you need most. To purchase accessories such as ribbons and option cards, check with your nearest Epson Service Center. The appendixes ...contain reference information, including all the details you need to use any of the printer's commands, and some advice on setting up your dealer. ...

User Manual
Page 10
... first step in setting it fits over the shaft. Paper feed knob installation 3. Installing the Ribbon The Apex80 printer uses a continuous-loop, inked fabric ribbon. It is flush with the printer case. Setting Up 1-3 Figure I-2. Insert the knob into an indentation in Figure 1-2. Locate the paper feed ...paper feed knob. Installing the Paper Feed Knob Now that makes ribbon installation and replacement a clean and easy job. Push the knob in until it up is packed into the hole on the right side of the printer, as shown in the white foam material. 2. Follow these steps...
... first step in setting it fits over the shaft. Paper feed knob installation 3. Installing the Ribbon The Apex80 printer uses a continuous-loop, inked fabric ribbon. It is flush with the printer case. Setting Up 1-3 Figure I-2. Insert the knob into an indentation in Figure 1-2. Locate the paper feed ...paper feed knob. Installing the Paper Feed Knob Now that makes ribbon installation and replacement a clean and easy job. Push the knob in until it up is packed into the hole on the right side of the printer, as shown in the white foam material. 2. Follow these steps...

User Manual
Page 11
Grasp the ribbon cartridge by its handle and hold the cartridge so that the other parts of the printer will not get in Figure 1-3. Also, if you've been using your printer, be off when you move the print head because moving the print head when the power is facing away from you to... see the print head, which is shown in your printer. Figure 1-3. Print head Caution The power must be careful not to touch the print head because it cool for a few minutes. 2. Move the print head by lifting the handles. To install the ribbon, follow these steps: 1. Remove the lid at the front...
Grasp the ribbon cartridge by its handle and hold the cartridge so that the other parts of the printer will not get in Figure 1-3. Also, if you've been using your printer, be off when you move the print head because moving the print head when the power is facing away from you to... see the print head, which is shown in your printer. Figure 1-3. Print head Caution The power must be careful not to touch the print head because it cool for a few minutes. 2. Move the print head by lifting the handles. To install the ribbon, follow these steps: 1. Remove the lid at the front...

User Manual
Page 12
...proper place between the print head and the ribbon guide. (See the figure on the ribbon cartridge itself.) You may want to use a pencil to tighten the ribbon. Ribbon cartridge installation 5. Turn the knob on each side of the arrow to direct the ribbon, as shown in the right and left front... corners. 4. Insert the cartridge by placing the black hooks on the cartridge in the direction of the cartridge into the slots located inside the printer ...
...proper place between the print head and the ribbon guide. (See the figure on the ribbon cartridge itself.) You may want to use a pencil to tighten the ribbon. Ribbon cartridge installation 5. Turn the knob on each side of the arrow to direct the ribbon, as shown in the right and left front... corners. 4. Insert the cartridge by placing the black hooks on the cartridge in the direction of the cartridge into the slots located inside the printer ...
User Manual
Page 13
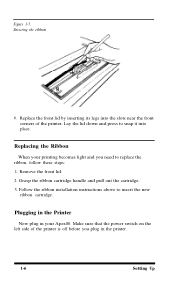
...switch on the left side of the printer. Figure 1-5. Follow the ribbon installation instructions above to snap it into the slots near the front corners of the printer is off before you need to replace the ribbon, follow these steps: 1. Directing the ribbon 6. Replace the front lid by ...inserting its legs into place. Replacing the Ribbon When your printing becomes light and you plug in your...
...switch on the left side of the printer. Figure 1-5. Follow the ribbon installation instructions above to snap it into the slots near the front corners of the printer is off before you need to replace the ribbon, follow these steps: 1. Directing the ribbon 6. Replace the front lid by ...inserting its legs into place. Replacing the Ribbon When your printing becomes light and you plug in your...

User Manual
Page 19
... different positions depending on the back of the paper guide, as shown in Figure 1-13. Pull the paper up until it comes up between the ribbon guide and the platen. 8. Note that the paper has no dips or wrinkles, then push the locking lever back to match the width of paper...
... different positions depending on the back of the paper guide, as shown in Figure 1-13. Pull the paper up until it comes up between the ribbon guide and the platen. 8. Note that the paper has no dips or wrinkles, then push the locking lever back to match the width of paper...

User Manual
Page 21
... too low on the page or is printing on your top of form setting is just below the top of the ribbon, 2. Your printer should rest atop the paper entering the printer, separating it to move to set up as shown in the slots, lean the guide all the way back. Setting top... guide should now be set the top of form setting and uses it when any program tells it from paper exiting the printer. Now replace the front lid. The printer with continuous-feed paper When you later find that your Apex80, it remembers this top of form position. If you turn on...
... too low on the page or is printing on your top of form setting is just below the top of the ribbon, 2. Your printer should rest atop the paper entering the printer, separating it to move to set up as shown in the slots, lean the guide all the way back. Setting top... guide should now be set the top of form setting and uses it when any program tells it from paper exiting the printer. Now replace the front lid. The printer with continuous-feed paper When you later find that your Apex80, it remembers this top of form position. If you turn on...

User Manual
Page 61
... the other hand, you need to know a little about dot graphics is how to produce a small dot. Each time a pin fires, it strikes the inked ribbon and presses it moves across the paper, the pins fire time after time in different patterns to produce letters, numbers, or symbols. 6.2 Introduction to fire.
... the other hand, you need to know a little about dot graphics is how to produce a small dot. Each time a pin fires, it strikes the inked ribbon and presses it moves across the paper, the pins fire time after time in different patterns to produce letters, numbers, or symbols. 6.2 Introduction to fire.

User Manual
Page 113
... print This can usually be replaced. Cancel emphasized mode; Cancel NLQ mode: it has priority over condensed. If that the ribbon is seated correctly If you have been using the ribbon for a long time or for long periods at the end of DIP switches 1-6 to 1-8. If they are graphics characters,...page. Horizontal tabs don't work Set margins before tabs, not after. It is also possible for the print head to wear out if the printer is correctly installed and that you have correctly set according to be corrected by changing the setting of the tabs on replacing the print head...
... print This can usually be replaced. Cancel emphasized mode; Cancel NLQ mode: it has priority over condensed. If that the ribbon is seated correctly If you have been using the ribbon for a long time or for long periods at the end of DIP switches 1-6 to 1-8. If they are graphics characters,...page. Horizontal tabs don't work Set margins before tabs, not after. It is also possible for the print head to wear out if the printer is correctly installed and that you have correctly set according to be corrected by changing the setting of the tabs on replacing the print head...
User Manual
Page 121
... alcohol or a thinner to change the ribbon or load continuous paper, turn the printer off and wait for information on the print head should last about 200 million strokes. Do not spray the inside of the pins may fire erratically or stop using the printer and obtain a replacement head; When the...with oil: unsuitable oils can damage the mechanism. Each pin on where to purchase one or more of the printer with the print head. either see your dealer or call the toll-free Epson number: 1-800421-5426. The catalog number is needed, call the 800 number for a few minutes while the...
... alcohol or a thinner to change the ribbon or load continuous paper, turn the printer off and wait for information on the print head should last about 200 million strokes. Do not spray the inside of the pins may fire erratically or stop using the printer and obtain a replacement head; When the...with oil: unsuitable oils can damage the mechanism. Each pin on where to purchase one or more of the printer with the print head. either see your dealer or call the toll-free Epson number: 1-800421-5426. The catalog number is needed, call the 800 number for a few minutes while the...

User Manual
Page 130
...interface, you must remove the printer's cover. Turn off the power to both the printer and the computer and unplug the power cable and disconnect the interface cable from the bottom. Remove the ribbon. 5. WARNING Do not remove the cover unless the printer is turned OFF and disconnected... because high voltages are present inside the printer when the power is installed. 4. To remove the upper case of the printer, insert a blade screwdriver into each ...
...interface, you must remove the printer's cover. Turn off the power to both the printer and the computer and unplug the power cable and disconnect the interface cable from the bottom. Remove the ribbon. 5. WARNING Do not remove the cover unless the printer is turned OFF and disconnected... because high voltages are present inside the printer when the power is installed. 4. To remove the upper case of the printer, insert a blade screwdriver into each ...

User Manual
Page 138
..., black #8750 (uses the same ribbon as the Epson LX-800 and FX printers) Life expectancy (in characters, at 14 dots/character): 3 million MCBF 3 million lines (excluding the print head) MTBF 4,000 hours Print head life 200 million strokes ...
..., black #8750 (uses the same ribbon as the Epson LX-800 and FX printers) Life expectancy (in characters, at 14 dots/character): 3 million MCBF 3 million lines (excluding the print head) MTBF 4,000 hours Print head life 200 million strokes ...

User Manual
Page 144
... tables L Lights, indicator. See Interface, parallel Pica, 4-2 Pin feed holders, 1-11-12 Pitch, 4-2 POWER light, 1-20 Printer commands, 2-2-7. See Continuous-feed paper or Single-sheet paper Paper feed knob, 1-1, 1-3 Paper guide, 1-7, 1-12-14, 1-15...1-9, 1-17 Paper rest, 1-7-8 Paper thickness lever, 1-19 Parallel interface. See also Commands Printer selection menu, 2-1-2 Print head, 1-4,6-2-3, C-10-13 Problem-solving, C-1-9 Programming languages, 2-6-7 R READY light, 1-20 Ribbon, 1-3-6 Ribbon guide, 1-5 Roman 1-21, 4-1 Index- 2 Index See International character sets FORM FEED ...
... tables L Lights, indicator. See Interface, parallel Pica, 4-2 Pin feed holders, 1-11-12 Pitch, 4-2 POWER light, 1-20 Printer commands, 2-2-7. See Continuous-feed paper or Single-sheet paper Paper feed knob, 1-1, 1-3 Paper guide, 1-7, 1-12-14, 1-15...1-9, 1-17 Paper rest, 1-7-8 Paper thickness lever, 1-19 Parallel interface. See also Commands Printer selection menu, 2-1-2 Print head, 1-4,6-2-3, C-10-13 Problem-solving, C-1-9 Programming languages, 2-6-7 R READY light, 1-20 Ribbon, 1-3-6 Ribbon guide, 1-5 Roman 1-21, 4-1 Index- 2 Index See International character sets FORM FEED ...


