
User Manual
Page 2
...-P7000 9 Attaching the paper basket (SC-P8000/SC-P9000 16 Installing the optional internal print server 24 Completing setup and connecting the power cord 26 Installing ink ...29 Loading roll paper ...33 Placing roll paper in the printer 33 Loading roll paper for printing 39 Aligning the print head ...40 Connecting to your system ...41...
...-P7000 9 Attaching the paper basket (SC-P8000/SC-P9000 16 Installing the optional internal print server 24 Completing setup and connecting the power cord 26 Installing ink ...29 Loading roll paper ...33 Placing roll paper in the printer 33 Loading roll paper for printing 39 Aligning the print head ...40 Connecting to your system ...41...
User Manual
Page 30
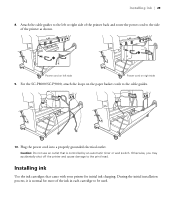
... the power cord to the side of the ink in each cartridge to the left side Power cord on the paper basket cords to the print head. Plug the power cord into a properly grounded electrical outlet. Installing ink | 29 8. Otherwise, you may accidentally shut off the printer and cause damage ...to the cable guides. 10. For the SC-P8000/SC-P9000, attach the loops on right side 9. Installing ink Use the ink cartridges that is normal for initial ink charging. Caution: Do not use...
... the power cord to the side of the ink in each cartridge to the left side Power cord on the paper basket cords to the print head. Plug the power cord into a properly grounded electrical outlet. Installing ink | 29 8. Otherwise, you may accidentally shut off the printer and cause damage ...to the cable guides. 10. For the SC-P8000/SC-P9000, attach the loops on right side 9. Installing ink Use the ink cartridges that is normal for initial ink charging. Caution: Do not use...

User Manual
Page 41
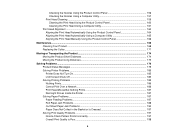
...appears on the printer. 2. Press the u or d button to select Bi-D All Color. Press the OK button to align the print head. The printer's white beam sensor reads the alignment pattern and adjusts the printer automatically. If banding appears on paper handling. Press the ... during this procedure with the included Epson Doubleweight Matte paper. You should start the alignment process 8. Make sure you are correct, or select Change Settings, then adjust the settings. 6. Aligning the print head Properly aligning the print head ensures the best print quality. Press the r Menu button...
...appears on the printer. 2. Press the u or d button to select Bi-D All Color. Press the OK button to align the print head. The printer's white beam sensor reads the alignment pattern and adjusts the printer automatically. If banding appears on paper handling. Press the ... during this procedure with the included Epson Doubleweight Matte paper. You should start the alignment process 8. Make sure you are correct, or select Change Settings, then adjust the settings. 6. Aligning the print head Properly aligning the print head ensures the best print quality. Press the r Menu button...

User Manual
Page 5
...145 Purchase Epson Ink Cartridges...146 Ink Cartridge and Maintenance Box Part Numbers 146 Removing and Installing Ink Cartridges 148 Replacing Maintenance Boxes...151 Switch Black Ink Type ...153 Switching the Black Ink Type...154 Black Ink Type Media List...154 Adjusting Print Quality...156 Print Head Maintenance...156 Print Head Nozzle ...Check...156 5 OS X 125 Sizing Printed Images - OS X 128 Checking...
...145 Purchase Epson Ink Cartridges...146 Ink Cartridge and Maintenance Box Part Numbers 146 Removing and Installing Ink Cartridges 148 Replacing Maintenance Boxes...151 Switch Black Ink Type ...153 Switching the Black Ink Type...154 Black Ink Type Media List...154 Adjusting Print Quality...156 Print Head Maintenance...156 Print Head Nozzle ...Check...156 5 OS X 125 Sizing Printed Images - OS X 128 Checking...
User Manual
Page 6
... Print Head Cleaning ...159 Cleaning the Print Head Using the Product Control Panel 160 Cleaning the Print Head Using a Computer Utility 161 Print Head Alignment ...163 Aligning the Print Head Automatically Using the Product Control Panel 164 Aligning the Print Head Automatically Using a Computer Utility 165 Aligning the Print Head... Does Not Turn On ...185 LCD Screen Shuts Off ...185 Solving Printing Problems ...185 Nothing Prints ...186 Cannot Print Over a Network...186 Print Head Moves But Nothing Prints 187 Red Light Shines Inside the Printer 187 Solving Paper Problems...187 Paper...
... Print Head Cleaning ...159 Cleaning the Print Head Using the Product Control Panel 160 Cleaning the Print Head Using a Computer Utility 161 Print Head Alignment ...163 Aligning the Print Head Automatically Using the Product Control Panel 164 Aligning the Print Head Automatically Using a Computer Utility 165 Aligning the Print Head... Does Not Turn On ...185 LCD Screen Shuts Off ...185 Solving Printing Problems ...185 Nothing Prints ...186 Cannot Print Over a Network...186 Print Head Moves But Nothing Prints 187 Red Light Shines Inside the Printer 187 Solving Paper Problems...187 Paper...
User Manual
Page 10
... in the Documentation Printer Part Locations Printer Features The Epson SureColor P6000/P7000/P8000/P9000 Series printers include these sections to learn more about your printer and this manual. Introduction to Your Printer Refer to these special features: High productivity • Precise Piezo-based print head capable of 8 or 10 channels with 360 nozzles...
... in the Documentation Printer Part Locations Printer Features The Epson SureColor P6000/P7000/P8000/P9000 Series printers include these sections to learn more about your printer and this manual. Introduction to Your Printer Refer to these special features: High productivity • Precise Piezo-based print head capable of 8 or 10 channels with 360 nozzles...

User Manual
Page 40
Parent topic: Cut Sheet Handling Related references Available Epson Papers Paper Specifications Related tasks Storing the Paper Basket Adjusting the Platen Gap If the print quality is flat. If that doesn't solve the problem, try changing the Platen Gap setting to select Printer Setup and press the right arrow... very thin or very thick media, you notice scuffs on the first few inches of your prints, this is caused by paper curl and print head strikes. You can lead to excess paper curl and cause damage to Wider. 1. Press the down arrow to adjust the Platen Gap setting. ...
Parent topic: Cut Sheet Handling Related references Available Epson Papers Paper Specifications Related tasks Storing the Paper Basket Adjusting the Platen Gap If the print quality is flat. If that doesn't solve the problem, try changing the Platen Gap setting to select Printer Setup and press the right arrow... very thin or very thick media, you notice scuffs on the first few inches of your prints, this is caused by paper curl and print head strikes. You can lead to excess paper curl and cause damage to Wider. 1. Press the down arrow to adjust the Platen Gap setting. ...

User Manual
Page 56
... or paper that you want to configure in printing on Epson Doubleweight Matte Paper. 1. Raise the rear of paper that is not supported by the Epson print driver. Note: Custom paper configurations are based the existing Uni-D and Bi-D print head alignment. Load the type of the basket (SC-P8000/SC-P9000). Select a number for use in...
... or paper that you want to configure in printing on Epson Doubleweight Matte Paper. 1. Raise the rear of paper that is not supported by the Epson print driver. Note: Custom paper configurations are based the existing Uni-D and Bi-D print head alignment. Load the type of the basket (SC-P8000/SC-P9000). Select a number for use in...
User Manual
Page 84
... choose other popular presets such as the Mode setting, then click Advanced and select any portion of your print. Platen Gap Adjusts the distance from the paper to the print head. (Use a wider setting if you are seeing edge marks or scuffs on any of your image. ... ink). Brightness Adjusts the overall lightness and darkness of the print head. Parent topic: Selecting Basic Print Settings - Color Toning Adds tone (hue) to compensate for the SureColor P7000 and P9000 Commercial Edition printers (configured with non-Epson media and avoid smearing the ink. Note that the presets ...
... choose other popular presets such as the Mode setting, then click Advanced and select any portion of your print. Platen Gap Adjusts the distance from the paper to the print head. (Use a wider setting if you are seeing edge marks or scuffs on any of your image. ... ink). Brightness Adjusts the overall lightness and darkness of the print head. Parent topic: Selecting Basic Print Settings - Color Toning Adds tone (hue) to compensate for the SureColor P7000 and P9000 Commercial Edition printers (configured with non-Epson media and avoid smearing the ink. Note that the presets ...

User Manual
Page 100
You see a window like this: 4. Select any of the following options, as necessary: • Nozzle Check to print a nozzle check pattern to check whether the print head nozzles are clogged. • Head Cleaning to clean the print head if you notice banding or gaps in your printouts. • Print Head Alignment to align the print head if printouts appear grainy or out of focus. • Epson Status Monitor 3 to check the printer's status. 100
You see a window like this: 4. Select any of the following options, as necessary: • Nozzle Check to print a nozzle check pattern to check whether the print head nozzles are clogged. • Head Cleaning to clean the print head if you notice banding or gaps in your printouts. • Print Head Alignment to align the print head if printouts appear grainy or out of focus. • Epson Status Monitor 3 to check the printer's status. 100
User Manual
Page 101
... Checking the Nozzles Using a Computer Utility Cleaning the Print Head Using a Computer Utility Aligning the Print Head Automatically Using a Computer Utility Printing Your Document or Photo - This option is available only if the Epson Color Calibration Utility is installed. • Epson Color Calibration Utility to save your settings and print. 1. Click OK to close the printer software window...
... Checking the Nozzles Using a Computer Utility Cleaning the Print Head Using a Computer Utility Aligning the Print Head Automatically Using a Computer Utility Printing Your Document or Photo - This option is available only if the Epson Color Calibration Utility is installed. • Epson Color Calibration Utility to save your settings and print. 1. Click OK to close the printer software window...

User Manual
Page 124
..., such as drafting paper or backlight film. Drying Time per Print Head Pass Pauses print head movement for banding in the direction of the paper feeding to the print head. (Use a wider setting if you print with non-Epson media and avoid smearing the ink. Color Density Adjusts the ink... saturation level. OS X Selecting Print Layout Options - Paper Feed Adjustment Modifies the speed of the print head. Platen Gap Adjusts the distance...
..., such as drafting paper or backlight film. Drying Time per Print Head Pass Pauses print head movement for banding in the direction of the paper feeding to the print head. (Use a wider setting if you print with non-Epson media and avoid smearing the ink. Color Density Adjusts the ink... saturation level. OS X Selecting Print Layout Options - Paper Feed Adjustment Modifies the speed of the print head. Platen Gap Adjusts the distance...

User Manual
Page 131
...specified location on the nozzle check pattern. Lets you align the print head when print results are still clogged, select the Heavy cleaning. Various Bi-D settings: when printing in cutter. Select the Normal cleaning first. If head alignment with this setting does not correct the problem, select ...Replace Cutter Parent topic: Using the Control Panel Menus Related tasks Checking the Nozzles Using the Product Control Panel Cleaning the Print Head Using the Product Control Panel 131 Description Prints a nozzle check pattern in pairs of 0.039 inch (1 mm) from -0.12 to 0.12 inch (-3 to 3...
...specified location on the nozzle check pattern. Lets you align the print head when print results are still clogged, select the Heavy cleaning. Various Bi-D settings: when printing in cutter. Select the Normal cleaning first. If head alignment with this setting does not correct the problem, select ...Replace Cutter Parent topic: Using the Control Panel Menus Related tasks Checking the Nozzles Using the Product Control Panel Cleaning the Print Head Using the Product Control Panel 131 Description Prints a nozzle check pattern in pairs of 0.039 inch (1 mm) from -0.12 to 0.12 inch (-3 to 3...

User Manual
Page 132
...Photo Paper Proofing Paper Fine Art Paper Matte Paper Plain Paper Others Custom Paper - - Aligning the Print Head Automatically Using the Product Control Panel Aligning the Print Head Manually Using the Product Control Panel Replacing the Cutter Paper Menu Settings The Paper menu lets you ...modify settings for the current paper, or create and customize paper configurations for the loaded media. Remaining Setup Set Length Set Alert Length Description Select the loaded Epson...
...Photo Paper Proofing Paper Fine Art Paper Matte Paper Plain Paper Others Custom Paper - - Aligning the Print Head Automatically Using the Product Control Panel Aligning the Print Head Manually Using the Product Control Panel Replacing the Cutter Paper Menu Settings The Paper menu lets you ...modify settings for the current paper, or create and customize paper configurations for the loaded media. Remaining Setup Set Length Set Alert Length Description Select the loaded Epson...

User Manual
Page 134
Caution: To avoid damaging the printer, do not select the Narrow setting when loading thick media. Lets you print patterns that you can use to determine the thickness of paper that is closest to the paper for most media. Standard: select for which you ... if printouts are creating a custom paper configuration: Photo Paper Matte Paper Plain Paper Others No Paper Selected Adjusts the gap between the media and the print head. Narrow: select if head alignment does not completely align the...
Caution: To avoid damaging the printer, do not select the Narrow setting when loading thick media. Lets you print patterns that you can use to determine the thickness of paper that is closest to the paper for most media. Standard: select for which you ... if printouts are creating a custom paper configuration: Photo Paper Matte Paper Plain Paper Others No Paper Selected Adjusts the gap between the media and the print head. Narrow: select if head alignment does not completely align the...

User Manual
Page 135
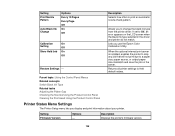
... does not feed correctly, you may need to resolve banding issues even after head cleaning and alignment. Lets you adjust the paper tension. Lets you enter a name up to increase the drying time per pass. If print quality is blurring on the paper, you may need to 22 characters for ... adjustment pattern that you adjust the amount of time the head pauses between each row: Paper Suction Drying Time Per Pass Roll Paper Tension Remove Skew Setting Name Restore Settings Value: lets you choose an adjustment between the print head and thin or soft paper. Lets you can use to their ...
... does not feed correctly, you may need to resolve banding issues even after head cleaning and alignment. Lets you adjust the paper tension. Lets you enter a name up to increase the drying time per pass. If print quality is blurring on the paper, you may need to 22 characters for ... adjustment pattern that you adjust the amount of time the head pauses between each row: Paper Suction Drying Time Per Pass Roll Paper Tension Remove Skew Setting Name Restore Settings Value: lets you choose an adjustment between the print head and thin or soft paper. Lets you can use to their ...

User Manual
Page 136
... Narrow Standard Wide Wider Widest Description Adjusts the gap between the media and the print head. Standard: select for most media. Narrow: select if head alignment does not completely align the print head. Wide, Wider, or Widest: select if printouts are smeared. Caution: To ...avoid damaging the printer, do not select the Narrow setting when loading thick media. 136 Parent topic: Using the Control Panel Menus Related references Available Epson...
... Narrow Standard Wide Wider Widest Description Adjusts the gap between the media and the print head. Standard: select for most media. Narrow: select if head alignment does not completely align the print head. Wide, Wider, or Widest: select if printouts are smeared. Caution: To ...avoid damaging the printer, do not select the Narrow setting when loading thick media. 136 Parent topic: Using the Control Panel Menus Related references Available Epson...

User Manual
Page 137
.... Caution: Disabling this setting turned on or woken from sleep mode and the printer has not printed within the set length of the loaded media and may clean the print head) when you reload paper. Changed settings take effect when you switch between black inks and after ... Periodically Every Job Off Auto Clean Max 1 to 3 Repeat Timer Cleaning Various settings Off 137 Description Automatically detects the width of automatic print head cleanings the printer performs when clogged nozzles are detected. Turn off this setting only if the printer displays a paper setting error when media...
.... Caution: Disabling this setting turned on or woken from sleep mode and the printer has not printed within the set length of the loaded media and may clean the print head) when you reload paper. Changed settings take effect when you switch between black inks and after ... Periodically Every Job Off Auto Clean Max 1 to 3 Repeat Timer Cleaning Various settings Off 137 Description Automatically detects the width of automatic print head cleanings the printer performs when clogged nozzles are detected. Turn off this setting only if the printer displays a paper setting error when media...
User Manual
Page 138
... Gap Checking the Nozzles Using the Product Control Panel Cleaning the Print Head Using the Product Control Panel Printer Status Menu Settings The Printer Setup menu lets you use the Epson Color Calibration Utility. Setting Firmware Version Options - Lets you display and print information about your printer. Allows you to Off, an error appears...
... Gap Checking the Nozzles Using the Product Control Panel Cleaning the Print Head Using the Product Control Panel Printer Status Menu Settings The Printer Setup menu lets you use the Epson Color Calibration Utility. Setting Firmware Version Options - Lets you display and print information about your printer. Allows you to Off, an error appears...
User Manual
Page 142
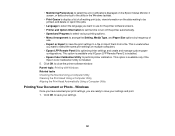
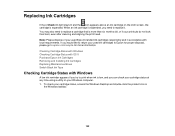
...icon in accordance with Windows A low ink reminder appears if you try to print when ink is low, and you need to replace a cartridge that is more information. To check your used Epson branded ink cartridges responsibly and in the Windows taskbar. 142 Note: Please ...on your printouts do not look their best, even after cleaning and aligning the print head. When an ink cartridge is expended. Checking Cartridge Status with Windows Checking Cartridge Status with OS X Purchase Epson Ink Cartridges Removing and Installing Ink Cartridges Replacing Maintenance Boxes Switch Black Ink Type...
...icon in accordance with Windows A low ink reminder appears if you try to print when ink is low, and you need to replace a cartridge that is more information. To check your used Epson branded ink cartridges responsibly and in the Windows taskbar. 142 Note: Please ...on your printouts do not look their best, even after cleaning and aligning the print head. When an ink cartridge is expended. Checking Cartridge Status with Windows Checking Cartridge Status with OS X Purchase Epson Ink Cartridges Removing and Installing Ink Cartridges Replacing Maintenance Boxes Switch Black Ink Type...


