

User Manual
Page 41
... settings. 6. Press the u or d button to select Bi-D All Color. Make sure you can align the print head using the printer utility software, aligning the printer from the paper path and roll it up when you need to start with the included Epson Doubleweight Matte paper. To avoid indenting or creasing the paper, remove it from the control panel will quickly and automatically perform the most thorough alignment. 1. When the bi-directional alignment is loaded...
... settings. 6. Press the u or d button to select Bi-D All Color. Make sure you can align the print head using the printer utility software, aligning the printer from the paper path and roll it up when you need to start with the included Epson Doubleweight Matte paper. To avoid indenting or creasing the paper, remove it from the control panel will quickly and automatically perform the most thorough alignment. 1. When the bi-directional alignment is loaded...

User Manual
Page 43
.../support/p8000 (U.S.) or www.epson.ca/support/p8000 (Canada) • www.epson.com/support/p9000 (U.S.) or www.epson.ca/support/p9000 (Canada) Follow the instructions on , connected to date, you should periodically check for your computer or network, and that the LCD screen shows the READY status. 1. Click Drivers & Downloads. Checking the current firmware version 1. Note the firmware version displayed. When finished, press the l button. 42 | Installing the software Installing the software Download and run your printer...
.../support/p8000 (U.S.) or www.epson.ca/support/p8000 (Canada) • www.epson.com/support/p9000 (U.S.) or www.epson.ca/support/p9000 (Canada) Follow the instructions on , connected to date, you should periodically check for your computer or network, and that the LCD screen shows the READY status. 1. Click Drivers & Downloads. Checking the current firmware version 1. Note the firmware version displayed. When finished, press the l button. 42 | Installing the software Installing the software Download and run your printer...

User Manual
Page 4
... Paper Configuration Options - Windows 85 Advanced Color Controls - Windows Only 91 Selecting Print Layout Options - Windows 106 Selecting Default Print Settings - OS X 112 Advanced Color Settings - OS X 119 Print Options - Take Up with the Printable Side Out 63 Removing Media from the Optional Auto Take-up Reel 68 Available Epson Papers ...69 Borderless Paper Type Compatibility 78 Printing from a Computer ...79 Printing with OS X ...111 Selecting Basic Print Settings - Windows 97 Reduce/Enlarge Options - Windows 108 Changing the Language of the Printer Software...
... Paper Configuration Options - Windows 85 Advanced Color Controls - Windows Only 91 Selecting Print Layout Options - Windows 106 Selecting Default Print Settings - OS X 112 Advanced Color Settings - OS X 119 Print Options - Take Up with the Printable Side Out 63 Removing Media from the Optional Auto Take-up Reel 68 Available Epson Papers ...69 Borderless Paper Type Compatibility 78 Printing from a Computer ...79 Printing with OS X ...111 Selecting Basic Print Settings - Windows 97 Reduce/Enlarge Options - Windows 108 Changing the Language of the Printer Software...

User Manual
Page 5
... Printer Status Menu Settings...138 Network Setup Menu Settings ...139 Preferences Menu Settings ...140 Administrator Menu Settings ...140 Replacing Ink Cartridges ...142 Checking Cartridge Status with Windows 142 Checking Cartridge Status with OS X 145 Purchase Epson Ink Cartridges...146 Ink Cartridge and Maintenance Box Part Numbers 146 Removing and Installing Ink Cartridges 148 Replacing Maintenance Boxes...151 Switch Black Ink Type ...153 Switching the Black Ink Type...154 Black Ink Type Media List...154 Adjusting Print Quality...156 Print Head Maintenance...156 Print Head Nozzle Check...
... Printer Status Menu Settings...138 Network Setup Menu Settings ...139 Preferences Menu Settings ...140 Administrator Menu Settings ...140 Replacing Ink Cartridges ...142 Checking Cartridge Status with Windows 142 Checking Cartridge Status with OS X 145 Purchase Epson Ink Cartridges...146 Ink Cartridge and Maintenance Box Part Numbers 146 Removing and Installing Ink Cartridges 148 Replacing Maintenance Boxes...151 Switch Black Ink Type ...153 Switching the Black Ink Type...154 Black Ink Type Media List...154 Adjusting Print Quality...156 Print Head Maintenance...156 Print Head Nozzle Check...

User Manual
Page 36
... roll paper cover. 5. Press the OK button. 8. Note: Store cut sheet media flat in the printer. 9. To remove your page. Note: For paper smaller than letter or A4 size, align the right edge of these settings: • If the paper settings are correct, select Keep Settings Above. • Select Change Settings so you can lead to excess paper curl and cause damage to the printer and ruined prints. 36 After printing, the sheet...
... roll paper cover. 5. Press the OK button. 8. Note: Store cut sheet media flat in the printer. 9. To remove your page. Note: For paper smaller than letter or A4 size, align the right edge of these settings: • If the paper settings are correct, select Keep Settings Above. • Select Change Settings so you can lead to excess paper curl and cause damage to the printer and ruined prints. 36 After printing, the sheet...

User Manual
Page 137
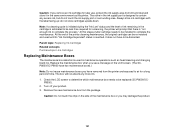
Caution: Disabling this setting only if the printer displays a paper setting error when media is loaded correctly. Changed settings take effect when you switch between black inks and after every print job. Performs an automatic nozzle check and head cleaning if the printer is detected. Stops printing when skewed paper is turned on to print outside the margins of the loaded media. Selects the number of time. Note: Even if you select Off as the Auto Cleaning Setting option, the printer runs an automatic...
Caution: Disabling this setting only if the printer displays a paper setting error when media is loaded correctly. Changed settings take effect when you switch between black inks and after every print job. Performs an automatic nozzle check and head cleaning if the printer is detected. Stops printing when skewed paper is turned on to print outside the margins of the loaded media. Selects the number of time. Note: Even if you select Off as the Auto Cleaning Setting option, the printer runs an automatic...
User Manual
Page 146
... topic: Replacing Ink Cartridges Ink Cartridge and Maintenance Box Part Numbers Use these part numbers when you order or purchase a new maintenance box or ink cartridges. Note: This product uses only genuine Epson-brand cartridges. Note: For best printing results, use , and temperature. Note: If any ink cartridge indicated on images printed, print settings, paper type, frequency of use up a cartridge within 6 months of ink cartridges and ink supplies are designed for printer setup and not for printing. Parent topic: Replacing Ink Cartridges Related tasks Removing and Installing Ink...
... topic: Replacing Ink Cartridges Ink Cartridge and Maintenance Box Part Numbers Use these part numbers when you order or purchase a new maintenance box or ink cartridges. Note: This product uses only genuine Epson-brand cartridges. Note: For best printing results, use , and temperature. Note: If any ink cartridge indicated on images printed, print settings, paper type, frequency of use up a cartridge within 6 months of ink cartridges and ink supplies are designed for printer setup and not for printing. Parent topic: Replacing Ink Cartridges Related tasks Removing and Installing Ink...
User Manual
Page 151
... in the same environment as head cleaning and changing black ink. It does not have removed from the package. Note: If a cleaning cycle is initiated during the "Ink Low" status and the level of the printer cleaning maintenance, the original cartridge can be replaced (SC-P8000/SCP9000). 2. Replace the maintenance box when you see a message on the side of time. Turn off your product. 3. Remove the new maintenance box from the printer and exposed to complete the...
... in the same environment as head cleaning and changing black ink. It does not have removed from the package. Note: If a cleaning cycle is initiated during the "Ink Low" status and the level of the printer cleaning maintenance, the original cartridge can be replaced (SC-P8000/SCP9000). 2. Replace the maintenance box when you see a message on the side of time. Turn off your product. 3. Remove the new maintenance box from the printer and exposed to complete the...

User Manual
Page 179
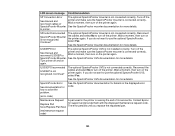
... Status Messages Solving Printer Problems Solving Printing Problems Solving Paper Problems Solving Print Quality Problems Where to Get Help Product Status Messages You can often diagnose problems with your product. If the message or replace ink cartridge. persists, insert a new ink cartridge. Ink Low The ink is the same color as the color displayed on the LCD screen. Remove the cartridge, leave it for four hours or more at room temperature, and reinstall it. Ink Cartridge Error Insert a genuine Epson ink cartridge that the cartridge is low...
... Status Messages Solving Printer Problems Solving Printing Problems Solving Paper Problems Solving Print Quality Problems Where to Get Help Product Status Messages You can often diagnose problems with your product. If the message or replace ink cartridge. persists, insert a new ink cartridge. Ink Low The ink is the same color as the color displayed on the LCD screen. Remove the cartridge, leave it for four hours or more at room temperature, and reinstall it. Ink Cartridge Error Insert a genuine Epson ink cartridge that the cartridge is low...
User Manual
Page 183
... SpectroProofer UVS is not recognized. Reconnect the cables and select No to use the optional SpectroProofer UVS, select Yes. SpectroProofer Error See documentation for support and provide them with the displayed maintenance request code. See the SpectroProofer documentation for more details. Contact Epson Replace Part Soon/Replace Part Now for how to solve the problem. The error persists until you do not want to turn off the printer.
... SpectroProofer UVS is not recognized. Reconnect the cables and select No to use the optional SpectroProofer UVS, select Yes. SpectroProofer Error See documentation for support and provide them with the displayed maintenance request code. See the SpectroProofer documentation for more details. Contact Epson Replace Part Soon/Replace Part Now for how to solve the problem. The error persists until you do not want to turn off the printer.
User Manual
Page 184
... the displayed service code. If the same call for service is not connected securely Power off several times. Parent topic: Solving Problems Related concepts Print Head Nozzle Check Print Head Cleaning Related references Print Quality Options - Windows Output Resolution Settings - OS X Advanced Color Settings - OS X Paper Menu Settings Printer Setup Menu Settings Administrator Menu Settings Where to Get Help Related tasks Removing and Installing Ink Cartridges Selecting Print Layout Options - Windows Related topics Replacing Ink Cartridges Media Handling Using the Auto Take...
... the displayed service code. If the same call for service is not connected securely Power off several times. Parent topic: Solving Problems Related concepts Print Head Nozzle Check Print Head Cleaning Related references Print Quality Options - Windows Output Resolution Settings - OS X Advanced Color Settings - OS X Paper Menu Settings Printer Setup Menu Settings Administrator Menu Settings Where to Get Help Related tasks Removing and Installing Ink Cartridges Selecting Print Layout Options - Windows Related topics Replacing Ink Cartridges Media Handling Using the Auto Take...
User Manual
Page 198
... cartridges that are using genuine Epson ink cartridges. Parent topic: Solving Print Quality Problems Related concepts Print Head Nozzle Check Print Head Cleaning Related references Administrator Menu Settings Overall Print Quality is Poor If you notice that your computer screen. • If the printer has not been used in the last three months. • Make sure you selected the correct Media Type setting in the printer driver that matches the paper loaded in the printer. • Compare the print...
... cartridges that are using genuine Epson ink cartridges. Parent topic: Solving Print Quality Problems Related concepts Print Head Nozzle Check Print Head Cleaning Related references Administrator Menu Settings Overall Print Quality is Poor If you notice that your computer screen. • If the printer has not been used in the last three months. • Make sure you selected the correct Media Type setting in the printer driver that matches the paper loaded in the printer. • Compare the print...

User Manual
Page 199
Windows Output Resolution Settings - Load blank paper and press the paper feed button to feed it or use new media. • If you are using cut sheet paper, check that changes in the (bi-directional) print output. If this occurs, align the print head. OS X Advanced Color Settings - Windows Selecting Basic Print Settings - OS X Related tasks Removing and Installing Ink Cartridges Selecting Basic Print Settings - Windows Color Management Options - OS X Lines Are Misaligned You may see vertical lines in humidity and temperature have not made the paper wavy. Flatten the ...
Windows Output Resolution Settings - Load blank paper and press the paper feed button to feed it or use new media. • If you are using cut sheet paper, check that changes in the (bi-directional) print output. If this occurs, align the print head. OS X Advanced Color Settings - Windows Selecting Basic Print Settings - OS X Related tasks Removing and Installing Ink Cartridges Selecting Basic Print Settings - Windows Color Management Options - OS X Lines Are Misaligned You may see vertical lines in humidity and temperature have not made the paper wavy. Flatten the ...
User Manual
Page 208
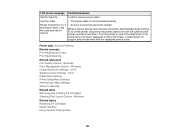
... Epson driver is permanent (Light Light Black or Violet) once the printer completes its initial ink charge and can not be changed. After some ink is used for charging, the rest is available for resale. Commercial Edition: Cyan, Light Cyan, Vivid Magenta, Vivid Light Magenta, Yellow, Orange, Green, Violet, Light Black, Photo Black, Matte Black. Parent topic: Technical Specifications Ink Cartridge Specifications Note: This product uses only genuine Epson-brand cartridges. To print longer images, you need...
... Epson driver is permanent (Light Light Black or Violet) once the printer completes its initial ink charge and can not be changed. After some ink is used for charging, the rest is available for resale. Commercial Edition: Cyan, Light Cyan, Vivid Magenta, Vivid Light Magenta, Yellow, Orange, Green, Violet, Light Black, Photo Black, Matte Black. Parent topic: Technical Specifications Ink Cartridge Specifications Note: This product uses only genuine Epson-brand cartridges. To print longer images, you need...
User Manual
Page 12
.... 3. Check the functions and operations of the network interface using EpsonNet Config. Make sure the necessary components (such as status lights and RJ-45 connector. If necessary, configure the network settings of the network interface, such as TCP/IP) are not sure, see "EpsonNet Config for Mac OS" on page 18 for details. 5. Configure the network interface using EpsonNet Config. For Windows users, see "EpsonNet Config for Windows" on your network environment and operating system. Install...
.... 3. Check the functions and operations of the network interface using EpsonNet Config. Make sure the necessary components (such as status lights and RJ-45 connector. If necessary, configure the network settings of the network interface, such as TCP/IP) are not sure, see "EpsonNet Config for Mac OS" on page 18 for details. 5. Configure the network interface using EpsonNet Config. For Windows users, see "EpsonNet Config for Windows" on your network environment and operating system. Install...
User Manual
Page 19
... use the printer's control panel. The software installer screen opens automatically. When you print a lot of data, we recommend you can use on your language, and then click the Next button. 5. otherwise the network interface may not work correctly. Select your computer. Important: After turning off the printer, wait until the status lights go off before turning it to the network (a hub or router). 2. Note: If you see "Configuring the Network Interface (Windows...
... use the printer's control panel. The software installer screen opens automatically. When you print a lot of data, we recommend you can use on your language, and then click the Next button. 5. otherwise the network interface may not work correctly. Select your computer. Important: After turning off the printer, wait until the status lights go off before turning it to the network (a hub or router). 2. Note: If you see "Configuring the Network Interface (Windows...
User Manual
Page 21
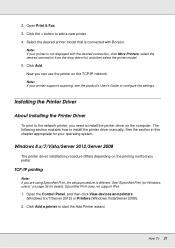
... printer supports scanning, see the product's User's Guide to install the printer driver manually. The following section explains how to configure the settings. How To 21 Note: If your operating system. Installing the Printer Driver About Installing the Printer Driver To print to the network printer, you can use the printer on the computer. Click Add a printer to install the printer driver on the TCP/IP network. Open the Control Panel, and then click View devices and printers (Windows 8.x/7/Server 2012) or Printers (Windows Vista/Server 2008). 2. Windows 8.x/7/Vista/Server...
... printer supports scanning, see the product's User's Guide to install the printer driver manually. The following section explains how to configure the settings. How To 21 Note: If your operating system. Installing the Printer Driver About Installing the Printer Driver To print to the network printer, you can use the printer on the computer. Click Add a printer to install the printer driver on the TCP/IP network. Open the Control Panel, and then click View devices and printers (Windows 8.x/7/Server 2012) or Printers (Windows Vista/Server 2008). 2. Windows 8.x/7/Vista/Server...
User Manual
Page 30
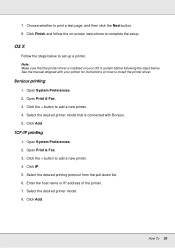
... the desired printer model that the printer driver is connected with your OS X system before following the steps below to add a new printer. 4. Select the desired printing protocol from the pull-down list. 6. 7. Choose whether to add a new printer. 4. Click IP. 5. Click the + button to print a test page, and then click the Next button. 8. Open Print & Fax. 3. Select the desired printer model. 8. Open Print & Fax. 3. How To 30 Open System Preferences. 2. Open System Preferences. 2. See the manual shipped with...
... the desired printer model that the printer driver is connected with your OS X system before following the steps below to add a new printer. 4. Select the desired printing protocol from the pull-down list. 6. 7. Choose whether to add a new printer. 4. Click IP. 5. Click the + button to print a test page, and then click the Next button. 8. Open Print & Fax. 3. Select the desired printer model. 8. Open Print & Fax. 3. How To 30 Open System Preferences. 2. Open System Preferences. 2. See the manual shipped with...

User Manual
Page 43
Note: If the Add Printer Wizard asks you to select either Keep existing driver or Replace existing driver, be sure to configure the printer port. To configure the printer port, see "Configuring the Printer Port" on -screen instructions to -peer printing. Windows XP/Server 2003: Click Start and then Printers and Faxes. 2. Configuring the Printer Port Follow the steps below to select the Replace existing driver radio button. Network Software 43 Select the CD/DVD drive for Drives, and double-click the appropriate...
Note: If the Add Printer Wizard asks you to select either Keep existing driver or Replace existing driver, be sure to configure the printer port. To configure the printer port, see "Configuring the Printer Port" on -screen instructions to -peer printing. Windows XP/Server 2003: Click Start and then Printers and Faxes. 2. Configuring the Printer Port Follow the steps below to select the Replace existing driver radio button. Network Software 43 Select the CD/DVD drive for Drives, and double-click the appropriate...
Quick Reference
Page 11
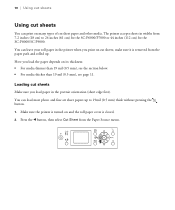
...). You can leave your roll paper in the printer when you load paper in widths from the Paper Source menu. 10 | Using cut sheets Using cut sheets You can print on many types of cut sheets; make sure it is closed. 2. Loading cut sheets Make sure you print on cut sheet paper and other media. How you load the paper depends on and the roll paper cover is removed from the paper path and rolled up to...
...). You can leave your roll paper in the printer when you load paper in widths from the Paper Source menu. 10 | Using cut sheets Using cut sheets You can print on many types of cut sheets; make sure it is closed. 2. Loading cut sheets Make sure you print on cut sheet paper and other media. How you load the paper depends on and the roll paper cover is removed from the paper path and rolled up to...


