
Network Installation Guide
Page 2
Do one of the following: ■ If you're installing the printer for use the printer on the network, follow the instructions in "Install Software" on the Start Here sheet. Before You Begin Make sure you 're setting up the printer for the first time, see "Choose Your Connection Type" ... information about setting up a wireless network, go to set up an additional computer to use on a network. Then follow the steps in this guide to : epson.com/support/wireless.
Do one of the following: ■ If you're installing the printer for use the printer on the network, follow the instructions in "Install Software" on the Start Here sheet. Before You Begin Make sure you 're setting up the printer for the first time, see "Choose Your Connection Type" ... information about setting up a wireless network, go to set up an additional computer to use on a network. Then follow the steps in this guide to : epson.com/support/wireless.

Network Installation Guide
Page 7
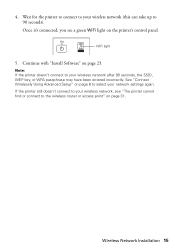
... that the settings are correct, press OK to save the settings and return to the Network Settings menu. 11. WiFi light 13. Continue with "Install Software" on page 31. When you need to change . 10. If the printer still doesn't connect to change a setting, press y Back until you see the setting...
... that the settings are correct, press OK to save the settings and return to the Network Settings menu. 11. WiFi light 13. Continue with "Install Software" on page 31. When you need to change . 10. If the printer still doesn't connect to change a setting, press y Back until you see the setting...
Network Installation Guide
Page 15
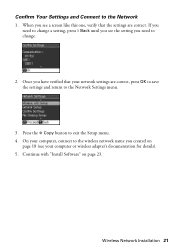
If the printer still doesn't connect to your wireless network, see a green WiFi light on page 23. Continue with "Install Software" on the printer's control panel. 4. Once it's connected, you see "The printer cannot find or connect to your network settings again. Note: If the printer ...
If the printer still doesn't connect to your wireless network, see a green WiFi light on page 23. Continue with "Install Software" on the printer's control panel. 4. Once it's connected, you see "The printer cannot find or connect to your network settings again. Note: If the printer ...

Network Installation Guide
Page 16
...® users: If your computer is complete, reconnect your computer is connected to a network with an Ethernet cable, you want to disconnect it before installing software. Important: For Windows® users: If your computer's Ethernet cable. See "Connect Wirelessly Using the Setup Wizard" on page 4 or "Wired (Ethernet) Installation" on the...
...® users: If your computer is complete, reconnect your computer is connected to a network with an Ethernet cable, you want to disconnect it before installing software. Important: For Windows® users: If your computer's Ethernet cable. See "Connect Wirelessly Using the Setup Wizard" on page 4 or "Wired (Ethernet) Installation" on the...
Network Installation Guide
Page 21
Once you see your network settings are correct. Continue with "Install Software" on page 18 (see a screen like this one, verify that your computer or wireless adapter's documentation for details). 5. Confirm Your Settings and Connect to exit ...
Once you see your network settings are correct. Continue with "Install Software" on page 18 (see a screen like this one, verify that your computer or wireless adapter's documentation for details). 5. Confirm Your Settings and Connect to exit ...

Network Installation Guide
Page 22
... to disable the wireless adapter using the printer's control panel. Note: If you're switching from a wireless to a wired network connection, you need to install software. 22 Wired (Ethernet) Installation Press the F Setup button on your printer. 2. Wired (Ethernet) Installation 1. Connect an Ethernet network cable to any available LAN port on...
... to disable the wireless adapter using the printer's control panel. Note: If you're switching from a wireless to a wired network connection, you need to install software. 22 Wired (Ethernet) Installation Press the F Setup button on your printer. 2. Wired (Ethernet) Installation 1. Connect an Ethernet network cable to any available LAN port on...
Network Installation Guide
Page 23
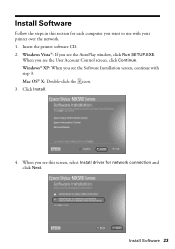
Windows Vista®: If you see the User Account Control screen, click Continue. When you see the AutoPlay window, click Run SETUP.EXE. When you see this section for network connection and click Next. Click Install. 4. Install Software 23 Insert the printer software CD. 2. Windows® XP: When you want to use with step 3. Install Software Follow the steps in this screen, select Install driver for each computer you see the Software Installation screen, continue with your printer over the network. 1. Mac OS® X: Double-click the icon. 3.
Windows Vista®: If you see the User Account Control screen, click Continue. When you see the AutoPlay window, click Run SETUP.EXE. When you see this section for network connection and click Next. Click Install. 4. Install Software 23 Insert the printer software CD. 2. Windows® XP: When you want to use with step 3. Install Software Follow the steps in this screen, select Install driver for each computer you see the Software Installation screen, continue with your printer over the network. 1. Mac OS® X: Double-click the icon. 3.
Network Installation Guide
Page 24
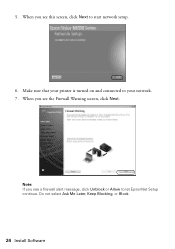
Note: If you see this screen, click Next to start network setup. 6. When you see the Firewall Warning screen, click Next. Do not select Ask Me Later, Keep Blocking, or Block. 24 Install Software Make sure that your printer is turned on and connected to let EpsonNet Setup continue. When you see a firewall alert message, click Unblock or Allow to your network. 7. 5.
Note: If you see this screen, click Next to start network setup. 6. When you see the Firewall Warning screen, click Next. Do not select Ask Me Later, Keep Blocking, or Block. 24 Install Software Make sure that your printer is turned on and connected to let EpsonNet Setup continue. When you see a firewall alert message, click Unblock or Allow to your network. 7. 5.

Network Installation Guide
Page 25
8. Install Software 25 Wait while EpsonNet Setup configures your printer for the network. 9. Do one of the following: ■ If you see the Installation Complete screen, continue with "Finish the Installation" on page 28.
8. Install Software 25 Wait while EpsonNet Setup configures your printer for the network. 9. Do one of the following: ■ If you see the Installation Complete screen, continue with "Finish the Installation" on page 28.
Network Installation Guide
Page 26
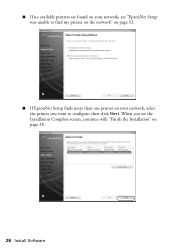
■ If no available printers are found on your network, see the Installation Complete screen, continue with "Finish the Installation" on your network, select the printer you want to configure, then click Next. When you see "EpsonNet Setup was unable to find my printer on the network" on page 32. ■ If EpsonNet Setup finds more than one printer on page 28. 26 Install Software
■ If no available printers are found on your network, see the Installation Complete screen, continue with "Finish the Installation" on your network, select the printer you want to configure, then click Next. When you see "EpsonNet Setup was unable to find my printer on the network" on page 32. ■ If EpsonNet Setup finds more than one printer on page 28. 26 Install Software
Network Installation Guide
Page 27
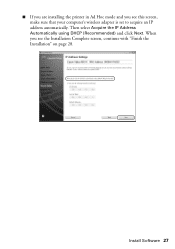
When you see the Installation Complete screen, continue with "Finish the Installation" on page 28. ■ If you are installing the printer in Ad Hoc mode and you see this screen, make sure that your computer's wireless adapter is set to acquire an IP address automatically. Then select Acquire the IP Address Automatically using DHCP (Recommended) and click Next. Install Software 27
When you see the Installation Complete screen, continue with "Finish the Installation" on page 28. ■ If you are installing the printer in Ad Hoc mode and you see this screen, make sure that your computer's wireless adapter is set to acquire an IP address automatically. Then select Acquire the IP Address Automatically using DHCP (Recommended) and click Next. Install Software 27
Network Installation Guide
Page 28
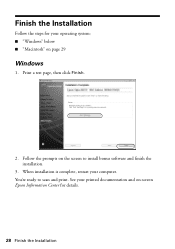
When installation is complete, restart your printed documentation and on-screen Epson Information Center for your operating system: ■ "Windows" below ■ "Macintosh" on the screen to scan and print. You're ready to install bonus software and finish the installation. 3. See your computer. Follow the prompts on page 29 Windows 1. Finish the Installation Follow the steps for details. 28 Finish the Installation Print a test page, then click Finish. 2.
When installation is complete, restart your printed documentation and on-screen Epson Information Center for your operating system: ■ "Windows" below ■ "Macintosh" on the screen to scan and print. You're ready to install bonus software and finish the installation. 3. See your computer. Follow the prompts on page 29 Windows 1. Finish the Installation Follow the steps for details. 28 Finish the Installation Print a test page, then click Finish. 2.

Network Installation Guide
Page 30
Follow the prompts on -screen Epson Information Center for your EPSON TCPIP printer. When you see this screen, click Add Printer. 5. Note: It may take up to find the EPSON TCPIP printer on the network. 6. Follow the steps on the right side of the screen to add your computer to 90 seconds for details. 30 Finish the Installation You're ready to print a test page, install bonus software, and finish the installation. 7. 4. When installation is complete, restart your printed documentation and on the screen to scan and print. See your computer.
Follow the prompts on -screen Epson Information Center for your EPSON TCPIP printer. When you see this screen, click Add Printer. 5. Note: It may take up to find the EPSON TCPIP printer on the network. 6. Follow the steps on the right side of the screen to add your computer to 90 seconds for details. 30 Finish the Installation You're ready to print a test page, install bonus software, and finish the installation. 7. 4. When installation is complete, restart your printed documentation and on the screen to scan and print. See your computer.
Network Installation Guide
Page 33
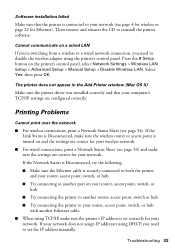
...F Setup button on a wired LAN If you're switching from a wireless to a wired network connection, you need to reinstall the printer software. The printer does not appear in the Add Printer window (Mac OS X) Make sure the printer driver was installed correctly and that the ...settings are correct for your network does not assign IP addresses using DHCP, you need to your network (see page 34). Troubleshooting 33 Software installation failed Make sure that your computer's TCP/IP settings are configured correctly. Cannot communicate on the printer's control panel, select Network...
...F Setup button on a wired LAN If you're switching from a wireless to a wired network connection, you need to reinstall the printer software. The printer does not appear in the Add Printer window (Mac OS X) Make sure the printer driver was installed correctly and that the ...settings are correct for your network does not assign IP addresses using DHCP, you need to your network (see page 34). Troubleshooting 33 Software installation failed Make sure that your computer's TCP/IP settings are configured correctly. Cannot communicate on the printer's control panel, select Network...
Network Installation Guide
Page 34
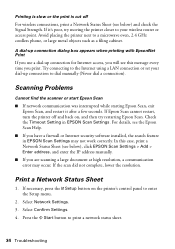
... then try moving the printer closer to your dial-up connection for Internet access, you will see the Epson Scan Help. ■ If you have a firewall or Internet security software installed, the search feature in EPSON Scan Settings. Select Network Settings. 3. Try connecting to the Internet using a LAN connection or set your wireless...
... then try moving the printer closer to your dial-up connection for Internet access, you will see the Epson Scan Help. ■ If you have a firewall or Internet security software installed, the search feature in EPSON Scan Settings. Select Network Settings. 3. Try connecting to the Internet using a LAN connection or set your wireless...
Network Installation Guide
Page 35
..., this product also includes open -source software and software license terms applied to this information as a result of: accident, misuse, or abuse of any options or any consumable products other equipment. Epson Stylus is subject to strictly comply with this publication may be reproduced, stored in a retrieval system, or transmitted in any and all...
..., this product also includes open -source software and software license terms applied to this information as a result of: accident, misuse, or abuse of any options or any consumable products other equipment. Epson Stylus is subject to strictly comply with this publication may be reproduced, stored in a retrieval system, or transmitted in any and all...

Product Brochure
Page 2
... Glossy measured from the first cartridges is a trademark of prints displayed under glass or UV filter or properly store them. Epson Stylus NX515 Print | Copy | Scan | Photo | Wi-Fi Specifications Printing Technology 4-color (CMYK) drop-on system configuration, software, and page complexity. Color photo in Draft Mode on continuous printing of a suite of five black and...
... Glossy measured from the first cartridges is a trademark of prints displayed under glass or UV filter or properly store them. Epson Stylus NX515 Print | Copy | Scan | Photo | Wi-Fi Specifications Printing Technology 4-color (CMYK) drop-on system configuration, software, and page complexity. Color photo in Draft Mode on continuous printing of a suite of five black and...
Quick Guide
Page 3
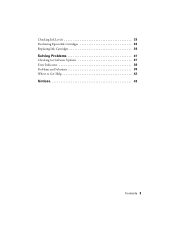
Checking Ink Levels 33 Purchasing Epson Ink Cartridges 33 Replacing Ink Cartridges 34 Solving Problems 37 Checking for Software Updates 37 Error Indicators 38 Problems and Solutions 39 Where to Get Help 42 Notices 43 Contents 3
Checking Ink Levels 33 Purchasing Epson Ink Cartridges 33 Replacing Ink Cartridges 34 Solving Problems 37 Checking for Software Updates 37 Error Indicators 38 Problems and Solutions 39 Where to Get Help 42 Notices 43 Contents 3

Quick Guide
Page 12
... on the scanner glass. 3. Load 4 × 6-inch, 5 × 7-inch, letter-size, or A4-size Epson special paper. 2. Press OK again to prescan your paper, press Display/Crop. ■ To resize the image area, ...press + or -. ■ To move the image area, use the NX510 Series software on your photo, press OK. 8. When you need to cancel copying, press y Stop/ Clear Settings. 12...fit onto your photo. To turn on Color Restoration.) 5. Restoring and Cropping Photos You can also crop your photo is not faded, do not turn on Color Restoration, press r, select On, then...
... on the scanner glass. 3. Load 4 × 6-inch, 5 × 7-inch, letter-size, or A4-size Epson special paper. 2. Press OK again to prescan your paper, press Display/Crop. ■ To resize the image area, ...press + or -. ■ To move the image area, use the NX510 Series software on your photo, press OK. 8. When you need to cancel copying, press y Stop/ Clear Settings. 12...fit onto your photo. To turn on Color Restoration.) 5. Restoring and Cropping Photos You can also crop your photo is not faded, do not turn on Color Restoration, press r, select On, then...
Quick Guide
Page 21
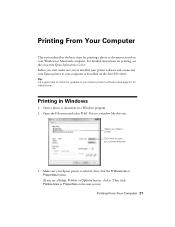
... is selected, then click the Preferences or Properties button. (If you 've installed your printer software and connected your Epson printer to your printer software 3. Printing in a Windows program. 2. You see a Setup, Printer, or Options button, click it. Open the File menu and select Print.... Before you start, make sure you see a window like this one: Select your Epson printer Click here to open your Epson printer's software (see the on the Start Here sheet. Then click Preferences or Properties on your computer as described on -screen...
... is selected, then click the Preferences or Properties button. (If you 've installed your printer software and connected your Epson printer to your printer software 3. Printing in a Windows program. 2. You see a Setup, Printer, or Options button, click it. Open the File menu and select Print.... Before you start, make sure you see a window like this one: Select your Epson printer Click here to open your Epson printer's software (see the on the Start Here sheet. Then click Preferences or Properties on your computer as described on -screen...


