
Epson Scan ICM Updater v1.20 (PSB.2008.07.001)
Page 1
... bulletin was created to inform you can now choose your preferred profile. When selecting any of these color profiles. Follow the onscreen prompts to and including 3.4xA Note: Scanners/All-in a few seconds. • Open Epson Scan. You can choose any of these three profiles, the program returns this error: "Cannot find necessary...
... bulletin was created to inform you can now choose your preferred profile. When selecting any of these color profiles. Follow the onscreen prompts to and including 3.4xA Note: Scanners/All-in a few seconds. • Open Epson Scan. You can choose any of these three profiles, the program returns this error: "Cannot find necessary...
Quick Guide
Page 34
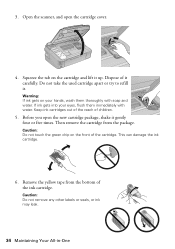
... remove any other labels or seals, or ink may leak. 34 Maintaining Your All-in-One 3. Remove the yellow tape from the package. Open the scanner, and open the new cartridge package, shake it . Warning: If ink gets on your eyes, flush them thoroughly with water.
... remove any other labels or seals, or ink may leak. 34 Maintaining Your All-in-One 3. Remove the yellow tape from the package. Open the scanner, and open the new cartridge package, shake it . Warning: If ink gets on your eyes, flush them thoroughly with water.
Quick Guide
Page 35
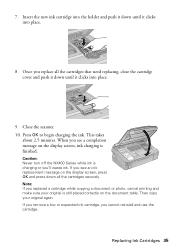
When you see an ink replacement message on the document table. Caution: Never turn off the NX400 Series while ink is finished. If you replace all the cartridges securely. Then copy your original is still placed correctly on the display screen, press ... cannot reinstall and use the cartridge. Insert the new ink cartridge into the holder and push it down until it clicks into place. 8. Close the scanner. 10. This takes about 2.5 minutes. 7. Press OK to begin charging the ink. Replacing Ink Cartridges 35 If you remove a low or expended ink cartridge, you...
When you see an ink replacement message on the document table. Caution: Never turn off the NX400 Series while ink is finished. If you replace all the cartridges securely. Then copy your original is still placed correctly on the display screen, press ... cannot reinstall and use the cartridge. Insert the new ink cartridge into the holder and push it down until it clicks into place. 8. Close the scanner. 10. This takes about 2.5 minutes. 7. Press OK to begin charging the ink. Replacing Ink Cartridges 35 If you remove a low or expended ink cartridge, you...
Quick Guide
Page 37
... on . The memory card is not inserted correctly or there is not resolved, contact Epson for help (see page 40). If the error is a problem with your NX400 Series (see page 40). Error Indicators Follow the instructions on . A scanner error has occurred. Problem and solution Replace the expended ink cartridges (see your documentation...
... on . The memory card is not inserted correctly or there is not resolved, contact Epson for help (see page 40). If the error is a problem with your NX400 Series (see page 40). Error Indicators Follow the instructions on . A scanner error has occurred. Problem and solution Replace the expended ink cartridges (see your documentation...
Quick Guide
Page 38
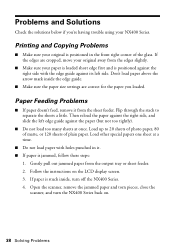
... other special papers one sheet at once. If paper is jammed, follow these steps: 1. Don't load paper above the arrow mark inside , turn the NX400 Series back on the LCD display screen. 3. Paper Feeding Problems ■ If paper doesn't feed, remove it . ■ If paper is stuck inside...edge guide against its left edge guide against the right side, and slide the left side. Open the scanner, remove the jammed paper and torn pieces, close the scanner, and turn off the NX400 Series. 4. Printing and Copying Problems ■ Make sure your original is positioned against the right side...
... other special papers one sheet at once. If paper is jammed, follow these steps: 1. Don't load paper above the arrow mark inside , turn the NX400 Series back on the LCD display screen. 3. Paper Feeding Problems ■ If paper doesn't feed, remove it . ■ If paper is stuck inside...edge guide against its left edge guide against the right side, and slide the left side. Open the scanner, remove the jammed paper and torn pieces, close the scanner, and turn off the NX400 Series. 4. Printing and Copying Problems ■ Make sure your original is positioned against the right side...
Quick Guide
Page 41
...cm) away from the wall. ■ Do not open the scanner section while the NX400 Series is copying, printing, or scanning. ■ Do not spill liquid on the NX400 Series. ■ Except as specifically explained in your Epson Stylus NX400 Series all-in-one, read and follow these safety instructions: ■...; Be sure to rapid changes in all warnings and instructions marked on the NX400 Series. ■ Use only the ...
...cm) away from the wall. ■ Do not open the scanner section while the NX400 Series is copying, printing, or scanning. ■ Do not spill liquid on the NX400 Series. ■ Except as specifically explained in your Epson Stylus NX400 Series all-in-one, read and follow these safety instructions: ■...; Be sure to rapid changes in all warnings and instructions marked on the NX400 Series. ■ Use only the ...
Start Here
Page 2
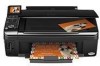
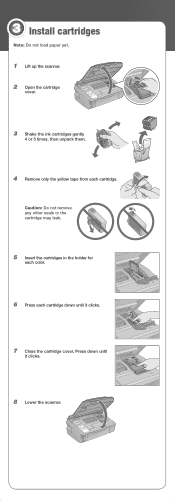
Press down until it clicks. 7 Close the cartridge cover. Caution: Do not remove any other seals or the cartridge may leak. 5 Insert the cartridges in the holder for each color. 6 Press each cartridge. 3 Install cartridges Note: Do not load paper yet. 1 Lift up the scanner. 2 Open the cartridge cover. 3 Shake the ink cartridges gently 4 or 5 times, then unpack them. 4 Remove only the yellow tape from each cartridge down until it clicks. 8 Lower the scanner.
Press down until it clicks. 7 Close the cartridge cover. Caution: Do not remove any other seals or the cartridge may leak. 5 Insert the cartridges in the holder for each color. 6 Press each cartridge. 3 Install cartridges Note: Do not load paper yet. 1 Lift up the scanner. 2 Open the cartridge cover. 3 Shake the ink cartridges gently 4 or 5 times, then unpack them. 4 Remove only the yellow tape from each cartridge down until it clicks. 8 Lower the scanner.


