
Epson Scan ICM Updater v1.20 (PSB.2008.07.001)
Page 1
... Authorization: TE08-0061 Rev A Total Pages: 1 All Scanners and All-in-One's using Epson Scan Epson Scan ICM updater v.1.20 for Epson Scan-affects all driver versions up to and including 3.4xA Note: Scanners/All-in-One's using ICM color profiles in Epson Scan when Adobe's Color Management Module (CMM) has also been installed on the computer. Note: Installation completes...
... Authorization: TE08-0061 Rev A Total Pages: 1 All Scanners and All-in-One's using Epson Scan Epson Scan ICM updater v.1.20 for Epson Scan-affects all driver versions up to and including 3.4xA Note: Scanners/All-in-One's using ICM color profiles in Epson Scan when Adobe's Color Management Module (CMM) has also been installed on the computer. Note: Installation completes...
Quick Guide
Page 1
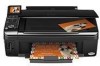
Epson Stylus® NX400 Series Quick Guide Basic Copying, Printing, and Scanning Maintaining Your All-in-One Solving Problems
Epson Stylus® NX400 Series Quick Guide Basic Copying, Printing, and Scanning Maintaining Your All-in-One Solving Problems
Quick Guide
Page 2
... 18 Memory Card Print Settings 20 Printing From Your Computer 21 Printing in Windows 21 Printing With a Macintosh 23 Selecting the Correct Paper Type 27 Scanning a Document or Photo 28 Basic Scanning 28 Restoring and Correcting Photos 29 2 Contents
... 18 Memory Card Print Settings 20 Printing From Your Computer 21 Printing in Windows 21 Printing With a Macintosh 23 Selecting the Correct Paper Type 27 Scanning a Document or Photo 28 Basic Scanning 28 Restoring and Correcting Photos 29 2 Contents
Quick Guide
Page 4
... must be observed to avoid damage to your NX400 Series. Note: Notes contain important information about your equipment. Introduction After you have set up your Epson Stylus® NX400 Series all-in-one as you connect it to your NX400 Series instructions: Warning: Warnings must be followed ...carefully to avoid bodily injury. Tip: Tips contain hints for printing from your computer ■ Scan a document or photo and restore or correct the color ...
... must be observed to avoid damage to your NX400 Series. Note: Notes contain important information about your equipment. Introduction After you have set up your Epson Stylus® NX400 Series all-in-one as you connect it to your NX400 Series instructions: Warning: Warnings must be followed ...carefully to avoid bodily injury. Tip: Tips contain hints for printing from your computer ■ Scan a document or photo and restore or correct the color ...
Quick Guide
Page 18
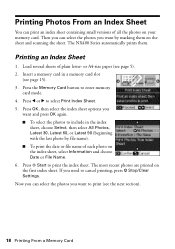
... Print Index Sheet. 5. If you want by file name). ■ To print the date or file name of each photo on the sheet and scanning the sheet. Now you can select the photos you want to cancel printing, press y Stop/Clear Settings. Load several sheets of all the photos on... memory card. Printing an Index Sheet 1. Printing Photos From an Index Sheet You can print an index sheet containing small versions of plain letter- The NX400 Series automatically prints them on the index sheet, select Information and choose Date or File Name. 6. Press the Memory Card button to include in a ...
... Print Index Sheet. 5. If you want by file name). ■ To print the date or file name of each photo on the sheet and scanning the sheet. Now you can select the photos you want to cancel printing, press y Stop/Clear Settings. Load several sheets of all the photos on... memory card. Printing an Index Sheet 1. Printing Photos From an Index Sheet You can print an index sheet containing small versions of plain letter- The NX400 Series automatically prints them on the index sheet, select Information and choose Date or File Name. 6. Press the Memory Card button to include in a ...

Quick Guide
Page 19
... right corner so that photo. Open the document cover. Then place the index sheet face-down on the glass, in the circles on the sheet, scan the sheet, and print the photos automatically. 1. If you want to print right on the sheet. Printing Photos From an Index Sheet 19 Close the...
... right corner so that photo. Open the document cover. Then place the index sheet face-down on the glass, in the circles on the sheet, scan the sheet, and print the photos automatically. 1. If you want to print right on the sheet. Printing Photos From an Index Sheet 19 Close the...
Quick Guide
Page 20
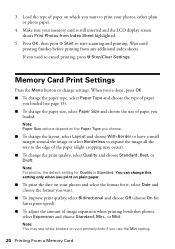
... press x Start to change the print quality, select Quality and choose Standard, Best, or Draft. Memory Card Print Settings Press the Menu button to start scanning and printing. Note: You may occur). ■ To change settings. Load the type of paper you use the Min setting. 20 Printing From a Memory Card...
... press x Start to change the print quality, select Quality and choose Standard, Best, or Draft. Memory Card Print Settings Press the Menu button to start scanning and printing. Note: You may occur). ■ To change settings. Load the type of paper you use the Min setting. 20 Printing From a Memory Card...
Quick Guide
Page 28
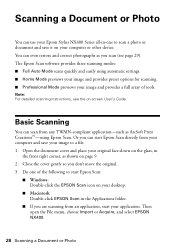
... and correct photographs as you don't move the original. 3. Or you can start Epson Scan directly from your computer and save your image to scan a photo or document and save it on page 9. 2. Scanning a Document or Photo You can use your Epson Stylus NX400 Series all-in-one of tools. Open the document cover and place your...
... and correct photographs as you don't move the original. 3. Or you can start Epson Scan directly from your computer and save your image to scan a photo or document and save it on page 9. 2. Scanning a Document or Photo You can use your Epson Stylus NX400 Series all-in-one of tools. Open the document cover and place your...
Quick Guide
Page 29
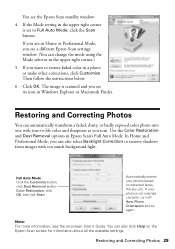
... upper right corner.) 5. You can change the mode using the Mode selector in Epson Scan's Full Auto Mode. If the Mode setting in the upper right corner is set to restore faded color in Windows Explorer or Macintosh Finder. Full Auto Mode Click the Customize button, click... Dust Removal and/or Color Restoration, click OK, and click Scan. Note: For more information, see the Epson Scan standby window: 4. Restoring and Correcting Photos 29 You see the on-screen User's Guide. Then follow the ...
... upper right corner.) 5. You can change the mode using the Mode selector in Epson Scan's Full Auto Mode. If the Mode setting in the upper right corner is set to restore faded color in Windows Explorer or Macintosh Finder. Full Auto Mode Click the Customize button, click... Dust Removal and/or Color Restoration, click OK, and click Scan. Note: For more information, see the Epson Scan standby window: 4. Restoring and Correcting Photos 29 You see the on-screen User's Guide. Then follow the ...
Quick Guide
Page 41
Do not use the cord with any other equipment. ■ Place the NX400 Series near a radiator or heating vent or in direct sunlight. ■ Place the NX400 Series on the NX400 Series. ■ Except as specifically explained in your Epson Stylus NX400 Series all-in heat or humidity, shocks or vibrations, or dust. &#... is at least 4 inches (10 cm) away from the wall. ■ Do not open the scanner section while the NX400 Series is copying, printing, or scanning. ■ Do not spill liquid on a flat, stable surface that are subject to rapid changes in -one, read and follow these safety ...
Do not use the cord with any other equipment. ■ Place the NX400 Series near a radiator or heating vent or in direct sunlight. ■ Place the NX400 Series on the NX400 Series. ■ Except as specifically explained in your Epson Stylus NX400 Series all-in heat or humidity, shocks or vibrations, or dust. &#... is at least 4 inches (10 cm) away from the wall. ■ Do not open the scanner section while the NX400 Series is copying, printing, or scanning. ■ Do not spill liquid on a flat, stable surface that are subject to rapid changes in -one, read and follow these safety ...
Start Here
Page 5
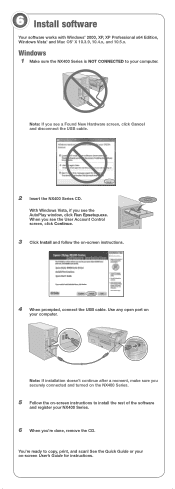
... on -screen instructions. 4 When prompted, connect the USB cable. When you see a Found New Hardware screen, click Cancel and disconnect the USB cable. 2 Insert the NX400 Series CD. 6 Install software Your software works with Windows® 2000, XP, XP Professional x64 Edition, Windows Vista® and Mac OS® X 10.3.9, 10.... With Windows Vista, if you see the User Account Control screen, click Continue. 3 Click Install and follow the on -screen instructions to copy, print, and scan! Note: If installation doesn't continue after a moment, make sure you 're done, remove the CD.
... on -screen instructions. 4 When prompted, connect the USB cable. When you see a Found New Hardware screen, click Cancel and disconnect the USB cable. 2 Insert the NX400 Series CD. 6 Install software Your software works with Windows® 2000, XP, XP Professional x64 Edition, Windows Vista® and Mac OS® X 10.3.9, 10.... With Windows Vista, if you see the User Account Control screen, click Continue. 3 Click Install and follow the on -screen instructions to copy, print, and scan! Note: If installation doesn't continue after a moment, make sure you 're done, remove the CD.
Start Here
Page 7
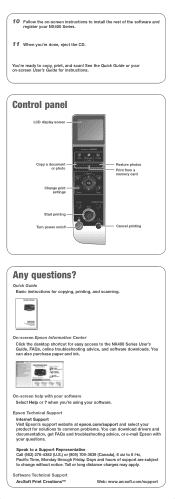
...install the rest of support are subject to copy, print, and scan! See the Quick Guide or your software. You can download drivers and documentation, get FAQs and troubleshooting advice, or e-mail Epson with your NX400 Series. 11 When you 're using your on /off Restore photos... printing Turn power on -screen User's Guide for copying, printing, and scanning. 10 Follow the on-screen instructions to the NX400 Series User's Guide, FAQs, online troubleshooting advice, and software downloads. On-screen Epson Information Center Click the desktop shortcut for solutions to 6 PM, Pacific Time...
...install the rest of support are subject to copy, print, and scan! See the Quick Guide or your software. You can download drivers and documentation, get FAQs and troubleshooting advice, or e-mail Epson with your NX400 Series. 11 When you 're using your on /off Restore photos... printing Turn power on -screen User's Guide for copying, printing, and scanning. 10 Follow the on-screen instructions to the NX400 Series User's Guide, FAQs, online troubleshooting advice, and software downloads. On-screen Epson Information Center Click the desktop shortcut for solutions to 6 PM, Pacific Time...


