Notices
Page 3
... there is copying, printing, or scanning. ■ Do not touch the flat white cable inside the NX110 Series or touch any cartridges during printing. ■ Install a new ink cartridge immediately after removing an expended one. Store cartridges with water. ■ Do not put your documentation, do not disassemble, modify, or attempt...
... there is copying, printing, or scanning. ■ Do not touch the flat white cable inside the NX110 Series or touch any cartridges during printing. ■ Install a new ink cartridge immediately after removing an expended one. Store cartridges with water. ■ Do not put your documentation, do not disassemble, modify, or attempt...
Notices
Page 4
...Certification of this equipment. WARNING The connection of a non-shielded equipment interface cable to this equipment will not occur in a residential installation. Cet appareil numérique de la classe B est conforme à la norme NMB-003 du Canada. 4 These limits ... limits established by one interface connector, do not leave cables connected to provide reasonable protection against harmful interference in a particular installation. For Canadian Users This Class B digital apparatus complies with the limits for help. FCC Compliance Statement For United States Users...
...Certification of this equipment. WARNING The connection of a non-shielded equipment interface cable to this equipment will not occur in a residential installation. Cet appareil numérique de la classe B est conforme à la norme NMB-003 du Canada. 4 These limits ... limits established by one interface connector, do not leave cables connected to provide reasonable protection against harmful interference in a particular installation. For Canadian Users This Class B digital apparatus complies with the limits for help. FCC Compliance Statement For United States Users...
Notices
Page 6
...Possessions). This warranty does not cover any color change or fading of prints or reimbursement of your Epson printer prove defective during the warranty period, please call the Epson ConnectionSM at its shipment from the Epson authorized service center. What Epson Will Do To Correct Problems: Should your... be removed or should the product fail to function properly as you must provide proof of the date of misuse, abuse, improper installation, neglect, improper shipping, damage caused by this warranty. This warranty does not cover ribbons, ink cartridges or third party parts, ...
...Possessions). This warranty does not cover any color change or fading of prints or reimbursement of your Epson printer prove defective during the warranty period, please call the Epson ConnectionSM at its shipment from the Epson authorized service center. What Epson Will Do To Correct Problems: Should your... be removed or should the product fail to function properly as you must provide proof of the date of misuse, abuse, improper installation, neglect, improper shipping, damage caused by this warranty. This warranty does not cover ribbons, ink cartridges or third party parts, ...
Start Here
Page 1
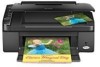
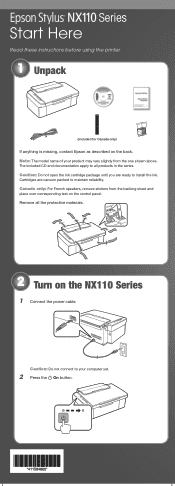
Note: The model name of your computer yet. 2 Press the On button. The included CD and documentation apply to install the ink. Cartridges are ready to all the protective materials. 2 Turn on the NX110 Series 1 Connect the power cable. Canada only: For French speakers, remove ... all products in the series. Series Start Here Read these instructions before using the printer. 1 Unpack (Included for Canada only) If anything is missing, contact Epson as described on the control panel.
Note: The model name of your computer yet. 2 Press the On button. The included CD and documentation apply to install the ink. Cartridges are ready to all the protective materials. 2 Turn on the NX110 Series 1 Connect the power cable. Canada only: For French speakers, remove ... all products in the series. Series Start Here Read these instructions before using the printer. 1 Unpack (Included for Canada only) If anything is missing, contact Epson as described on the control panel.
Start Here
Page 2
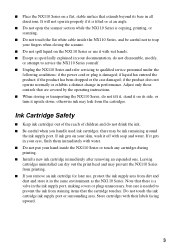
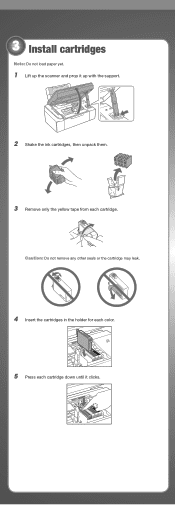
Caution: Do not remove any other seals or the cartridge may leak. 4 Insert the cartridges in the holder for each color. 5 Press each cartridge down until it up the scanner and prop it clicks. 3 Install cartridges Note: Do not load paper yet. 1 Lift up with the support. 2 Shake the ink cartridges, then unpack them. 3 Remove only the yellow tape from each cartridge.
Caution: Do not remove any other seals or the cartridge may leak. 4 Insert the cartridges in the holder for each color. 5 Press each cartridge down until it up the scanner and prop it clicks. 3 Install cartridges Note: Do not load paper yet. 1 Lift up with the support. 2 Shake the ink cartridges, then unpack them. 3 Remove only the yellow tape from each cartridge.
Start Here
Page 5
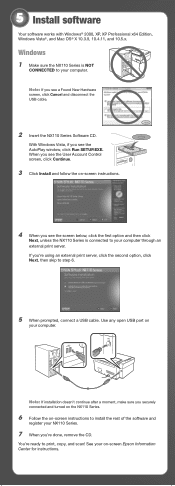
...you see the screen below, click the first option and then click Next, unless the NX110 Series is NOT CONNECTED to your on-screen Epson Information Center for instructions. With Windows Vista, if you 're using an external print server, click the second option, click Next, then skip ... screen, click Cancel and disconnect the USB cable. 2 Insert the NX110 Series Software CD. Windows 1 Make sure the NX110 Series is connected to install the rest of the software and register your computer through an external print server. Use any open USB port on -screen instructions to your NX110...
...you see the screen below, click the first option and then click Next, unless the NX110 Series is NOT CONNECTED to your on-screen Epson Information Center for instructions. With Windows Vista, if you 're using an external print server, click the second option, click Next, then skip ... screen, click Cancel and disconnect the USB cable. 2 Insert the NX110 Series Software CD. Windows 1 Make sure the NX110 Series is connected to install the rest of the software and register your computer through an external print server. Use any open USB port on -screen instructions to your NX110...
Start Here
Page 6
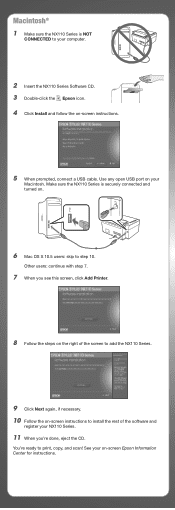
... 8 Follow the steps on the right of the software and register your computer. 2 Insert the NX110 Series Software CD. 3 Double-click the Epson icon. 4 Click Install and follow the on -screen instructions to step 10. Macintosh® 1 Make sure the NX110 Series is securely connected and turned on. 6 ...Mac OS X 10.5 users: skip to install the rest of the screen to add the NX110 Series. 9 Click Next again, if necessary. 10 Follow the on -screen instructions. 5 When prompted, connect...
... 8 Follow the steps on the right of the software and register your computer. 2 Insert the NX110 Series Software CD. 3 Double-click the Epson icon. 4 Click Install and follow the on -screen instructions to step 10. Macintosh® 1 Make sure the NX110 Series is securely connected and turned on. 6 ...Mac OS X 10.5 users: skip to install the rest of the screen to add the NX110 Series. 9 Click Next again, if necessary. 10 Follow the on -screen instructions. 5 When prompted, connect...


