
Operation Manual
Page 2
... 6.2. Power Connection 15 INSTALLATION OF MX-80 F/T TYPE II 17 1. Repacking steps 17 2. Paper Loading 25 7.1. Loading of the Printer 5 4. Power Connection 34 -i- Introduction 1 2. Installation of cut paper sheet 30 8. Top of the Printer 18 4. Column layout on fanfold... setting 14 7. Top of fanfold paper 25 7.1.2. Roll paper holder 29 7.2.2. Paper Loading 10 6.1. Gap Adjustment 15 8. Cartridge Ribbon Setting 22 6. Loading of form position setting 28 7.2. Roll paper 29 7.2.1. Unpacking steps 3 1.2. Separator Installation 23 6. Removal ...
... 6.2. Power Connection 15 INSTALLATION OF MX-80 F/T TYPE II 17 1. Repacking steps 17 2. Paper Loading 25 7.1. Loading of the Printer 5 4. Power Connection 34 -i- Introduction 1 2. Installation of cut paper sheet 30 8. Top of the Printer 18 4. Column layout on fanfold... setting 14 7. Top of fanfold paper 25 7.1.2. Roll paper holder 29 7.2.2. Paper Loading 10 6.1. Gap Adjustment 15 8. Cartridge Ribbon Setting 22 6. Loading of form position setting 28 7.2. Roll paper 29 7.2.1. Unpacking steps 3 1.2. Separator Installation 23 6. Removal ...

Operation Manual
Page 4
...EPSON MX-80 Type II and MX-80 F/T Type II Dot Matrix Printers ... 1 Fig. 2 Contents of Carton 4 Fig. 3 Laying Printer on Firm Surface 5 Fig. 4 Assembly Tools 6 Fig. 5 Removal of Shipping Screws 7 Fig. 6 Removal of Printer Lid 7 Fig. 7 Remounting of Printer Lid 8 Fig. 8 Cartridge Ribbon Setting 8 Fig. 9 Cartridge Ribbon Setting 9 Fig. 10 Examples of Correct and Incorrect Ribbon... Screws 20 Fig. 23 Removal of Printer Lid 21 Fig. 24 Cartridge Ribbon Setting 2 2 Fig. 25 Cartridge Ribbon Setting 22 Fig. 26 Examples of Correct and Incorrect Ribbon Setting 23 Fig. 27 Separator Installation...
...EPSON MX-80 Type II and MX-80 F/T Type II Dot Matrix Printers ... 1 Fig. 2 Contents of Carton 4 Fig. 3 Laying Printer on Firm Surface 5 Fig. 4 Assembly Tools 6 Fig. 5 Removal of Shipping Screws 7 Fig. 6 Removal of Printer Lid 7 Fig. 7 Remounting of Printer Lid 8 Fig. 8 Cartridge Ribbon Setting 8 Fig. 9 Cartridge Ribbon Setting 9 Fig. 10 Examples of Correct and Incorrect Ribbon... Screws 20 Fig. 23 Removal of Printer Lid 21 Fig. 24 Cartridge Ribbon Setting 2 2 Fig. 25 Cartridge Ribbon Setting 22 Fig. 26 Examples of Correct and Incorrect Ribbon Setting 23 Fig. 27 Separator Installation...

Operation Manual
Page 8
...function selectable by DIP switch setting or variable by software. (c) Programmable line spacing. (d) Vertical tabulation and horizontal tabulation (e) Buzzer, printer select/deselect function. (4) High throughput by DIP switch setting or software. (7) Complete with versatile functions to -replace "throwaway" print...Top of approx. 100 x 106 characters. (6) 8 international character sets are freely available. 2. Characteristics The MX-80 Type II and MX-80 F/T Type II have been designed as a printer with standard equipment including paper end detector, custom cartridge ribbon, etc. -2-
...function selectable by DIP switch setting or variable by software. (c) Programmable line spacing. (d) Vertical tabulation and horizontal tabulation (e) Buzzer, printer select/deselect function. (4) High throughput by DIP switch setting or software. (7) Complete with versatile functions to -replace "throwaway" print...Top of approx. 100 x 106 characters. (6) 8 international character sets are freely available. 2. Characteristics The MX-80 Type II and MX-80 F/T Type II have been designed as a printer with standard equipment including paper end detector, custom cartridge ribbon, etc. -2-
Operation Manual
Page 10
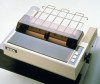
MX-80 Type I I Dot Matrix Printer 1 2. Cartridge Ribbon 1 4. Separator 1 3. Power Cord (Only European Type 220/240V) 1 5. 1. MX-80 Type I I Operation Manual 1 Fig. 2 Contents of Carton -4-
MX-80 Type I I Dot Matrix Printer 1 2. Cartridge Ribbon 1 4. Separator 1 3. Power Cord (Only European Type 220/240V) 1 5. 1. MX-80 Type I I Operation Manual 1 Fig. 2 Contents of Carton -4-

Operation Manual
Page 14
... the cartridge case when pushing the cartridge ribbon down , Fig. 7 Remounting of the printer lid onto the left projection and push the printer lid down . (See Fig. 8.) Fig. 8 Cartridge Ribbon Setting -8- Cartridge Ribbon Setting EPSON's Cartridge Ribbon is touching. Fit the left side of Printer Lid 4. STEP 3. To facilitate the cartridge ribbon setting, be sure to soil your fingers...
... the cartridge case when pushing the cartridge ribbon down , Fig. 7 Remounting of the printer lid onto the left projection and push the printer lid down . (See Fig. 8.) Fig. 8 Cartridge Ribbon Setting -8- Cartridge Ribbon Setting EPSON's Cartridge Ribbon is touching. Fit the left side of Printer Lid 4. STEP 3. To facilitate the cartridge ribbon setting, be sure to soil your fingers...

Operation Manual
Page 24
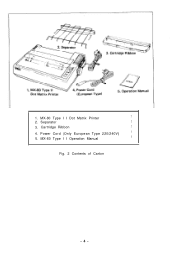
... to electric noise-generating equipment, such as large-power motors, refrigerators, etc. (d) Do not subject the Printer to temperatures below 5°C (40°F) or above 35°C (95°F) during operation, to ...Printer (1) Operating site selection When installing the MX-80 F/T Type I I, observe the following instructions. (a) Place the Printer on which the MX-80 F/T Type I I Operation Manual 1 Fig. 19 Contents of the Printer. MX-80 F/T Type II Dot Matrix Printer 1 2. Separator 1 3. MX-80 F/T Type I I is placed. (b) Avoid operating the MX-80 F/T Type. Cartridge Ribbon...
... to electric noise-generating equipment, such as large-power motors, refrigerators, etc. (d) Do not subject the Printer to temperatures below 5°C (40°F) or above 35°C (95°F) during operation, to ...Printer (1) Operating site selection When installing the MX-80 F/T Type I I, observe the following instructions. (a) Place the Printer on which the MX-80 F/T Type I I Operation Manual 1 Fig. 19 Contents of the Printer. MX-80 F/T Type II Dot Matrix Printer 1 2. Separator 1 3. MX-80 F/T Type I I is placed. (b) Avoid operating the MX-80 F/T Type. Cartridge Ribbon...
Operation Manual
Page 28
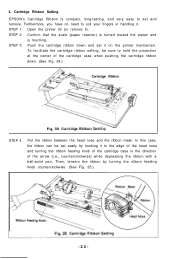
Cartridge Ribbon Setting EPSON's Cartridge Ribbon is touching. STEP 1. Open the printer lid (or remove it . To facilitate the cartridge ribbon setting, be set easily by turning the ribbon feeding knob counterclockwise. (See Fig. 25.) -22- Put the ribbon between the head nose and the ribbon mask. Then, tension the ribbon by hooking it to set it on the printer mechanism...
Cartridge Ribbon Setting EPSON's Cartridge Ribbon is touching. STEP 1. Open the printer lid (or remove it . To facilitate the cartridge ribbon setting, be set easily by turning the ribbon feeding knob counterclockwise. (See Fig. 25.) -22- Put the ribbon between the head nose and the ribbon mask. Then, tension the ribbon by hooking it to set it on the printer mechanism...

Operation Manual
Page 29
Set the separator by inserting its edge into the two holes located at the rear part of the frame of Correct and Incorrect Ribbon Setting 5. Confirm that the ribbon is neither twisted nor creased and that the cartridge is set properly. Fig. 26 Examples of the printer mechanism. (See Fig. 27.) I Fig. 27 Separator Installation -23- Separator Installation The separator of the ribbon may cause it to smooth paper feeding. Incorrect setting of the Printer contributes to come off. (See Fig. 26.) 2. NOTES: 1.
Set the separator by inserting its edge into the two holes located at the rear part of the frame of Correct and Incorrect Ribbon Setting 5. Confirm that the ribbon is neither twisted nor creased and that the cartridge is set properly. Fig. 26 Examples of the printer mechanism. (See Fig. 27.) I Fig. 27 Separator Installation -23- Separator Installation The separator of the ribbon may cause it to smooth paper feeding. Incorrect setting of the Printer contributes to come off. (See Fig. 26.) 2. NOTES: 1.

Operation Manual
Page 46
... pin Nos. 2, 4, 7 and 9 to pin NO. 33. -40- Self -Test The MX-80 Type I I has a self-test (self-diagnostic) function to check the following two methods. (a)... all previously established data such as follows: a) Connect ACKNLG signal pin No. 10 to start the Printer again when it is automatically put in the OFF-LINE state and paper advancement can be performed by ...either of the following . (1) Print head operation and printing quality (2) Operation of the printer mechanisms (motor, cartridge ribbon mechanism, belt, etc.) The self-test function is pre-programmed and can be performed by ...
... pin Nos. 2, 4, 7 and 9 to pin NO. 33. -40- Self -Test The MX-80 Type I I has a self-test (self-diagnostic) function to check the following two methods. (a)... all previously established data such as follows: a) Connect ACKNLG signal pin No. 10 to start the Printer again when it is automatically put in the OFF-LINE state and paper advancement can be performed by ...either of the following . (1) Print head operation and printing quality (2) Operation of the printer mechanisms (motor, cartridge ribbon mechanism, belt, etc.) The self-test function is pre-programmed and can be performed by ...
Operation Manual
Page 58
... two different print modes. You might be familiar with the text mode because an ordinary printer has it impacts ribbon with carbon and forms the characters you to a computer or another is the text mode, and another equipment except a limited number of the ... impact or non-impact printing method, line or serial printing method and so on. •Broadly speaking, the EPSON MX-80 Type I I belongs to understand. Definitions of hardware and software. As you know, many kinds of the chapter are marketed in the buffer memory and then print at the same time like a line printer...
... two different print modes. You might be familiar with the text mode because an ordinary printer has it impacts ribbon with carbon and forms the characters you to a computer or another is the text mode, and another equipment except a limited number of the ... impact or non-impact printing method, line or serial printing method and so on. •Broadly speaking, the EPSON MX-80 Type I I belongs to understand. Definitions of hardware and software. As you know, many kinds of the chapter are marketed in the buffer memory and then print at the same time like a line printer...

Operation Manual
Page 59
...character formation. Since the MX-80 Type II is formed by the electronics inside the printer. EPSON's MX-80 Type II can control each letter, number and punctuation mark is a bidirectional printing type, the head can create distinctive characters like with typewriter. They hit the ribbon. Then the head shifts ... "wires" vertically. In the above figure, the print head moves from the holder and to impact carbon, causing the character to print characters. It has a print head that the printer has. As an example (see Fig. 61). Signals from the computer cause the appropriate dot...
...character formation. Since the MX-80 Type II is formed by the electronics inside the printer. EPSON's MX-80 Type II can control each letter, number and punctuation mark is a bidirectional printing type, the head can create distinctive characters like with typewriter. They hit the ribbon. Then the head shifts ... "wires" vertically. In the above figure, the print head moves from the holder and to impact carbon, causing the character to print characters. It has a print head that the printer has. As an example (see Fig. 61). Signals from the computer cause the appropriate dot...

Operation Manual
Page 84
...the head. 2. STEP 6. Parts Replacement (1) General Owing to the sophisticated nature of the circuitry and mechanisms utilized in the Type II Printer, operator's troubleshooting is logically obliged to be cleaned with a soft brush to as described below. (See Fig. 69.) NOTE: Be...lock lever. NOTES: 1. MAINTENANCE 1. Turn the power off the printer lid and cartridge ribbon. Turn the head lock lever clockwise and remove the print head. Preventive Maintenance Preventive maintenance for the MX-80 Type II and MX-80 F/T Type I I Printer was purchased. (2) Print head In case of a print head ...
...the head. 2. STEP 6. Parts Replacement (1) General Owing to the sophisticated nature of the circuitry and mechanisms utilized in the Type II Printer, operator's troubleshooting is logically obliged to be cleaned with a soft brush to as described below. (See Fig. 69.) NOTE: Be...lock lever. NOTES: 1. MAINTENANCE 1. Turn the power off the printer lid and cartridge ribbon. Turn the head lock lever clockwise and remove the print head. Preventive Maintenance Preventive maintenance for the MX-80 Type II and MX-80 F/T Type I I Printer was purchased. (2) Print head In case of a print head ...


