Product Information Guide
Page 1
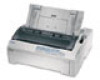
... You can load only ordinary single sheets in the pull position along with telex machines. EPSON FX-880/FX-1180 13 paper guide continuous paper support* printer cover logo plate edge guides front cover paper release lever control panel paper tension unit tractor ...center support and sprockets are parts of the tractor. Additional tractor unit (C800201 for FX-880, C800211 for FX-1180) Feeds up to 6 parts. 11/98 EPSON FX-880/FX-1180 - 1 User Replaceable Parts FX-880 User Replaceable Part Parts Price List Name Part Number Front cover Cover, front 1036539 Knob Knob ...
... You can load only ordinary single sheets in the pull position along with telex machines. EPSON FX-880/FX-1180 13 paper guide continuous paper support* printer cover logo plate edge guides front cover paper release lever control panel paper tension unit tractor ...center support and sprockets are parts of the tractor. Additional tractor unit (C800201 for FX-880, C800211 for FX-1180) Feeds up to 6 parts. 11/98 EPSON FX-880/FX-1180 - 1 User Replaceable Parts FX-880 User Replaceable Part Parts Price List Name Part Number Front cover Cover, front 1036539 Knob Knob ...
Product Information Guide
Page 12
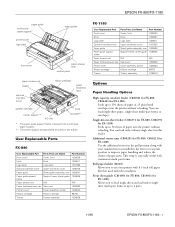
...light begins flashing and the printer enters the micro adjust mode. 3. paper tension unit 3. then slide the print head to turn off the printer. 1. EPSON FX-880/FX-1180 Note: Your tear-off position setting remains in the ribbon. 12 - Replacing the Ribbon Cartridge Warning: You... need to adjust the tear-off position beyond these limits, the printer beeps and stops moving the paper. 4. Remove the printer cover. 4. EPSON FX-880/FX-...
...light begins flashing and the printer enters the micro adjust mode. 3. paper tension unit 3. then slide the print head to turn off the printer. 1. EPSON FX-880/FX-1180 Note: Your tear-off position setting remains in the ribbon. 12 - Replacing the Ribbon Cartridge Warning: You... need to adjust the tear-off position beyond these limits, the printer beeps and stops moving the paper. 4. Remove the printer cover. 4. EPSON FX-880/FX-...
Product Information Guide
Page 13
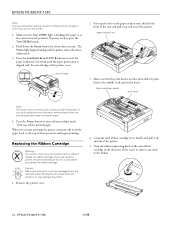
... may sometimes need to fit the plastic hooks into place. 10. EPSON FX-880/FX-1180 6. If continuous paper is off the printer before you turn on the printer's mounting pegs and lowering it firmly down both ends of the printer. 6. Slide the print head from side to side to make sure... head and ribbon guide while you use the knob; Replace the printer cover and press the Operate button to turn the ribbon-tightening knob to turn off . The factory settings are bold. 11/98 EPSON FX-880/FX-1180 - 13 otherwise the printer may be lost. 5. Make sure the Paper Out ...
... may sometimes need to fit the plastic hooks into place. 10. EPSON FX-880/FX-1180 6. If continuous paper is off the printer before you turn on the printer's mounting pegs and lowering it firmly down both ends of the printer. 6. Slide the print head from side to side to make sure... head and ribbon guide while you use the knob; Replace the printer cover and press the Operate button to turn the ribbon-tightening knob to turn off . The factory settings are bold. 11/98 EPSON FX-880/FX-1180 - 13 otherwise the printer may be lost. 5. Make sure the Paper Out ...

User Manual
Page 5
... Manuals 0-11 Warnings, Cautions, and Notes 0-12 Chapter 1 Setting Up the Printer Unpacking the Printer 1-2 Choosing a Place for the Printer 1-3 Positioning the continuous paper supply 1-4 Installing or Replacing the Ribbon Cartridge 1-5 Plugging in the Printer 1-10 Connecting the Printer to Your Computer 1-11 Installing the Printer Driver on Your PC 1-13 For Windows 95 or NT 4.0 1-13...
... Manuals 0-11 Warnings, Cautions, and Notes 0-12 Chapter 1 Setting Up the Printer Unpacking the Printer 1-2 Choosing a Place for the Printer 1-3 Positioning the continuous paper supply 1-4 Installing or Replacing the Ribbon Cartridge 1-5 Plugging in the Printer 1-10 Connecting the Printer to Your Computer 1-11 Installing the Printer Driver on Your PC 1-13 For Windows 95 or NT 4.0 1-13...

User Manual
Page 17
...variety of the print head and other printer parts. By adding options, such as a cut-sheet feeder, pull tractor, or roll paper holder, you need to replace the ribbon cartridge. They ensure proper ...printer, see Appendix A, "Enhancing Your Printer With Options." Genuine EPSON ribbon cartridges are also available to work properly with everything necessary to Know Your Printer 7 Getting to print on page 1-5. Options Your printer comes with your printer's versatility. Ribbon Cartridges Your printer uses the following ribbon cartridge: EPSON black ribbon cartridge FX-880: #8750 FX...
...variety of the print head and other printer parts. By adding options, such as a cut-sheet feeder, pull tractor, or roll paper holder, you need to replace the ribbon cartridge. They ensure proper ...printer, see Appendix A, "Enhancing Your Printer With Options." Genuine EPSON ribbon cartridges are also available to work properly with everything necessary to Know Your Printer 7 Getting to print on page 1-5. Options Your printer comes with your printer's versatility. Ribbon Cartridges Your printer uses the following ribbon cartridge: EPSON black ribbon cartridge FX-880: #8750 FX...
User Manual
Page 21
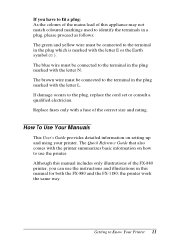
... your printer. The brown wire must be connected to the terminal in the plug marked with the letter E or the Earth symbol (G ). The blue wire must be connected to fit a plug: As the colours of the mains lead of this manual for both the FX-880 and the FX-1180; Replace fuses ...only with the letter N. Although this manual includes only illustrations of the correct size and rating. Getting to the plug, replace the cord set or consult a qualified electrician. How To Use Your...
... your printer. The brown wire must be connected to the terminal in the plug marked with the letter E or the Earth symbol (G ). The blue wire must be connected to fit a plug: As the colours of the mains lead of this manual for both the FX-880 and the FX-1180; Replace fuses ...only with the letter N. Although this manual includes only illustrations of the correct size and rating. Getting to the plug, replace the cord set or consult a qualified electrician. How To Use Your...
User Manual
Page 23
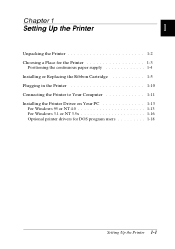
Chapter 1 Setting Up the Printer 1 Unpacking the Printer 1-2 Choosing a Place for the Printer 1-3 Positioning the continuous paper supply 1-4 Installing or Replacing the Ribbon Cartridge 1-5 Plugging in the Printer 1-10 Connecting the Printer to Your Computer 1-11 Installing the Printer Driver on Your PC 1-13 For Windows 95 or NT 4.0 1-13 For Windows 3.1 or NT 3.5x 1-16 Optional printer drivers for DOS program users 1-18 Setting Up the Printer 1-1
Chapter 1 Setting Up the Printer 1 Unpacking the Printer 1-2 Choosing a Place for the Printer 1-3 Positioning the continuous paper supply 1-4 Installing or Replacing the Ribbon Cartridge 1-5 Plugging in the Printer 1-10 Connecting the Printer to Your Computer 1-11 Installing the Printer Driver on Your PC 1-13 For Windows 95 or NT 4.0 1-13 For Windows 3.1 or NT 3.5x 1-16 Optional printer drivers for DOS program users 1-18 Setting Up the Printer 1-1

User Manual
Page 27
... the surface of genuine EPSON ribbon cartridges (#8750 for FX-880, #8755 for FX-1180). The printer is on may damage the printer. c Caution: Moving the print head while the printer is off . EPSON recommends the use of the Operate button is even with a new one. Products not manufactured by EPSON may be hot; Installing or Replacing the Ribbon Cartridge...
... the surface of genuine EPSON ribbon cartridges (#8750 for FX-880, #8755 for FX-1180). The printer is on may damage the printer. c Caution: Moving the print head while the printer is off . EPSON recommends the use of the Operate button is even with a new one. Products not manufactured by EPSON may be hot; Installing or Replacing the Ribbon Cartridge...

User Manual
Page 32
Make sure the printer is turned off when the surface of the Operate button is off . Then push it down until it clicks. Plugging in the Printer 1. The printer is even with the button protectors as shown below. 1-10 Setting Up the Printer 12. Replace the printer cover by inserting the front tabs into the slots on the printer and lowering the cover into place.
Make sure the printer is turned off when the surface of the Operate button is off . Then push it down until it clicks. Plugging in the Printer 1. The printer is even with the button protectors as shown below. 1-10 Setting Up the Printer 12. Replace the printer cover by inserting the front tabs into the slots on the printer and lowering the cover into place.

User Manual
Page 90
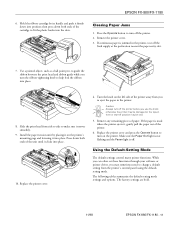
Store the tractor in this chapter. 5. Then press down on Continuous Paper 3-29 To replace the paper tension unit, lower it in the front or rear push position as described earlier in a safe place, or install it onto the printer's mounting pegs. Replace the printer cover. Printing on both ends of the unit until it off the printer. 3 4. 3. Press the tractor's lock tabs, tilt the tractor toward you, and lift it clicks into place. 6.
Store the tractor in this chapter. 5. Then press down on Continuous Paper 3-29 To replace the paper tension unit, lower it in the front or rear push position as described earlier in a safe place, or install it onto the printer's mounting pegs. Replace the printer cover. Printing on both ends of the unit until it off the printer. 3 4. 3. Press the tractor's lock tabs, tilt the tractor toward you, and lift it clicks into place. 6.
User Manual
Page 139
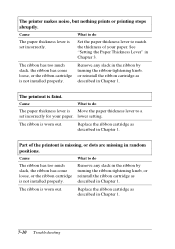
...installed properly. Remove any slack in the ribbon by turning the ribbon-tightening knob, or reinstall the ribbon cartridge as described in Chapter 1. The printer makes noise, but nothing prints or printing stops abruptly. The ribbon has too much slack, the ribbon has come loose, or the ribbon ...cartridge is worn out. The printout is worn out. Replace the ribbon cartridge as described in Chapter 1. Cause What to match the thickness of the printout is set incorrectly for your paper. See "Setting...
...installed properly. Remove any slack in the ribbon by turning the ribbon-tightening knob, or reinstall the ribbon cartridge as described in Chapter 1. The printer makes noise, but nothing prints or printing stops abruptly. The ribbon has too much slack, the ribbon has come loose, or the ribbon ...cartridge is worn out. The printout is worn out. Replace the ribbon cartridge as described in Chapter 1. Cause What to match the thickness of the printout is set incorrectly for your paper. See "Setting...
User Manual
Page 140
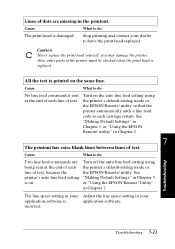
... line space setting in your Adjust the line space setting in Chapter 5, is application software. All the text is replaced. Troubleshooting 7-11 Also, other parts of the printer must be checked when the print head is printed on the same line. Lines of dots are Turn off the... Default Settings" in Chapter 2. 7 The printout has extra blank lines between lines of each carriage return. c Caution: Never replace the print head yourself; or "Using the EPSON Remote! Cause What to do Two line feed commands are missing in Chapter 2. Cause What to do No line feed command ...
... line space setting in your Adjust the line space setting in Chapter 5, is application software. All the text is replaced. Troubleshooting 7-11 Also, other parts of the printer must be checked when the print head is printed on the same line. Lines of dots are Turn off the... Default Settings" in Chapter 2. 7 The printout has extra blank lines between lines of each carriage return. c Caution: Never replace the print head yourself; or "Using the EPSON Remote! Cause What to do Two line feed commands are missing in Chapter 2. Cause What to do No line feed command ...

User Manual
Page 153
...bin 1 or bin 2)" on loading paper in the single-bin cut -sheet feeder. A-6 Enhancing Your Printer With Options You are now ready to select your paper path (bin 1 or bin 2). To replace the printer cover, first insert the front tabs into place. See "Selecting your single-bin, high-capacity, or ...page A-10. For instructions on page A-14. Follow the steps below to load single sheets and envelopes one at a time. For instructions on the printer, then lower the cover into the slots on loading paper in the single-bin cut -sheet feeder. c Caution: Do not load multi-part forms...
...bin 1 or bin 2)" on loading paper in the single-bin cut -sheet feeder. A-6 Enhancing Your Printer With Options You are now ready to select your paper path (bin 1 or bin 2). To replace the printer cover, first insert the front tabs into place. See "Selecting your single-bin, high-capacity, or ...page A-10. For instructions on page A-14. Follow the steps below to load single sheets and envelopes one at a time. For instructions on the printer, then lower the cover into the slots on loading paper in the single-bin cut -sheet feeder. c Caution: Do not load multi-part forms...

User Manual
Page 173
...above. Slide the interface card along the slots on both sides of the printer and remove the plate. 3. Firmly push in a safe place; Make sure the printer is fully inserted into the printer's internal socket. Then replace the screws and tighten them. Note: Store the shield plate in the... card to make sure the connector at the back of the card is turned off. A-26 Enhancing Your Printer With Options If you...
...above. Slide the interface card along the slots on both sides of the printer and remove the plate. 3. Firmly push in a safe place; Make sure the printer is fully inserted into the printer's internal socket. Then replace the screws and tighten them. Note: Store the shield plate in the... card to make sure the connector at the back of the card is turned off. A-26 Enhancing Your Printer With Options If you...
User Manual
Page 177
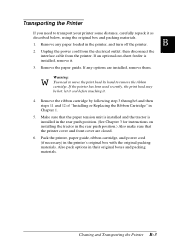
... the tractor in the printer, and turn off the printer. If the printer has been used recently, the print head may be hot; Transporting the Printer If you need to move the print head by following step 3 through 6 and then steps 11 and 12 of "Installing or Replacing the Ribbon Cartridge" in... Chapter 1. 5. If any paper loaded in the rear push position.) Also make sure that the printer cover and front cover are installed, remove them. Also pack options in the...
... the tractor in the printer, and turn off the printer. If the printer has been used recently, the print head may be hot; Transporting the Printer If you need to move the print head by following step 3 through 6 and then steps 11 and 12 of "Installing or Replacing the Ribbon Cartridge" in... Chapter 1. 5. If any paper loaded in the rear push position.) Also make sure that the printer cover and front cover are installed, remove them. Also pack options in the...

User Manual
Page 194
.... You can select the character tables shown in this section with an asterisk (*) after the table name are replaced.) Table 1 Table 2 Specifications C-17 C The character tables with the printer's default-setting mode or by using software commands. when you select Table 2, hex codes 00 to 9FH are... replaced; Character Tables You can choose between the two IBM character tables shown below when you select IBM 2380 ...
.... You can select the character tables shown in this section with an asterisk (*) after the table name are replaced.) Table 1 Table 2 Specifications C-17 C The character tables with the printer's default-setting mode or by using software commands. when you select Table 2, hex codes 00 to 9FH are... replaced; Character Tables You can choose between the two IBM character tables shown below when you select IBM 2380 ...

User Manual
Page 219
..., 3-19 Release lever. See EPSON Status Monitor 2 utility Printing or.... See EPSON remote! See Paper release lever Remote!. utility EPSON Status Monitor 2. See EPSON Remote! Printer choosing a... place for, 1-3 cleaning, B-2 connecting to your computer, 1-11 errors, 7-2 parts, inside back cover plugging in, 1-10 specifications. See Specifications transporting, B-3 unpacking, 1-2 Printer cover inserting, 1-10 removing, 1-6 Printer...5x, 2-19 Windows NT 4.0, 2-13 Printer utilities EPSON Remote!. See Front push tractor or Rear...
..., 3-19 Release lever. See EPSON Status Monitor 2 utility Printing or.... See EPSON remote! See Paper release lever Remote!. utility EPSON Status Monitor 2. See EPSON Remote! Printer choosing a... place for, 1-3 cleaning, B-2 connecting to your computer, 1-11 errors, 7-2 parts, inside back cover plugging in, 1-10 specifications. See Specifications transporting, B-3 unpacking, 1-2 Printer cover inserting, 1-10 removing, 1-6 Printer...5x, 2-19 Windows NT 4.0, 2-13 Printer utilities EPSON Remote!. See Front push tractor or Rear...
User Setup Information
Page 1
... or Rear Push Tractor 6 Removing Continuous Paper With Labels From the Front Push Tractor 7 Replacing the Ribbon Cartridge 8 Clearing Paper Jams 14 Error Indicators 16 EPSON is a registered trademark of their respective owners. ® 9-Pin Dot Matrix Printer Quick Reference Guide Read your User's Guide first for identification purposes only and may be...
... or Rear Push Tractor 6 Removing Continuous Paper With Labels From the Front Push Tractor 7 Replacing the Ribbon Cartridge 8 Clearing Paper Jams 14 Error Indicators 16 EPSON is a registered trademark of their respective owners. ® 9-Pin Dot Matrix Printer Quick Reference Guide Read your User's Guide first for identification purposes only and may be...

User Setup Information
Page 8
Ribbon cartridge: FX-880 FX-1180 #8750 #8755 c Caution: Products not manufactured by EPSON's warranties. 8 Replacing the Ribbon Cartridge Ribbon Cartridge When printing becomes faint, you use genuine EPSON ribbon cartridges. They ensure proper operation and long life of the print head and other printer parts. EPSON recommends you need to work properly with your printer not covered by EPSON may cause damage to your EPSON printer. These cartridges are designed and manufactured to replace the ribbon cartridge.
Ribbon cartridge: FX-880 FX-1180 #8750 #8755 c Caution: Products not manufactured by EPSON's warranties. 8 Replacing the Ribbon Cartridge Ribbon Cartridge When printing becomes faint, you use genuine EPSON ribbon cartridges. They ensure proper operation and long life of the print head and other printer parts. EPSON recommends you need to work properly with your printer not covered by EPSON may cause damage to your EPSON printer. These cartridges are designed and manufactured to replace the ribbon cartridge.

User Setup Information
Page 9
...: You need to move the print head by its back edge and then pull it . 1 3 g1 Press the Operate button to replace the ribbon cartridge. Lift the printer cover by hand to turn off when the surface of the Operate button is on may be hot; let it cool for a few ...minutes before touching it straight up and off. 9 c Caution: Moving the print head while the printer is even with the button protectors as shown. 2 Unplug the printer from the electrical outlet. Replacing the Ribbon Cartridge To replace the ribbon cartridge, follow the steps below. The...
...: You need to move the print head by its back edge and then pull it . 1 3 g1 Press the Operate button to replace the ribbon cartridge. Lift the printer cover by hand to turn off when the surface of the Operate button is on may be hot; let it cool for a few ...minutes before touching it straight up and off. 9 c Caution: Moving the print head while the printer is even with the button protectors as shown. 2 Unplug the printer from the electrical outlet. Replacing the Ribbon Cartridge To replace the ribbon cartridge, follow the steps below. The...

