
Technical Brief (Impact Printers)
Page 1
...Near Letter Quality Twenty-four-pin impact printers - EPSON impact printers are renowned for their reliability with LQ FX-980-Nine-pin narrow carriage Wide carriage printers have 4 number in their names Narrow carriage printers have finer printhead pins which :...Ribbon quality M Ribbon cartridge reliability M Total Print Volume vs. L LL L Nine-pin impact printers - These printers have 3 numbers in purchase price and low cost of printer: Low cost - only impact printers can handle multi-part forms and multiple paper paths that the printer are capable of an EPSON's impact printer...
...Near Letter Quality Twenty-four-pin impact printers - EPSON impact printers are renowned for their reliability with LQ FX-980-Nine-pin narrow carriage Wide carriage printers have 4 number in their names Narrow carriage printers have finer printhead pins which :...Ribbon quality M Ribbon cartridge reliability M Total Print Volume vs. L LL L Nine-pin impact printers - These printers have 3 numbers in purchase price and low cost of printer: Low cost - only impact printers can handle multi-part forms and multiple paper paths that the printer are capable of an EPSON's impact printer...

Technical Brief (Impact Printers)
Page 6
... Manufactured with ink precisely applied to every sale 5 Reliability-Ribbon cartridge reliability Most EPSON impact printers use a stationary ribbon cartridge. L EPSON's stationary ribbon cartridge Competitive design with the print head, and therefore has...EPSON Sales Training EPSON is a registered trademark of Seiko Epson Corporation. 1/00 Other trademarks are the property of the print head = First Character = 2,000,000 th Character vs. Technical Brief-Multimedia projectors Page 6 Reliability-Ribbon quality EPSON brand impact printer ribbons are ... EPSON's stationary ribbon...
... Manufactured with ink precisely applied to every sale 5 Reliability-Ribbon cartridge reliability Most EPSON impact printers use a stationary ribbon cartridge. L EPSON's stationary ribbon cartridge Competitive design with the print head, and therefore has...EPSON Sales Training EPSON is a registered trademark of Seiko Epson Corporation. 1/00 Other trademarks are the property of the print head = First Character = 2,000,000 th Character vs. Technical Brief-Multimedia projectors Page 6 Reliability-Ribbon quality EPSON brand impact printer ribbons are ... EPSON's stationary ribbon...

Product Brochure
Page 2
...10.1" x 25.2" x 15.8" (257 x 639 x 402mm) Weight: approx. 28.8 lb (13 kg.) Product Codes/Accessories FX-2180 impact printer FX-2180 fabric ribbon Pull tractor unit Cut sheet feeders High capacity cut sheet feeder Second-bin cut sheet feeder† Interfaces Type B Serial interface card ...C806741 C823051 C823071 C823452 C823572 C823141 C823151 8310 Warranty Two-year limited warranty Support - Epson disclaims any product or service. © Copyright 1998 Epson America, Inc. EPSON and EPSON ESC/P are trademarks and/ or registered trademarks of their respective companies. maximum thickness...
...10.1" x 25.2" x 15.8" (257 x 639 x 402mm) Weight: approx. 28.8 lb (13 kg.) Product Codes/Accessories FX-2180 impact printer FX-2180 fabric ribbon Pull tractor unit Cut sheet feeders High capacity cut sheet feeder Second-bin cut sheet feeder† Interfaces Type B Serial interface card ...C806741 C823051 C823071 C823452 C823572 C823141 C823151 8310 Warranty Two-year limited warranty Support - Epson disclaims any product or service. © Copyright 1998 Epson America, Inc. EPSON and EPSON ESC/P are trademarks and/ or registered trademarks of their respective companies. maximum thickness...

Product Information Guide
Page 1
... print server Model Number C823051 C823071 C823141 C823151 C823452 C823572 11/98 EPSON FX-2180 - 1 Roll paper holder (#8310) Allows you to 150 sheets of paper jams. Using a pull tractor in your printer with 8.5-inch roll paper like that used with a push tractor is...) Feeds up to use your printer. EPSON FX-2180 paper guide cover printer cover rear edge guides paper guide paper separator paper release lever User Replaceable Part Ribbon cartridge Ribbon pack Tractor (pull or front push) Parts Price List Name Ribbon cartridge Ribbon pack Front tractor assembly Part Number...
... print server Model Number C823051 C823071 C823141 C823151 C823452 C823572 11/98 EPSON FX-2180 - 1 Roll paper holder (#8310) Allows you to 150 sheets of paper jams. Using a pull tractor in your printer with 8.5-inch roll paper like that used with a push tractor is...) Feeds up to use your printer. EPSON FX-2180 paper guide cover printer cover rear edge guides paper guide paper separator paper release lever User Replaceable Part Ribbon cartridge Ribbon pack Tractor (pull or front push) Parts Price List Name Ribbon cartridge Ribbon pack Front tractor assembly Part Number...

Product Information Guide
Page 3
... 0.0075 0.19 (lb) 17 (g/m2) 68 2.5 inches (63.5 mm) min. 15/16 inch (23.8 mm) min. EPSON FX-2180 Ribbon: Black ribbon cartridge (S015086) Ribbon life of the printer for your printer's voltage. corner radius = 0.1 inch (2.5 mm) min. Continuous paper (ordinary and multi-part): Minimum Maximum Width (inches) 4 ... entry: 3.9 16.5 100 420 0.0025 0.065 0.0055 0.14 14 24 52.3 90 Plain paper, bond paper, and recycled paper 11/98 EPSON FX-2180 - 3 Environmental Operation Storage Temperature 41° to 95° F (5° to 35° C) -22° to 140° F...
... 0.0075 0.19 (lb) 17 (g/m2) 68 2.5 inches (63.5 mm) min. 15/16 inch (23.8 mm) min. EPSON FX-2180 Ribbon: Black ribbon cartridge (S015086) Ribbon life of the printer for your printer's voltage. corner radius = 0.1 inch (2.5 mm) min. Continuous paper (ordinary and multi-part): Minimum Maximum Width (inches) 4 ... entry: 3.9 16.5 100 420 0.0025 0.065 0.0055 0.14 14 24 52.3 90 Plain paper, bond paper, and recycled paper 11/98 EPSON FX-2180 - 3 Environmental Operation Storage Temperature 41° to 95° F (5° to 35° C) -22° to 140° F...
Product Information Guide
Page 11
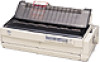
... tear-off edge, you can use the micro adjust feature to move the perforation to feed continuous paper with the top edge of the plastic ribbon cover. Press the Load/Eject U and LF/FF D buttons to adjust the top-of-form position as a reference point when adjusting the top-of-form... adjust it receives a full page of data or a form feed command followed by turning on the page where the printer will start printing. Caution: Never use the tear-off the printed document. EPSON FX-2180 Adjusting the Top-of-Form Position The top-of-form position is the position on the auto tear-off...
... tear-off edge, you can use the micro adjust feature to move the perforation to feed continuous paper with the top edge of the plastic ribbon cover. Press the Load/Eject U and LF/FF D buttons to adjust the top-of-form position as a reference point when adjusting the top-of-form... adjust it receives a full page of data or a form feed command followed by turning on the page where the printer will start printing. Caution: Never use the tear-off the printed document. EPSON FX-2180 Adjusting the Top-of-Form Position The top-of-form position is the position on the auto tear-off...
Product Information Guide
Page 12
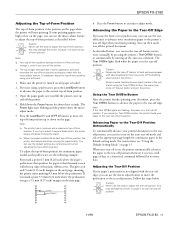
... or forward until you change it, even if you can replace the ribbon cartridge when the print head is not in effect until the paper perforation is not hot; ribbon guide 12 - EPSON FX-2180 11/98 You may damage the printer. Make sure that the print head is aligned with the tear-off... it straight up and out of the paper tension unit) by hand. Caution: Make sure the printer is at the current tear-off position). EPSON FX-2180 Note: Your tear-off position setting remains in the ribbon installation position. 3. Make sure the Tear Off/Bin lights are flashing (the paper is off and...
... or forward until you change it, even if you can replace the ribbon cartridge when the print head is not in effect until the paper perforation is not hot; ribbon guide 12 - EPSON FX-2180 11/98 You may damage the printer. Make sure that the print head is aligned with the tear-off... it straight up and out of the paper tension unit) by hand. Caution: Make sure the printer is at the current tear-off position). EPSON FX-2180 Note: Your tear-off position setting remains in the ribbon installation position. 3. Make sure the Tear Off/Bin lights are flashing (the paper is off and...
Product Information Guide
Page 13
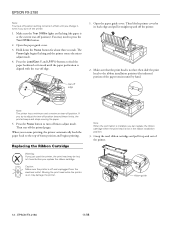
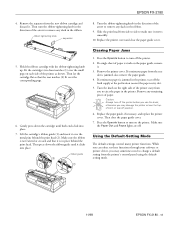
... the Operate button to remove any remaining pieces of the printer as shown. Remove the printer cover. Remove any slack in place behind the print head (2). Then close the paper guide cover. 5. ribbon guide Clearing Paper Jams 1. EPSON FX-2180 4. Remove the separator from side to side to make sure it is stuck on the right...
... the Operate button to remove any remaining pieces of the printer as shown. Remove the printer cover. Remove any slack in place behind the print head (2). Then close the paper guide cover. 5. ribbon guide Clearing Paper Jams 1. EPSON FX-2180 4. Remove the separator from side to side to make sure it is stuck on the right...

Product Information Guide
Page 16
... not to remove the ribbon cartridge. 4. Contact an EPSON dealer if you need to transport your printer some distance, carefully repack it cool before attempting to get water on page 12. 5. Related Documentation 4008467 4008466 4008465 TM-FX2180 PL-FX2180 EPSON FX-2180 User's Guide EPSON FX-2180 Quick Reference Guide EPSON FX-2180 Unpacking sheet EPSON FX-2180 Service Manual EPSON FX-2180 Parts Price List Transporting...
... not to remove the ribbon cartridge. 4. Contact an EPSON dealer if you need to transport your printer some distance, carefully repack it cool before attempting to get water on page 12. 5. Related Documentation 4008467 4008466 4008465 TM-FX2180 PL-FX2180 EPSON FX-2180 User's Guide EPSON FX-2180 Quick Reference Guide EPSON FX-2180 Unpacking sheet EPSON FX-2180 Service Manual EPSON FX-2180 Parts Price List Transporting...

User Manual
Page 3
Printer Parts edge guides paper guide cover printer cover front paper guide (closed) control panel paper thickness lever shield plate paper guide paper separator paper release lever knob ribbon cartridge parallel interface tractor paper tension unit front paper guide (open) front edge guides
Printer Parts edge guides paper guide cover printer cover front paper guide (closed) control panel paper thickness lever shield plate paper guide paper separator paper release lever knob ribbon cartridge parallel interface tractor paper tension unit front paper guide (open) front edge guides

User Manual
Page 5
..., and Notes 0-15 Chapter 1 Setting Up the Printer Unpacking the Printer 1-2 Choosing a Place for the Printer 1-4 Positioning the continuous paper supply 1-5 Installing or Replacing the Ribbon Cartridge 1-6 Attaching the Paper Guide and Paper Separator 1-11 Plugging In the Printer 1-13 Connecting the Printer to Your Computer 1-14 Installing the Printer Driver on Your PC 1-15 For Windows...
..., and Notes 0-15 Chapter 1 Setting Up the Printer Unpacking the Printer 1-2 Choosing a Place for the Printer 1-4 Positioning the continuous paper supply 1-5 Installing or Replacing the Ribbon Cartridge 1-6 Attaching the Paper Guide and Paper Separator 1-11 Plugging In the Printer 1-13 Connecting the Printer to Your Computer 1-14 Installing the Printer Driver on Your PC 1-15 For Windows...

User Manual
Page 21
... on continuous paper and single sheets using a variety of the print head and other printer parts. Genuine EPSON ribbon cartridges are also available to print on options for your printer, see Appendix A, "Enhancing Your Printer With Options." Options Your printer comes with your EPSON printer. By adding options, such as a cut-sheet feeder, pull tractor unit, or roll...
... on continuous paper and single sheets using a variety of the print head and other printer parts. Genuine EPSON ribbon cartridges are also available to print on options for your printer, see Appendix A, "Enhancing Your Printer With Options." Options Your printer comes with your EPSON printer. By adding options, such as a cut-sheet feeder, pull tractor unit, or roll...

User Manual
Page 28
Chapter 1 Setting Up the Printer 1 Unpacking the Printer 1-2 Choosing a Place for the Printer 1-4 Positioning the continuous paper supply 1-5 Installing or Replacing the Ribbon Cartridge 1-6 Attaching the Paper Guide and Paper Separator 1-11 Plugging In the Printer 1-13 Connecting the Printer to Your Computer 1-14 Installing the Printer Driver on Your PC 1-15 For Windows 95 or NT 4.0 1-16 For Windows 3.1 or NT 3.5x 1-19 For DOS programs 1-20 Setting Up the Printer 1-1
Chapter 1 Setting Up the Printer 1 Unpacking the Printer 1-2 Choosing a Place for the Printer 1-4 Positioning the continuous paper supply 1-5 Installing or Replacing the Ribbon Cartridge 1-6 Attaching the Paper Guide and Paper Separator 1-11 Plugging In the Printer 1-13 Connecting the Printer to Your Computer 1-14 Installing the Printer Driver on Your PC 1-15 For Windows 95 or NT 4.0 1-16 For Windows 3.1 or NT 3.5x 1-19 For DOS programs 1-20 Setting Up the Printer 1-1

User Manual
Page 29
Unpacking the Printer Besides this guide, your printer box should include EPSON printer software disks, a Notice Sheet, and the following items: printer power cord paper guide paper separator screwdriver ribbon cartridge Note: Depending on the country in which you have is the right one for your printer model, the power cord may be sure the plug you bought your printer; be permanently attached to the printer. Also, the shape of the power cord plug varies depending on your location. 1-2 Setting Up the Printer
Unpacking the Printer Besides this guide, your printer box should include EPSON printer software disks, a Notice Sheet, and the following items: printer power cord paper guide paper separator screwdriver ribbon cartridge Note: Depending on the country in which you have is the right one for your printer model, the power cord may be sure the plug you bought your printer; be permanently attached to the printer. Also, the shape of the power cord plug varies depending on your location. 1-2 Setting Up the Printer

User Manual
Page 33
... touching it. 1. w Warning: You will need to remove the used the printer, the print head may be hot; Make sure the printer is connected to your printer not covered by EPSON's warranties. If the printer is turned off when the surface of genuine EPSON ribbon cartridges (S015086). let it cool for a few minutes before replacing it from...
... touching it. 1. w Warning: You will need to remove the used the printer, the print head may be hot; Make sure the printer is connected to your printer not covered by EPSON's warranties. If the printer is turned off when the surface of genuine EPSON ribbon cartridges (S015086). let it cool for a few minutes before replacing it from...

User Manual
Page 34
Lift the printer cover by hand. t 1 i 4. Note: When you use the pull tractor, you can replace the ribbon cartridge even though the print head is not hot; Make sure that the print head is not positioned in the ribbon installation position. Then slide the print head to the ribbon installation position (the indented portion of the paper tension unit) by its back edge and then pull it . Setting Up the Printer 1-7 if it is, let it cool for a few minutes before touching it straight up and off. 3.
Lift the printer cover by hand. t 1 i 4. Note: When you use the pull tractor, you can replace the ribbon cartridge even though the print head is not hot; Make sure that the print head is not positioned in the ribbon installation position. Then slide the print head to the ribbon installation position (the indented portion of the paper tension unit) by its back edge and then pull it . Setting Up the Printer 1-7 if it is, let it cool for a few minutes before touching it straight up and off. 3.

User Manual
Page 35
If a used ribbon cartridge. Remove the new ribbon cartridge from the middle of the ribbon cartridge and discard the separator. 5. ribbon guide 6. Then turn the ribbon-tightening knob in the direction of the used cartridge is installed, grasp the cartridge and pull it slightly forward and up; Properly dispose of the arrow to remove any slack in the ribbon. separator ribbon-tightening knob 1-8 Setting Up the Printer Remove the separator from the package. the ribbon guide snaps away from the metal pins behind the print head.
If a used ribbon cartridge. Remove the new ribbon cartridge from the middle of the ribbon cartridge and discard the separator. 5. ribbon guide 6. Then turn the ribbon-tightening knob in the direction of the used cartridge is installed, grasp the cartridge and pull it slightly forward and up; Properly dispose of the arrow to remove any slack in the ribbon. separator ribbon-tightening knob 1-8 Setting Up the Printer Remove the separator from the package. the ribbon guide snaps away from the metal pins behind the print head.

User Manual
Page 36
Setting Up the Printer 1-9 Fit the two front notches of the ribbon cartridge over the small pegs on each side of the printer as shown below. Then gently press down the cartridge until both ends click into place. 7. Hold the cartridge with the ribbon-tightening knob up. Make sure that the two rear notches of the cartridge fit over the small pegs on each side of the printer. Then lay 1 the cartridge flat. 8.
Setting Up the Printer 1-9 Fit the two front notches of the ribbon cartridge over the small pegs on each side of the printer as shown below. Then gently press down the cartridge until both ends click into place. 7. Hold the cartridge with the ribbon-tightening knob up. Make sure that the two rear notches of the cartridge fit over the small pegs on each side of the printer. Then lay 1 the cartridge flat. 8.

User Manual
Page 37
Lift the ribbon guide of the arrow to make sure it is in the ribbon as shown above. Make sure the ribbon is not twisted or creased and that it moves smoothly. 1-10 Setting Up the Printer Turn the ribbon-tightening knob in the direction of the ribbon cartridge (i ) and insert it clicks into place. Then slide the print head from side to side to remove any slack in place behind the print head (t ). ribbon guide ribbon-tightening knob 10. Press down the guide until it firmly over the metal pins behind the print head. 9.
Lift the ribbon guide of the arrow to make sure it is in the ribbon as shown above. Make sure the ribbon is not twisted or creased and that it moves smoothly. 1-10 Setting Up the Printer Turn the ribbon-tightening knob in the direction of the ribbon cartridge (i ) and insert it clicks into place. Then slide the print head from side to side to remove any slack in place behind the print head (t ). ribbon guide ribbon-tightening knob 10. Press down the guide until it firmly over the metal pins behind the print head. 9.

User Manual
Page 74
... paper printable side up (forward). Slide the right sprocket to remove any slack in the bottom slot printable side up . Fit four holes of the printer's ribbon. 2 Before you load paper in the front slot, remove the front paper guide. Then load paper in place by pushing the sprocket lock down . 10...
... paper printable side up (forward). Slide the right sprocket to remove any slack in the bottom slot printable side up . Fit four holes of the printer's ribbon. 2 Before you load paper in the front slot, remove the front paper guide. Then load paper in place by pushing the sprocket lock down . 10...


