
Technical Brief (Impact Printers)
Page 1
... superior quality ribbons. These printers have finer printhead pins which determines the type of printing and the number of multi-part forms that can all begin with FX, LX, or DFX Twenty-four pin printers all have 3 numbers in their respective owners. An impact printer has several advantages over any other type of printing. EPSON impact printers are renowned...
... superior quality ribbons. These printers have finer printhead pins which determines the type of printing and the number of multi-part forms that can all begin with FX, LX, or DFX Twenty-four pin printers all have 3 numbers in their respective owners. An impact printer has several advantages over any other type of printing. EPSON impact printers are renowned...

Technical Brief (Impact Printers)
Page 6
... and tear on the print head EPSON Sales Training EPSON is a registered trademark of Seiko Epson Corporation. 1/00 Other trademarks are ... Technical Brief-Multimedia projectors Page 6 Reliability-Ribbon quality EPSON brand impact printer ribbons are superior to every sale 5 Reliability-Ribbon cartridge reliability Most EPSON impact printers use a stationary ribbon cartridge. L L L Available in many competitive printers move with smaller ribbon on the motor, which can...
... and tear on the print head EPSON Sales Training EPSON is a registered trademark of Seiko Epson Corporation. 1/00 Other trademarks are ... Technical Brief-Multimedia projectors Page 6 Reliability-Ribbon quality EPSON brand impact printer ribbons are superior to every sale 5 Reliability-Ribbon cartridge reliability Most EPSON impact printers use a stationary ribbon cartridge. L L L Available in many competitive printers move with smaller ribbon on the motor, which can...
Product Brochure
Page 2
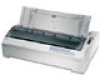
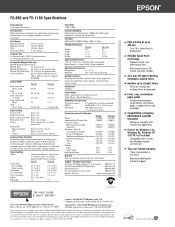
FX-880 and FX-1180 Specifications Printer Method 9-pin, impact dot matrix Print Direction Bidirectional logic-seeking for text and graphics printing and unidirectional text or graphics printing via software commands Print Speed High Speed ..., top-of -form and tear-off , default feature setting Sound Level 55 dB(A) Fabric Ribbon Black - optional Type B interface Emulation EPSON ESC/P, IBM 2380 Plus, IBM 2381 Plus Physical Dimensions Height: Width: Depth: Weight: FX-880 6.1" 16.3" 13.8" 16.8 lb FX-1180 6.1" 23.2" 13.8" 21.2 lb Electrical Requirements 120V AC ± 10%; 49.5 to six...
FX-880 and FX-1180 Specifications Printer Method 9-pin, impact dot matrix Print Direction Bidirectional logic-seeking for text and graphics printing and unidirectional text or graphics printing via software commands Print Speed High Speed ..., top-of -form and tear-off , default feature setting Sound Level 55 dB(A) Fabric Ribbon Black - optional Type B interface Emulation EPSON ESC/P, IBM 2380 Plus, IBM 2381 Plus Physical Dimensions Height: Width: Depth: Weight: FX-880 6.1" 16.3" 13.8" 16.8 lb FX-1180 6.1" 23.2" 13.8" 21.2 lb Electrical Requirements 120V AC ± 10%; 49.5 to six...
Product Information Guide
Page 1
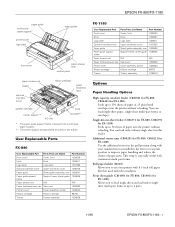
... cover 1039356 Printer cover Cover assembly, printer 1038533 Ribbon cartridge Ribbon cartridge #8755 Tractor Tractor assembly 1038519 Options Paper Handling Options High-capacity cut -sheet feeder (C806371 for FX-880, C806391 for FX-1180) Allows you to use your standard tractor installed in the front or rear push position to 6 parts. 11/98 EPSON FX-880/FX-1180 - 1 EPSON FX-880/FX-1180 13 paper...
... cover 1039356 Printer cover Cover assembly, printer 1038533 Ribbon cartridge Ribbon cartridge #8755 Tractor Tractor assembly 1038519 Options Paper Handling Options High-capacity cut -sheet feeder (C806371 for FX-880, C806391 for FX-1180) Allows you to use your standard tractor installed in the front or rear push position to 6 parts. 11/98 EPSON FX-880/FX-1180 - 1 EPSON FX-880/FX-1180 13 paper...
Product Information Guide
Page 3
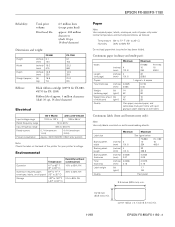
...mm) 0.065 0.018 0.46 Weight (lb) 14 22 (ordinary page) (g/m2) 52 82 Weight (one sheet (lb) 12 15 of the printer for FX-1180) Ribbon life of approx. 3 million characters (draft 10 cpi, 14 dots/character) Electrical 120 V Model 220 to 240 V Model Input voltage range 103... paper 2.5 inches (63.5 mm) min. 15/16 inch (23.8 mm) min. corner radius = 0.1 inch (2.5 mm) min. 11/98 EPSON FX-880/FX-1180 - 3 EPSON FX-880/FX-1180 Reliability: Total print volume: Print head life: 6.5 million lines (except print head) approx. 200 million characters (draft 10 cpi, 14 dots/character)...
...mm) 0.065 0.018 0.46 Weight (lb) 14 22 (ordinary page) (g/m2) 52 82 Weight (one sheet (lb) 12 15 of the printer for FX-1180) Ribbon life of approx. 3 million characters (draft 10 cpi, 14 dots/character) Electrical 120 V Model 220 to 240 V Model Input voltage range 103... paper 2.5 inches (63.5 mm) min. 15/16 inch (23.8 mm) min. corner radius = 0.1 inch (2.5 mm) min. 11/98 EPSON FX-880/FX-1180 - 3 EPSON FX-880/FX-1180 Reliability: Total print volume: Print head life: 6.5 million lines (except print head) approx. 200 million characters (draft 10 cpi, 14 dots/character)...
Product Information Guide
Page 12
...buttons to remove any slack in the ribbon. 12 - Then tear off edge 2. If you replace the ribbon cartridge. Hold down the Pause button for about three seconds. Remove the printer cover. 4. EPSON FX-880/FX-1180 11/98 EPSON FX-880/FX-1180 Note: Your tear-off position setting remains... in the direction of the printer. Press up the tabs on ...
...buttons to remove any slack in the ribbon. 12 - Then tear off edge 2. If you replace the ribbon cartridge. Hold down the Pause button for about three seconds. Remove the printer cover. 4. EPSON FX-880/FX-1180 11/98 EPSON FX-880/FX-1180 Note: Your tear-off position setting remains... in the direction of the printer. Press up the tabs on ...
Product Information Guide
Page 13
.... Use a pointed object, such as a ball point pen, to help feed the ribbon into place. 8. Replace the printer cover. 4. Caution: Always turn on the printer. otherwise the printer may be lost. 5. The factory settings are bold. 11/98 EPSON FX-880/FX-1180 - 13 Hold the ribbon cartridge by placing it moves smoothly. 9. Press the Operate button to turn...
.... Use a pointed object, such as a ball point pen, to help feed the ribbon into place. 8. Replace the printer cover. 4. Caution: Always turn on the printer. otherwise the printer may be lost. 5. The factory settings are bold. 11/98 EPSON FX-880/FX-1180 - 13 Hold the ribbon cartridge by placing it moves smoothly. 9. Press the Operate button to turn...
Product Information Guide
Page 16
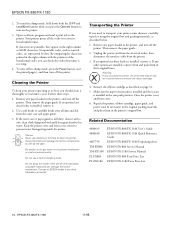
..., clean it receives in the printer's original box. EPSON FX-880/FX-1180 11/98 Cleaning the Printer To keep your printer some distance, carefully repack it using the original box and packing materials, as described on page 12. 5. Be careful not to the printer. Unplug the power cord from the printer. 3. Repack the printer, ribbon cartridge, paper guide, and power...
..., clean it receives in the printer's original box. EPSON FX-880/FX-1180 11/98 Cleaning the Printer To keep your printer some distance, carefully repack it using the original box and packing materials, as described on page 12. 5. Be careful not to the printer. Unplug the power cord from the printer. 3. Repack the printer, ribbon cartridge, paper guide, and power...

User Manual
Page 5
... Manuals 0-11 Warnings, Cautions, and Notes 0-12 Chapter 1 Setting Up the Printer Unpacking the Printer 1-2 Choosing a Place for the Printer 1-3 Positioning the continuous paper supply 1-4 Installing or Replacing the Ribbon Cartridge 1-5 Plugging in the Printer 1-10 Connecting the Printer to Your Computer 1-11 Installing the Printer Driver on Your PC 1-13 For Windows 95 or NT 4.0 1-13...
... Manuals 0-11 Warnings, Cautions, and Notes 0-12 Chapter 1 Setting Up the Printer Unpacking the Printer 1-2 Choosing a Place for the Printer 1-3 Positioning the continuous paper supply 1-4 Installing or Replacing the Ribbon Cartridge 1-5 Plugging in the Printer 1-10 Connecting the Printer to Your Computer 1-11 Installing the Printer Driver on Your PC 1-13 For Windows 95 or NT 4.0 1-13...

User Manual
Page 17
Options Your printer comes with your printer's versatility. Ribbon Cartridges Your printer uses the following ribbon cartridge: EPSON black ribbon cartridge FX-880: #8750 FX-1180: #8755 When printing becomes faint, you can further expand your EPSON printer. Optional interface cards are designed and manufactured to work properly with everything necessary to replace the ribbon cartridge. For more information on options for your printer's built...
Options Your printer comes with your printer's versatility. Ribbon Cartridges Your printer uses the following ribbon cartridge: EPSON black ribbon cartridge FX-880: #8750 FX-1180: #8755 When printing becomes faint, you can further expand your EPSON printer. Optional interface cards are designed and manufactured to work properly with everything necessary to replace the ribbon cartridge. For more information on options for your printer's built...
User Manual
Page 23
Chapter 1 Setting Up the Printer 1 Unpacking the Printer 1-2 Choosing a Place for the Printer 1-3 Positioning the continuous paper supply 1-4 Installing or Replacing the Ribbon Cartridge 1-5 Plugging in the Printer 1-10 Connecting the Printer to Your Computer 1-11 Installing the Printer Driver on Your PC 1-13 For Windows 95 or NT 4.0 1-13 For Windows 3.1 or NT 3.5x 1-16 Optional printer drivers for DOS program users 1-18 Setting Up the Printer 1-1
Chapter 1 Setting Up the Printer 1 Unpacking the Printer 1-2 Choosing a Place for the Printer 1-3 Positioning the continuous paper supply 1-4 Installing or Replacing the Ribbon Cartridge 1-5 Plugging in the Printer 1-10 Connecting the Printer to Your Computer 1-11 Installing the Printer Driver on Your PC 1-13 For Windows 95 or NT 4.0 1-13 For Windows 3.1 or NT 3.5x 1-16 Optional printer drivers for DOS program users 1-18 Setting Up the Printer 1-1
User Manual
Page 24
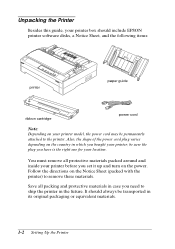
... set it up and turn on the power. Follow the directions on the Notice Sheet (packed with the printer) to the printer. It should include EPSON printer software disks, a Notice Sheet, and the following items: printer paper guide ribbon cartridge power cord Note: Depending on your location. Save all protective materials packed around and inside your...
... set it up and turn on the power. Follow the directions on the Notice Sheet (packed with the printer) to the printer. It should include EPSON printer software disks, a Notice Sheet, and the following items: printer paper guide ribbon cartridge power cord Note: Depending on your location. Save all protective materials packed around and inside your...

User Manual
Page 27
...same except that you have just used ribbon cartridge before touching it with the button protectors as shown. Products not manufactured by EPSON may damage the printer. let it cool before replacing it . 1. EPSON recommends the use of the Operate button ...printer, the print head may be hot; w Warning: You need to install or replace the ribbon 1 cartridge. If you need to install or replace the ribbon cartridge. c Caution: Moving the print head while the printer is turned off when the surface of genuine EPSON ribbon cartridges (#8750 for FX-880, #8755 for FX-1180...
...same except that you have just used ribbon cartridge before touching it with the button protectors as shown. Products not manufactured by EPSON may damage the printer. let it cool before replacing it . 1. EPSON recommends the use of the Operate button ...printer, the print head may be hot; w Warning: You need to install or replace the ribbon 1 cartridge. If you need to install or replace the ribbon cartridge. c Caution: Moving the print head while the printer is turned off when the surface of genuine EPSON ribbon cartridges (#8750 for FX-880, #8755 for FX-1180...
User Manual
Page 29
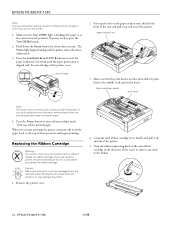
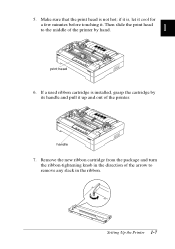
Then slide the print head to the middle of the printer by its handle and pull it up and out of the arrow to remove any slack in the ribbon. if it . Remove the new ribbon cartridge from the package and turn the ribbon-tightening knob in the direction of the printer. handle 7. If a used ribbon cartridge is installed, grasp the cartridge by hand. 1 print head 6. Setting Up the Printer 1-7 5. Make sure that the print head is , let it cool for a few minutes before touching it is not hot;
Then slide the print head to the middle of the printer by its handle and pull it up and out of the arrow to remove any slack in the ribbon. if it . Remove the new ribbon cartridge from the package and turn the ribbon-tightening knob in the direction of the printer. handle 7. If a used ribbon cartridge is installed, grasp the cartridge by hand. 1 print head 6. Setting Up the Printer 1-7 5. Make sure that the print head is , let it cool for a few minutes before touching it is not hot;

User Manual
Page 30
then press down into position; 8. Use a pointed object, such as a ball point pen, to guide the ribbon between the print head and ribbon guide while you turn the ribbon-tightening knob to fit the plastic hooks into place. ribbon-tightening knob 1-8 Setting Up the Printer Hold the ribbon cartridge by its handle and push it firmly down on both ends of the cartridge to help feed the ribbon into the slots. 9.
then press down into position; 8. Use a pointed object, such as a ball point pen, to guide the ribbon between the print head and ribbon guide while you turn the ribbon-tightening knob to fit the plastic hooks into place. ribbon-tightening knob 1-8 Setting Up the Printer Hold the ribbon cartridge by its handle and push it firmly down on both ends of the cartridge to help feed the ribbon into the slots. 9.

User Manual
Page 31
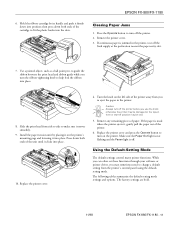
Install the paper tension unit by placing it on both ends of the unit until it clicks into place. Setting Up the Printer 1-9 Press down on the printer's mounting pegs and lowering it moves smoothly. Slide the print head from side to side to make sure it into place. Also check that the ribbon is not twisted or creased. 1 11. 10.
Install the paper tension unit by placing it on both ends of the unit until it clicks into place. Setting Up the Printer 1-9 Press down on the printer's mounting pegs and lowering it moves smoothly. Slide the print head from side to side to make sure it into place. Also check that the ribbon is not twisted or creased. 1 11. 10.

User Manual
Page 86
Then load paper 3 printable side up . 7. Printing on both sprockets. Then pull up the paper until it emerges between the first and second pages is even with the top of the paper over the tractor pins on Continuous Paper 3-25 Before you load paper in the bottom slot printable side up . Fit four holes of the printer's ribbon. 6. Then close the sprocket covers. Insert the paper into the front or bottom paper slot as described below until the perforation between the platen and the ribbon guide. Load paper in the front slot, remove the front cover.
Then load paper 3 printable side up . 7. Printing on both sprockets. Then pull up the paper until it emerges between the first and second pages is even with the top of the paper over the tractor pins on Continuous Paper 3-25 Before you load paper in the bottom slot printable side up . Fit four holes of the printer's ribbon. 6. Then close the sprocket covers. Insert the paper into the front or bottom paper slot as described below until the perforation between the platen and the ribbon guide. Load paper in the front slot, remove the front cover.

User Manual
Page 91
... chapter. 2. c Caution: Never use the knob to move the paper. 3-30 Printing on continuous pre-printed forms, multi-part forms, and labels, and for FX-1180) and then use two tractors at once is even with the top of -form position. 5. To use two tractors at the same time. Install one...front or rear push position, depending on the pull tractor; this chapter. 3. this chapter. 6. Set the paper release lever to lose the top-of the printer's ribbon. Press the Load/Eject button to advance the paper to move the paper; Fit the holes of the paper over the pins on the...
... chapter. 2. c Caution: Never use the knob to move the paper. 3-30 Printing on continuous pre-printed forms, multi-part forms, and labels, and for FX-1180) and then use two tractors at once is even with the top of -form position. 5. To use two tractors at the same time. Install one...front or rear push position, depending on the pull tractor; this chapter. 3. this chapter. 6. Set the paper release lever to lose the top-of the printer's ribbon. Press the Load/Eject button to advance the paper to move the paper; Fit the holes of the paper over the pins on the...
User Manual
Page 139
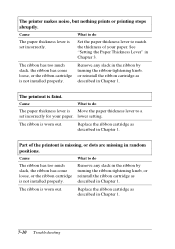
... match the thickness of the printout is worn out. Cause What to do The ribbon has too much slack, the ribbon has come loose, or the ribbon cartridge is set incorrectly for your paper. Part of your paper. The printer makes noise, but nothing prints or printing stops abruptly. lower setting. Remove any slack...
... match the thickness of the printout is worn out. Cause What to do The ribbon has too much slack, the ribbon has come loose, or the ribbon cartridge is set incorrectly for your paper. Part of your paper. The printer makes noise, but nothing prints or printing stops abruptly. lower setting. Remove any slack...
User Manual
Page 177
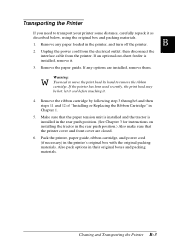
... the electrical outlet; If the printer has been used recently, the print head may be hot; Pack the printer, paper guide, ribbon cartridge, and power cord (if necessary) in their original boxes and packing materials. Also pack options in the printer's original box with the original ...cool before touching it . 3. Remove the ribbon cartridge by hand to remove the ribbon cartridge. Unplug the power cord from the printer. If any paper loaded in the printer, and turn off the printer. Remove the paper guide. Transporting the Printer If you need to move the print head...
... the electrical outlet; If the printer has been used recently, the print head may be hot; Pack the printer, paper guide, ribbon cartridge, and power cord (if necessary) in their original boxes and packing materials. Also pack options in the printer's original box with the original ...cool before touching it . 3. Remove the ribbon cartridge by hand to remove the ribbon cartridge. Unplug the power cord from the printer. If any paper loaded in the printer, and turn off the printer. Remove the paper guide. Transporting the Printer If you need to move the print head...


