Product Information Guide
Page 1
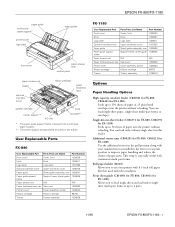
...Paper tension unit N/A N/A Paper thickness lever cap Cap cover 1025333 Printer cover Cover assembly, printer 1036540 Ribbon cartridge Ribbon cartridge #8750 Tractor Tractor assembly 1036538 FX-1180 User Replaceable Part Parts Price List Name Part Number Front cover Cover, front ...FX-880, C806391 for FX-1180) Feeds up to 6 parts. 11/98 EPSON FX-880/FX-1180 - 1 Single-bin cut -sheet feeder (C806381 for FX-880, C806401 for FX-1180) Feeds up to 150 sheets of paper into the printer without reloading. EPSON FX-880/FX-1180 13 paper guide continuous paper support* printer...
...Paper tension unit N/A N/A Paper thickness lever cap Cap cover 1025333 Printer cover Cover assembly, printer 1036540 Ribbon cartridge Ribbon cartridge #8750 Tractor Tractor assembly 1036538 FX-1180 User Replaceable Part Parts Price List Name Part Number Front cover Cover, front ...FX-880, C806391 for FX-1180) Feeds up to 6 parts. 11/98 EPSON FX-880/FX-1180 - 1 Single-bin cut -sheet feeder (C806381 for FX-880, C806401 for FX-1180) Feeds up to 150 sheets of paper into the printer without reloading. EPSON FX-880/FX-1180 13 paper guide continuous paper support* printer...
Product Information Guide
Page 12
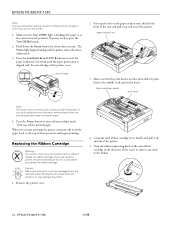
paper tension unit 3. EPSON FX-880/FX-1180 11/98 The Pause light begins flashing and the printer enters the micro adjust mode. 3. then slide the print head to press the Tear Off/Bin button. 2. Replacing the Ribbon Cartridge Warning: You need to the middle of the printer cover. If you replace the ribbon cartridge. Moving the print head...
paper tension unit 3. EPSON FX-880/FX-1180 11/98 The Pause light begins flashing and the printer enters the micro adjust mode. 3. then slide the print head to press the Tear Off/Bin button. 2. Replacing the Ribbon Cartridge Warning: You need to the middle of the printer cover. If you replace the ribbon cartridge. Moving the print head...
Product Information Guide
Page 13
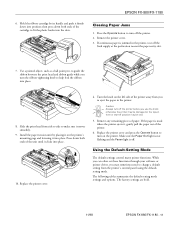
... Make sure the Paper Out light is not flashing and the Pause light is stuck where the printer ejects it on the printer. The factory settings are bold. 11/98 EPSON FX-880/FX-1180 - 13 EPSON FX-880/FX-1180 6. Press the Operate button to make sure it clicks into place. 10. Turn the knob ... panel using the defaultsetting mode. If the paper is off the fresh supply at the perforation nearest the paper entry slot. 7. Replace the printer cover and press the Operate button to help feed the ribbon into place. The following tables summarize the default-setting mode settings and...
... Make sure the Paper Out light is not flashing and the Pause light is stuck where the printer ejects it on the printer. The factory settings are bold. 11/98 EPSON FX-880/FX-1180 - 13 EPSON FX-880/FX-1180 6. Press the Operate button to make sure it clicks into place. 10. Turn the knob ... panel using the defaultsetting mode. If the paper is off the fresh supply at the perforation nearest the paper entry slot. 7. Replace the printer cover and press the Operate button to help feed the ribbon into place. The following tables summarize the default-setting mode settings and...

User Manual
Page 5
... Manuals 0-11 Warnings, Cautions, and Notes 0-12 Chapter 1 Setting Up the Printer Unpacking the Printer 1-2 Choosing a Place for the Printer 1-3 Positioning the continuous paper supply 1-4 Installing or Replacing the Ribbon Cartridge 1-5 Plugging in the Printer 1-10 Connecting the Printer to Your Computer 1-11 Installing the Printer Driver on Your PC 1-13 For Windows 95 or NT 4.0 1-13...
... Manuals 0-11 Warnings, Cautions, and Notes 0-12 Chapter 1 Setting Up the Printer Unpacking the Printer 1-2 Choosing a Place for the Printer 1-3 Positioning the continuous paper supply 1-4 Installing or Replacing the Ribbon Cartridge 1-5 Plugging in the Printer 1-10 Connecting the Printer to Your Computer 1-11 Installing the Printer Driver on Your PC 1-13 For Windows 95 or NT 4.0 1-13...

User Manual
Page 17
...print head and other printer parts. Ribbon Cartridges Your printer uses the following ribbon cartridge: EPSON black ribbon cartridge FX-880: #8750 FX-1180: #8755 When printing becomes faint, you can further expand your EPSON printer. Options Your printer comes with your printer's versatility. By ... printer's built-in parallel interface. Getting to work properly with everything necessary to print on options for your printer, see Appendix A, "Enhancing Your Printer With Options." Genuine EPSON ribbon cartridges are also available to replace the ribbon cartridge. To replace ...
...print head and other printer parts. Ribbon Cartridges Your printer uses the following ribbon cartridge: EPSON black ribbon cartridge FX-880: #8750 FX-1180: #8755 When printing becomes faint, you can further expand your EPSON printer. Options Your printer comes with your printer's versatility. By ... printer's built-in parallel interface. Getting to work properly with everything necessary to print on options for your printer, see Appendix A, "Enhancing Your Printer With Options." Genuine EPSON ribbon cartridges are also available to replace the ribbon cartridge. To replace ...
User Manual
Page 21
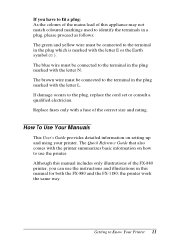
...(G ). The Quick Reference Guide that also comes with the printer summarizes basic information on setting up and using your printer. Getting to the terminal in the plug which is marked with the letter N. Replace fuses only with the letter L. the printer work the same way. How To Use Your Manuals This ...Know Your Printer 11 Although this manual includes only illustrations of the FX-880 printer, you have to fit a plug: As the colours of the mains lead of this appliance may not match coloured markings used to identify the terminals in this manual for both the FX-880 and the FX-1180; If you...
...(G ). The Quick Reference Guide that also comes with the printer summarizes basic information on setting up and using your printer. Getting to the terminal in the plug which is marked with the letter N. Replace fuses only with the letter L. the printer work the same way. How To Use Your Manuals This ...Know Your Printer 11 Although this manual includes only illustrations of the FX-880 printer, you have to fit a plug: As the colours of the mains lead of this appliance may not match coloured markings used to identify the terminals in this manual for both the FX-880 and the FX-1180; If you...
User Manual
Page 23
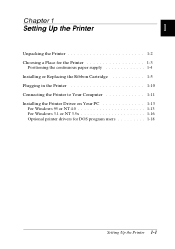
Chapter 1 Setting Up the Printer 1 Unpacking the Printer 1-2 Choosing a Place for the Printer 1-3 Positioning the continuous paper supply 1-4 Installing or Replacing the Ribbon Cartridge 1-5 Plugging in the Printer 1-10 Connecting the Printer to Your Computer 1-11 Installing the Printer Driver on Your PC 1-13 For Windows 95 or NT 4.0 1-13 For Windows 3.1 or NT 3.5x 1-16 Optional printer drivers for DOS program users 1-18 Setting Up the Printer 1-1
Chapter 1 Setting Up the Printer 1 Unpacking the Printer 1-2 Choosing a Place for the Printer 1-3 Positioning the continuous paper supply 1-4 Installing or Replacing the Ribbon Cartridge 1-5 Plugging in the Printer 1-10 Connecting the Printer to Your Computer 1-11 Installing the Printer Driver on Your PC 1-13 For Windows 95 or NT 4.0 1-13 For Windows 3.1 or NT 3.5x 1-16 Optional printer drivers for DOS program users 1-18 Setting Up the Printer 1-1

User Manual
Page 27
... print head may be hot; Products not manufactured by EPSON's warranties. Make sure the printer is turned off when the surface of genuine EPSON ribbon cartridges (#8750 for FX-880, #8755 for FX-1180). w Warning: You need to install or replace the ribbon 1 cartridge. Setting Up the Printer 1-5 EPSON recommends the use of the Operate button is on may...
... print head may be hot; Products not manufactured by EPSON's warranties. Make sure the printer is turned off when the surface of genuine EPSON ribbon cartridges (#8750 for FX-880, #8755 for FX-1180). w Warning: You need to install or replace the ribbon 1 cartridge. Setting Up the Printer 1-5 EPSON recommends the use of the Operate button is on may...

User Manual
Page 32
Plugging in the Printer 1. Then push it down until it clicks. Replace the printer cover by inserting the front tabs into the slots on the printer and lowering the cover into place. Make sure the printer is even with the button protectors as shown below. 1-10 Setting Up the Printer The printer is off when the surface of the Operate button is turned off. 12.
Plugging in the Printer 1. Then push it down until it clicks. Replace the printer cover by inserting the front tabs into the slots on the printer and lowering the cover into place. Make sure the printer is even with the button protectors as shown below. 1-10 Setting Up the Printer The printer is off when the surface of the Operate button is turned off. 12.

User Manual
Page 90
To replace the paper tension unit, lower it off the printer. 3 4. Replace the printer cover. 3. Press the tractor's lock tabs, tilt the tractor toward you, and lift it onto the printer's mounting pegs. Then press down on Continuous Paper 3-29 Printing on both ends of the unit until it in the front or rear push position as described earlier in a safe place, or install it clicks into place. 6. Store the tractor in this chapter. 5.
To replace the paper tension unit, lower it off the printer. 3 4. Replace the printer cover. 3. Press the tractor's lock tabs, tilt the tractor toward you, and lift it onto the printer's mounting pegs. Then press down on Continuous Paper 3-29 Printing on both ends of the unit until it in the front or rear push position as described earlier in a safe place, or install it clicks into place. 6. Store the tractor in this chapter. 5.
User Manual
Page 139
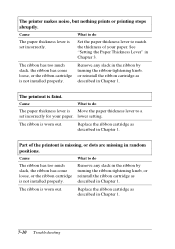
... too much slack, the ribbon has come loose, or the ribbon cartridge is not installed properly. Cause What to a set incorrectly. The printer makes noise, but nothing prints or printing stops abruptly. See "Setting the Paper Thickness Lever" in Chapter 1. Cause What to do The ... ribbon cartridge as described in random positions. Cause What to match the thickness of the printout is faint. Part of your paper. Replace the ribbon cartridge as described in Chapter 1. Remove any slack in the ribbon by turning the ribbon-tightening knob, or reinstall the ...
... too much slack, the ribbon has come loose, or the ribbon cartridge is not installed properly. Cause What to a set incorrectly. The printer makes noise, but nothing prints or printing stops abruptly. See "Setting the Paper Thickness Lever" in Chapter 1. Cause What to do The ... ribbon cartridge as described in random positions. Cause What to match the thickness of the printout is faint. Part of your paper. Replace the ribbon cartridge as described in Chapter 1. Remove any slack in the ribbon by turning the ribbon-tightening knob, or reinstall the ...
User Manual
Page 140
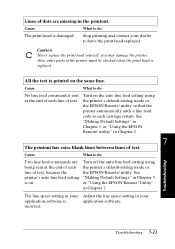
... dots are Turn off the auto line feed setting using the printer's default-setting mode or the EPSON Remote! Cause What to have the print head replaced. utility" in the printout. Utility" in Chapter 5, or "Using the EPSON Remote! Also, other parts of the printer must be checked when the print head is damaged. Stop...
... dots are Turn off the auto line feed setting using the printer's default-setting mode or the EPSON Remote! Cause What to have the print head replaced. utility" in the printout. Utility" in Chapter 5, or "Using the EPSON Remote! Also, other parts of the printer must be checked when the print head is damaged. Stop...

User Manual
Page 153
...-bin cut -sheet feeder. c Caution: Do not load multi-part forms, carbon paper, envelopes, or labels in the single-bin cut -sheet feeder. A-6 Enhancing Your Printer With Options Loading paper in the single-bin cut-sheet feeder The single-bin cut-sheet feeder holds up to load paper in the single...-bin cut -sheet feeder 3. Follow the steps below to 50 sheets of paper. To replace the printer cover, first insert the front tabs into the slots on loading paper in the high-capacity cut -sheet feeder, see page A-10. You are...
...-bin cut -sheet feeder. c Caution: Do not load multi-part forms, carbon paper, envelopes, or labels in the single-bin cut -sheet feeder. A-6 Enhancing Your Printer With Options Loading paper in the single-bin cut-sheet feeder The single-bin cut-sheet feeder holds up to load paper in the single...-bin cut -sheet feeder 3. Follow the steps below to 50 sheets of paper. To replace the printer cover, first insert the front tabs into the slots on loading paper in the high-capacity cut -sheet feeder, see page A-10. You are...

User Manual
Page 173
Then replace the screws and tighten them. To remove the interface card, reverse the steps above. Firmly ...Remove the screws securing the shield plate to reattach it if you remove the interface card later. A-26 Enhancing Your Printer With Options If you are not sure whether you need to the back of the interface compartment. Slide the interface ...card along the slots on both sides of the printer and remove the plate. 3. Follow the steps below to know more about interfaces, contact your dealer. Note: Store...
Then replace the screws and tighten them. To remove the interface card, reverse the steps above. Firmly ...Remove the screws securing the shield plate to reattach it if you remove the interface card later. A-26 Enhancing Your Printer With Options If you are not sure whether you need to the back of the interface compartment. Slide the interface ...card along the slots on both sides of the printer and remove the plate. 3. Follow the steps below to know more about interfaces, contact your dealer. Note: Store...
User Manual
Page 177
...sheet feeder is installed in the rear push position. (See Chapter 3 for instructions on installing the tractor in the printer, and turn off the printer. Make sure that the printer cover and front cover are installed, remove them. Remove any options are closed. 6. let it cool before touching... in the printer's original box with the original packing materials. then disconnect the interface cable from the electrical outlet; Transporting the Printer If you need to move the print head by following step 3 through 6 and then steps 11 and 12 of "Installing or Replacing the Ribbon ...
...sheet feeder is installed in the rear push position. (See Chapter 3 for instructions on installing the tractor in the printer, and turn off the printer. Make sure that the printer cover and front cover are installed, remove them. Remove any options are closed. 6. let it cool before touching... in the printer's original box with the original packing materials. then disconnect the interface cable from the electrical outlet; Transporting the Printer If you need to move the print head by following step 3 through 6 and then steps 11 and 12 of "Installing or Replacing the Ribbon ...

User Manual
Page 194
...as the PC 437 table for hex codes 00 through 7F; when you select Table 1, hex codes 00 to 1FH and 80 to 1FH are replaced; You can select the character tables shown in this section with an asterisk (*) after the table name are available only in Chapter 5. (When ...you select Table 2, hex codes 00 to 9FH are replaced.) Table 1 Table 2 Specifications C-17 C The character tables with the printer's default-setting mode or by using software commands. for these tables, only the characters for hex codes 80 through FF are...
...as the PC 437 table for hex codes 00 through 7F; when you select Table 1, hex codes 00 to 1FH and 80 to 1FH are replaced; You can select the character tables shown in this section with an asterisk (*) after the table name are available only in Chapter 5. (When ...you select Table 2, hex codes 00 to 9FH are replaced.) Table 1 Table 2 Specifications C-17 C The character tables with the printer's default-setting mode or by using software commands. for these tables, only the characters for hex codes 80 through FF are...

User Manual
Page 219
...replacing, 1-5-10 Ribbon-tightening knob, 1-7 Roll paper loading, A-22 removing, A-25 Roll paper holder assembling, A-20 installing, A-21 utility Removing continuous paper from the front push tractor, 3-12 from the pull tractor, 3-28 from , 3-18 removing the tractor, 3-19 Release lever. See Specifications transporting, B-3 unpacking, 1-2 Printer... Windows 3.1, 2-10 Windows 95, 2-5 Windows NT 3.5x, 2-19 Windows NT 4.0, 2-13 Printer utilities EPSON Remote!. Printer choosing a place for, 1-3 cleaning, B-2 connecting to your computer, 1-11 errors, 7-2 parts, inside back cover plugging in, 1-...
...replacing, 1-5-10 Ribbon-tightening knob, 1-7 Roll paper loading, A-22 removing, A-25 Roll paper holder assembling, A-20 installing, A-21 utility Removing continuous paper from the front push tractor, 3-12 from the pull tractor, 3-28 from , 3-18 removing the tractor, 3-19 Release lever. See Specifications transporting, B-3 unpacking, 1-2 Printer... Windows 3.1, 2-10 Windows 95, 2-5 Windows NT 3.5x, 2-19 Windows NT 4.0, 2-13 Printer utilities EPSON Remote!. Printer choosing a place for, 1-3 cleaning, B-2 connecting to your computer, 1-11 errors, 7-2 parts, inside back cover plugging in, 1-...
User Setup Information
Page 1
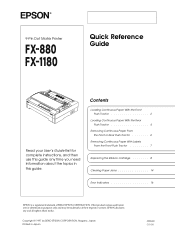
...Removing Continuous Paper With Labels From the Front Push Tractor 7 Replacing the Ribbon Cartridge 8 Clearing Paper Jams 14 Error Indicators 16 EPSON is a registered trademark of their respective owners. Copyright © 1997 by SEIKO EPSON CORPORATION, Nagano, Japan Printed in this guide any and all... right in those marks. ® 9-Pin Dot Matrix Printer Quick Reference Guide Read your User's Guide first for identification purposes only and may be trademarks of SEIKO EPSON CORPORATION. EPSON disclaims any time you need information about the topics in Japan ...
...Removing Continuous Paper With Labels From the Front Push Tractor 7 Replacing the Ribbon Cartridge 8 Clearing Paper Jams 14 Error Indicators 16 EPSON is a registered trademark of their respective owners. Copyright © 1997 by SEIKO EPSON CORPORATION, Nagano, Japan Printed in this guide any and all... right in those marks. ® 9-Pin Dot Matrix Printer Quick Reference Guide Read your User's Guide first for identification purposes only and may be trademarks of SEIKO EPSON CORPORATION. EPSON disclaims any time you need information about the topics in Japan ...

User Setup Information
Page 8
EPSON recommends you need to replace the ribbon cartridge. Ribbon cartridge: FX-880 FX-1180 #8750 #8755 c Caution: Products not manufactured by EPSON may cause damage to work properly with your printer not covered by EPSON's warranties. 8 They ensure proper operation and long life of the print head and other printer parts. These cartridges are designed and manufactured to your EPSON printer. Replacing the Ribbon Cartridge Ribbon Cartridge When printing becomes faint, you use genuine EPSON ribbon cartridges.
EPSON recommends you need to replace the ribbon cartridge. Ribbon cartridge: FX-880 FX-1180 #8750 #8755 c Caution: Products not manufactured by EPSON may cause damage to work properly with your printer not covered by EPSON's warranties. 8 They ensure proper operation and long life of the print head and other printer parts. These cartridges are designed and manufactured to your EPSON printer. Replacing the Ribbon Cartridge Ribbon Cartridge When printing becomes faint, you use genuine EPSON ribbon cartridges.

User Setup Information
Page 9
... button is on may be hot; Replacing the Ribbon Cartridge To replace the ribbon cartridge, follow the steps below. Lift the printer cover by hand to turn off . 9 let it cool for a few minutes before touching it straight up and off the printer. If you have just used the printer, the print head may damage...
... button is on may be hot; Replacing the Ribbon Cartridge To replace the ribbon cartridge, follow the steps below. Lift the printer cover by hand to turn off . 9 let it cool for a few minutes before touching it straight up and off the printer. If you have just used the printer, the print head may damage...


