
Technical Brief (Impact Printers)
Page 1
... paper loaded and waiting. An impact printer has several advantages over any other type of an EPSON's impact printer tells you if it has a narrow or wide carriage: LLL L Nine-pin printers all begin with FX, LX, or DFX Twenty-four pin printers all begin with tireless printheads and superior quality ribbons. only impact printers can handle multi-part forms and...
... paper loaded and waiting. An impact printer has several advantages over any other type of an EPSON's impact printer tells you if it has a narrow or wide carriage: LLL L Nine-pin printers all begin with FX, LX, or DFX Twenty-four pin printers all begin with tireless printheads and superior quality ribbons. only impact printers can handle multi-part forms and...

Technical Brief (Impact Printers)
Page 6
... of their respective owners. Technical Brief-Multimedia projectors Page 6 Reliability-Ribbon quality EPSON brand impact printer ribbons are ... L EPSON brand ribbons are superior to move the ribbon with the print head assembly unit. L L L Available in many competitive printers move with every printer Adds profit to every sale 5 Reliability-Ribbon cartridge reliability Most EPSON impact printers use and extreme temperature changes L L Easy to both sides...
... of their respective owners. Technical Brief-Multimedia projectors Page 6 Reliability-Ribbon quality EPSON brand impact printer ribbons are ... L EPSON brand ribbons are superior to move the ribbon with the print head assembly unit. L L L Available in many competitive printers move with every printer Adds profit to every sale 5 Reliability-Ribbon cartridge reliability Most EPSON impact printers use and extreme temperature changes L L Easy to both sides...
Product Brochure
Page 2
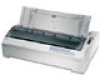
...to six-part forms q Prints on Recycled Paper and Canada Support - As an ENERGY STAR Partner, Epson America, Inc. FX-880 and FX-1180 Specifications Printer Method 9-pin, impact dot matrix Print Direction Bidirectional logic-seeking for text and graphics printing and unidirectional text or graphics printing ...-form and tear-off , default feature setting Sound Level 55 dB(A) Fabric Ribbon Black - has determined that this class q Backed by solid Epson technical support THE WORLD LEADER IN IMPACT PRINTING. The ENERGY STAR emblem does not represent EPA endorsement of their respective ...
...to six-part forms q Prints on Recycled Paper and Canada Support - As an ENERGY STAR Partner, Epson America, Inc. FX-880 and FX-1180 Specifications Printer Method 9-pin, impact dot matrix Print Direction Bidirectional logic-seeking for text and graphics printing and unidirectional text or graphics printing ...-form and tear-off , default feature setting Sound Level 55 dB(A) Fabric Ribbon Black - has determined that this class q Backed by solid Epson technical support THE WORLD LEADER IN IMPACT PRINTING. The ENERGY STAR emblem does not represent EPA endorsement of their respective ...
Product Information Guide
Page 1
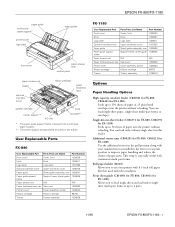
EPSON FX-880/FX-1180 13 paper guide continuous paper support* printer cover logo plate edge guides front cover paper release lever control panel paper tension unit tractor optional interface cover ribbon cartridge paper thickness lever parallel interface center support** AC inlet knob ...1036506 Paper tension unit N/A N/A Paper thickness lever cap Cap cover 1025333 Printer cover Cover assembly, printer 1036540 Ribbon cartridge Ribbon cartridge #8750 Tractor Tractor assembly 1036538 FX-1180 User Replaceable Part Parts Price List Name Part Number Front cover Cover, ...
EPSON FX-880/FX-1180 13 paper guide continuous paper support* printer cover logo plate edge guides front cover paper release lever control panel paper tension unit tractor optional interface cover ribbon cartridge paper thickness lever parallel interface center support** AC inlet knob ...1036506 Paper tension unit N/A N/A Paper thickness lever cap Cap cover 1025333 Printer cover Cover assembly, printer 1036540 Ribbon cartridge Ribbon cartridge #8750 Tractor Tractor assembly 1036538 FX-1180 User Replaceable Part Parts Price List Name Part Number Front cover Cover, ...
Product Information Guide
Page 3
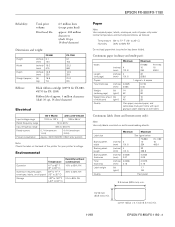
...only labels mounted on continuous backing sheets. corner radius = 0.1 inch (2.5 mm) min. 11/98 EPSON FX-880/FX-1180 - 3 Continuous paper (ordinary and multi-part): Minimum Maximum Width (inches) 4 (mm) 101.6 FX-880: 10 254 FX-1180: 16 406.4 Length (one page) (inches) 4 (mm) 101.6 22 558.8 Copies 1 original...065 0.018 0.46 Weight (lb) 14 22 (ordinary page) (g/m2) 52 82 Weight (one sheet (lb) 12 15 of the printer for FX-1180) Ribbon life of approx. 3 million characters (draft 10 cpi, 14 dots/character) Electrical 120 V Model 220 to 240 V Model Input voltage range...
...only labels mounted on continuous backing sheets. corner radius = 0.1 inch (2.5 mm) min. 11/98 EPSON FX-880/FX-1180 - 3 Continuous paper (ordinary and multi-part): Minimum Maximum Width (inches) 4 (mm) 101.6 FX-880: 10 254 FX-1180: 16 406.4 Length (one page) (inches) 4 (mm) 101.6 22 558.8 Copies 1 original...065 0.018 0.46 Weight (lb) 14 22 (ordinary page) (g/m2) 52 82 Weight (one sheet (lb) 12 15 of the printer for FX-1180) Ribbon life of approx. 3 million characters (draft 10 cpi, 14 dots/character) Electrical 120 V Model 220 to 240 V Model Input voltage range...
Product Information Guide
Page 12
...up and out of -form position and begins printing. Remove the printer cover. 4. Turn the ribbon-tightening knob of the new ribbon cartridge in the direction of the printer by hand to the top-of the printer. Hold down the Pause button for about three seconds. Press ...to install or replace the ribbon cartridge. When you replace the ribbon cartridge. EPSON FX-880/FX-1180 11/98 ribbon cartridge handle print head Note: The printer has a minimum and a maximum tear-off position). Moving the print head while the printer is not hot; EPSON FX-880/FX-1180 Note: Your tear-off ...
...up and out of -form position and begins printing. Remove the printer cover. 4. Turn the ribbon-tightening knob of the new ribbon cartridge in the direction of the printer by hand to the top-of the printer. Hold down the Pause button for about three seconds. Press ...to install or replace the ribbon cartridge. When you replace the ribbon cartridge. EPSON FX-880/FX-1180 11/98 ribbon cartridge handle print head Note: The printer has a minimum and a maximum tear-off position). Moving the print head while the printer is not hot; EPSON FX-880/FX-1180 Note: Your tear-off ...
Product Information Guide
Page 13
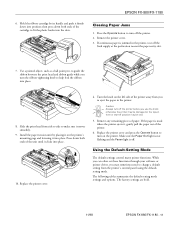
...to side to turn on the left side of the printer. 6. The factory settings are bold. 11/98 EPSON FX-880/FX-1180 - 13 Slide the print head from the printer's control panel using the defaultsetting mode. then press down... both ends of paper. Clearing Paper Jams 1. If continuous paper is jammed in the printer. EPSON FX-880/FX-1180 6. Using the Default-Setting Mode The default settings control many printer functions. Caution: Always turn the ribbon...
...to side to turn on the left side of the printer. 6. The factory settings are bold. 11/98 EPSON FX-880/FX-1180 - 13 Slide the print head from the printer's control panel using the defaultsetting mode. then press down... both ends of paper. Clearing Paper Jams 1. If continuous paper is jammed in the printer. EPSON FX-880/FX-1180 6. Using the Default-Setting Mode The default settings control many printer functions. Caution: Always turn the ribbon...
Product Information Guide
Page 16
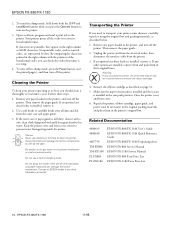
... the printer, ribbon cartridge, paper guide, and power cord (if necessary) in the original packing materials and place them in the printer's original box. Related Documentation 4008439 4008440 4007754 TM-FX880 TM-FX1180 PL-FX880 PL-FX1180 EPSON FX-880/FX-1180 User's Guide EPSON FX-880/FX-1180 Quick Reference Guide EPSON FX-880/FX-1180 Unpacking sheet EPSON FX-880 Service Manual EPSON FX-1180 Service Manual EPSON FX-880...
... the printer, ribbon cartridge, paper guide, and power cord (if necessary) in the original packing materials and place them in the printer's original box. Related Documentation 4008439 4008440 4007754 TM-FX880 TM-FX1180 PL-FX880 PL-FX1180 EPSON FX-880/FX-1180 User's Guide EPSON FX-880/FX-1180 Quick Reference Guide EPSON FX-880/FX-1180 Unpacking sheet EPSON FX-880 Service Manual EPSON FX-1180 Service Manual EPSON FX-880...

User Manual
Page 5
... Manuals 0-11 Warnings, Cautions, and Notes 0-12 Chapter 1 Setting Up the Printer Unpacking the Printer 1-2 Choosing a Place for the Printer 1-3 Positioning the continuous paper supply 1-4 Installing or Replacing the Ribbon Cartridge 1-5 Plugging in the Printer 1-10 Connecting the Printer to Your Computer 1-11 Installing the Printer Driver on Your PC 1-13 For Windows 95 or NT 4.0 1-13...
... Manuals 0-11 Warnings, Cautions, and Notes 0-12 Chapter 1 Setting Up the Printer Unpacking the Printer 1-2 Choosing a Place for the Printer 1-3 Positioning the continuous paper supply 1-4 Installing or Replacing the Ribbon Cartridge 1-5 Plugging in the Printer 1-10 Connecting the Printer to Your Computer 1-11 Installing the Printer Driver on Your PC 1-13 For Windows 95 or NT 4.0 1-13...

User Manual
Page 17
... sheets using a variety of the print head and other printer parts. Ribbon Cartridges Your printer uses the following ribbon cartridge: EPSON black ribbon cartridge FX-880: #8750 FX-1180: #8755 When printing becomes faint, you can further expand your printer, see Appendix A, "Enhancing Your Printer With Options." Options Your printer comes with your printer's built-in parallel interface. They ensure proper operation and...
... sheets using a variety of the print head and other printer parts. Ribbon Cartridges Your printer uses the following ribbon cartridge: EPSON black ribbon cartridge FX-880: #8750 FX-1180: #8755 When printing becomes faint, you can further expand your printer, see Appendix A, "Enhancing Your Printer With Options." Options Your printer comes with your printer's built-in parallel interface. They ensure proper operation and...
User Manual
Page 23
Chapter 1 Setting Up the Printer 1 Unpacking the Printer 1-2 Choosing a Place for the Printer 1-3 Positioning the continuous paper supply 1-4 Installing or Replacing the Ribbon Cartridge 1-5 Plugging in the Printer 1-10 Connecting the Printer to Your Computer 1-11 Installing the Printer Driver on Your PC 1-13 For Windows 95 or NT 4.0 1-13 For Windows 3.1 or NT 3.5x 1-16 Optional printer drivers for DOS program users 1-18 Setting Up the Printer 1-1
Chapter 1 Setting Up the Printer 1 Unpacking the Printer 1-2 Choosing a Place for the Printer 1-3 Positioning the continuous paper supply 1-4 Installing or Replacing the Ribbon Cartridge 1-5 Plugging in the Printer 1-10 Connecting the Printer to Your Computer 1-11 Installing the Printer Driver on Your PC 1-13 For Windows 95 or NT 4.0 1-13 For Windows 3.1 or NT 3.5x 1-16 Optional printer drivers for DOS program users 1-18 Setting Up the Printer 1-1
User Manual
Page 24
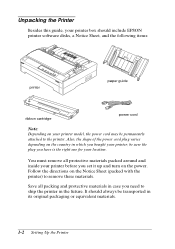
..., the power cord may be permanently attached to remove these materials. It should include EPSON printer software disks, a Notice Sheet, and the following items: printer paper guide ribbon cartridge power cord Note: Depending on your printer before you set it up and turn on the power. Also, the shape of the power cord plug varies...
..., the power cord may be permanently attached to remove these materials. It should include EPSON printer software disks, a Notice Sheet, and the following items: printer paper guide ribbon cartridge power cord Note: Depending on your printer before you set it up and turn on the power. Also, the shape of the power cord plug varies...

User Manual
Page 27
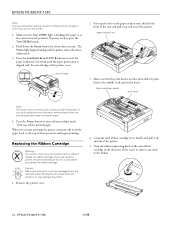
... the ribbon cartridge. let it cool before replacing it . 1. If you need to install or replace the ribbon 1 cartridge. c Caution: Moving the print head while the printer is on may be hot; EPSON recommends the use of the Operate button is turned off when the surface of genuine EPSON ribbon cartridges (#8750 for FX-880, #8755 for FX-1180).
... the ribbon cartridge. let it cool before replacing it . 1. If you need to install or replace the ribbon 1 cartridge. c Caution: Moving the print head while the printer is on may be hot; EPSON recommends the use of the Operate button is turned off when the surface of genuine EPSON ribbon cartridges (#8750 for FX-880, #8755 for FX-1180).
User Manual
Page 29
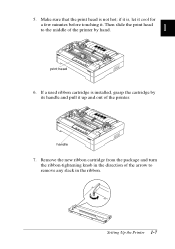
Then slide the print head to remove any slack in the ribbon. Setting Up the Printer 1-7 Remove the new ribbon cartridge from the package and turn the ribbon-tightening knob in the direction of the printer. if it is, let it cool for a few minutes before touching it up and out of the arrow to the middle of the printer by its handle and pull it . If a used ribbon cartridge is not hot; handle 7. 5. Make sure that the print head is installed, grasp the cartridge by hand. 1 print head 6.
Then slide the print head to remove any slack in the ribbon. Setting Up the Printer 1-7 Remove the new ribbon cartridge from the package and turn the ribbon-tightening knob in the direction of the printer. if it is, let it cool for a few minutes before touching it up and out of the arrow to the middle of the printer by its handle and pull it . If a used ribbon cartridge is not hot; handle 7. 5. Make sure that the print head is installed, grasp the cartridge by hand. 1 print head 6.

User Manual
Page 30
then press down into the slots. 9. 8. ribbon-tightening knob 1-8 Setting Up the Printer Hold the ribbon cartridge by its handle and push it firmly down on both ends of the cartridge to help feed the ribbon into place. Use a pointed object, such as a ball point pen, to guide the ribbon between the print head and ribbon guide while you turn the ribbon-tightening knob to fit the plastic hooks into position;
then press down into the slots. 9. 8. ribbon-tightening knob 1-8 Setting Up the Printer Hold the ribbon cartridge by its handle and push it firmly down on both ends of the cartridge to help feed the ribbon into place. Use a pointed object, such as a ball point pen, to guide the ribbon between the print head and ribbon guide while you turn the ribbon-tightening knob to fit the plastic hooks into position;

User Manual
Page 31
Also check that the ribbon is not twisted or creased. 1 11. Setting Up the Printer 1-9 Press down on the printer's mounting pegs and lowering it into place. Install the paper tension unit by placing it on both ends of the unit until it moves smoothly. Slide the print head from side to side to make sure it clicks into place. 10.
Also check that the ribbon is not twisted or creased. 1 11. Setting Up the Printer 1-9 Press down on the printer's mounting pegs and lowering it into place. Install the paper tension unit by placing it on both ends of the unit until it moves smoothly. Slide the print head from side to side to make sure it clicks into place. 10.

User Manual
Page 86
6. Before you load paper in the bottom slot printable side up. 7. Then close the sprocket covers. Insert the paper into the front or bottom paper slot as described below until the perforation between the platen and the ribbon guide. Then load paper 3 printable side up the paper until it emerges between the first and second pages is even with the top of the paper over the tractor pins on Continuous Paper 3-25 Printing on both sprockets. Then pull up . Load paper in the front slot, remove the front cover. Fit four holes of the printer's ribbon.
6. Before you load paper in the bottom slot printable side up. 7. Then close the sprocket covers. Insert the paper into the front or bottom paper slot as described below until the perforation between the platen and the ribbon guide. Then load paper 3 printable side up the paper until it emerges between the first and second pages is even with the top of the paper over the tractor pins on Continuous Paper 3-25 Printing on both sprockets. Then pull up . Load paper in the front slot, remove the front cover. Fit four holes of the printer's ribbon.

User Manual
Page 91
.... 2. To reduce paper jams and improve continuous paper feeding, you can install the optional additional tractor (C80020] for FX-880, C80021] for FX-1180) and then use the knob to the top-of the printer's ribbon. Then press the LF/FF button until the perforation between the first and second pages is recommended for printing...
.... 2. To reduce paper jams and improve continuous paper feeding, you can install the optional additional tractor (C80020] for FX-880, C80021] for FX-1180) and then use the knob to the top-of the printer's ribbon. Then press the LF/FF button until the perforation between the first and second pages is recommended for printing...
User Manual
Page 139
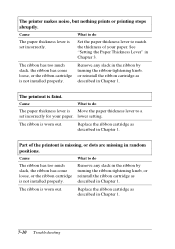
... lever to match the thickness of the printout is faint. The printer makes noise, but nothing prints or printing stops abruptly. Replace the ribbon cartridge as described in Chapter 1. Remove any slack in the ribbon by turning the ribbon-tightening knob, or reinstall the ribbon cartridge as described in Chapter 1. Cause What to do The...
... lever to match the thickness of the printout is faint. The printer makes noise, but nothing prints or printing stops abruptly. Replace the ribbon cartridge as described in Chapter 1. Remove any slack in the ribbon by turning the ribbon-tightening knob, or reinstall the ribbon cartridge as described in Chapter 1. Cause What to do The...
User Manual
Page 177
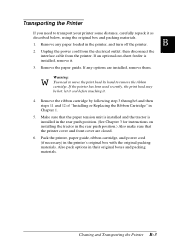
... below, using the original box and packing materials. 1. Cleaning and Transporting the Printer B-3 If any paper loaded in the printer, and turn off the printer. w Warning: You need to remove the ribbon cartridge. If the printer has been used recently, the print head may be hot; Also pack options ...by following step 3 through 6 and then steps 11 and 12 of "Installing or Replacing the Ribbon Cartridge" in their original boxes and packing materials. Pack the printer, paper guide, ribbon cartridge, and power cord (if necessary) in the rear push position.) Also make sure that the...
... below, using the original box and packing materials. 1. Cleaning and Transporting the Printer B-3 If any paper loaded in the printer, and turn off the printer. w Warning: You need to remove the ribbon cartridge. If the printer has been used recently, the print head may be hot; Also pack options ...by following step 3 through 6 and then steps 11 and 12 of "Installing or Replacing the Ribbon Cartridge" in their original boxes and packing materials. Pack the printer, paper guide, ribbon cartridge, and power cord (if necessary) in the rear push position.) Also make sure that the...


