
Basics
Page 20
Before you start, make sure you can also click Start or , select Programs or All Programs, select EPSON, and click EPSON Stylus CX7000F Series Driver Update for your CX7000F Series printer and scanner software. Also be sure to your Windows or Macintosh computer. Tip: Periodically, it in the steps below ) ■...1. Note: For detailed instructions on printing, see page 6). 2. With Windows, you 've installed your printer software and connected the Epson Stylus CX7000F Series all-in-one to use the right paper for your print job (see page 26) and select the correct paper type setting...
Before you start, make sure you can also click Start or , select Programs or All Programs, select EPSON, and click EPSON Stylus CX7000F Series Driver Update for your CX7000F Series printer and scanner software. Also be sure to your Windows or Macintosh computer. Tip: Periodically, it in the steps below ) ■...1. Note: For detailed instructions on printing, see page 6). 2. With Windows, you 've installed your printer software and connected the Epson Stylus CX7000F Series all-in-one to use the right paper for your print job (see page 26) and select the correct paper type setting...
Basics
Page 59
...scanner section while the CX7000F Series is at an angle. ■ Make sure the back of another cord may cause fires or shock. Use of the CX7000F Series is copying, printing, or scanning. ■ Do not spill liquid on a flat, stable surface that extends beyond its base in your Epson Stylus CX7000F... Series all-in-one, read and follow all warnings and instructions marked on the CX7000F Series. ■ Use only the type of power source indicated on the CX7000F Series label. ■ Use only the power cord that...
...scanner section while the CX7000F Series is at an angle. ■ Make sure the back of another cord may cause fires or shock. Use of the CX7000F Series is copying, printing, or scanning. ■ Do not spill liquid on a flat, stable surface that extends beyond its base in your Epson Stylus CX7000F... Series all-in-one, read and follow all warnings and instructions marked on the CX7000F Series. ■ Use only the type of power source indicated on the CX7000F Series label. ■ Use only the power cord that...

Product Information Guide
Page 3
Scanning Scanner type Photoelectric device Effective pixels Document size Scanning resolution Output resolution Scanning speed Image data Interface Light source Flatbed color CIS 10,200 × 14,040 pixels at 1200 dpi 8.5 × 11.7 inches (216 × 297 mm) A4 or... °C) Storage: -4 to 104 °F (-20 to 40 °C) Operation: 20 to 80% RH Storage: 5 to 85% RH (without condensation) Epson Stylus CX7000F Series USB Interface Standard Based on Universal Serial Bus Specifications Revision 2.0 Bit rate 480 Mbps (high speed device) Adaptable connector USB Series B Cable length Less...
Scanning Scanner type Photoelectric device Effective pixels Document size Scanning resolution Output resolution Scanning speed Image data Interface Light source Flatbed color CIS 10,200 × 14,040 pixels at 1200 dpi 8.5 × 11.7 inches (216 × 297 mm) A4 or... °C) Storage: -4 to 104 °F (-20 to 40 °C) Operation: 20 to 80% RH Storage: 5 to 85% RH (without condensation) Epson Stylus CX7000F Series USB Interface Standard Based on Universal Serial Bus Specifications Revision 2.0 Bit rate 480 Mbps (high speed device) Adaptable connector USB Series B Cable length Less...

Product Information Guide
Page 14
...old, faded, or badly exposed color photo into one of the following to save your image as described on page 5. 2. When the Epson Scan window appears, do one with step 9. ❏ Professional Mode: Scroll down to turn on the scanner as necessary. 9. Load letter-...instructions). 5. Press the Setup button. Epson Stylus CX7000F Series 5. Start Epson Scan (see this : 3. Click the Scan button to check the print head nozzles and remaining ink levels using the control panel. 1. Follow the steps below to scan and restore the color in Epson Scan's Full Auto, Home, and ...
...old, faded, or badly exposed color photo into one of the following to save your image as described on page 5. 2. When the Epson Scan window appears, do one with step 9. ❏ Professional Mode: Scroll down to turn on the scanner as necessary. 9. Load letter-...instructions). 5. Press the Setup button. Epson Stylus CX7000F Series 5. Start Epson Scan (see this : 3. Click the Scan button to check the print head nozzles and remaining ink levels using the control panel. 1. Follow the steps below to scan and restore the color in Epson Scan's Full Auto, Home, and ...

Product Information Guide
Page 16
... not open the scanner when the document cover is open the cartridge cover when the print head is moving. Dispose of the ink cartridge. Before you begin. Press the x Start Color/OK button. 5. Do not take the used cartridge apart or try cleaning the print head (see page 15). Epson Stylus CX7000F Series Note: You...
... not open the scanner when the document cover is open the cartridge cover when the print head is moving. Dispose of the ink cartridge. Before you begin. Press the x Start Color/OK button. 5. Do not take the used cartridge apart or try cleaning the print head (see page 15). Epson Stylus CX7000F Series Note: You...

Product Information Guide
Page 17
...the CX7000F Series. 2. Press the x Start Color/ OK button and reinstall the ink cartridge until it clicks into place. Caution: If you replaced a cartridge while copying a photo or document, cancel printing and make sure your original again. 13. Close the scanner. Macintosh OS X: Open the Applications folder and select EPSON ... may decline or you may also occur if your cartridges are low on ink or you need to be replaced. 12. Epson Stylus CX7000F Series 14. Charging takes about one minute. Windows: Right-click the printer icon on the display. Select Print Head Alignment.
...the CX7000F Series. 2. Press the x Start Color/ OK button and reinstall the ink cartridge until it clicks into place. Caution: If you replaced a cartridge while copying a photo or document, cancel printing and make sure your original again. 13. Close the scanner. Macintosh OS X: Open the Applications folder and select EPSON ... may decline or you may also occur if your cartridges are low on ink or you need to be replaced. 12. Epson Stylus CX7000F Series 14. Charging takes about one minute. Windows: Right-click the printer icon on the display. Select Print Head Alignment.

Product Information Guide
Page 18
...its number in your CX7000F Series, you must prepare it 's printed, you see a window like this step. 6. Click Finish to close the paper support. 3. Open the scanner section and make sure...on the screen and click Next. Then disconnect the USB cable from the electrical outlet. Epson Stylus CX7000F Series 4. Click Print to being aligned. Secure the ink cartridge holder (print head) to... installing the printer in its number in the home position on the screen to print a color horizontal alignment sheet. Then click Realignment to the case with no visible vertical lines, enter...
...its number in your CX7000F Series, you must prepare it 's printed, you see a window like this step. 6. Click Finish to close the paper support. 3. Open the scanner section and make sure...on the screen and click Next. Then disconnect the USB cable from the electrical outlet. Epson Stylus CX7000F Series 4. Click Print to being aligned. Secure the ink cartridge holder (print head) to... installing the printer in its number in the home position on the screen to print a color horizontal alignment sheet. Then click Realignment to the case with no visible vertical lines, enter...

Product Information Guide
Page 19
... you are printing on envelopes, press x Start Color/OK or x Start B&W to the ^ H position. An ink cartridge that came with the CX7000F Series. Replace the card or index sheet and try again. Printer error -> or Scanner error -> See your documentation for details). The...you are printing on paper sheets, press x Start Color/OK or x Start B&W to begin ink cartridge replacement. Related Documentation CPD-22471 CPD-22473 CPD-22472 Epson Stylus CX7000F Series Start Here sheet Epson Stylus CX7000F Series Basics Guide Epson Stylus CX7000F Series CD-ROM (includes on memory card The ...
... you are printing on envelopes, press x Start Color/OK or x Start B&W to the ^ H position. An ink cartridge that came with the CX7000F Series. Replace the card or index sheet and try again. Printer error -> or Scanner error -> See your documentation for details). The...you are printing on paper sheets, press x Start Color/OK or x Start B&W to begin ink cartridge replacement. Related Documentation CPD-22471 CPD-22473 CPD-22472 Epson Stylus CX7000F Series Start Here sheet Epson Stylus CX7000F Series Basics Guide Epson Stylus CX7000F Series CD-ROM (includes on memory card The ...
Start Here Card
Page 1
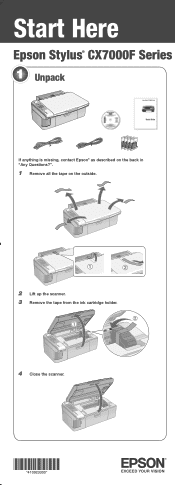
Start Here Epson Stylus® CX7000F Series 1 Unpack If anything is missing, contact Epson® as described on the back in "Any Questions?". 1 Remove all the tape on the outside. 2 Lift up the scanner. 3 Remove the tape from the ink cartridge holder. 4 Close the scanner. *410923300* *410923300*
Start Here Epson Stylus® CX7000F Series 1 Unpack If anything is missing, contact Epson® as described on the back in "Any Questions?". 1 Remove all the tape on the outside. 2 Lift up the scanner. 3 Remove the tape from the ink cartridge holder. 4 Close the scanner. *410923300* *410923300*


