
Basics
Page 2
.... While some people assume. and Matsushita Electric Industrial Co., Ltd. xD-Picture Card is a trademark. Copyright Notice All rights reserved. Trademarks Epson and Epson Stylus are registered trademarks, and Exceed Your Vision, USB DIRECT-PRINT, and the USB DIRECT-PRINT logo are trademarks of Fuji Photo Film Co., Ltd. SDHC ...
.... While some people assume. and Matsushita Electric Industrial Co., Ltd. xD-Picture Card is a trademark. Copyright Notice All rights reserved. Trademarks Epson and Epson Stylus are registered trademarks, and Exceed Your Vision, USB DIRECT-PRINT, and the USB DIRECT-PRINT logo are trademarks of Fuji Photo Film Co., Ltd. SDHC ...
Basics
Page 5
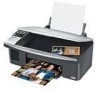
Introduction After you have set up your Epson Stylus® CX7000F Series all-in-one as described on the Start Here sheet, turn here to: ■ Load paper ■ Make a quick copy of a photo or document &#... camera ■ Print a basic document or photo from your computer ■ Fax a photo or document ■ Scan a photo or document, including restoring a color photo as you read your CX7000F Series instructions: Warning: Warnings must be followed carefully to avoid bodily injury. Caution: Cautions must be observed to avoid damage to your desktop...
Introduction After you have set up your Epson Stylus® CX7000F Series all-in-one as described on the Start Here sheet, turn here to: ■ Load paper ■ Make a quick copy of a photo or document &#... camera ■ Print a basic document or photo from your computer ■ Fax a photo or document ■ Scan a photo or document, including restoring a color photo as you read your CX7000F Series instructions: Warning: Warnings must be followed carefully to avoid bodily injury. Caution: Cautions must be observed to avoid damage to your desktop...
Basics
Page 6
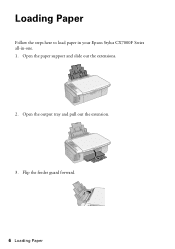
Open the output tray and pull out the extension. 3. Loading Paper Follow the steps here to load paper in your Epson Stylus CX7000F Series all-in-one. 1. Flip the feeder guard forward. 6 Loading Paper Open the paper support and slide out the extensions. 2.
Open the output tray and pull out the extension. 3. Loading Paper Follow the steps here to load paper in your Epson Stylus CX7000F Series all-in-one. 1. Flip the feeder guard forward. 6 Loading Paper Open the paper support and slide out the extensions. 2.
Basics
Page 8
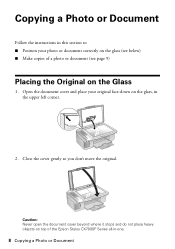
Close the cover gently so you don't move the original. Caution: Never open the document cover beyond where it stops and do not place heavy objects on the glass, in -one. 8 Copying a Photo or Document Open the document cover and place your photo or document correctly on the glass (see below) ■ Make copies of the Epson Stylus CX7000F Series all-in the upper left corner. 2. Copying a Photo or Document Follow the instructions in this section to: ■ Position your original face-down on top of a photo or document (see page 9) Placing the Original on the Glass 1.
Close the cover gently so you don't move the original. Caution: Never open the document cover beyond where it stops and do not place heavy objects on the glass, in -one. 8 Copying a Photo or Document Open the document cover and place your photo or document correctly on the glass (see below) ■ Make copies of the Epson Stylus CX7000F Series all-in the upper left corner. 2. Copying a Photo or Document Follow the instructions in this section to: ■ Position your original face-down on top of a photo or document (see page 9) Placing the Original on the Glass 1.
Basics
Page 12
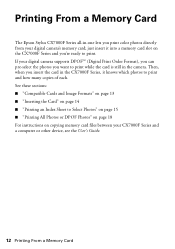
Then, when you insert the card in the camera. Printing From a Memory Card The Epson Stylus CX7000F Series all-in-one lets you print color photos directly from your digital camera supports DPOF™ (Digital Print Order Format), you can pre-select the photos you want to print while the... card is still in the CX7000F Series, it into a memory card slot on copying memory card files between your CX7000F Series and a ...
Then, when you insert the card in the camera. Printing From a Memory Card The Epson Stylus CX7000F Series all-in-one lets you print color photos directly from your digital camera supports DPOF™ (Digital Print Order Format), you can pre-select the photos you want to print while the... card is still in the CX7000F Series, it into a memory card slot on copying memory card files between your CX7000F Series and a ...

Basics
Page 19
... small white border. 5. or USB DIRECT-PRINT™-compatible, you can print your JPEG photos by connecting your digital camera directly to your Epson Stylus CX7000F Series all-in your camera manual. Remove any memory cards from 80 × 80 pixels to the USB connector on the front of photos ...if you 'll be reflected in the printed output. Press the paper size button to print with your CX7000F Series. 7. Select the photos you want to select Letter, 4"x6", or 5"x7". 6. Epson cannot guarantee the compatibility of paper type, size, and layout may not be printing. 4. Make sure ...
... small white border. 5. or USB DIRECT-PRINT™-compatible, you can print your JPEG photos by connecting your digital camera directly to your Epson Stylus CX7000F Series all-in your camera manual. Remove any memory cards from 80 × 80 pixels to the USB connector on the front of photos ...if you 'll be reflected in the printed output. Press the paper size button to print with your CX7000F Series. 7. Select the photos you want to select Letter, 4"x6", or 5"x7". 6. Epson cannot guarantee the compatibility of paper type, size, and layout may not be printing. 4. Make sure ...

Basics
Page 20
... printer and scanner software. Before you start, make sure you can also click Start or , select Programs or All Programs, select EPSON, and click EPSON Stylus CX7000F Series Driver Update for driver updates. With Windows, you 've installed your Windows or Macintosh computer. Printing From Your Computer This section describes the basic ...
... printer and scanner software. Before you start, make sure you can also click Start or , select Programs or All Programs, select EPSON, and click EPSON Stylus CX7000F Series Driver Update for driver updates. With Windows, you 've installed your Windows or Macintosh computer. Printing From Your Computer This section describes the basic ...
Basics
Page 21
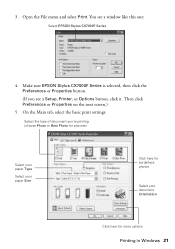
Open the File menu and select Print. Make sure EPSON Stylus CX7000F Series is selected, then click the Preferences or Properties button. (If you 're printing (choose Photo or Best Photo for pictures) Select your paper Type ... Options button, click it. 3. On the Main tab, select the basic print settings: w Select the type of document you see a window like this one: Select EPSON Stylus CX7000F Series 4.
Open the File menu and select Print. Make sure EPSON Stylus CX7000F Series is selected, then click the Preferences or Properties button. (If you 're printing (choose Photo or Best Photo for pictures) Select your paper Type ... Options button, click it. 3. On the Main tab, select the basic print settings: w Select the type of document you see a window like this one: Select EPSON Stylus CX7000F Series 4.

Basics
Page 23
... the progress of your document or image orientation For borderless printing, choose a Sheet Feeder - Open the photo or document in ). 4. Make the following settings: Select Stylus CX7000F Select your Paper Size Select your print job. Borderless option in the Paper Size list for your settings, then click OK or Print to start...
... the progress of your document or image orientation For borderless printing, choose a Sheet Feeder - Open the photo or document in ). 4. Make the following settings: Select Stylus CX7000F Select your Paper Size Select your print job. Borderless option in the Paper Size list for your settings, then click OK or Print to start...

Basics
Page 24
You see page 26) Select Color or Black ink Select higher quality or faster printing Select Automatic mode Note: In certain programs, you may need to print at a later time. 24 ... file (OS X 10.2.x or 10.3.x). In OS X 10.4.x, click the PDF button instead. ■ Scheduler: Schedule your Media Type (see a window like this one: Select Stylus CX7000F Select Print Settings 6. 5. Choose Print Settings from the File menu. For more information about printer settings, click the ? Select Print from the pop-up menu...
You see page 26) Select Color or Black ink Select higher quality or faster printing Select Automatic mode Note: In certain programs, you may need to print at a later time. 24 ... file (OS X 10.2.x or 10.3.x). In OS X 10.4.x, click the PDF button instead. ■ Scheduler: Schedule your Media Type (see a window like this one: Select Stylus CX7000F Select Print Settings 6. 5. Choose Print Settings from the File menu. For more information about printer settings, click the ? Select Print from the pop-up menu...

Basics
Page 25
...a group so you 're using OS X 10.2.x, click the Print Center icon instead, then double-click Stylus CX7000F in the Printer List window. Click the Advanced button to change the gamma setting, or turn off color adjustments in the printer software. ■ Cover Page (OS X 10.4.x only): Add a cover page ... settings, or instructions on the bottom of all your desktop. If you can reuse them as Reverse print order. ■ ColorSync or Color Management: Select ColorSync® or adjust the color controls, change additional settings. Printing With a Macintosh 25 Click Print. 10.
...a group so you 're using OS X 10.2.x, click the Print Center icon instead, then double-click Stylus CX7000F in the Printer List window. Click the Advanced button to change the gamma setting, or turn off color adjustments in the printer software. ■ Cover Page (OS X 10.4.x only): Add a cover page ... settings, or instructions on the bottom of all your desktop. If you can reuse them as Reverse print order. ■ ColorSync or Color Management: Select ColorSync® or adjust the color controls, change additional settings. Printing With a Macintosh 25 Click Print. 10.
Basics
Page 29
Faxing a Photo or Document 29 You can also set up your CX7000F Series to automatically receive faxes or select to make voice calls, follow these sections: ...; "Receiving a Fax" on page 39 For more information on the back of the CX7000F Series. Connecting a Phone or Answering Machine If you're connecting the CX7000F Series to a phone line, and connecting a telephone or answering machine to the same ...you 're receiving a fax. See these steps: 1. Faxing a Photo or Document Your Epson Stylus CX7000F Series all-in-one end of another phone cable to the telephone or answering machine. 3.
Faxing a Photo or Document 29 You can also set up your CX7000F Series to automatically receive faxes or select to make voice calls, follow these sections: ...; "Receiving a Fax" on page 39 For more information on the back of the CX7000F Series. Connecting a Phone or Answering Machine If you're connecting the CX7000F Series to a phone line, and connecting a telephone or answering machine to the same ...you 're receiving a fax. See these steps: 1. Faxing a Photo or Document Your Epson Stylus CX7000F Series all-in-one end of another phone cable to the telephone or answering machine. 3.

Basics
Page 41
... or Document 41 Open the document cover and place your original face-down on your computer or other device. The Epson Scan software provides three scanning modes for progressive levels of control over your scanned image: ■ Full Auto Mode scans quickly... can even automatically restore faded color photographs as ArcSoft PhotoImpression™-using automatic settings. ■ Home Mode previews your image and provides automatic image adjustments, cropping tools, and preset options for details). Scanning a Photo or Document You can use your Epson Stylus CX7000F Series all-in the upper ...
... or Document 41 Open the document cover and place your original face-down on your computer or other device. The Epson Scan software provides three scanning modes for progressive levels of control over your scanned image: ■ Full Auto Mode scans quickly... can even automatically restore faded color photographs as ArcSoft PhotoImpression™-using automatic settings. ■ Home Mode previews your image and provides automatic image adjustments, cropping tools, and preset options for details). Scanning a Photo or Document You can use your Epson Stylus CX7000F Series all-in the upper ...

Basics
Page 42
... scan a thick document, you want to automatically restore a color photo as you scan, click the Customize button (see page 43 for it in an open the File menu, choose Import or Acquire, and select Epson Stylus CX7000F Series. (Your program may use different scanning commands.) You see... the on your desktop. ■ Macintosh: Double-click EPSON Scan in the Applications folder. ■ If you see a different Epson Scan settings window. (You can remove the ...
... scan a thick document, you want to automatically restore a color photo as you scan, click the Customize button (see page 43 for it in an open the File menu, choose Import or Acquire, and select Epson Stylus CX7000F Series. (Your program may use different scanning commands.) You see... the on your desktop. ■ Macintosh: Double-click EPSON Scan in the Applications folder. ■ If you see a different Epson Scan settings window. (You can remove the ...

Basics
Page 44
...have gaps in them, some of the ink cartridges. You see this display: 1.Load/Eject 4. Press the u or d button, or press the 3 key on the Epson Stylus CX7000F Series all-in-one or more of the nozzles in the print head may be clogged or ink may be running low in one , or..., follow the instructions in this chapter for: ■ "Checking the Print Head Nozzles" (see below to display this option: 3.Nozzle Check 44 Maintaining Your CX7000F Series Load letter-size paper in the sheet feeder. 2. Press the P On button to turn on the numeric keypad, to check the print head nozzles...
...have gaps in them, some of the ink cartridges. You see this display: 1.Load/Eject 4. Press the u or d button, or press the 3 key on the Epson Stylus CX7000F Series all-in-one or more of the nozzles in the print head may be clogged or ink may be running low in one , or..., follow the instructions in this chapter for: ■ "Checking the Print Head Nozzles" (see below to display this option: 3.Nozzle Check 44 Maintaining Your CX7000F Series Load letter-size paper in the sheet feeder. 2. Press the P On button to turn on the numeric keypad, to check the print head nozzles...

Basics
Page 52
... press the x Start Color/OK button to install a new ink cartridge. Replace [Cyan, Magenta, Yellow, Black] ink cartridge -> Press the OK button to begin ink cartridge replacement. See these sections: ■ "Error Messages" (below) ■ "Problems and Solutions" on page 54 ■ "Where To Get Help" on your Epson Stylus CX7000F Series all-in...
... press the x Start Color/OK button to install a new ink cartridge. Replace [Cyan, Magenta, Yellow, Black] ink cartridge -> Press the OK button to begin ink cartridge replacement. See these sections: ■ "Error Messages" (below) ■ "Problems and Solutions" on page 54 ■ "Where To Get Help" on your Epson Stylus CX7000F Series all-in...

Basics
Page 57
... through Friday Toll or long distance charges may apply. Where To Get Help Epson Technical Support Epson provides these technical support services: Internet Support Visit Epson's support website, epson.com/support, for support, please have the following information ready: ■ Product name (Epson Stylus CX7000F Series all-in-one) ■ Product serial number (located on the label...
... through Friday Toll or long distance charges may apply. Where To Get Help Epson Technical Support Epson provides these technical support services: Internet Support Visit Epson's support website, epson.com/support, for support, please have the following information ready: ■ Product name (Epson Stylus CX7000F Series all-in-one) ■ Product serial number (located on the label...
Basics
Page 59
... ventilation. Do not use the cord with any other equipment. ■ Place the CX7000F Series near a radiator or heating vent or in direct sunlight. ■ Place the CX7000F Series on the CX7000F Series. ■ Except as specifically explained in your Epson Stylus CX7000F Series all-in-one, read and follow these safety instructions: ■ Be sure...
... ventilation. Do not use the cord with any other equipment. ■ Place the CX7000F Series near a radiator or heating vent or in direct sunlight. ■ Place the CX7000F Series on the CX7000F Series. ■ Except as specifically explained in your Epson Stylus CX7000F Series all-in-one, read and follow these safety instructions: ■ Be sure...

Product Information Guide
Page 2
...7 inches 3.5 × 5 inches 8 × 10 inches User Defined up to 8.5 × 44 inches Plain bond paper or special paper distributed by Epson's warranty. C: The minimum bottom margin is 0.12" (3 mm). Do not load curled or folded paper. Other products may cause damage to 60% RH ... printout quality. B-L: The minimum left with the flap side down. 2 10/06 Epson Stylus CX7000F Series Specifications Printing Printing method On-demand ink jet Nozzle configuration Black: 90 nozzles Color: 270 nozzles (90 each cartridge: cyan, magenta, yellow) Print direction Bidirectional with logic...
...7 inches 3.5 × 5 inches 8 × 10 inches User Defined up to 8.5 × 44 inches Plain bond paper or special paper distributed by Epson's warranty. C: The minimum bottom margin is 0.12" (3 mm). Do not load curled or folded paper. Other products may cause damage to 60% RH ... printout quality. B-L: The minimum left with the flap side down. 2 10/06 Epson Stylus CX7000F Series Specifications Printing Printing method On-demand ink jet Nozzle configuration Black: 90 nozzles Color: 270 nozzles (90 each cartridge: cyan, magenta, yellow) Print direction Bidirectional with logic...

Product Information Guide
Page 3
Scanning Scanner type Photoelectric device Effective pixels Document size Scanning resolution Output resolution Scanning speed Image data Interface Light source Flatbed color CIS 10,200 × 14,040 pixels at 1200 dpi 8.5 × 11.7 inches (216 × 297 mm) A4 or... °C) Storage: -4 to 104 °F (-20 to 40 °C) Operation: 20 to 80% RH Storage: 5 to 85% RH (without condensation) Epson Stylus CX7000F Series USB Interface Standard Based on Universal Serial Bus Specifications Revision 2.0 Bit rate 480 Mbps (high speed device) Adaptable connector USB Series B Cable length Less...
Scanning Scanner type Photoelectric device Effective pixels Document size Scanning resolution Output resolution Scanning speed Image data Interface Light source Flatbed color CIS 10,200 × 14,040 pixels at 1200 dpi 8.5 × 11.7 inches (216 × 297 mm) A4 or... °C) Storage: -4 to 104 °F (-20 to 40 °C) Operation: 20 to 80% RH Storage: 5 to 85% RH (without condensation) Epson Stylus CX7000F Series USB Interface Standard Based on Universal Serial Bus Specifications Revision 2.0 Bit rate 480 Mbps (high speed device) Adaptable connector USB Series B Cable length Less...


