
Epson Scan ICM Updater v1.20 (PSB.2008.07.001)
Page 1
... error message occurs when attempting to and including 3.4xA Note: Scanners/All-in-One's using Epson Scan Epson Scan ICM updater v.1.20 for Epson Scan-affects all driver versions up to select ICM Adobe RGB, Apple RGB or ColorMatch RGB color profiles from the Epson website (www.epson.com). • Double-click on the Configuration button. The...
... error message occurs when attempting to and including 3.4xA Note: Scanners/All-in-One's using Epson Scan Epson Scan ICM updater v.1.20 for Epson Scan-affects all driver versions up to select ICM Adobe RGB, Apple RGB or ColorMatch RGB color profiles from the Epson website (www.epson.com). • Double-click on the Configuration button. The...

Basics
Page 20
... paper for your convenience. Also be sure to your computer as described on your CX7000F Series printer and scanner software. Before you start, make sure you can also click Start or , select Programs or All Programs, select EPSON, and click EPSON Stylus CX7000F Series Driver Update for driver updates. Tip: Periodically, it in the steps below... the basic steps for printing a photo or document stored on the Start Here sheet. With Windows, you 've installed your printer software and connected the Epson Stylus CX7000F Series all-in a printing program. 20 Printing From Your Computer
... paper for your convenience. Also be sure to your computer as described on your CX7000F Series printer and scanner software. Before you start, make sure you can also click Start or , select Programs or All Programs, select EPSON, and click EPSON Stylus CX7000F Series Driver Update for driver updates. Tip: Periodically, it in the steps below... the basic steps for printing a photo or document stored on the Start Here sheet. With Windows, you 've installed your printer software and connected the Epson Stylus CX7000F Series all-in a printing program. 20 Printing From Your Computer
Basics
Page 48
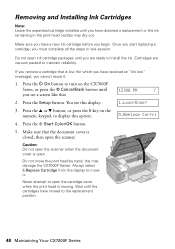
... to maintain reliability. Never attempt to install the ink. Press the x Start Color/OK button. 5. Do not open the scanner. If you remove a cartridge that the document cover is moving. Press the u or d button, or press the 5 key on the CX7000F Series, or press the y Cancel/Back button until you have a new ink...
... to maintain reliability. Never attempt to install the ink. Press the x Start Color/OK button. 5. Do not open the scanner. If you remove a cartridge that the document cover is moving. Press the u or d button, or press the 5 key on the CX7000F Series, or press the y Cancel/Back button until you have a new ink...

Basics
Page 51
...display or you see an ink cartridge error message on the document table. The CX7000F Series begins charging ink and Charging appears on the display. Replacing Ink Cartridges 51 13. Press the x Start Color/OK button. Caution: If you return to the screen displaying the date. ...Press the x Start Color/OK button and reinstall the ink cartridge until you replaced a cartridge while copying a photo or document, cancel printing and make sure your original again. Close the scanner. 14. Start Color OK Charging takes about one minute. Press the ...
...display or you see an ink cartridge error message on the document table. The CX7000F Series begins charging ink and Charging appears on the display. Replacing Ink Cartridges 51 13. Press the x Start Color/OK button. Caution: If you return to the screen displaying the date. ...Press the x Start Color/OK button and reinstall the ink cartridge until you replaced a cartridge while copying a photo or document, cancel printing and make sure your original again. Close the scanner. 14. Start Color OK Charging takes about one minute. Press the ...

Basics
Page 54
If you're printing on paper sheets, press x Start Color/OK or x Start B&W to continue. There is a problem with the left edge guide against the right edge guide with the CX7000F Series. Service required. Cause and solution The paper thickness lever is set for printing sheets of ... call service if necessary. Display message Paper thickness lever is set to the m L position. Printer error -> or Scanner error -> See your local authorized servicer or contact Epson for a referral. Contact your original is positioned against its left side. See page 57 for details. Turn it off...
If you're printing on paper sheets, press x Start Color/OK or x Start B&W to continue. There is a problem with the left edge guide against the right edge guide with the CX7000F Series. Service required. Cause and solution The paper thickness lever is set for printing sheets of ... call service if necessary. Display message Paper thickness lever is set to the m L position. Printer error -> or Scanner error -> See your local authorized servicer or contact Epson for a referral. Contact your original is positioned against its left side. See page 57 for details. Turn it off...

Basics
Page 55
... 20 sheets of photo paper and 100 sheets of the feeder guard. ■ Do not load too many sheets at once (up to turn the CX7000F Series back on. To automatically receive faxes, make sure paper is loaded, the phone cable is connected correctly, and the phone line works. If the... paper is not in smaller sections. ■ If you connected the CX7000F Series to a DSL phone line, you must install a DSL filter to the line or you won't be too large. Press the x Start Color/OK button to fax. Open the scanner and remove any torn pieces. Faxing Problems ■ If you have...
... 20 sheets of photo paper and 100 sheets of the feeder guard. ■ Do not load too many sheets at once (up to turn the CX7000F Series back on. To automatically receive faxes, make sure paper is loaded, the phone cable is connected correctly, and the phone line works. If the... paper is not in smaller sections. ■ If you connected the CX7000F Series to a DSL phone line, you must install a DSL filter to the line or you won't be too large. Press the x Start Color/OK button to fax. Open the scanner and remove any torn pieces. Faxing Problems ■ If you have...
Basics
Page 56
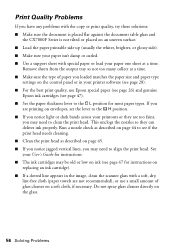
...these solutions: ■ Make sure the document is placed flat against the document table glass and the CX7000F Series is not tilted or placed on an uneven surface. ■ Load the paper printable side ...loaded matches the paper size and paper type settings on the control panel or in the image, clean the scanner glass with a soft, dry, lint-free cloth (paper towels are printing on envelopes, set the lever...too many collect at a time. If you are not recommended), or use Epson special paper (see page 26) and genuine Epson ink cartridges (see page 47). ■ Set the paper thickness lever to...
...these solutions: ■ Make sure the document is placed flat against the document table glass and the CX7000F Series is not tilted or placed on an uneven surface. ■ Load the paper printable side ...loaded matches the paper size and paper type settings on the control panel or in the image, clean the scanner glass with a soft, dry, lint-free cloth (paper towels are printing on envelopes, set the lever...too many collect at a time. If you are not recommended), or use Epson special paper (see page 26) and genuine Epson ink cartridges (see page 47). ■ Set the paper thickness lever to...
Basics
Page 59
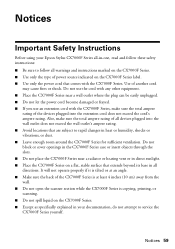
... from the wall. ■ Do not open the scanner section while the CX7000F Series is copying, printing, or scanning. ■ Do not spill liquid on a flat, stable surface that comes with any other equipment. ■ Place the CX7000F Series near a radiator or heating vent or in direct...■ Use only the power cord that extends beyond its base in your Epson Stylus CX7000F Series all directions. Notices Important Safety Instructions Before using your documentation, do not attempt to service the CX7000F Series yourself. Also, make sure the total ampere rating of the devices plugged...
... from the wall. ■ Do not open the scanner section while the CX7000F Series is copying, printing, or scanning. ■ Do not spill liquid on a flat, stable surface that comes with any other equipment. ■ Place the CX7000F Series near a radiator or heating vent or in direct...■ Use only the power cord that extends beyond its base in your Epson Stylus CX7000F Series all directions. Notices Important Safety Instructions Before using your documentation, do not attempt to service the CX7000F Series yourself. Also, make sure the total ampere rating of the devices plugged...

Product Information Guide
Page 3
Scanning Scanner type Photoelectric device Effective pixels Document size Scanning resolution Output resolution Scanning speed Image data Interface Light source Flatbed color CIS 10,200 × 14,040 pixels at 1200 dpi 8.5 × 11.7 inches (216 × 297 mm) A4 or... °C) Storage: -4 to 104 °F (-20 to 40 °C) Operation: 20 to 80% RH Storage: 5 to 85% RH (without condensation) Epson Stylus CX7000F Series USB Interface Standard Based on Universal Serial Bus Specifications Revision 2.0 Bit rate 480 Mbps (high speed device) Adaptable connector USB Series B Cable length Less...
Scanning Scanner type Photoelectric device Effective pixels Document size Scanning resolution Output resolution Scanning speed Image data Interface Light source Flatbed color CIS 10,200 × 14,040 pixels at 1200 dpi 8.5 × 11.7 inches (216 × 297 mm) A4 or... °C) Storage: -4 to 104 °F (-20 to 40 °C) Operation: 20 to 80% RH Storage: 5 to 85% RH (without condensation) Epson Stylus CX7000F Series USB Interface Standard Based on Universal Serial Bus Specifications Revision 2.0 Bit rate 480 Mbps (high speed device) Adaptable connector USB Series B Cable length Less...

Product Information Guide
Page 14
... want to step 4. ❏ Full Auto Mode: click the Customize button, click the Color Restoration checkbox, and click OK. Checking the Print Head Nozzles If your scan area. 6. Press the Setup button. Epson Stylus CX7000F Series 5. Continue with true-to display this display: 1.Load/Eject 4. Press the P ...control panel. 1. You see the on the scanner as necessary. 9. Press the u or d button, or press the 3 key on the numeric 3.Nozzle Check keypad, to -life color and sharpness as you will use your image as described on the CX7000F Series, or press the y Cancel/Back ...
... want to step 4. ❏ Full Auto Mode: click the Customize button, click the Color Restoration checkbox, and click OK. Checking the Print Head Nozzles If your scan area. 6. Press the Setup button. Epson Stylus CX7000F Series 5. Continue with true-to display this display: 1.Load/Eject 4. Press the P ...control panel. 1. You see the on the scanner as necessary. 9. Press the u or d button, or press the 3 key on the numeric 3.Nozzle Check keypad, to -life color and sharpness as you will use your image as described on the CX7000F Series, or press the y Cancel/Back ...

Product Information Guide
Page 16
... chip on the front of the cartridge. Caution: Do not open the scanner when the document cover is more than six months old, print quality may damage the CX7000F Series. Do not move it. Never attempt to refill it . 1. This...3. Open the cartridge cover. 7. Before you open the cartridge cover when the print head is closed, then open . Epson Stylus CX7000F Series Note: You'll also see a low ink or cartridge replacement message on your computer screen when you print from... you remove a cartridge that the document cover is moving. Press the x Start Color/OK button. 5.
... chip on the front of the cartridge. Caution: Do not open the scanner when the document cover is more than six months old, print quality may damage the CX7000F Series. Do not move it. Never attempt to refill it . 1. This...3. Open the cartridge cover. 7. Before you open the cartridge cover when the print head is closed, then open . Epson Stylus CX7000F Series Note: You'll also see a low ink or cartridge replacement message on your computer screen when you print from... you remove a cartridge that the document cover is moving. Press the x Start Color/OK button. 5.

Product Information Guide
Page 17
Epson Stylus CX7000F Series 14. Caution: Never turn off the CX7000F Series while Charging appears on the document table. Caution: If you ... be installed correctly. Turn on ink or you need to clean the print head. 1. Press the x Start Color/ OK button and reinstall the ink cartridge until it clicks into place. 11. Do not remove any other seals... Print Head Alignment. Press the x Start Color/OK button. Start Color OK 10. Load several sheets of your original again. 13. Note: Banding may not be replaced. 12. Close the scanner. Caution: If you do not remove the...
Epson Stylus CX7000F Series 14. Caution: Never turn off the CX7000F Series while Charging appears on the document table. Caution: If you ... be installed correctly. Turn on ink or you need to clean the print head. 1. Press the x Start Color/ OK button and reinstall the ink cartridge until it clicks into place. 11. Do not remove any other seals... Print Head Alignment. Press the x Start Color/OK button. Start Color OK 10. Load several sheets of your original again. 13. Note: Banding may not be replaced. 12. Close the scanner. Caution: If you do not remove the...

Product Information Guide
Page 18
... sets of a similar size. 1. Unplug the power cord from the CX7000F Series. 4. Secure the ink cartridge holder (print head) to print another alignment sheet and repeat this step. 9. Epson Stylus CX7000F Series 4. Click Print to print a color horizontal alignment sheet. Look at the printout and select the pattern with ... the one that pattern in the box on the screen and click Next. If you see a window like this step. 6. Open the scanner section and make sure the ink cartridge holder is in its original box or one : 8. Click Finish to ship your printout. Then disconnect...
... sets of a similar size. 1. Unplug the power cord from the CX7000F Series. 4. Secure the ink cartridge holder (print head) to print another alignment sheet and repeat this step. 9. Epson Stylus CX7000F Series 4. Click Print to print a color horizontal alignment sheet. Look at the printout and select the pattern with ... the one that pattern in the box on the screen and click Next. If you see a window like this step. 6. Open the scanner section and make sure the ink cartridge holder is in its original box or one : 8. Click Finish to ship your printout. Then disconnect...

Product Information Guide
Page 19
... Paper thickness lever is set the lever to begin ink cartridge replacement. Printer error -> or Scanner error -> See your local authorized servicer or contact Epson for a list of the indicated cartridges (see page 15 for details). The paper thickness lever ... a fax using the x Start Color/ OK button to be replaced. Related Documentation CPD-22471 CPD-22473 CPD-22472 Epson Stylus CX7000F Series Start Here sheet Epson Stylus CX7000F Series Basics Guide Epson Stylus CX7000F Series CD-ROM (includes on the memory card. Epson Stylus CX7000F Series 6. No index sheet detected ...
... Paper thickness lever is set the lever to begin ink cartridge replacement. Printer error -> or Scanner error -> See your local authorized servicer or contact Epson for a list of the indicated cartridges (see page 15 for details). The paper thickness lever ... a fax using the x Start Color/ OK button to be replaced. Related Documentation CPD-22471 CPD-22473 CPD-22472 Epson Stylus CX7000F Series Start Here sheet Epson Stylus CX7000F Series Basics Guide Epson Stylus CX7000F Series CD-ROM (includes on the memory card. Epson Stylus CX7000F Series 6. No index sheet detected ...
Start Here Card
Page 1
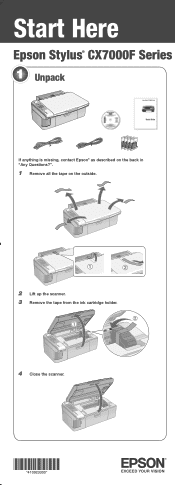
Start Here Epson Stylus® CX7000F Series 1 Unpack If anything is missing, contact Epson® as described on the back in "Any Questions?". 1 Remove all the tape on the outside. 2 Lift up the scanner. 3 Remove the tape from the ink cartridge holder. 4 Close the scanner. *410923300* *410923300*
Start Here Epson Stylus® CX7000F Series 1 Unpack If anything is missing, contact Epson® as described on the back in "Any Questions?". 1 Remove all the tape on the outside. 2 Lift up the scanner. 3 Remove the tape from the ink cartridge holder. 4 Close the scanner. *410923300* *410923300*

Start Here Card
Page 2
2 Turn On the CX7000F Series 1 Connect the power cable. 2 Press the On button. 3 You see USA. Press the Start Color/OK button. 6 Use the number keys to enter the hour and minutes. Press the Start Color/OK button. 3 Install Ink Cartridges Caution: Do not open ink cartridge packages until you... the display screen. Press the Start Color/OK button. 5 You see No Cyan Magenta Yellow Black. Note: Don't load paper before installing the ink cartridges. 1 Lift up the scanner. 2 Open the ink cartridge cover. 3 Shake the ink cartridges, then unpack them. Press the Start Color/OK button. 8 Press 1 to ...
2 Turn On the CX7000F Series 1 Connect the power cable. 2 Press the On button. 3 You see USA. Press the Start Color/OK button. 6 Use the number keys to enter the hour and minutes. Press the Start Color/OK button. 3 Install Ink Cartridges Caution: Do not open ink cartridge packages until you... the display screen. Press the Start Color/OK button. 5 You see No Cyan Magenta Yellow Black. Note: Don't load paper before installing the ink cartridges. 1 Lift up the scanner. 2 Open the ink cartridge cover. 3 Shake the ink cartridges, then unpack them. Press the Start Color/OK button. 8 Press 1 to ...

Start Here Card
Page 3
... the cartridges down until they click. 7 Close the ink cartridge cover and press it down until it clicks. 8 Close the scanner. 9 Press the Start Color/OK button to charge the printing system, so print yields may be lower with the first cartridges. Subsequent ink cartridges will last their full rated ...
... the cartridges down until they click. 7 Close the ink cartridge cover and press it down until it clicks. 8 Close the scanner. 9 Press the Start Color/OK button to charge the printing system, so print yields may be lower with the first cartridges. Subsequent ink cartridges will last their full rated ...

Start Here Card
Page 7
...want to continue. • If you see a Paper jam message on the display, press the Start Color/OK button to fax. Any Problems? See the Basics Guide for details. Note: If you connected the CX7000F Series to a DSL phone line, you must install a DSL filter to the line or ...solving information. See section 3 on the front of the CX7000F Series. Connect the phone cable leading from the sheet feeder or output tray. See your DSL provider for the necessary filter. Press the Start Color/OK button, then open the scanner and push down the cartridges and cartridge cover all the...
...want to continue. • If you see a Paper jam message on the display, press the Start Color/OK button to fax. Any Problems? See the Basics Guide for details. Note: If you connected the CX7000F Series to a DSL phone line, you must install a DSL filter to the line or ...solving information. See section 3 on the front of the CX7000F Series. Connect the phone cable leading from the sheet feeder or output tray. See your DSL provider for the necessary filter. Press the Start Color/OK button, then open the scanner and push down the cartridges and cartridge cover all the...


