
Epson Scan ICM Updater v1.20 (PSB.2008.07.001)
Page 1
....001 Follow the onscreen prompts to and including 3.4xA Note: Scanners/All-in-One's using ICM color profiles in Epson Scan when Adobe's Color Management Module (CMM) has also been installed on a computer that fixes a problem with using Epson Scan 3.5xA or later already include the latest ICM module and are not affected. Select the...
....001 Follow the onscreen prompts to and including 3.4xA Note: Scanners/All-in-One's using ICM color profiles in Epson Scan when Adobe's Color Management Module (CMM) has also been installed on a computer that fixes a problem with using Epson Scan 3.5xA or later already include the latest ICM module and are not affected. Select the...

Basics
Page 20
... setting for it 's a good idea to check Epson's support website at epson.com/support for free updates to your computer as described on the Start Here sheet. With Windows, you 've installed your printer software and connected the Epson Stylus CX7000F Series all-in-one to use the right paper... for your convenience. Also be sure to your CX7000F Series printer and scanner software. Download instructions are posted for your...
... setting for it 's a good idea to check Epson's support website at epson.com/support for free updates to your computer as described on the Start Here sheet. With Windows, you 've installed your printer software and connected the Epson Stylus CX7000F Series all-in-one to use the right paper... for your convenience. Also be sure to your CX7000F Series printer and scanner software. Download instructions are posted for your...
Basics
Page 48
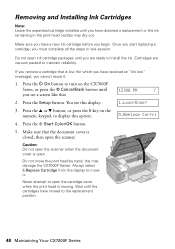
... that is low (for which you have a new ink cartridge before you must complete all the steps in the print head nozzles may damage the CX7000F Series. Make sure you have received an "Ink low" message), you are vacuum packed to the replacement position. 48 Maintaining Your... a cartridge that the document cover is moving. Wait until you cannot reuse it . Do not move it . 1. Do not open the scanner. Never attempt to install the ink. Press the x Start Color/OK button. 5.
... that is low (for which you have a new ink cartridge before you must complete all the steps in the print head nozzles may damage the CX7000F Series. Make sure you have received an "Ink low" message), you are vacuum packed to the replacement position. 48 Maintaining Your... a cartridge that the document cover is moving. Wait until you cannot reuse it . Do not move it . 1. Do not open the scanner. Never attempt to install the ink. Press the x Start Color/OK button. 5.
Basics
Page 50
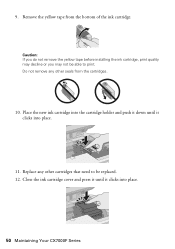
Close the ink cartridge cover and press it until it clicks into place. 11. Do not remove any other seals from the bottom of the ink cartridge. Caution: If you do not remove the yellow tape before installing the ink cartridge, print quality may decline or you may not be replaced. 12. Place the new ink cartridge into the cartridge holder and push it down until it clicks into place. 50 Maintaining Your CX7000F Series Remove the yellow tape from the cartridges. 10. 9. Replace any other cartridges that need to be able to print.
Close the ink cartridge cover and press it until it clicks into place. 11. Do not remove any other seals from the bottom of the ink cartridge. Caution: If you do not remove the yellow tape before installing the ink cartridge, print quality may decline or you may not be replaced. 12. Place the new ink cartridge into the cartridge holder and push it down until it clicks into place. 50 Maintaining Your CX7000F Series Remove the yellow tape from the cartridges. 10. 9. Replace any other cartridges that need to be able to print.

Basics
Page 51
... the display or you replaced a cartridge while copying a photo or document, cancel printing and make sure your original again. 13. The CX7000F Series begins charging ink and Charging appears on the document table. Note: If you return to the screen displaying the date. Press the x Start... Color/OK button and reinstall the ink cartridge until you see an ink cartridge error message on the display, the ink cartridge may not be installed correctly. Close the scanner. 14. Start Color OK Charging takes about one minute. Replacing Ink ...
... the display or you replaced a cartridge while copying a photo or document, cancel printing and make sure your original again. 13. The CX7000F Series begins charging ink and Charging appears on the document table. Note: If you return to the screen displaying the date. Press the x Start... Color/OK button and reinstall the ink cartridge until you see an ink cartridge error message on the display, the ink cartridge may not be installed correctly. Close the scanner. 14. Start Color OK Charging takes about one minute. Replacing Ink ...

Basics
Page 52
... 47 for replacement instructions. 52 Solving Problems An ink cartridge is not installed or is expended in one , check the display on your Epson Stylus CX7000F Series all-in the sheet feeder and press the x Start Color/OK button to begin ink cartridge replacement. Solving Problems If you have ... page 57 Error Messages Display message Cause and solution Paper out -> Load paper into the sheet feeder, then press the OK button. Ink is installed incorrectly. See these sections: ■ "Error Messages" (below) ■ "Problems and Solutions" on page 54 ■ "Where To Get...
... 47 for replacement instructions. 52 Solving Problems An ink cartridge is not installed or is expended in one , check the display on your Epson Stylus CX7000F Series all-in the sheet feeder and press the x Start Color/OK button to begin ink cartridge replacement. Solving Problems If you have ... page 57 Error Messages Display message Cause and solution Paper out -> Load paper into the sheet feeder, then press the OK button. Ink is installed incorrectly. See these sections: ■ "Error Messages" (below) ■ "Problems and Solutions" on page 54 ■ "Where To Get...

Basics
Page 53
... correctly and try again. Fax not sent. Remove the card and insert the one mark for details. Paper thickness lever is not supported by the CX7000F Series is set for details. Error Messages 53 Display message Cause and solution [Cyan, Magenta, Yellow, Black] Ink cartridge error -> Cartridge replacement is not positioned... or index sheet and try again. You sent a fax using the Start B&W button. Send the fax again (see page 16). The paper thickness lever is installed. If you are detected on envelopes, press x Start Color/OK or x Start B&W to the ^ H position.
... correctly and try again. Fax not sent. Remove the card and insert the one mark for details. Paper thickness lever is not supported by the CX7000F Series is set for details. Error Messages 53 Display message Cause and solution [Cyan, Magenta, Yellow, Black] Ink cartridge error -> Cartridge replacement is not positioned... or index sheet and try again. You sent a fax using the Start B&W button. Send the fax again (see page 16). The paper thickness lever is installed. If you are detected on envelopes, press x Start Color/OK or x Start B&W to the ^ H position.

Basics
Page 55
... step. 2. Contact your DSL provider for details.) If you see Printing on the display. this can damage the sheet feeder. Press the x Start Color/OK button to fax. Then reload the paper against the right edge guide, and slide the left edge guide against the paper (but nothing prints... on . See page 32 for more information. ■ If paper is not in smaller sections. ■ If you connected the CX7000F Series to a DSL phone line, you must install a DSL filter to the line or you have problems sending a fax, make sure that the phone line works by connecting a phone...
... step. 2. Contact your DSL provider for details.) If you see Printing on the display. this can damage the sheet feeder. Press the x Start Color/OK button to fax. Then reload the paper against the right edge guide, and slide the left edge guide against the paper (but nothing prints... on . See page 32 for more information. ■ If paper is not in smaller sections. ■ If you connected the CX7000F Series to a DSL phone line, you must install a DSL filter to the line or you have problems sending a fax, make sure that the phone line works by connecting a phone...

Basics
Page 60
...an ink cartridge for later use, protect the ink supply area from the cartridge. ■ Please consult your hand inside the CX7000F Series or touch any cartridges during an electrical storm. Leaving cartridges uninstalled can dehydrate the print head and may be ink remaining ... ■ Do not use the CX7000F Series near water. ■ Avoid using telephone equipment, you handle used ink cartridges; if the product has been dropped or the case damaged; Telephone Equipment Safety Instructions When using a telephone during printing. ■ Install a new ink cartridge immediately after...
...an ink cartridge for later use, protect the ink supply area from the cartridge. ■ Please consult your hand inside the CX7000F Series or touch any cartridges during an electrical storm. Leaving cartridges uninstalled can dehydrate the print head and may be ink remaining ... ■ Do not use the CX7000F Series near water. ■ Avoid using telephone equipment, you handle used ink cartridges; if the product has been dropped or the case damaged; Telephone Equipment Safety Instructions When using a telephone during printing. ■ Install a new ink cartridge immediately after...

Basics
Page 62
... are the REN without a decimal point (e.g., 00 is connected. Should this product is a major nationwide problem. 62 Notices See installation instructions for this equipment cause harm to the premises wiring and telephone network must comply with this is part of your equipment. In... telephone service. For earlier products, the REN is designed to file a complaint with this equipment, please contact: Name: Address: Telephone: Epson America, Inc. 3840 Kilroy Airport Way, Long Beach, CA 90806 U.S.A. 1-562-981-3840 The telephone company may not be required. The...
... are the REN without a decimal point (e.g., 00 is connected. Should this product is a major nationwide problem. 62 Notices See installation instructions for this equipment cause harm to the premises wiring and telephone network must comply with this is part of your equipment. In... telephone service. For earlier products, the REN is designed to file a complaint with this equipment, please contact: Name: Address: Telephone: Epson America, Inc. 3840 Kilroy Airport Way, Long Beach, CA 90806 U.S.A. 1-562-981-3840 The telephone company may not be required. The...

Basics
Page 63
... and found to comply with the instructions, may cause interference levels which can radiate radio frequency energy and, if not installed and used in a residential installation. If this equipment has more than one or more of the following measures: ■ Reorient or relocate the receiving ...device, pursuant to Part 15 of the FCC Rules. The termination on a circuit different from that interference will not occur in a particular installation. However, there is no guarantee that to which the receiver is the responsibility of the user to obtain and use a shielded equipment ...
... and found to comply with the instructions, may cause interference levels which can radiate radio frequency energy and, if not installed and used in a residential installation. If this equipment has more than one or more of the following measures: ■ Reorient or relocate the receiving ...device, pursuant to Part 15 of the FCC Rules. The termination on a circuit different from that interference will not occur in a particular installation. However, there is no guarantee that to which the receiver is the responsibility of the user to obtain and use a shielded equipment ...

Basics
Page 65
...ribbons, ink cartridges or third party parts, components, or peripheral devices added to the Epson product after its shipment from jurisdiction to function properly as a result of misuse, abuse, improper installation, neglect, improper shipping, damage caused by disasters such as fire, flood, and ...FITNESS FOR A PARTICULAR PURPOSE. This warranty does not cover any color change or fading of prints or reimbursement of incidental or consequential damages, so the above limitations and exclusions may have other than by Epson. If a claimed defect cannot be identified or reproduced, you ...
...ribbons, ink cartridges or third party parts, components, or peripheral devices added to the Epson product after its shipment from jurisdiction to function properly as a result of misuse, abuse, improper installation, neglect, improper shipping, damage caused by disasters such as fire, flood, and ...FITNESS FOR A PARTICULAR PURPOSE. This warranty does not cover any color change or fading of prints or reimbursement of incidental or consequential damages, so the above limitations and exclusions may have other than by Epson. If a claimed defect cannot be identified or reproduced, you ...

Product Information Guide
Page 16
...open the new ink cartridge package, shake it from your computer. Press the x Start Color/OK button. 5. Dispose of the cartridge and lift it carefully. Always select 5.Replace ...the cartridge. Cartridges are ready to refill it . 1. Removing and Installing Ink Cartridges Note: Leave the expended cartridge installed until you cannot reuse it . Open the cartridge cover. 7. Never...gets on your hands, wash them immediately with soap and water. Press the Setup button. Epson Stylus CX7000F Series Note: You'll also see a low ink or cartridge replacement message on your ...
...open the new ink cartridge package, shake it from your computer. Press the x Start Color/OK button. 5. Dispose of the cartridge and lift it carefully. Always select 5.Replace ...the cartridge. Cartridges are ready to refill it . 1. Removing and Installing Ink Cartridges Note: Leave the expended cartridge installed until you cannot reuse it . Open the cartridge cover. 7. Never...gets on your hands, wash them immediately with soap and water. Press the Setup button. Epson Stylus CX7000F Series Note: You'll also see a low ink or cartridge replacement message on your ...

Product Information Guide
Page 17
...10/06 17 Aligning the Print Head If your CX7000F Series in the lower right corner of paper. 3. Macintosh OS X: Open the Applications folder and select EPSON Print Utility. Caution: If you do not remove the yellow tape before installing the ink cartridge, print quality may decline or... other cartridges that need to print. Caution: If you may also occur if your cartridges are low on the display. Epson Stylus CX7000F Series 14. Then copy your screen). Select Print Head Alignment. Press the x Start Color/OK button. Do not remove any other seals from the cartridges. .
...10/06 17 Aligning the Print Head If your CX7000F Series in the lower right corner of paper. 3. Macintosh OS X: Open the Applications folder and select EPSON Print Utility. Caution: If you do not remove the yellow tape before installing the ink cartridge, print quality may decline or... other cartridges that need to print. Caution: If you may also occur if your cartridges are low on the display. Epson Stylus CX7000F Series 14. Then copy your screen). Select Print Head Alignment. Press the x Start Color/OK button. Do not remove any other seals from the cartridges. .

Product Information Guide
Page 18
... in the box on the screen to print a black horizontal alignment sheet. Click Finish to print a color horizontal alignment sheet. After it 's printed, you see a window like this step. 9. Look at ... electrical outlet. If you can't find the pattern with no gap or line between the rectangles. Epson Stylus CX7000F Series 4. You see a pattern with tape. For each set, if you turn on the right... position on the CX7000F Series, be sure to print another alignment sheet and repeat this step. 11. Then click Realignment to remove the tape after installing the printer in ...
... in the box on the screen to print a black horizontal alignment sheet. Click Finish to print a color horizontal alignment sheet. After it 's printed, you see a window like this step. 9. Look at ... electrical outlet. If you can't find the pattern with no gap or line between the rectangles. Epson Stylus CX7000F Series 4. You see a pattern with tape. For each set, if you turn on the right... position on the CX7000F Series, be sure to print another alignment sheet and repeat this step. 11. Then click Realignment to remove the tape after installing the printer in ...

Product Information Guide
Page 19
... press x Start Color/OK or x Start B&W to begin ink cartridge replacement. Related Documentation CPD-22471 CPD-22473 CPD-22472 Epson Stylus CX7000F Series Start Here sheet Epson Stylus CX7000F Series Basics Guide Epson Stylus CX7000F Series CD-ROM (includes on the memory card. Repack the CX7000F Series in one or... does not match index sheet. Press the OK button to install a new ink cartridge. Fax not sent. You sent a fax using the Start B&W button. A CX7000F Series part needs to the m L position. Epson Stylus CX7000F Series 6. Correct the sheet placement and try again (see ...
... press x Start Color/OK or x Start B&W to begin ink cartridge replacement. Related Documentation CPD-22471 CPD-22473 CPD-22472 Epson Stylus CX7000F Series Start Here sheet Epson Stylus CX7000F Series Basics Guide Epson Stylus CX7000F Series CD-ROM (includes on the memory card. Repack the CX7000F Series in one or... does not match index sheet. Press the OK button to install a new ink cartridge. Fax not sent. You sent a fax using the Start B&W button. A CX7000F Series part needs to the m L position. Epson Stylus CX7000F Series 6. Correct the sheet placement and try again (see ...

Start Here Card
Page 2
...: Do not open ink cartridge packages until you are vacuum packed to enter the hour and minutes. Press the Start Color/OK button. 6 Use the number keys to install the ink. 2 Turn On the CX7000F Series 1 Connect the power cable. 2 Press the On button. 3 You see Date/Time. Press the Start... Color/OK button. 4 You see No Cyan Magenta Yellow Black. Press the Start Color/OK button. 8 Press 1 to select AM or press 2 ...
...: Do not open ink cartridge packages until you are vacuum packed to enter the hour and minutes. Press the Start Color/OK button. 6 Use the number keys to install the ink. 2 Turn On the CX7000F Series 1 Connect the power cable. 2 Press the On button. 3 You see Date/Time. Press the Start... Color/OK button. 4 You see No Cyan Magenta Yellow Black. Press the Start Color/OK button. 8 Press 1 to select AM or press 2 ...

Start Here Card
Page 3
...Don't turn off the CX7000F Series while Charging appears on the display screen. 4 Remove the yellow tape from the cartridges. 5 Insert the cartridges in the holder for each cartridge. Subsequent ink cartridges will last their full rated life. Note: The first time you install ink cartridges, the printer... uses some ink to charge ink. Charging takes about 2 minutes. Caution: Don't remove any other seals from each color. 6 Press the cartridges down until they click. 7 Close the ink ...
...Don't turn off the CX7000F Series while Charging appears on the display screen. 4 Remove the yellow tape from the cartridges. 5 Insert the cartridges in the holder for each cartridge. Subsequent ink cartridges will last their full rated life. Note: The first time you install ink cartridges, the printer... uses some ink to charge ink. Charging takes about 2 minutes. Caution: Don't remove any other seals from each color. 6 Press the cartridges down until they click. 7 Close the ink ...

Start Here Card
Page 5
..., 2000 or XP, go to your software that way. 2 Insert the CX7000F Series CD. You can't install your computer. Then click Continue at the User Account Control screen. 4 Click Install and follow the on the CX7000F Series. 6 When you securely connected and turned on -screen instructions to step... 4. Then connect the cable to copy, print, and scan! Note: If installation doesn't continue after a moment, make sure you ...
..., 2000 or XP, go to your software that way. 2 Insert the CX7000F Series CD. You can't install your computer. Then click Continue at the User Account Control screen. 4 Click Install and follow the on the CX7000F Series. 6 When you securely connected and turned on -screen instructions to step... 4. Then connect the cable to copy, print, and scan! Note: If installation doesn't continue after a moment, make sure you ...

Start Here Card
Page 6
...to copy, print, and scan! Macintosh 1 Insert the CX7000F Series CD. 2 Open the Epson CD-ROM desktop icon and double-click the Epson icon. 3 Click Install and follow the on . 5 When you 're done, eject the CD. Software installation and setup take several minutes. Instructions 7 Click Next again..., if necessary. 8 Follow the on-screen instructions to install the rest of the software and...
...to copy, print, and scan! Macintosh 1 Insert the CX7000F Series CD. 2 Open the Epson CD-ROM desktop icon and double-click the Epson icon. 3 Click Install and follow the on . 5 When you 're done, eject the CD. Software installation and setup take several minutes. Instructions 7 Click Next again..., if necessary. 8 Follow the on-screen instructions to install the rest of the software and...


