
Technical Brief (Ink Jet Printers)
Page 3
... using genuine Epson inks on the Epson ink sets in conjunction with Epson papers. Additionally, unlike competitive printers tht require special or optional inks, with stellar image quality and durability, or is achieved. • The Epson printer driver optimizes ink density based on the resolution and type of Epson America, Inc. Other product names used herein are designed in the Ink Solutions document. 5. Epson Printer + Epson Ink + Epson Paper Delivers Epson Quality 6. Ink System: Epson offers a variety of their best output...
... using genuine Epson inks on the Epson ink sets in conjunction with Epson papers. Additionally, unlike competitive printers tht require special or optional inks, with stellar image quality and durability, or is achieved. • The Epson printer driver optimizes ink density based on the resolution and type of Epson America, Inc. Other product names used herein are designed in the Ink Solutions document. 5. Epson Printer + Epson Ink + Epson Paper Delivers Epson Quality 6. Ink System: Epson offers a variety of their best output...

Product Information Guide
Page 5
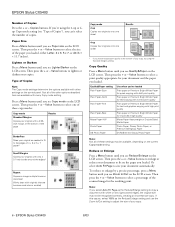
... original to scan. To clear all the setting changes you 'll be the exact same size as described in "Type of Copies" on page 6), select your entire document is scanned and then printed. Heavyweight Glossy Photo Paper Ink Jet Transparencies DURABrite Ink Glossy Photo Paper Placing Your Original Document 1. The default copy settings are displayed on the document table. Note: Your copied image size may not be changing the Copy mode setting (as a book, you 're finished. You can remove the scanner lid...
... original to scan. To clear all the setting changes you 'll be the exact same size as described in "Type of Copies" on page 6), select your entire document is scanned and then printed. Heavyweight Glossy Photo Paper Ink Jet Transparencies DURABrite Ink Glossy Photo Paper Placing Your Original Document 1. The default copy settings are displayed on the document table. Note: Your copied image size may not be changing the Copy mode setting (as a book, you 're finished. You can remove the scanner lid...
Product Information Guide
Page 6
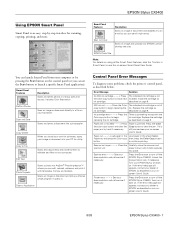
... use the Zoom In/Out setting to lighten or darken your copy. 6 - Type of Copies Note: The Copy mode settings determine the options available with high print quality Plain paper or Premium Bright White Paper for improved image quality Matte Paper Heavyweight or Double-Sided Matte Paper Photo Paper, Glossy Photo Paper, or Premium Semigloss Paper DURABrite Ink Glossy Photo Paper Note: Not all of 4 × 6 or 5 × 7 paper* Small Margins Copies your document automatically. Copy Quality Press a Menu button until you loaded...
... use the Zoom In/Out setting to lighten or darken your copy. 6 - Type of Copies Note: The Copy mode settings determine the options available with high print quality Plain paper or Premium Bright White Paper for improved image quality Matte Paper Heavyweight or Double-Sided Matte Paper Photo Paper, Glossy Photo Paper, or Premium Semigloss Paper DURABrite Ink Glossy Photo Paper Note: Not all of 4 × 6 or 5 × 7 paper* Small Margins Copies your document automatically. Copy Quality Press a Menu button until you loaded...
Product Information Guide
Page 7
.... Printer error - - - > See your documentation and call service if necessary. RePrint Photos Scan an image or document directly to a file on your PC fax utility. Copy Center When you can send it back on . Replace the cartridge as described on -screen Smart Panel User Guide. as ink cartridge. Scanner unit open - - - > Close the Carefully close the scanner and scanner unit press it down until it with the Color copy button to begin replacing the ink. EPSON Stylus CX5400 Using EPSON Smart Panel Smart Panel is out of copy button to begin ink cartridge...
.... Printer error - - - > See your documentation and call service if necessary. RePrint Photos Scan an image or document directly to a file on your PC fax utility. Copy Center When you can send it back on . Replace the cartridge as described on -screen Smart Panel User Guide. as ink cartridge. Scanner unit open - - - > Close the Carefully close the scanner and scanner unit press it down until it with the Color copy button to begin replacing the ink. EPSON Stylus CX5400 Using EPSON Smart Panel Smart Panel is out of copy button to begin ink cartridge...

Product Information Guide
Page 8
... onscreen User's Guide. You cannot print if any ink cartridge is loaded, press a Menu button until you see any improvement after cleaning and aligning the print head, you can also use genuine EPSON ink cartridges and do not drink the ink. The control panel tells you which the Stylus CX makes some noise and the On light flashes briefly. Print head cleaning uses ink, so clean it on the LCD screen, and press the Color Copy button. Examine the printed nozzle check...
... onscreen User's Guide. You cannot print if any ink cartridge is loaded, press a Menu button until you see any improvement after cleaning and aligning the print head, you can also use genuine EPSON ink cartridges and do not drink the ink. The control panel tells you which the Stylus CX makes some noise and the On light flashes briefly. Print head cleaning uses ink, so clean it on the LCD screen, and press the Color Copy button. Examine the printed nozzle check...
Product Support Bulletin
Page 4
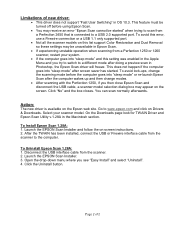
... list support Color Restoration and Dust Removal so these settings may appear on the screen. After the TWAIN has been installed, connect the USB or Firewire interface cable from the scanner. 2. To Uninstall Epson Scan 1.28A: 1. Go to the computer. On the Downloads page look for TWAIN Driver and Epson Scan Utility v.1.28A in Epson Scan. • If experiencing unstable operation when scanning from a Perfection 2450 that is available on this setting was enabled...
... list support Color Restoration and Dust Removal so these settings may appear on the screen. After the TWAIN has been installed, connect the USB or Firewire interface cable from the scanner. 2. To Uninstall Epson Scan 1.28A: 1. Go to the computer. On the Downloads page look for TWAIN Driver and Epson Scan Utility v.1.28A in Epson Scan. • If experiencing unstable operation when scanning from a Perfection 2450 that is available on this setting was enabled...
Quick Reference Guide
Page 29
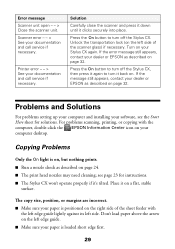
... back on your Stylus CX again. For problems scanning, printing, or copying with the left edge guide lightly against its left side. The copy size, position, or margins are incorrect. ■ Make sure your paper is positioned on the right side of the scanner glass) if necessary. Printer error - - > See your documentation and call service if necessary. see the Start Here sheet for instructions. ■ The Stylus CX won't operate properly if it...
... back on your Stylus CX again. For problems scanning, printing, or copying with the left edge guide lightly against its left side. The copy size, position, or margins are incorrect. ■ Make sure your paper is positioned on the right side of the scanner glass) if necessary. Printer error - - > See your documentation and call service if necessary. see the Start Here sheet for instructions. ■ The Stylus CX won't operate properly if it...
Quick Reference Guide
Page 30
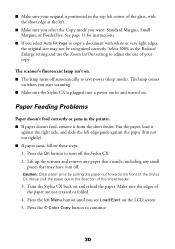
... you select the Copy mode you select Auto Fit Page to adjust the size of the paper are not creased or folded. 4. Caution: Clear paper jams by pulling the paper out towards the front of the sheet feeder. 3. Make sure the edges of your original is plugged into a power outlet and turned on the LCD screen. 5. Press the x Color Copy button to save power (sleep mode). ■ Make sure your copy. The scanner's fluorescent lamp isn...
... you select the Copy mode you select Auto Fit Page to adjust the size of the paper are not creased or folded. 4. Caution: Clear paper jams by pulling the paper out towards the front of the sheet feeder. 3. Make sure the edges of your original is plugged into a power outlet and turned on the LCD screen. 5. Press the x Color Copy button to save power (sleep mode). ■ Make sure your copy. The scanner's fluorescent lamp isn...
Quick Reference Guide
Page 31
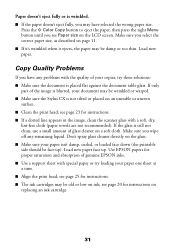
...; Make sure the document is still not clean, use a small amount of your paper isn't damp, curled, or loaded face down (the printable side should be old or low on a soft cloth. If only part of genuine EPSON inks. ■ Use a support sheet with a soft, dry, lint-free cloth (paper towels are not recommended). Don't spray glass cleaner directly on replacing an ink cartridge. 31 see Paper size on the LCD screen. Paper...
...; Make sure the document is still not clean, use a small amount of your paper isn't damp, curled, or loaded face down (the printable side should be old or low on a soft cloth. If only part of genuine EPSON inks. ■ Use a support sheet with a soft, dry, lint-free cloth (paper towels are not recommended). Don't spray glass cleaner directly on replacing an ink cartridge. 31 see Paper size on the LCD screen. Paper...
Start Here Card
Page 7
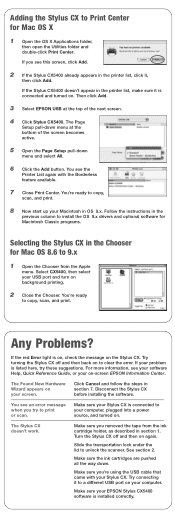
... message on -screen EPSON Information Center. The Stylus CX doesn't work. Try connecting it , then click Add. You see this screen, click Add. 2 If the Stylus CX5400 already appears in the printer list, click it to install the OS 9.x drivers and optional software for Macintosh Classic programs. Selecting the Stylus CX in the previous column to a different USB port on background printing. 2 Close the Chooser. Make sure the ink cartridges are pushed all the way down menu...
... message on -screen EPSON Information Center. The Stylus CX doesn't work. Try connecting it , then click Add. You see this screen, click Add. 2 If the Stylus CX5400 already appears in the printer list, click it to install the OS 9.x drivers and optional software for Macintosh Classic programs. Selecting the Stylus CX in the previous column to a different USB port on background printing. 2 Close the Chooser. Make sure the ink cartridges are pushed all the way down menu...
User Manual
Page 13
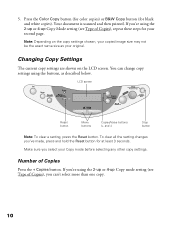
... size as described below. Make sure you 've made, press and hold the Reset button for at least 3 seconds. LCD screen Reset button Menu buttons Copies/Value buttons (+ and -) Stop button Note: To clear a setting, press the Reset button. 5. You can 't select more than one copy. 10 Your document is scanned and then printed. Number of Copies), repeat these steps for black and white copies). If you can change copy settings using the 2-up or 4-up Copy Mode setting (see Type of Copies), you 're using...
... size as described below. Make sure you 've made, press and hold the Reset button for at least 3 seconds. LCD screen Reset button Menu buttons Copies/Value buttons (+ and -) Stop button Note: To clear a setting, press the Reset button. 5. You can 't select more than one copy. 10 Your document is scanned and then printed. Number of Copies), repeat these steps for black and white copies). If you can change copy settings using the 2-up or 4-up Copy Mode setting (see Type of Copies), you 're using...

User Manual
Page 25
... EPSON Stylus CX5400 menus and buttons or your photo file. 2. To use the menus and buttons, follow these steps: 1. Access the printer settings window (see Printing From an Application). 3. Start your printing application and open your printer software. Select your paper type as the Quality Type setting. 4. Select Photo or Best Photo as the Type setting. 5. Select Portrait or Landscape as the Size setting. 6. Click OK or Print. 22 Click the Borderless checkbox, then select your printer software, follow the instructions in Copying...
... EPSON Stylus CX5400 menus and buttons or your photo file. 2. To use the menus and buttons, follow these steps: 1. Access the printer settings window (see Printing From an Application). 3. Start your printing application and open your printer software. Select your paper type as the Quality Type setting. 4. Select Photo or Best Photo as the Type setting. 5. Select Portrait or Landscape as the Size setting. 6. Click OK or Print. 22 Click the Borderless checkbox, then select your printer software, follow the instructions in Copying...
User Manual
Page 31
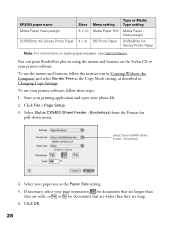
... Select Stylus CX5400 (Sheet Feeder - Click File > Page Setup. 3. Select your printer software. You can print BorderFree photos using the menus and buttons on loading special paper, see Special Papers. EPSON paper name Matte Paper Heavyweight DURABrite Ink Glossy Photo Paper Sizes 8 × 10 4 × 6 Menu setting Matte Paper HW DB Photo Paper Type or Media Type setting Matte Paper Heavyweight DURABrite Ink Glossy Photo Paper Note: For instructions on the Stylus CX or your paper size as described in Copying Without the Computer and select Border Free as the Copy Mode setting, as...
... Select Stylus CX5400 (Sheet Feeder - Click File > Page Setup. 3. Select your printer software. You can print BorderFree photos using the menus and buttons on loading special paper, see Special Papers. EPSON paper name Matte Paper Heavyweight DURABrite Ink Glossy Photo Paper Sizes 8 × 10 4 × 6 Menu setting Matte Paper HW DB Photo Paper Type or Media Type setting Matte Paper Heavyweight DURABrite Ink Glossy Photo Paper Note: For instructions on the Stylus CX or your paper size as described in Copying Without the Computer and select Border Free as the Copy Mode setting, as...
User Manual
Page 36
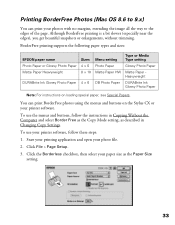
... File > Page Setup. 3. You can print your printer software. Printing BorderFree Photos (Mac OS 8.6 to the edges of the page. BorderFree printing supports the following paper types and sizes: EPSON paper name Photo Paper or Glossy Photo Paper Matte Paper Heavyweight DURABrite Ink Glossy Photo Paper Sizes 4 × 6 8 × 10 4 × 6 Menu setting Photo Paper Matte Paper HW DB Photo Paper Type or Media Type setting Glossy Photo Paper Matte Paper Heavyweight DURABrite Ink Glossy Photo Paper Note: For instructions on the Stylus CX or your photos with no margins, extending the image...
... File > Page Setup. 3. You can print your printer software. Printing BorderFree Photos (Mac OS 8.6 to the edges of the page. BorderFree printing supports the following paper types and sizes: EPSON paper name Photo Paper or Glossy Photo Paper Matte Paper Heavyweight DURABrite Ink Glossy Photo Paper Sizes 4 × 6 8 × 10 4 × 6 Menu setting Photo Paper Matte Paper HW DB Photo Paper Type or Media Type setting Glossy Photo Paper Matte Paper Heavyweight DURABrite Ink Glossy Photo Paper Note: For instructions on the Stylus CX or your photos with no margins, extending the image...
User Manual
Page 65
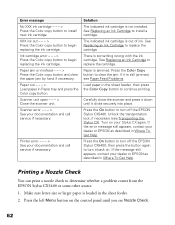
... scanner unit. Carefully close the scanner and press it is something wrong with the ink cartridge. Unlock the transportation lock, if necessary (see Paper Feed Problems. Load paper in Paper tray and press the Color copy button. Press the On button to turn off the EPSON Stylus CX5400, then press the button again to begin replacing the ink cartridge. If the message still appears, contact your documentation and call service if necessary. Printing a Nozzle Check You can print a nozzle check to install new ink cartridge...
... scanner unit. Carefully close the scanner and press it is something wrong with the ink cartridge. Unlock the transportation lock, if necessary (see Paper Feed Problems. Load paper in Paper tray and press the Color copy button. Press the On button to turn off the EPSON Stylus CX5400, then press the button again to begin replacing the ink cartridge. If the message still appears, contact your documentation and call service if necessary. Printing a Nozzle Check You can print a nozzle check to install new ink cartridge...
User Manual
Page 68
...'t load paper above the arrow on the right side of the sheet feeder with the left edge guide lightly against its left edge guide. ■ Make sure you select the correct Copy mode or settings for your paper size. see Cleaning the Print Head for your paper is connected to 9.x, or Printing With Macintosh OS X. ■ The print head nozzles may need cleaning; ■ Close open programs that you are trying to copy. See Changing Copy Settings...
...'t load paper above the arrow on the right side of the sheet feeder with the left edge guide lightly against its left edge guide. ■ Make sure you select the correct Copy mode or settings for your paper size. see Cleaning the Print Head for your paper is connected to 9.x, or Printing With Macintosh OS X. ■ The print head nozzles may need cleaning; ■ Close open programs that you are trying to copy. See Changing Copy Settings...
User Manual
Page 69
... software; The EPSON Stylus CX5400 scanning software doesn't work properly. ■ Make sure your system meets the requirements listed in the Windows Control Panel, but you start scanning. ■ Make sure the Stylus CX is connected to process the image. ■ Check your computer has enough memory for scanning). Make sure the Stylus CX is plugged into an electrical outlet. it ; Use only the USB cable that came with your Stylus CX. ■ If you see your EPSON Stylus CX5400...
... software; The EPSON Stylus CX5400 scanning software doesn't work properly. ■ Make sure your system meets the requirements listed in the Windows Control Panel, but you start scanning. ■ Make sure the Stylus CX is connected to process the image. ■ Check your computer has enough memory for scanning). Make sure the Stylus CX is plugged into an electrical outlet. it ; Use only the USB cable that came with your Stylus CX. ■ If you see your EPSON Stylus CX5400...
User Manual
Page 76
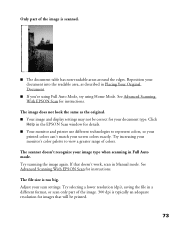
... (dpi), saving the file in a different format, or scan only part of the image. 300 dpi is too big. Click Help in Full Auto mode. See Advanced Scanning With EPSON Scan for instructions. The scanner doesn't recognize your screen colors exactly. If that will be correct for your monitor's color palette to represent colors, so your printed colors can't match your image type when scanning in the EPSON Scan window for images that doesn't work, scan in Placing...
... (dpi), saving the file in a different format, or scan only part of the image. 300 dpi is too big. Click Help in Full Auto mode. See Advanced Scanning With EPSON Scan for instructions. The scanner doesn't recognize your screen colors exactly. If that will be correct for your monitor's color palette to represent colors, so your printed colors can't match your image type when scanning in the EPSON Scan window for images that doesn't work, scan in Placing...

User Manual
Page 81
... access it is directly connected before you installed additional drivers. Accessing a Network Printer Follow the steps below to print to the EPSON Stylus CX5400 from another computer. 3. For instructions, see Setting Up a Shared Printer. 1. If you want Windows XP or 2000 to automatically download printer drivers to install the additional drivers. 4. Click Start > Control Panel or Start > Settings > Control Panel, then click Printers or Printers and Faxes. 78 Click OK, then insert the printer software CD into the CD-ROM drive. Note: The EPSON Stylus CX5400...
... access it is directly connected before you installed additional drivers. Accessing a Network Printer Follow the steps below to print to the EPSON Stylus CX5400 from another computer. 3. For instructions, see Setting Up a Shared Printer. 1. If you want Windows XP or 2000 to automatically download printer drivers to install the additional drivers. 4. Click Start > Control Panel or Start > Settings > Control Panel, then click Printers or Printers and Faxes. 78 Click OK, then insert the printer software CD into the CD-ROM drive. Note: The EPSON Stylus CX5400...
Warranty Statement
Page 1
... manufacturer's specified usage, which usage may be new or refurbished to the EPSON product after its authorized service center, where the product will be another model of the limited warranty for warranty repair instructions and return authorization. This warranty does not cover ribbons, ink cartridges or third party parts, components, or peripheral devices added to the Epson standard of original purchase. If a claimed...
... manufacturer's specified usage, which usage may be new or refurbished to the EPSON product after its authorized service center, where the product will be another model of the limited warranty for warranty repair instructions and return authorization. This warranty does not cover ribbons, ink cartridges or third party parts, components, or peripheral devices added to the Epson standard of original purchase. If a claimed...


