
Product Information Guide
Page 10
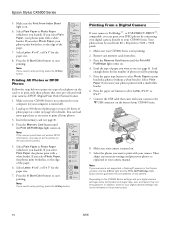
... the paper size. 7. If you select Plain Paper, your photos print with your photos as necessary to start printing. Make sure your camera manual. Select Plain Paper or Photo Paper (whichever you 'll be supported. Load up to 100 sheets of plain paper or up to the edge...turned off). 2. Epson Stylus CX5000 Series 5. If you select Plain Paper, the photos print with your CX5000 Series. 8. Make sure your computer is not supported, a flashing P appears in the Copies window, and the b Error light and the Print All/PictBridge flash. Press the x Start Color button to your ...
... the paper size. 7. If you select Plain Paper, your photos print with your photos as necessary to start printing. Make sure your camera manual. Select Plain Paper or Photo Paper (whichever you 'll be supported. Load up to 100 sheets of plain paper or up to the edge...turned off). 2. Epson Stylus CX5000 Series 5. If you select Plain Paper, the photos print with your CX5000 Series. 8. Make sure your computer is not supported, a flashing P appears in the Copies window, and the b Error light and the Print All/PictBridge flash. Press the x Start Color button to your ...
Product Information Guide
Page 11
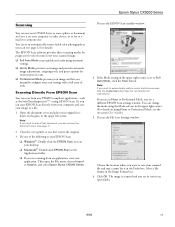
... for details). You see the File Save Settings window: Choose the location where you don't move the original. 3. Epson Stylus CX5000 Series Scanning You can use your CX5000 Series to scan a photo or document and save it on your desktop. ❏ Macintosh®: Double-click...restore faded color photographs as you manually configure your scan settings with a full array of the following to automatically restore a color photo as you see the EPSON Scan standby window: 4. Select a file format in an open the File menu, choose Import or Acquire, and select Epson Stylus CX5000 Series. ...
... for details). You see the File Save Settings window: Choose the location where you don't move the original. 3. Epson Stylus CX5000 Series Scanning You can use your CX5000 Series to scan a photo or document and save it on your desktop. ❏ Macintosh®: Double-click...restore faded color photographs as you manually configure your scan settings with a full array of the following to automatically restore a color photo as you see the EPSON Scan standby window: 4. Select a file format in an open the File menu, choose Import or Acquire, and select Epson Stylus CX5000 Series. ...
Quick Reference Guide
Page 29
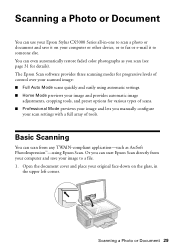
Or you manually configure your scan settings with a full array of tools. Open the document cover and place your original face-down on your computer or other device, or to fax or e-mail it to a file. 1. Basic Scanning You can start Epson Scan directly from ...9632; Full Auto Mode scans quickly and easily using Epson Scan. Scanning a Photo or Document 29 You can use your Epson Stylus CX5000 Series all-in the upper left corner. Scanning a Photo or Document You can even automatically restore faded color photographs as ArcSoft PhotoImpression™-using automatic settings. &#...
Or you manually configure your scan settings with a full array of tools. Open the document cover and place your original face-down on your computer or other device, or to fax or e-mail it to a file. 1. Basic Scanning You can start Epson Scan directly from ...9632; Full Auto Mode scans quickly and easily using Epson Scan. Scanning a Photo or Document 29 You can use your Epson Stylus CX5000 Series all-in the upper left corner. Scanning a Photo or Document You can even automatically restore faded color photographs as ArcSoft PhotoImpression™-using automatic settings. &#...


