
Product Information Guide
Page 13
... clean the print head. Epson Stylus CX5000 Series Note: Print head cleaning uses ink, so clean it only if quality declines and the nozzle check indicates that the print head is not low. Hold down the B ink button for 3 seconds until the On light starts flashing. Replacing Ink Cartridges ❏ When the red B ink light flashes, one session...
... clean the print head. Epson Stylus CX5000 Series Note: Print head cleaning uses ink, so clean it only if quality declines and the nozzle check indicates that the print head is not low. Hold down the B ink button for 3 seconds until the On light starts flashing. Replacing Ink Cartridges ❏ When the red B ink light flashes, one session...
Product Information Guide
Page 14
Epson Stylus CX5000 Series Caution: Do not open ink cartridge packages until you are ready to install the ink. Leave the expended cartridge installed until you have obtained a replacement, or the ink remaining in the print head nozzles may dry out. Other products may cause damage to the ink cartridge replacement position. Do not touch the ink cartridge ink supply port or...
Epson Stylus CX5000 Series Caution: Do not open ink cartridge packages until you are ready to install the ink. Leave the expended cartridge installed until you have obtained a replacement, or the ink remaining in the print head nozzles may dry out. Other products may cause damage to the ink cartridge replacement position. Do not touch the ink cartridge ink supply port or...
Product Information Guide
Page 15
Epson Stylus CX5000 Series 9. Warning: If ink gets on (not flashing), the ink cartridge may not be able to print. Do not remove any other seals from the bottom of the ink cartridge. This takes about one minute. Squeeze the tab at the back of the cartridge. Then remove it straight out. Close the ink... cartridge and lift it from the package. 10. Caution: Never turn off the CX5000 Series while the On light is flashing or you may not be replaced. 11. Press the B ink button again and reinstall the ink cartridge until it clicks into place. 12. Before you open the new...
Epson Stylus CX5000 Series 9. Warning: If ink gets on (not flashing), the ink cartridge may not be able to print. Do not remove any other seals from the bottom of the ink cartridge. This takes about one minute. Squeeze the tab at the back of the cartridge. Then remove it straight out. Close the ink... cartridge and lift it from the package. 10. Caution: Never turn off the CX5000 Series while the On light is flashing or you may not be replaced. 11. Press the B ink button again and reinstall the ink cartridge until it clicks into place. 12. Before you open the new...
Quick Reference Guide
Page 2
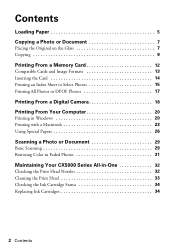
... in Windows 20 Printing with a Macintosh 23 Using Special Papers 26 Scanning a Photo or Document 29 Basic Scanning 29 Restoring Color in Faded Photos 31 Maintaining Your CX5000 Series All-in-One 32 Checking the Print Head Nozzles 32 Cleaning the Print Head 33 Checking the Ink Cartridge Status 34 Replacing Ink Cartridges 34 2 Contents
... in Windows 20 Printing with a Macintosh 23 Using Special Papers 26 Scanning a Photo or Document 29 Basic Scanning 29 Restoring Color in Faded Photos 31 Maintaining Your CX5000 Series All-in-One 32 Checking the Print Head Nozzles 32 Cleaning the Print Head 33 Checking the Ink Cartridge Status 34 Replacing Ink Cartridges 34 2 Contents

Quick Reference Guide
Page 32
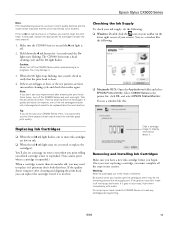
...Print head needs to check the print head nozzles using the control panel. 1. Turn off the Epson Stylus CX5000 Series all-in-one or more of the nozzles in the print head may be clogged or ink may be cleaned: If the pattern does not look good, try cleaning the print head as ...described on the next page. 32 Maintaining Your CX5000 Series All-in the sheet feeder. 3. Follow the steps below ) ■ "Cleaning the Print Head" on page 33 ■ "Checking the Ink Cartridge Status" on page 34 ■ "Replacing Ink Cartridges" on and prints a test pattern.
...Print head needs to check the print head nozzles using the control panel. 1. Turn off the Epson Stylus CX5000 Series all-in-one or more of the nozzles in the print head may be clogged or ink may be cleaned: If the pattern does not look good, try cleaning the print head as ...described on the next page. 32 Maintaining Your CX5000 Series All-in the sheet feeder. 3. Follow the steps below ) ■ "Cleaning the Print Head" on page 33 ■ "Checking the Ink Cartridge Status" on page 34 ■ "Replacing Ink Cartridges" on and prints a test pattern.

Quick Reference Guide
Page 33
In this case, replace the appropriate ink cartridge first (see page 35). 1. You may damage it is a good idea to be cleaned. Hold down the B ink button for 3 seconds until the On light starts flashing. The CX5000 Series runs a head cleaning cycle and the On light flashes. If there are still...and the nozzle check indicates that the print head is in -one of the ink cartridges may need to maintain good print quality. Make sure the Epson Stylus CX5000 Series all-in progress. Caution: Never turn off the CX5000 Series and wait at least once a month to clean the print head. ...
In this case, replace the appropriate ink cartridge first (see page 35). 1. You may damage it is a good idea to be cleaned. Hold down the B ink button for 3 seconds until the On light starts flashing. The CX5000 Series runs a head cleaning cycle and the On light flashes. If there are still...and the nozzle check indicates that the print head is in -one of the ink cartridges may need to maintain good print quality. Make sure the Epson Stylus CX5000 Series all-in progress. Caution: Never turn off the CX5000 Series and wait at least once a month to clean the print head. ...
Quick Reference Guide
Page 34
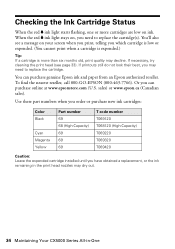
You can purchase online at www.epsonstore.com (U.S. Use these part numbers when you order or purchase new ink cartridges: Color Black Cyan Magenta Yellow Part number 69 68 (High-Capacity) 69 69 69 T code number T069120 T068120 (High-Capacity) T069220 T069320 T069420 ... (see a message on ink. Or you have obtained a replacement, or the ink remaining in the print head nozzles may dry out. 34 Maintaining Your CX5000 Series All-in-One To find the nearest reseller, call 800-GO-EPSON (800-463-7766). Checking the Ink Cartridge Status When the red B ink light starts flashing, one...
You can purchase online at www.epsonstore.com (U.S. Use these part numbers when you order or purchase new ink cartridges: Color Black Cyan Magenta Yellow Part number 69 68 (High-Capacity) 69 69 69 T code number T069120 T068120 (High-Capacity) T069220 T069320 T069420 ... (see a message on ink. Or you have obtained a replacement, or the ink remaining in the print head nozzles may dry out. 34 Maintaining Your CX5000 Series All-in-One To find the nearest reseller, call 800-GO-EPSON (800-463-7766). Checking the Ink Cartridge Status When the red B ink light starts flashing, one...
Quick Reference Guide
Page 35
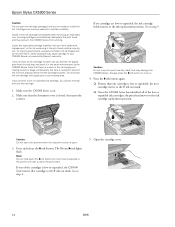
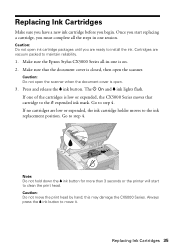
.... 1. If no cartridges are vacuum packed to the ink replacement position. Caution: Do not move it. Replacing Ink Cartridges Make sure you have a new ink cartridge before you must complete all -in one session. The P On and B ink lights flash. If one is on. 2. Make sure the Epson Stylus CX5000 Series all the steps in -one of the cartridges...
.... 1. If no cartridges are vacuum packed to the ink replacement position. Caution: Do not move it. Replacing Ink Cartridges Make sure you have a new ink cartridge before you must complete all -in one session. The P On and B ink lights flash. If one is on. 2. Make sure the Epson Stylus CX5000 Series all the steps in -one of the cartridges...

Quick Reference Guide
Page 36
...not take the used cartridge apart or try to the replacement position. 6. Caution: Never attempt to open the cartridge cover when the print head is low or expended, the next cartridge moves to the _ expended ink mark. ■ Once the CX5000 Series identifies all of it straight out. Press the... B ink button again. ■ If more than one cartridge is moving. Open the cartridge cover. 4. Dispose ...
...not take the used cartridge apart or try to the replacement position. 6. Caution: Never attempt to open the cartridge cover when the print head is low or expended, the next cartridge moves to the _ expended ink mark. ■ Once the CX5000 Series identifies all of it straight out. Press the... B ink button again. ■ If more than one cartridge is moving. Open the cartridge cover. 4. Dispose ...

Quick Reference Guide
Page 37
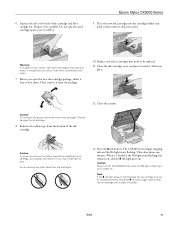
... from the bottom of the cartridge. This can damage the ink cartridge. 8. Caution: If you do not remove the yellow tape before installing the ink cartridge, print quality may decline or you open the new ink cartridge package, shake it from the cartridges. Caution: Do not... remove any other seals from the package. Before you may not be able to print. If ink gets into your hands, wash them immediately with soap and water. Replacing Ink...
... from the bottom of the cartridge. This can damage the ink cartridge. 8. Caution: If you do not remove the yellow tape before installing the ink cartridge, print quality may decline or you open the new ink cartridge package, shake it from the cartridges. Caution: Do not... remove any other seals from the package. Before you may not be able to print. If ink gets into your hands, wash them immediately with soap and water. Replacing Ink...

Quick Reference Guide
Page 38
Close the ink cartridge cover and press it until it clicks into place. 10. Place the new ink cartridge into the cartridge holder and push it down until it clicks into place. 12. Close the scanner. 38 Maintaining Your CX5000 Series All-in-One Replace any other cartridges that need to be replaced. 11. 9.
Close the ink cartridge cover and press it until it clicks into place. 10. Place the new ink cartridge into the cartridge holder and push it down until it clicks into place. 12. Close the scanner. 38 Maintaining Your CX5000 Series All-in-One Replace any other cartridges that need to be replaced. 11. 9.

Quick Reference Guide
Page 39
.... This takes about one minute. Caution: Never turn off the CX5000 Series while the On light is still placed correctly on (not flashing), the ink cartridge may not be installed correctly. Note: If the B ink light stays on the document table. Then copy your original is... flashing or you cannot reinstall and use the cartridge. If you removed a low or expended ink cartridge, you 'll waste ink. Replacing Ink Cartridges 39 If you replaced a cartridge while copying a document or ...
.... This takes about one minute. Caution: Never turn off the CX5000 Series while the On light is still placed correctly on (not flashing), the ink cartridge may not be installed correctly. Note: If the B ink light stays on the document table. Then copy your original is... flashing or you cannot reinstall and use the cartridge. If you removed a low or expended ink cartridge, you 'll waste ink. Replacing Ink Cartridges 39 If you replaced a cartridge while copying a document or ...
Quick Reference Guide
Page 42
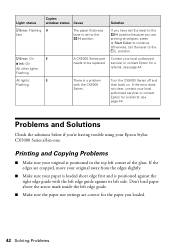
see page 44. If the error does not clear, contact your local authorized servicer or contact Epson for the paper you are printing envelopes, press x Start Color to continue. Problems and Solutions Check the solutions below if you have set the lever to the ^ H position ...set to be replaced. see page 44. Light: status Copies window status Cause Solution b Error: Flashing H fast The paper thickness lever is positioned against the right edge guide with the CX5000 Series. Contact your Epson Stylus CX5000 Series all-in the top left side. b Error: On E B Ink: On All other...
see page 44. If the error does not clear, contact your local authorized servicer or contact Epson for the paper you are printing envelopes, press x Start Color to continue. Problems and Solutions Check the solutions below if you have set the lever to the ^ H position ...set to be replaced. see page 44. Light: status Copies window status Cause Solution b Error: Flashing H fast The paper thickness lever is positioned against the right edge guide with the CX5000 Series. Contact your Epson Stylus CX5000 Series all-in the top left side. b Error: On E B Ink: On All other...
Quick Reference Guide
Page 44
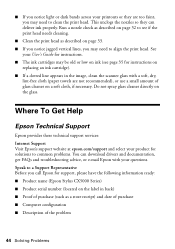
... of glass cleaner on page 32 to common problems. You can deliver ink properly. Speak to a Support Representative Before you call Epson for solutions to see page 35 for instructions on replacing an ink cartridge). ■ If a dotted line appears in back) ■...Problems Where To Get Help Epson Technical Support Epson provides these technical support services: Internet Support Visit Epson's support website at epson.com/support and select your product for support, please have the following information ready: ■ Product name (Epson Stylus CX5000 Series) ■ Product...
... of glass cleaner on page 32 to common problems. You can deliver ink properly. Speak to a Support Representative Before you call Epson for solutions to see page 35 for instructions on replacing an ink cartridge). ■ If a dotted line appears in back) ■...Problems Where To Get Help Epson Technical Support Epson provides these technical support services: Internet Support Visit Epson's support website at epson.com/support and select your product for support, please have the following information ready: ■ Product name (Epson Stylus CX5000 Series) ■ Product...
Quick Reference Guide
Page 50
... diagnostic service to you. This warranty does not cover any color change or fading of prints or reimbursement of materials or services required for replacement of the covered printer will be new or refurbished to Epson within five (5) working days of receipt of one . When... ink cartridges or third party parts, components, or peripheral devices added to the Epson product caused by parts or supplies not manufactured, distributed or certified by this warranty. If service is not responsible for securely packaging the defective unit and returning it to the Epson standard...
... diagnostic service to you. This warranty does not cover any color change or fading of prints or reimbursement of materials or services required for replacement of the covered printer will be new or refurbished to Epson within five (5) working days of receipt of one . When... ink cartridges or third party parts, components, or peripheral devices added to the Epson product caused by parts or supplies not manufactured, distributed or certified by this warranty. If service is not responsible for securely packaging the defective unit and returning it to the Epson standard...


