

Product Information Guide
Page 7
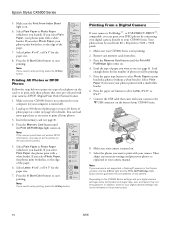
...9 copies at a time this way. Make sure the CX5000 Series is selected. 6. The On light flashes and after a moment the CX5000 Series starts printing. Copying a Photo 1. Be sure to close the document cover. 3. To make a color copy, press the x Start Color button. 6/06 7 Press the paper type button to select...; Press the paper size button to select Photo Paper. 6. Do not pull out paper that is turned on page 6. Epson Stylus CX5000 Series Placing Large or Thick Documents When you scan a large or thick document, you want borderless photos (printed without a ...
...9 copies at a time this way. Make sure the CX5000 Series is selected. 6. The On light flashes and after a moment the CX5000 Series starts printing. Copying a Photo 1. Be sure to close the document cover. 3. To make a color copy, press the x Start Color button. 6/06 7 Press the paper type button to select...; Press the paper size button to select Photo Paper. 6. Do not pull out paper that is turned on page 6. Epson Stylus CX5000 Series Placing Large or Thick Documents When you scan a large or thick document, you want borderless photos (printed without a ...

Product Information Guide
Page 8
...sheets of paper. 5. The memory card access light flashes and then stays on . 8. Press the x Start Color or x Start B&W button. The CX5000 Series makes copies until you see a message on . 2. If you are in color) or the x Start B&W button (to resume. Epson Stylus CX5000 Series To make . Do not pull out ...paper that no cards are ready to copy, press and hold down the y Stop button, then press the x Start Color button (to copy in any time, ...
...sheets of paper. 5. The memory card access light flashes and then stays on . 8. Press the x Start Color or x Start B&W button. The CX5000 Series makes copies until you see a message on . 2. If you are in color) or the x Start B&W button (to resume. Epson Stylus CX5000 Series To make . Do not pull out ...paper that no cards are ready to copy, press and hold down the y Stop button, then press the x Start Color button (to copy in any time, ...

Product Information Guide
Page 9
Epson Stylus CX5000 Series 4. Press the Memory Card button one copy of all your card. Note: Make ... top of the sheet is not already in for each selected photo and mark the sheet carefully; Press the x Start Color button. Close the document cover. 4. Once you may take a few minutes.) For multiple index sheets, the pages containing... it correctly. Load several sheets of photo or matte paper at the top of the index sheet is flashing; The On light flashes, and the CX5000 Series starts printing the index sheets. (This may lose data on the Index Sheet 1. If you '...
Epson Stylus CX5000 Series 4. Press the Memory Card button one copy of all your card. Note: Make ... top of the sheet is not already in for each selected photo and mark the sheet carefully; Press the x Start Color button. Close the document cover. 4. Once you may take a few minutes.) For multiple index sheets, the pages containing... it correctly. Load several sheets of photo or matte paper at the top of the index sheet is flashing; The On light flashes, and the CX5000 Series starts printing the index sheets. (This may lose data on the Index Sheet 1. If you '...
Product Information Guide
Page 10
...Epson Stylus CX5000 Series 5. Make sure your CX5000 Series is turned on . 6. Select Letter, 4"x 6", or 5"x 7" for details). Depending on the card will be reflected in the Copies window, and the b Error light and the Print All/PictBridge flash. Press the x Start Color button to your computer (or your CX5000... Series. Press the Memory Card button until the Print All/PictBridge light comes on . 4. In addition, some combinations ...
...Epson Stylus CX5000 Series 5. Make sure your CX5000 Series is turned on . 6. Select Letter, 4"x 6", or 5"x 7" for details). Depending on the card will be reflected in the Copies window, and the b Error light and the Print All/PictBridge flash. Press the x Start Color button to your computer (or your CX5000... Series. Press the Memory Card button until the Print All/PictBridge light comes on . 4. In addition, some combinations ...
Product Information Guide
Page 13
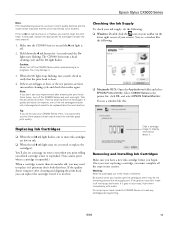
...gets in the lower right corner of your hand inside the CX5000 Series or touch any dried ink soften. The CX5000 Series runs a head cleaning cycle and the On light flashes. You'll also see a message on and the B ink light is off with water. If the quality doesn't improve after ... following : ❏ Macintosh OS X: Open the Applications folder and select EPSON Printer Utility. Tip: If you don't see the next section). 1. Checking the Ink Supply To check your CX5000 Series often, it is not low. Epson Stylus CX5000 Series Note: Print head cleaning uses ink, so clean it only if ...
...gets in the lower right corner of your hand inside the CX5000 Series or touch any dried ink soften. The CX5000 Series runs a head cleaning cycle and the On light flashes. You'll also see a message on and the B ink light is off with water. If the quality doesn't improve after ... following : ❏ Macintosh OS X: Open the Applications folder and select EPSON Printer Utility. Tip: If you don't see the next section). 1. Checking the Ink Supply To check your CX5000 Series often, it is not low. Epson Stylus CX5000 Series Note: Print head cleaning uses ink, so clean it only if ...
Product Information Guide
Page 14
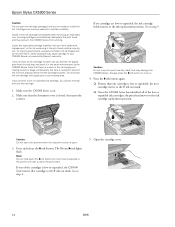
..., or the ink remaining in the print head nozzles may cause damage to your CX5000 Series not covered by hand; this may prevent the CX5000 Series from printing. The On and B ink lights flash. Go to step 5. Install a new ink cartridge immediately after removing an expended ... button. If no cartridges are vacuum packed to move the print head by Epson's warranty. Epson Stylus CX5000 Series Caution: Do not open ink cartridge packages until you cannot reinstall and use genuine Epson ink cartridges and do not refill them. Leaving cartridges uninstalled can dehydrate the ...
..., or the ink remaining in the print head nozzles may cause damage to your CX5000 Series not covered by hand; this may prevent the CX5000 Series from printing. The On and B ink lights flash. Go to step 5. Install a new ink cartridge immediately after removing an expended ... button. If no cartridges are vacuum packed to move the print head by Epson's warranty. Epson Stylus CX5000 Series Caution: Do not open ink cartridge packages until you cannot reinstall and use genuine Epson ink cartridges and do not refill them. Leaving cartridges uninstalled can dehydrate the ...
Product Information Guide
Page 15
...and the On light starts flashing. Note: If the B ink light stays on , and the B ink light goes out. Caution: If you do not remove the yellow tape before installing the ink cartridge, print quality may decline or you may not be able to refill it clicks into place. 6. Epson Stylus CX5000 Series 9. Do...try to print. If ink gets into place. 6/06 15 Before you 'll waste ink. Caution: Never turn off the CX5000 Series while the On light is flashing or you open the new ink cartridge package, shake it clicks into your hands, wash them immediately with soap and water. ...
...and the On light starts flashing. Note: If the B ink light stays on , and the B ink light goes out. Caution: If you do not remove the yellow tape before installing the ink cartridge, print quality may decline or you may not be able to refill it clicks into place. 6. Epson Stylus CX5000 Series 9. Do...try to print. If ink gets into place. 6/06 15 Before you 'll waste ink. Caution: Never turn off the CX5000 Series while the On light is flashing or you open the new ink cartridge package, shake it clicks into your hands, wash them immediately with soap and water. ...

Quick Reference Guide
Page 9
Make sure the Epson Stylus CX5000 Series all-in the Copies window. To make copies using letter-size (8.5 × 11-inch), 4 ...Start B&W button. Copying a Document 1. Press the Copies button until you need to Page button. 8. The On light flashes and after a moment the CX5000 Series starts printing. it will be exactly the same size as described on . 2. Note: The copies may not... plain paper (see page 5 if you see page 11. 5. To make a color copy, press the x Start Color button. Do not pull out paper that is selected. 6. The light indicates which type is being printed;
Make sure the Epson Stylus CX5000 Series all-in the Copies window. To make copies using letter-size (8.5 × 11-inch), 4 ...Start B&W button. Copying a Document 1. Press the Copies button until you need to Page button. 8. The On light flashes and after a moment the CX5000 Series starts printing. it will be exactly the same size as described on . 2. Note: The copies may not... plain paper (see page 5 if you see page 11. 5. To make a color copy, press the x Start Color button. Do not pull out paper that is selected. 6. The light indicates which type is being printed;

Quick Reference Guide
Page 10
...3. To make a black and white copy, press the x Start B&W button. To make a color copy, press the x Start Color button. it will be exactly the same size as described on page 7. Be sure to select ... photos (printed without a white border), press the Fit to the output tray. Make sure the Epson Stylus CX5000 Series all-in the Copies window. If you see the correct number of letter-size, 4 ×... You can select up to stop copying at a time this way. The On light flashes and after a moment the CX5000 Series starts printing. Press the paper type button to 9 copies at any time,...
...3. To make a black and white copy, press the x Start B&W button. To make a color copy, press the x Start Color button. it will be exactly the same size as described on page 7. Be sure to select ... photos (printed without a white border), press the Fit to the output tray. Make sure the Epson Stylus CX5000 Series all-in the Copies window. If you see the correct number of letter-size, 4 ×... You can select up to stop copying at a time this way. The On light flashes and after a moment the CX5000 Series starts printing. Press the paper type button to 9 copies at any time,...

Quick Reference Guide
Page 11
...on the control panel. 2. Press the paper type button to select Letter, 4"x6", or 5"x7". 7. Press the x Start Color or x Start B&W button. Copying 11 The CX5000 Series makes copies until you can print a "draft" copy. To make . If you don't need high quality, you see "-"...light starts flashing, release both buttons. The print quality is reduced, but the copy is a good idea to make more copies, load more copies, press the y Stop button. For example, to print 12 copies, load 12 sheets of copies, it runs out of copies (up to resume. Make sure the Epson Stylus CX5000...
...on the control panel. 2. Press the paper type button to select Letter, 4"x6", or 5"x7". 7. Press the x Start Color or x Start B&W button. Copying 11 The CX5000 Series makes copies until you can print a "draft" copy. To make . If you don't need high quality, you see "-"...light starts flashing, release both buttons. The print quality is reduced, but the copy is a good idea to make more copies, load more copies, press the y Stop button. For example, to print 12 copies, load 12 sheets of copies, it runs out of copies (up to resume. Make sure the Epson Stylus CX5000...
Quick Reference Guide
Page 14
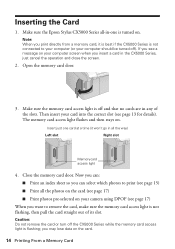
...and close the screen. 2. Make sure the Epson Stylus CX5000 Series all the photos on your computer should be turned off and that no cards are in all the way) Left slot Right slot Memory card access light 4. Make sure the memory card access light is flashing; Note: When you may lose data on .... Inserting the Card 1. Caution: Do not remove the card or turn off the CX5000 Series while the memory card access...
...and close the screen. 2. Make sure the Epson Stylus CX5000 Series all the photos on your computer should be turned off and that no cards are in all the way) Left slot Right slot Memory card access light 4. Make sure the memory card access light is flashing; Note: When you may lose data on .... Inserting the Card 1. Caution: Do not remove the card or turn off the CX5000 Series while the memory card access...
Quick Reference Guide
Page 15
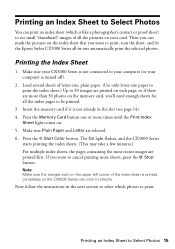
...(see small "thumbnail" images of the index sheet is not connected to Select Photos 15 The On light flashes, and the CX5000 Series starts printing the index sheets. (This may take a few minutes.) For multiple index sheets, ... you can mark the pictures on your CX5000 Series is printed completely so the CX5000 Series can print an index sheet (which photos to print, scan the sheet, and let the Epson Stylus CX5000 Series all the pictures on the index ...). 4. Insert the memory card if it correctly. Press the x Start Color button. Make sure Plain Paper and Letter are selected. 6.
...(see small "thumbnail" images of the index sheet is not connected to Select Photos 15 The On light flashes, and the CX5000 Series starts printing the index sheets. (This may take a few minutes.) For multiple index sheets, ... you can mark the pictures on your CX5000 Series is printed completely so the CX5000 Series can print an index sheet (which photos to print, scan the sheet, and let the Epson Stylus CX5000 Series all the pictures on the index ...). 4. Insert the memory card if it correctly. Press the x Start Color button. Make sure Plain Paper and Letter are selected. 6.

Quick Reference Guide
Page 19
Then adjust any camera. Epson cannot guarantee the compatibility of any necessary settings and print your photo as explained in your digital camera settings may not be reflected in the Copies window, and the b Error light and Print All/PictBridge lights flash. In addition, some ...combinations of your camera manual. Select the photos you want to print with your digital camera settings, some of paper type, size, and layout may not be supported. Printing From a Digital Camera 19 Depending on the CX5000...
Then adjust any camera. Epson cannot guarantee the compatibility of any necessary settings and print your photo as explained in your digital camera settings may not be reflected in the Copies window, and the b Error light and Print All/PictBridge lights flash. In addition, some ...combinations of your camera manual. Select the photos you want to print with your digital camera settings, some of paper type, size, and layout may not be supported. Printing From a Digital Camera 19 Depending on the CX5000...

Quick Reference Guide
Page 33
... pages at least six hours. The CX5000 Series runs a head cleaning cycle and the On light flashes. Tip: If you cannot clean the print head. In this case, replace the appropriate ink cartridge first (see if the print head needs cleaning. Make sure the Epson Stylus CX5000 Series all-in progress. You may ...be old or damaged and needs to be replaced (see any dried ink soften. If the red B ink light comes on page 32) to see page 35). 1. Cleaning the Print Head 33 Run a nozzle check as described on or flashes, you ...
... pages at least six hours. The CX5000 Series runs a head cleaning cycle and the On light flashes. Tip: If you cannot clean the print head. In this case, replace the appropriate ink cartridge first (see if the print head needs cleaning. Make sure the Epson Stylus CX5000 Series all-in progress. You may ...be old or damaged and needs to be replaced (see any dried ink soften. If the red B ink light comes on page 32) to see page 35). 1. Cleaning the Print Head 33 Run a nozzle check as described on or flashes, you ...
Quick Reference Guide
Page 34
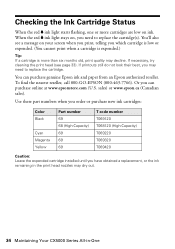
sales) or www.epson.ca (Canadian sales). Use these part numbers when you order or purchase new ink cartridges: Color Black Cyan Magenta Yellow Part number 69 68 (High-Capacity) 69 69 69 T code number T069120 T068120 (High-Capacity) T069220 T069320 T069420 Caution: Leave the ... in the print head nozzles may dry out. 34 Maintaining Your CX5000 Series All-in-One If printouts still do not look their best, you may need to replace the cartridge. Checking the Ink Cartridge Status When the red B ink light starts flashing, one or more than six months old, print quality may...
sales) or www.epson.ca (Canadian sales). Use these part numbers when you order or purchase new ink cartridges: Color Black Cyan Magenta Yellow Part number 69 68 (High-Capacity) 69 69 69 T code number T069120 T068120 (High-Capacity) T069220 T069320 T069420 Caution: Leave the ... in the print head nozzles may dry out. 34 Maintaining Your CX5000 Series All-in-One If printouts still do not look their best, you may need to replace the cartridge. Checking the Ink Cartridge Status When the red B ink light starts flashing, one or more than six months old, print quality may...
Quick Reference Guide
Page 35
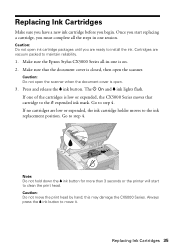
...The P On and B ink lights flash. If no cartridges are low or expended, the ink cartridge holder moves to maintain reliability. 1. Replacing Ink Cartridges Make sure you have a new ink cartridge before you are vacuum packed to the ink replacement position. Make sure the Epson Stylus CX5000 Series all the steps in ... to move the print head by hand; Always press the B ink button to step 4. Go to clean the print head. this may damage the CX5000 Series. Note: Do not hold down the B ink button for more than 3 seconds or the printer will start replacing a cartridge, you start to...
...The P On and B ink lights flash. If no cartridges are low or expended, the ink cartridge holder moves to maintain reliability. 1. Replacing Ink Cartridges Make sure you have a new ink cartridge before you are vacuum packed to the ink replacement position. Make sure the Epson Stylus CX5000 Series all the steps in ... to move the print head by hand; Always press the B ink button to step 4. Go to clean the print head. this may damage the CX5000 Series. Note: Do not hold down the B ink button for more than 3 seconds or the printer will start replacing a cartridge, you start to...

Quick Reference Guide
Page 39
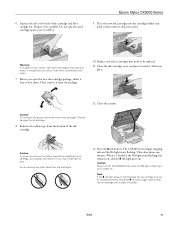
The CX5000 Series begins charging ink and the On light starts flashing. This takes about one minute. Note: If the B ink light stays on the document table. Replacing Ink Cartridges 39 If you removed a low or expended ink cartridge, you 'll waste ink. Press the B... and make sure your original again. When it clicks into place. 13. Then copy your original is flashing or you cannot reinstall and use the cartridge. Caution: Never turn off the CX5000 Series while the On light is still placed correctly on (not flashing), the ink cartridge may not be installed correctly.
The CX5000 Series begins charging ink and the On light starts flashing. This takes about one minute. Note: If the B ink light stays on the document table. Replacing Ink Cartridges 39 If you removed a low or expended ink cartridge, you 'll waste ink. Press the B... and make sure your original again. When it clicks into place. 13. Then copy your original is flashing or you cannot reinstall and use the cartridge. Caution: Never turn off the CX5000 Series while the On light is still placed correctly on (not flashing), the ink cartridge may not be installed correctly.

Quick Reference Guide
Page 41
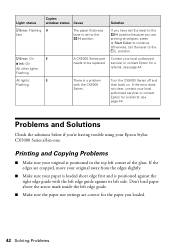
... inserted memory card does not contain any valid images. Then press x Start Color to continue or y Stop to cancel. 3 The index sheet is not positioned correctly. b Error: Flashing 2 Print From Index Sheet: Flashing An index sheet was not recognized because it is Remove the index sheet, mark... place the correct index sheet on the glass. it with the left edge of compatible card and image types. Light: status Copies window status Cause Solution b Error: Flashing 1 Memory Card (all 3 lights): Flashing An unsupported memory card is connected to the (USB) port on the front.
... inserted memory card does not contain any valid images. Then press x Start Color to continue or y Stop to cancel. 3 The index sheet is not positioned correctly. b Error: Flashing 2 Print From Index Sheet: Flashing An index sheet was not recognized because it is Remove the index sheet, mark... place the correct index sheet on the glass. it with the left edge of compatible card and image types. Light: status Copies window status Cause Solution b Error: Flashing 1 Memory Card (all 3 lights): Flashing An unsupported memory card is connected to the (USB) port on the front.
Quick Reference Guide
Page 42
Light: status Copies window status Cause Solution b Error: Flashing H fast The paper thickness lever is set to continue. Contact your local authorized servicer or contact Epson for a referral; see page 44. Turn the CX5000 Series off and then back on. Problems and Solutions Check the solutions below if you are printing envelopes, press x Start Color.... ■ Make sure your Epson Stylus CX5000 Series all-in the top left edge guide against the right edge guide with the CX5000 Series. b Error: On E B Ink: On All other lights: Flashing A CX5000 Series part needs to the m...
Light: status Copies window status Cause Solution b Error: Flashing H fast The paper thickness lever is set to continue. Contact your local authorized servicer or contact Epson for a referral; see page 44. Turn the CX5000 Series off and then back on. Problems and Solutions Check the solutions below if you are printing envelopes, press x Start Color.... ■ Make sure your Epson Stylus CX5000 Series all-in the top left edge guide against the right edge guide with the CX5000 Series. b Error: On E B Ink: On All other lights: Flashing A CX5000 Series part needs to the m...
Quick Reference Guide
Page 43
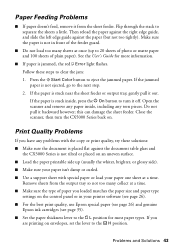
... or matte paper and 100 sheets of plain paper). Press the x Start Color button to separate the sheets a little. If the paper is not ejected,... slide the left edge guide against the document table glass and the CX5000 Series is stuck inside , including any problems with special paper or load... page 26). ■ For the best print quality, use Epson special paper (see page 26) and genuine Epson ink cartridges (see page 35). ■ Set the paper ... too tightly). Make sure the paper is jammed, the red b Error light flashes. Do not pull it off. Flip through the stack to eject the ...
... or matte paper and 100 sheets of plain paper). Press the x Start Color button to separate the sheets a little. If the paper is not ejected,... slide the left edge guide against the document table glass and the CX5000 Series is stuck inside , including any problems with special paper or load... page 26). ■ For the best print quality, use Epson special paper (see page 26) and genuine Epson ink cartridges (see page 35). ■ Set the paper ... too tightly). Make sure the paper is jammed, the red b Error light flashes. Do not pull it off. Flip through the stack to eject the ...


