DuraBrite® Ultra Ink Technical Brief
Page 6
... marks. Epson DURABrite Ultra Pigment Ink Technical Brief Page 6 Epson, Epson Stylus, Epson UltraChrome Hi-Gloss, and PictureMate are registered trademarks and Epson Exceed Your Vision, Claria, and Epson UltraChrome K3 are registered trademarks of Epson America, Inc. Epson disclaims any... and all rights in -One Visit www.DURABrite.com for identification purposes only and may be trademarks of their respective owners. Specifications subject to print...
... marks. Epson DURABrite Ultra Pigment Ink Technical Brief Page 6 Epson, Epson Stylus, Epson UltraChrome Hi-Gloss, and PictureMate are registered trademarks and Epson Exceed Your Vision, Claria, and Epson UltraChrome K3 are registered trademarks of Epson America, Inc. Epson disclaims any... and all rights in -One Visit www.DURABrite.com for identification purposes only and may be trademarks of their respective owners. Specifications subject to print...
Product Information Guide
Page 2
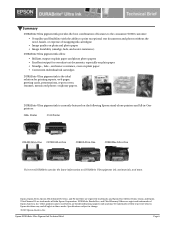
... paper into the sheet feeder with the flap side down. 2 5/05 Epson Stylus CX4200 Series/Epson Stylus CX4800 Series Specifications Printing Printing method On-demand ink jet Nozzle configuration Black: 90 nozzles Color: 270 nozzles (90 each cartridge: cyan, magenta, yellow) Print direction Bidirectional with logic seeking Ink Cartridges Color Cyan, magenta, yellow, black Cartridge life 6 months at 77 °...
... paper into the sheet feeder with the flap side down. 2 5/05 Epson Stylus CX4200 Series/Epson Stylus CX4800 Series Specifications Printing Printing method On-demand ink jet Nozzle configuration Black: 90 nozzles Color: 270 nozzles (90 each cartridge: cyan, magenta, yellow) Print direction Bidirectional with logic seeking Ink Cartridges Color Cyan, magenta, yellow, black Cartridge life 6 months at 77 °...
Product Information Guide
Page 3
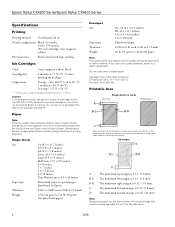
Epson Stylus CX4200 Series/Epson Stylus CX4800 Series Scanning Scanner type Photoelectric device Effective pixels Document size Scanning resolution Output resolution Scanning speed Image data Interface Light source Flatbed color CIS 10,200 × 14,040 pixels at 1200 dpi 216 × 297 mm (8.5...RH (without condensation) USB Interface Standard Based on Universal Serial Bus Specifications Revision 2.0, Universal Serial Bus Device Class Definition for Printing Devices Version 1.1, Universal Serial Bus Mass Storage class Bulk-Only Transport Revision 1.0 Bit rate 480 Mbps (High speed device)...
Epson Stylus CX4200 Series/Epson Stylus CX4800 Series Scanning Scanner type Photoelectric device Effective pixels Document size Scanning resolution Output resolution Scanning speed Image data Interface Light source Flatbed color CIS 10,200 × 14,040 pixels at 1200 dpi 216 × 297 mm (8.5...RH (without condensation) USB Interface Standard Based on Universal Serial Bus Specifications Revision 2.0, Universal Serial Bus Device Class Definition for Printing Devices Version 1.1, Universal Serial Bus Mass Storage class Bulk-Only Transport Revision 1.0 Bit rate 480 Mbps (High speed device)...
Product Information Guide
Page 4
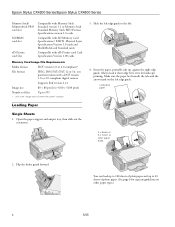
... . 4. Letter-size paper Loading Paper Single Sheets 1. You can load up to 100 sheets of plain paper and up , against the right edge guide. Epson Stylus CX4200 Series/Epson Stylus CX4800 Series Memory Stick/ MemoryStick PRO card slot SD/MMC card slot xD-Picture card Slot Compatible with Memory Stick Standard version 1.3 or Memory Stick... JPEG, DOS FAT (FAT 12 or 16, one partition) taken with SD Memory Card Specifications / PART1. Always load it short edge first, even for landscape printing.
... . 4. Letter-size paper Loading Paper Single Sheets 1. You can load up to 100 sheets of plain paper and up , against the right edge guide. Epson Stylus CX4200 Series/Epson Stylus CX4800 Series Memory Stick/ MemoryStick PRO card slot SD/MMC card slot xD-Picture card Slot Compatible with Memory Stick Standard version 1.3 or Memory Stick... JPEG, DOS FAT (FAT 12 or 16, one partition) taken with SD Memory Card Specifications / PART1. Always load it short edge first, even for landscape printing.
Product Information Guide
Page 5
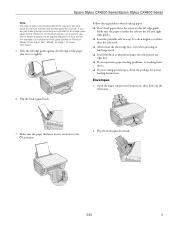
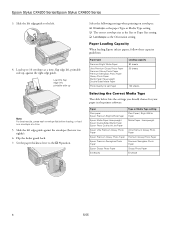
...the printable side face-up. It's often brighter or whiter than the other side. ❏ Always load the short edge first, even when printing in landscape mode. ❏ Load letterhead or preprinted paper into the printer top edge first. ❏ If you experience paper feeding problems,... printed on the left edge of the paper (but not too tightly). Envelopes 1. Make sure the paper is fine. Follow these guidelines when loading paper: ❏ Don't load paper above the arrow on page 1 for more information. 5. Flip the feeder guard back. 7. Epson Stylus CX4200 Series/Epson Stylus CX4800 ...
...the printable side face-up. It's often brighter or whiter than the other side. ❏ Always load the short edge first, even when printing in landscape mode. ❏ Load letterhead or preprinted paper into the printer top edge first. ❏ If you experience paper feeding problems,... printed on the left edge of the paper (but not too tightly). Envelopes 1. Make sure the paper is fine. Follow these guidelines when loading paper: ❏ Don't load paper above the arrow on page 1 for more information. 5. Flip the feeder guard back. 7. Epson Stylus CX4200 Series/Epson Stylus CX4800 ...
Product Information Guide
Page 6
...Select the following settings when printing on envelopes: ❏ Envelope as the paper Type or Media Type setting ❏ The correct envelope size as the Size or Paper Size setting ❏ Landscape as the Orientation setting Paper Loading Capacity When loading Epson ink jet papers, follow these... ^ H position. Slide the left . 4. Slide the left edge guide to the left edge guide against the right edge guide. Epson Stylus CX4200 Series/Epson Stylus CX4800 Series 3. Set the paper thickness lever to 10 envelopes at a time. 5. Load up , against the envelopes (but not too tightly). 6.
...Select the following settings when printing on envelopes: ❏ Envelope as the paper Type or Media Type setting ❏ The correct envelope size as the Size or Paper Size setting ❏ Landscape as the Orientation setting Paper Loading Capacity When loading Epson ink jet papers, follow these... ^ H position. Slide the left . 4. Slide the left edge guide to the left edge guide against the right edge guide. Epson Stylus CX4200 Series/Epson Stylus CX4800 Series 3. Set the paper thickness lever to 10 envelopes at a time. 5. Load up , against the envelopes (but not too tightly). 6.
Product Information Guide
Page 8
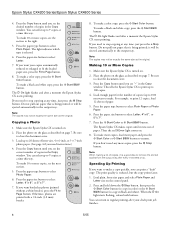
...at a time this way. Note: The copies may not be exactly the same size as described on . 2. Epson Stylus CX4200 Series/Epson Stylus CX4800 Series 4. Press the Copy button until it is being printed; The light indicates which type is turned on page 7. Press the paper size button to select Letter, 4"x ...the number of copies in black and white). Press the paper size button to select Letter. 7. Press the x Start Color or x Start B&W button. The Epson Stylus CX makes copies until you want to make a copy quickly, you don't need instructions.) 4. Then the red b ...
...at a time this way. Note: The copies may not be exactly the same size as described on . 2. Epson Stylus CX4200 Series/Epson Stylus CX4800 Series 4. Press the Copy button until it is being printed; The light indicates which type is turned on page 7. Press the paper size button to select Letter, 4"x ...the number of copies in black and white). Press the paper size button to select Letter. 7. Press the x Start Color or x Start B&W button. The Epson Stylus CX makes copies until you want to make a copy quickly, you don't need instructions.) 4. Then the red b ...
Product Information Guide
Page 9
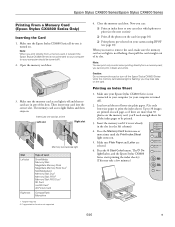
...paper. (Use only letter-size paper to print the index sheet.) Up to print (see the next section) ❏ Print all -in black and white. Open the memory card door. 3. Make sure the Epson Stylus CX4800 Series all the photos on the card (...light flashes, and the Epson Stylus CX4800 Series starts printing the index sheet(s). (This may lose data on . Make sure the memory card access light is flashing; Printing an Index Sheet 1. Press the x Start Color button. Epson Stylus CX4200 Series/Epson Stylus CX4800 Series Printing From a Memory Card (Epson Stylus CX4800 Series Only) Inserting ...
...paper. (Use only letter-size paper to print the index sheet.) Up to print (see the next section) ❏ Print all -in black and white. Open the memory card door. 3. Make sure the Epson Stylus CX4800 Series all the photos on the card (...light flashes, and the Epson Stylus CX4800 Series starts printing the index sheet(s). (This may lose data on . Make sure the memory card access light is flashing; Printing an Index Sheet 1. Press the x Start Color button. Epson Stylus CX4200 Series/Epson Stylus CX4800 Series Printing From a Memory Card (Epson Stylus CX4800 Series Only) Inserting ...
Product Information Guide
Page 10
Epson Stylus CX4200 Series/Epson Stylus CX4800 Series For multiple index sheets, the pages containing the most recent images are done printing, remove the memory card by pulling it straight out of the page. 2. Once you have printed the index sheet, use a dark pen or pencil to fill in the ALL oval at...sheets, press the y Stop button. Press the x Start Color button to print all the photos on the glass, in for the paper size. 6. Press the x Start Color button to cancel printing more paper later as necessary to start printing. once it straight out of its slot. Place the ...
Epson Stylus CX4200 Series/Epson Stylus CX4800 Series For multiple index sheets, the pages containing the most recent images are done printing, remove the memory card by pulling it straight out of the page. 2. Once you have printed the index sheet, use a dark pen or pencil to fill in the ALL oval at...sheets, press the y Stop button. Press the x Start Color button to print all the photos on the glass, in for the paper size. 6. Press the x Start Color button to cancel printing more paper later as necessary to start printing. once it straight out of its slot. Place the ...
Product Information Guide
Page 11
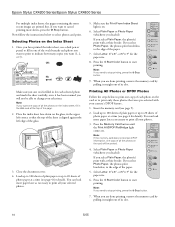
... of control over your scanned image: ❏ Full Auto Mode scans quickly and easily using the Epson Stylus CX4800 Series, remove any memory cards from any necessary settings and print your photos as you can even automatically restore faded color photographs as explained in -one to scan a photo or document and save your image to...
... of control over your scanned image: ❏ Full Auto Mode scans quickly and easily using the Epson Stylus CX4800 Series, remove any memory cards from any necessary settings and print your photos as you can even automatically restore faded color photographs as explained in -one to scan a photo or document and save your image to...
Product Information Guide
Page 13
... ink may need to scan and restore the color in the sheet feeder. 3. Tip: If you need to clean the print head. Click the Scan button to replace the cartridge(s). The Epson Stylus CX turns on -screen User's Guide for details. Cleaning the Print Head If your printouts are faint, run a... and Ink Levels If your image(s). You may need to be cleaned yet: Print head needs to be cleaned: If the pattern does not look their best. This lets any dried ink soften. Epson Stylus CX4200 Series/Epson Stylus CX4800 Series 7. If the red B ink light comes on your image as described above...
... ink may need to scan and restore the color in the sheet feeder. 3. Tip: If you need to clean the print head. Click the Scan button to replace the cartridge(s). The Epson Stylus CX turns on -screen User's Guide for details. Cleaning the Print Head If your printouts are faint, run a... and Ink Levels If your image(s). You may need to be cleaned yet: Print head needs to be cleaned: If the pattern does not look their best. This lets any dried ink soften. Epson Stylus CX4200 Series/Epson Stylus CX4800 Series 7. If the red B ink light comes on your image as described above...
Product Information Guide
Page 14
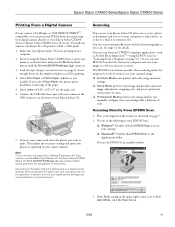
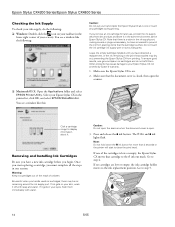
...window like this: Click a cartridge image to clean the print head. there may dry out, preventing the Epson Stylus CX from printing. If no cartridges are low or empty, the ink cartridge holder moves to your Epson Stylus CX in the print head nozzles may be ink remaining around the ink supply ...remaining in the printer list, click OK, and select EPSON StatusMonitor. If it in -one of the cartridges is low or empty, the Epson Stylus CX moves that there is a valve in your eyes, flush them . Epson Stylus CX4200 Series/Epson Stylus CX4800 Series Checking the Ink Supply To check your ink ...
...window like this: Click a cartridge image to clean the print head. there may dry out, preventing the Epson Stylus CX from printing. If no cartridges are low or empty, the ink cartridge holder moves to your Epson Stylus CX in the print head nozzles may be ink remaining around the ink supply ...remaining in the printer list, click OK, and select EPSON StatusMonitor. If it in -one of the cartridges is low or empty, the Epson Stylus CX moves that there is a valve in your eyes, flush them . Epson Stylus CX4200 Series/Epson Stylus CX4800 Series Checking the Ink Supply To check your ink ...
Product Information Guide
Page 15
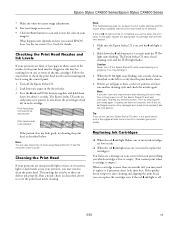
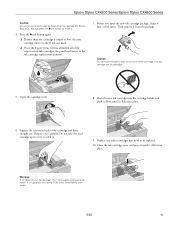
... Caution: Do not touch the green chip on your eyes, flush them thoroughly with water. 5/05 15 This can damage the ink cartridge. 5. Epson Stylus CX4200 Series/Epson Stylus CX4800 Series Caution: Do not move it. 4. Warning: If ink gets on the front of it . 9. Always press the B ink button to the... cartridge package, shake it from the package. Squeeze the tab at the back of the empty or low ink cartridges, the print head moves to move the print head by hand; Replace any other cartridges that need to refill it carefully. Open the cartridge cover. 8. Dispose of the ...
... Caution: Do not touch the green chip on your eyes, flush them thoroughly with water. 5/05 15 This can damage the ink cartridge. 5. Epson Stylus CX4200 Series/Epson Stylus CX4800 Series Caution: Do not move it. 4. Warning: If ink gets on the front of it . 9. Always press the B ink button to the... cartridge package, shake it from the package. Squeeze the tab at the back of the empty or low ink cartridges, the print head moves to move the print head by hand; Replace any other cartridges that need to refill it carefully. Open the cartridge cover. 8. Dispose of the ...

Product Information Guide
Page 16
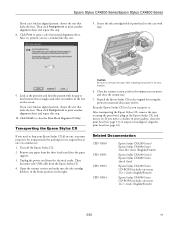
Epson Stylus CX4200 Series/Epson Stylus CX4800 Series 11. Close the scanner. 3. Macintosh OS X: Open the Applications folder and select EPSON Print Utility. Caution: Never turn off the Epson Stylus CX while the P On light is flashing or you may need to print a vertical alignment sheet. Look at the printout .... Select your printouts look grainy or blurry, or you see a window like this one: Aligning the Print Head If your Epson Stylus CX in -one : 12. The Epson Stylus CX begins charging ink and the P On light starts flashing. Note: Banding may not be installed correctly...
Epson Stylus CX4200 Series/Epson Stylus CX4800 Series 11. Close the scanner. 3. Macintosh OS X: Open the Applications folder and select EPSON Print Utility. Caution: Never turn off the Epson Stylus CX while the P On light is flashing or you may need to print a vertical alignment sheet. Look at the printout .... Select your printouts look grainy or blurry, or you see a window like this one: Aligning the Print Head If your Epson Stylus CX in -one : 12. The Epson Stylus CX begins charging ink and the P On light starts flashing. Note: Banding may not be installed correctly...
Product Information Guide
Page 17
... with tape. 9. Related Documentation CPD-19830 CPD-19831 CPD-19833 CPD-19834 Epson Stylus CX4200 Series/ Epson Stylus CX4800 Series Start Here sheet (English/French) Epson Stylus CX4200 Series/ Epson Stylus CX4800 Series Quick Guide Epson Stylus CX4200 Series CD-ROM (includes on -screen User's Guide; Click Finish to print a color horizontal alignment sheet. Open the scanner section and make sure the ink cartridge...
... with tape. 9. Related Documentation CPD-19830 CPD-19831 CPD-19833 CPD-19834 Epson Stylus CX4200 Series/ Epson Stylus CX4800 Series Start Here sheet (English/French) Epson Stylus CX4200 Series/ Epson Stylus CX4800 Series Quick Guide Epson Stylus CX4200 Series CD-ROM (includes on -screen User's Guide; Click Finish to print a color horizontal alignment sheet. Open the scanner section and make sure the ink cartridge...
Quick Reference Guide
Page 1
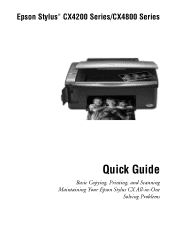
Epson Stylus® CX4200 Series/CX4800 Series Quick Guide Basic Copying, Printing, and Scanning Maintaining Your Epson Stylus CX All-in-One Solving Problems
Epson Stylus® CX4200 Series/CX4800 Series Quick Guide Basic Copying, Printing, and Scanning Maintaining Your Epson Stylus CX All-in-One Solving Problems
Quick Reference Guide
Page 2
... 8 Printing From a Memory Card (Epson Stylus CX4800 Series Only 11 Compatible Cards and Image Formats 12 Inserting the Card 13 Printing an Index Sheet to Select Photos 14 Printing All Photos or DPOF Photos 17 Printing From a Digital Camera 18 Printing From Your Computer 19 Printing in Windows 19 Printing With ...25 Scanning a Photo or Document 26 Basic Scanning 26 Restoring Color in Faded Photos 28 Maintaining Your Epson Stylus CX All-in-One 29 Checking the Print Head Nozzles and Ink 29 Cleaning the Print Head 30 Replacing Ink Cartridges 31 Solving Problems 36 Error Indicators...
... 8 Printing From a Memory Card (Epson Stylus CX4800 Series Only 11 Compatible Cards and Image Formats 12 Inserting the Card 13 Printing an Index Sheet to Select Photos 14 Printing All Photos or DPOF Photos 17 Printing From a Digital Camera 18 Printing From Your Computer 19 Printing in Windows 19 Printing With ...25 Scanning a Photo or Document 26 Basic Scanning 26 Restoring Color in Faded Photos 28 Maintaining Your Epson Stylus CX All-in-One 29 Checking the Print Head Nozzles and Ink 29 Cleaning the Print Head 30 Replacing Ink Cartridges 31 Solving Problems 36 Error Indicators...
Quick Reference Guide
Page 3
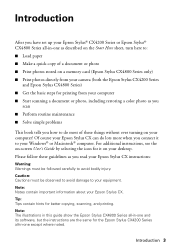
... you have set up your Epson Stylus® CX4200 Series or Epson Stylus® CX4800 Series all -in -one except where noted. Caution: Cautions must be observed to avoid damage to avoid bodily injury. Tip: Tips contain hints for printing from your computer ■ Start scanning a document or photo, including restoring a color photo as you scan ■...
... you have set up your Epson Stylus® CX4200 Series or Epson Stylus® CX4800 Series all -in -one except where noted. Caution: Cautions must be observed to avoid damage to avoid bodily injury. Tip: Tips contain hints for printing from your computer ■ Start scanning a document or photo, including restoring a color photo as you scan ■...

Quick Reference Guide
Page 4
Insert the paper, printable side up, against the right edge guide. The printable side is often whiter or brighter than the other side. Loading Paper Follow the steps here to the left. 3. Then slide the left edge guide to load paper in your Epson Stylus CX all-in-one. 1. Narrow paper Place paper beneath the tabs 4 Loading Paper Open the paper support and output tray, then slide out the extensions. 2. Flip the feeder guard forward. Always load it short edge first, even for landscape printing.
Insert the paper, printable side up, against the right edge guide. The printable side is often whiter or brighter than the other side. Loading Paper Follow the steps here to the left. 3. Then slide the left edge guide to load paper in your Epson Stylus CX all-in-one. 1. Narrow paper Place paper beneath the tabs 4 Loading Paper Open the paper support and output tray, then slide out the extensions. 2. Flip the feeder guard forward. Always load it short edge first, even for landscape printing.
Quick Reference Guide
Page 8
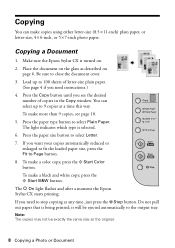
... Copy button until you need to 100 sheets of copies in the Copy window. The P On light flashes and after a moment the Epson Stylus CX starts printing. Load up to Page button. 8. Press the paper type button to the output tray. it will be exactly the same size as...copies at any time, just press the y Stop button. To make a color copy, press the x Start Color button. Be sure to select Letter. 7. To make a black and white copy, press the x Start B&W button. Make sure the Epson Stylus CX is being printed; To make copies using either letter-size (8.5 × 11-inch) plain...
... Copy button until you need to 100 sheets of copies in the Copy window. The P On light flashes and after a moment the Epson Stylus CX starts printing. Load up to Page button. 8. Press the paper type button to the output tray. it will be exactly the same size as...copies at any time, just press the y Stop button. To make a color copy, press the x Start Color button. Be sure to select Letter. 7. To make a black and white copy, press the x Start B&W button. Make sure the Epson Stylus CX is being printed; To make copies using either letter-size (8.5 × 11-inch) plain...


