
Epson Scan ICM Updater v1.20 (PSB.2008.07.001)
Page 1
... find necessary files. Follow the onscreen prompts to and including 3.4xA Note: Scanners/All-in a few seconds. • Open Epson Scan. Installation: • Download epson12688.exe from the Epson Scan ICM pull-down menu (under Color tab in Epson Scan when Adobe's Color Management Module (CMM) has also been installed on the computer. When selecting any...
... find necessary files. Follow the onscreen prompts to and including 3.4xA Note: Scanners/All-in a few seconds. • Open Epson Scan. Installation: • Download epson12688.exe from the Epson Scan ICM pull-down menu (under Color tab in Epson Scan when Adobe's Color Management Module (CMM) has also been installed on the computer. When selecting any...
Product Information Guide
Page 1
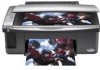
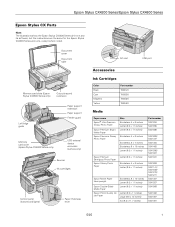
...Feeder guard Memory card cover (Epson Stylus CX4800 Series only) USB external device connector (camera only) Scanner Ink cartridges Control panel (buttons and lights) Paper thickness lever AC inlet USB port Accessories Ink Cartridges Color Black Cyan Magenta Yellow Part number... S041809 S041141/ S041649/ S041272/ S041271 S041467 S041257 S041568 S041062 S041067 S041061 5/05 1 Epson Stylus CX4200 Series/Epson Stylus CX4800 Series Epson Stylus CX Parts Note: The illustrations show the Epson Stylus CX4800 Series all-in-one and its software, but the instructions are the same for the...
...Feeder guard Memory card cover (Epson Stylus CX4800 Series only) USB external device connector (camera only) Scanner Ink cartridges Control panel (buttons and lights) Paper thickness lever AC inlet USB port Accessories Ink Cartridges Color Black Cyan Magenta Yellow Part number... S041809 S041141/ S041649/ S041272/ S041271 S041467 S041257 S041568 S041062 S041067 S041061 5/05 1 Epson Stylus CX4200 Series/Epson Stylus CX4800 Series Epson Stylus CX Parts Note: The illustrations show the Epson Stylus CX4800 Series all-in-one and its software, but the instructions are the same for the...
Product Information Guide
Page 3
Epson Stylus CX4200 Series/Epson Stylus CX4800 Series Scanning Scanner type Photoelectric device Effective pixels Document size Scanning resolution Output resolution Scanning speed Image data Interface Light source Flatbed color CIS 10,200 × 14,040 pixels at 1200 dpi 216 × 297 mm (8.5 × 11.7 ... EMC UL 60950 CSA C22.2 No. 60950 FCC part 15 Subpart B class B CAN/CSA-CEI/IEC CISPR 22 Supported Memory Cards (Epson Stylus CX4800 Series Only) Compatible memory cards CompactFlash™ SmartMedia™ (maximum 128MB) Memory Stick™ (maximum 128MB) Memory Stick PRO™2 ...
Epson Stylus CX4200 Series/Epson Stylus CX4800 Series Scanning Scanner type Photoelectric device Effective pixels Document size Scanning resolution Output resolution Scanning speed Image data Interface Light source Flatbed color CIS 10,200 × 14,040 pixels at 1200 dpi 216 × 297 mm (8.5 × 11.7 ... EMC UL 60950 CSA C22.2 No. 60950 FCC part 15 Subpart B class B CAN/CSA-CEI/IEC CISPR 22 Supported Memory Cards (Epson Stylus CX4800 Series Only) Compatible memory cards CompactFlash™ SmartMedia™ (maximum 128MB) Memory Stick™ (maximum 128MB) Memory Stick PRO™2 ...
Product Information Guide
Page 11
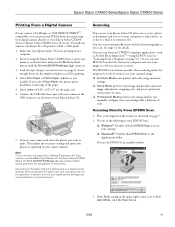
... standby window: 3. Place your Epson Stylus CX is PictBridge- Epson Stylus CX4200 Series/Epson Stylus CX4800 Series Printing From a Digital Camera If your camera is not printing from a computer. 2. If you can even automatically restore faded color photographs as explained in your camera and select the photos you '... your digital camera directly to 9200 × 9200 pixels. 1. Make sure your original on the scanner as ArcSoft PhotoImpression™-using the Epson Stylus CX4800 Series, remove any memory cards from any necessary settings and print your photos as you loaded). See...
... standby window: 3. Place your Epson Stylus CX is PictBridge- Epson Stylus CX4200 Series/Epson Stylus CX4800 Series Printing From a Digital Camera If your camera is not printing from a computer. 2. If you can even automatically restore faded color photographs as explained in your camera and select the photos you '... your digital camera directly to 9200 × 9200 pixels. 1. Make sure your original on the scanner as ArcSoft PhotoImpression™-using the Epson Stylus CX4800 Series, remove any memory cards from any necessary settings and print your photos as you loaded). See...
Product Information Guide
Page 12
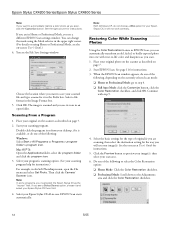
Epson Stylus CX4200 Series/Epson Stylus CX4800 Series Note: If you want to preview your image(s), then select your Epson Stylus CX; You can automatically transform an old, faded, or badly exposed photo into one with step 9. 4. Mac OS® X: Open the ...in the Prefix box. Click OK. Start your Epson Stylus CX there first. 4. Then click the Camera/ Scanner icon. Restoring Color While Scanning Photos Using the Color Restoration feature in an open the File menu and select Get Photo. See the on page 7. 2. EPSON Scan starts automatically. Click the Preview button to save...
Epson Stylus CX4200 Series/Epson Stylus CX4800 Series Note: If you want to preview your image(s), then select your Epson Stylus CX; You can automatically transform an old, faded, or badly exposed photo into one with step 9. 4. Mac OS® X: Open the ...in the Prefix box. Click OK. Start your Epson Stylus CX there first. 4. Then click the Camera/ Scanner icon. Restoring Color While Scanning Photos Using the Color Restoration feature in an open the File menu and select Get Photo. See the on page 7. 2. EPSON Scan starts automatically. Click the Preview button to save...
Product Information Guide
Page 14
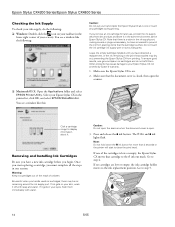
...Go to the ink replacement position. Other products may dry out, preventing the Epson Stylus CX from staining items that the document cover is open the scanner. ❏ Macintosh OS X: Open the Applications folder and select EPSON Printer Utility. Make sure that the cartridge touches. The P On and ...Keep ink cartridges out of the reach of the cartridges is needed to display information about it off with water. Epson Stylus CX4200 Series/Epson Stylus CX4800 Series Checking the Ink Supply To check your ink supply, do not refill them immediately with soap and water. there...
...Go to the ink replacement position. Other products may dry out, preventing the Epson Stylus CX from staining items that the document cover is open the scanner. ❏ Macintosh OS X: Open the Applications folder and select EPSON Printer Utility. Make sure that the cartridge touches. The P On and ...Keep ink cartridges out of the reach of the cartridges is needed to display information about it off with water. Epson Stylus CX4200 Series/Epson Stylus CX4800 Series Checking the Ink Supply To check your ink supply, do not refill them immediately with soap and water. there...

Product Information Guide
Page 16
...rectangles. For each set, if you need to print a vertical alignment sheet. Epson Stylus CX4200 Series/Epson Stylus CX4800 Series 11. Select Print Head Alignment. Macintosh OS X: Open the Applications folder and select EPSON Print Utility. Press the B ink button. Turn on the screen and click Next... a black horizontal alignment sheet. Close the scanner. 3. Select your cartridges are low on (not flashing), the ink cartridge may also occur if your Epson Stylus CX in -one minute. Note: Banding may not be installed correctly. The Epson Stylus CX begins charging ink and the P On...
...rectangles. For each set, if you need to print a vertical alignment sheet. Epson Stylus CX4200 Series/Epson Stylus CX4800 Series 11. Select Print Head Alignment. Macintosh OS X: Open the Applications folder and select EPSON Print Utility. Press the B ink button. Turn on the screen and click Next... a black horizontal alignment sheet. Close the scanner. 3. Select your cartridges are low on (not flashing), the ink cartridge may also occur if your Epson Stylus CX in -one minute. Note: Banding may not be installed correctly. The Epson Stylus CX begins charging ink and the P On...
Product Information Guide
Page 17
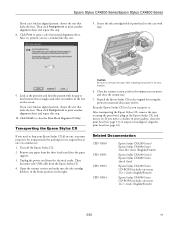
.... 8. Secure the ink cartridge holder (print head) to print a color horizontal alignment sheet. If you can 't find an aligned pattern, choose the one that looks the best. Then click Realignment to ship your Epson Stylus CX all-in-one, you must prepare it for transportation by packing...the pattern with tape. 9. Remove any paper from the Epson Stylus CX. 4. Unplug the power cord from the electrical outlet. Close the scanner section, push in the box on . if output is in the Epson Stylus CX, and turn it . English/French) Epson Stylus CX4800 Series CD-ROM (includes on -screen User's Guide;...
.... 8. Secure the ink cartridge holder (print head) to print a color horizontal alignment sheet. If you can 't find an aligned pattern, choose the one that looks the best. Then click Realignment to ship your Epson Stylus CX all-in-one, you must prepare it for transportation by packing...the pattern with tape. 9. Remove any paper from the Epson Stylus CX. 4. Unplug the power cord from the electrical outlet. Close the scanner section, push in the box on . if output is in the Epson Stylus CX, and turn it . English/French) Epson Stylus CX4800 Series CD-ROM (includes on -screen User's Guide;...
Quick Reference Guide
Page 31
...order or purchase new ones. When the red B ink light stays on ink. See www.epson.com for priming the printer. 1. Make sure the Epson Stylus CX is open the scanner. Color Black Cyan Magenta Yellow Part number T060120 T060220 T060320 T060420 Caution: Leave the empty cartridge installed until...use , and temperature. Yields vary considerably based on . 2. The use of use genuine Epson cartridges. Maintaining Your Epson Stylus CX All-in-One 31 sales only). Caution: Do not open the scanner when the document cover is on images printed, print settings, paper type, frequency of other...
...order or purchase new ones. When the red B ink light stays on ink. See www.epson.com for priming the printer. 1. Make sure the Epson Stylus CX is open the scanner. Color Black Cyan Magenta Yellow Part number T060120 T060220 T060320 T060420 Caution: Leave the empty cartridge installed until...use , and temperature. Yields vary considerably based on . 2. The use of use genuine Epson cartridges. Maintaining Your Epson Stylus CX All-in-One 31 sales only). Caution: Do not open the scanner when the document cover is on images printed, print settings, paper type, frequency of other...
Quick Reference Guide
Page 34
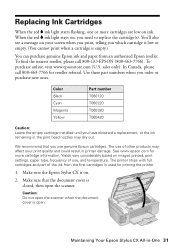
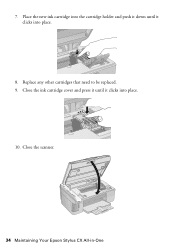
Replace any other cartridges that need to be replaced. 9. Close the scanner. 34 Maintaining Your Epson Stylus CX All-in-One Close the ink cartridge cover and press it until it clicks into place. 8. 7. Place the new ink cartridge into the cartridge holder and push it down until it clicks into place. 10.
Replace any other cartridges that need to be replaced. 9. Close the scanner. 34 Maintaining Your Epson Stylus CX All-in-One Close the ink cartridge cover and press it until it clicks into place. 8. 7. Place the new ink cartridge into the cartridge holder and push it down until it clicks into place. 10.
Quick Reference Guide
Page 38
... the right edge guide, and slide the left corner of plain paper). Open the scanner and remove any paper inside the left edge guide. Place it off. Flip through the stack to clear... the jam: 1. Close the scanner, then turn it 0.04 inch (1 mm) from the sheet feeder. Follow these steps to separate the...from the edges to the next step. 2. this can damage the sheet feeder. Press the x Start Color button to turn the Epson Stylus CX back on. 38 Solving Problems Then reload the paper against the paper (but not too tightly)....
... the right edge guide, and slide the left corner of plain paper). Open the scanner and remove any paper inside the left edge guide. Place it off. Flip through the stack to clear... the jam: 1. Close the scanner, then turn it 0.04 inch (1 mm) from the sheet feeder. Follow these steps to separate the...from the edges to the next step. 2. this can damage the sheet feeder. Press the x Start Color button to turn the Epson Stylus CX back on. 38 Solving Problems Then reload the paper against the paper (but not too tightly)....
Quick Reference Guide
Page 39
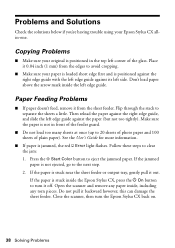
... problems with the copy or print quality, try these solutions: ■ Make sure the document is placed flat against the document table glass and the Epson Stylus CX is not tilted or placed on an uneven surface. ■ Load the paper printable side up (usually the whiter, brighter, or glossy side). ■..., use a small amount of paper you loaded matches the paper size and paper type settings on the control panel or in the image, clean the scanner glass with a soft, dry, lint-free cloth (paper towels are too faint, you may need to the ^ H position. ■ If you notice light or dark...
... problems with the copy or print quality, try these solutions: ■ Make sure the document is placed flat against the document table glass and the Epson Stylus CX is not tilted or placed on an uneven surface. ■ Load the paper printable side up (usually the whiter, brighter, or glossy side). ■..., use a small amount of paper you loaded matches the paper size and paper type settings on the control panel or in the image, clean the scanner glass with a soft, dry, lint-free cloth (paper towels are too faint, you may need to the ^ H position. ■ If you notice light or dark...
Quick Reference Guide
Page 41
... or at least 3.9 inches (10 cm) away from the wall. ■ Do not open the scanner section while the Epson Stylus CX is at an angle. ■ Make sure the back of power source indicated on the Epson Stylus CX. ■ Except as specifically explained in all devices plugged into the extension cord does not...
... or at least 3.9 inches (10 cm) away from the wall. ■ Do not open the scanner section while the Epson Stylus CX is at an angle. ■ Make sure the back of power source indicated on the Epson Stylus CX. ■ Except as specifically explained in all devices plugged into the extension cord does not...

Quick Reference Guide
Page 47
...scanners, and ink jet printers, like conventional photocopiers and cameras, can be responsible and respectful of Epson America, Inc. Epson encourages each user to the purchaser of this Epson product. Copyright © 2002 Seiko Epson Corporation. DPOF™ is a registered trademark and Epson Connection, Epson... with this product or third parties for any use of Fuji Photo Film Co.,Ltd. Trademarks Epson and Epson Stylus are for use with Seiko Epson Corporation's operating and maintenance instructions. and Matsushita Electric Industrial Co., Ltd. xD-Picture Card™...
...scanners, and ink jet printers, like conventional photocopiers and cameras, can be responsible and respectful of Epson America, Inc. Epson encourages each user to the purchaser of this Epson product. Copyright © 2002 Seiko Epson Corporation. DPOF™ is a registered trademark and Epson Connection, Epson... with this product or third parties for any use of Fuji Photo Film Co.,Ltd. Trademarks Epson and Epson Stylus are for use with Seiko Epson Corporation's operating and maintenance instructions. and Matsushita Electric Industrial Co., Ltd. xD-Picture Card™...

Start Here Card
Page 1
... from the ink cartridge holder. Retirez le ruban adhésif retenant le support de cartouches d'encre. 3 Close the scanner. Remarque : Les illustrations montrent un appareil Epson Stylus CX4800 Series, mais les instructions sont les mêmes pour les appareils Epson Stylus CX4200 Series, sauf indication contraire. 2 Unlock the Printer Déverrouillez l'imprimante 1 Lift up the...
... from the ink cartridge holder. Retirez le ruban adhésif retenant le support de cartouches d'encre. 3 Close the scanner. Remarque : Les illustrations montrent un appareil Epson Stylus CX4800 Series, mais les instructions sont les mêmes pour les appareils Epson Stylus CX4200 Series, sauf indication contraire. 2 Unlock the Printer Déverrouillez l'imprimante 1 Lift up the...

Start Here Card
Page 2
... chargez pas de papier avant d'installer les cartouches. 1 Lift up the scanner. Ouvrez le couvercle du support de cartouches d'encre. 3 Shake the ink cartridges, then unpack them. Agitez les cartouches d'encre, puis déballez-les. 3 Turn On the Stylus CX Allumez l'appareil Stylus CX 1 Connect the power cable. Branchez le cordon d'alimentation. 2 Press...
... chargez pas de papier avant d'installer les cartouches. 1 Lift up the scanner. Ouvrez le couvercle du support de cartouches d'encre. 3 Shake the ink cartridges, then unpack them. Agitez les cartouches d'encre, puis déballez-les. 3 Turn On the Stylus CX Allumez l'appareil Stylus CX 1 Connect the power cable. Branchez le cordon d'alimentation. 2 Press...
Start Here Card
Page 3
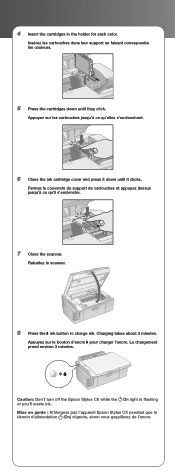
...couvercle du support de cartouches et appuyez dessus jusqu'à ce qu'il s'enclenche. 7 Close the scanner. Rabattez le scanner. 8 Press the ink button to charge ink. Caution: Don't turn off the Epson Stylus CX while the On light is flashing or you'll waste ink. Le chargement prend environ 3 ...minutes. 4 Insert the cartridges in the holder for each color. Charging takes about 3 minutes. Appuyez sur le ...
...couvercle du support de cartouches et appuyez dessus jusqu'à ce qu'il s'enclenche. 7 Close the scanner. Rabattez le scanner. 8 Press the ink button to charge ink. Caution: Don't turn off the Epson Stylus CX while the On light is flashing or you'll waste ink. Le chargement prend environ 3 ...minutes. 4 Insert the cartridges in the holder for each color. Charging takes about 3 minutes. Appuyez sur le ...


