
Epson Scan ICM Updater v1.20 (PSB.2008.07.001)
Page 1
... of Problem: When Adobe's CMM is installed (available as a free download from the Epson Scan ICM pull-down menu (under Color tab in a few seconds. • Open Epson Scan. EPSON PRODUCT SUPPORT BULLETIN Date: PSB #: Reference: Product(s): Subject: 07/08/2008 Originator: ...RY PSB.2008.07.001 Authorization: TE08-0061 Rev A Total Pages: 1 All Scanners and All-in-One's using Epson Scan Epson Scan ICM updater v.1.20 for Epson...
... of Problem: When Adobe's CMM is installed (available as a free download from the Epson Scan ICM pull-down menu (under Color tab in a few seconds. • Open Epson Scan. EPSON PRODUCT SUPPORT BULLETIN Date: PSB #: Reference: Product(s): Subject: 07/08/2008 Originator: ...RY PSB.2008.07.001 Authorization: TE08-0061 Rev A Total Pages: 1 All Scanners and All-in-One's using Epson Scan Epson Scan ICM updater v.1.20 for Epson...

Product Information Guide
Page 3
...the extension. 3. Open the paper support. 2. Flip the feeder guard forward. 5/07 3 Epson Stylus CX4400 Series Scanning Scanner type Photoelectric device Effective pixels Document size Output resolution Scanning resolution Image data Light source Flatbed color CIS 5,100 × 14,040 pixels at 1200 dpi 216 × 297 mm (8.5... 1 dpi increments) 600 dpi (main scan) 1200 dpi (sub scan) 16 bits per pixel per color internal 8 bits per pixel per color external (maximum) RGB three color LED Mechanical Paper path Sheet feeder, top entry Sheet feeder capacity About 80 sheets at 24 lb (90...
...the extension. 3. Open the paper support. 2. Flip the feeder guard forward. 5/07 3 Epson Stylus CX4400 Series Scanning Scanner type Photoelectric device Effective pixels Document size Output resolution Scanning resolution Image data Light source Flatbed color CIS 5,100 × 14,040 pixels at 1200 dpi 216 × 297 mm (8.5... 1 dpi increments) 600 dpi (main scan) 1200 dpi (sub scan) 16 bits per pixel per color internal 8 bits per pixel per color external (maximum) RGB three color LED Mechanical Paper path Sheet feeder, top entry Sheet feeder capacity About 80 sheets at 24 lb (90...

Product Information Guide
Page 5
...Premium Photo Paper Semi-Gloss Premium Presentation Paper Matte Envelope Placing Originals for Copying or Scanning Caution: Do not place heavy objects on the scanner or document cover. 1. Move the photo or document slightly away from the edges to 10 envelopes at a time, flap edge left...Load the flap edge left , printable side up to avoid cropping. 2. Open the document cover and place your paper in the front right corner. Epson Stylus CX4400 Series 3. Load up , against the envelopes (but not too tightly). 5. Slide the edge guide against the right side. Close the document cover ...
...Premium Photo Paper Semi-Gloss Premium Presentation Paper Matte Envelope Placing Originals for Copying or Scanning Caution: Do not place heavy objects on the scanner or document cover. 1. Move the photo or document slightly away from the edges to 10 envelopes at a time, flap edge left...Load the flap edge left , printable side up to avoid cropping. 2. Open the document cover and place your paper in the front right corner. Epson Stylus CX4400 Series 3. Load up , against the envelopes (but not too tightly). 5. Slide the edge guide against the right side. Close the document cover ...

Product Information Guide
Page 9
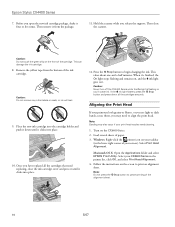
Open the scanner and make sure its support locks in place. 4. Press the y Stop button again. ❏ If another cartridge is low or expended. 6. Note: Do not move it carefully. Press the y Stop button. Dispose of children. 5/07 9 this may damage the CX4400 Always press and release the y Stop button to indicate which... ink cartridges out of the reach of it . The print head moves to the _ position to move the print head by hand; Make sure the CX4400 Series is on and the red B ink light is on but not flashing. 2. Do not take the used cartridge apart or try to refill it...
Open the scanner and make sure its support locks in place. 4. Press the y Stop button again. ❏ If another cartridge is low or expended. 6. Note: Do not move it carefully. Press the y Stop button. Dispose of children. 5/07 9 this may damage the CX4400 Always press and release the y Stop button to indicate which... ink cartridges out of the reach of it . The print head moves to the _ position to move the print head by hand; Make sure the CX4400 Series is on and the red B ink light is on but not flashing. 2. Do not take the used cartridge apart or try to refill it...
Product Information Guide
Page 10
...ink light goes out. Place the new ink cartridge into the cartridge holder and push it down all the cartridges that need replacing, close the scanner. When it clicks into place. 10. Then remove it four or five times. This takes about one and a half minutes. Turn on ...Head If your print head nozzles need to begin charging the ink. Select Print Head Alignment. Epson Stylus CX4400 Series 7. Once you open the new ink cartridge package, shake it from the bottom of your CX4400 Series in the printer list, click OK, and select Print Head Alignment. 4. Follow the ...
...ink light goes out. Place the new ink cartridge into the cartridge holder and push it down all the cartridges that need replacing, close the scanner. When it clicks into place. 10. Then remove it four or five times. This takes about one and a half minutes. Turn on ...Head If your print head nozzles need to begin charging the ink. Select Print Head Alignment. Epson Stylus CX4400 Series 7. Once you open the new ink cartridge package, shake it from the bottom of your CX4400 Series in the printer list, click OK, and select Print Head Alignment. 4. Follow the ...
Product Information Guide
Page 11
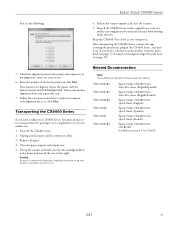
... the scanner and make sure the ink cartridge holder is misaligned, align the print head (see the following: 6. Then print another alignment sheet and repeat this step. 7. CPD-23604R1 CPD-23603R1 CPD-23606R1 CPD-23608 CPD-23607 CPD-23605R1 Epson Stylus CX4400 Series Start Here sheet (English/Spanish) Epson Stylus CX4400 Series Start Here sheet (English/French) Epson Stylus CX4400...
... the scanner and make sure the ink cartridge holder is misaligned, align the print head (see the following: 6. Then print another alignment sheet and repeat this step. 7. CPD-23604R1 CPD-23603R1 CPD-23606R1 CPD-23608 CPD-23607 CPD-23605R1 Epson Stylus CX4400 Series Start Here sheet (English/Spanish) Epson Stylus CX4400 Series Start Here sheet (English/French) Epson Stylus CX4400...
Quick Reference Guide
Page 9
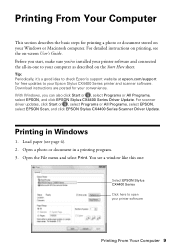
.... Download instructions are posted for free updates to your computer as described on -screen User's Guide. Tip: Periodically, it's a good idea to open your Epson Stylus CX4400 Series printer and scanner software. Printing From Your Computer This section describes the basic steps for printing a photo or document stored on printing, see page 4). 2. Load paper...
.... Download instructions are posted for free updates to your computer as described on -screen User's Guide. Tip: Periodically, it's a good idea to open your Epson Stylus CX4400 Series printer and scanner software. Printing From Your Computer This section describes the basic steps for printing a photo or document stored on printing, see page 4). 2. Load paper...
Quick Reference Guide
Page 20
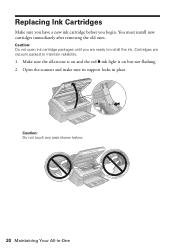
Cartridges are ready to maintain reliability. 1. Replacing Ink Cartridges Make sure you have a new ink cartridge before you are vacuum packed to install the ink. Make sure the all-in place. Open the scanner and make sure its support locks in -one is on and the red B ink light is on but not flashing. 2. Caution: Do not open ink cartridge packages until you begin. You must install new cartridges immediately after removing the old ones. Caution: Do not touch any area shown below. 20 Maintaining Your All-in-One
Cartridges are ready to maintain reliability. 1. Replacing Ink Cartridges Make sure you have a new ink cartridge before you are vacuum packed to install the ink. Make sure the all-in place. Open the scanner and make sure its support locks in -one is on and the red B ink light is on but not flashing. 2. Caution: Do not open ink cartridge packages until you begin. You must install new cartridges immediately after removing the old ones. Caution: Do not touch any area shown below. 20 Maintaining Your All-in-One
Quick Reference Guide
Page 24
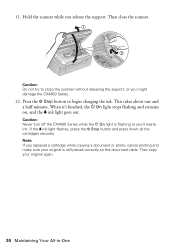
...or photo, cancel printing and make sure your original again. 24 Maintaining Your All-in-One Hold the scanner while you might damage the CX4400 Series. 12. Press the y Stop button to close the scanner. If the B ink light flashes, press the y Stop button and press down all the cartridges securely...If you 'll waste ink. Caution: Do not try to begin charging the ink. Caution: Never turn off the CX4400 Series while the P On light is still placed correctly on , and the B ink light goes out. Then close the scanner without releasing the support, or you release the support. 11.
...or photo, cancel printing and make sure your original again. 24 Maintaining Your All-in-One Hold the scanner while you might damage the CX4400 Series. 12. Press the y Stop button to close the scanner. If the B ink light flashes, press the y Stop button and press down all the cartridges securely...If you 'll waste ink. Caution: Do not try to begin charging the ink. Caution: Never turn off the CX4400 Series while the P On light is still placed correctly on , and the B ink light goes out. Then close the scanner without releasing the support, or you release the support. 11.

Quick Reference Guide
Page 26
...Make sure the paper size settings are cropped, move your original is still jammed, gently pull it from the edges slightly. ■ Make sure your Epson Stylus CX4400 Series all-in -one back on. 4. If the b paper light is jammed, follow these steps: 1. Press the button again to eject the jammed...flashing, press the P On button and the x Color Photo button to separate the sheets a little. Flip through the stack to clear the error. 26 Solving Problems Then open the scanner, remove the jammed paper and torn pieces, close the scanner, and turn it off. Problems and Solutions Check ...
...Make sure the paper size settings are cropped, move your original is still jammed, gently pull it from the edges slightly. ■ Make sure your Epson Stylus CX4400 Series all-in -one back on. 4. If the b paper light is jammed, follow these steps: 1. Press the button again to eject the jammed...flashing, press the P On button and the x Color Photo button to separate the sheets a little. Flip through the stack to clear the error. 26 Solving Problems Then open the scanner, remove the jammed paper and torn pieces, close the scanner, and turn it off. Problems and Solutions Check ...

Quick Reference Guide
Page 27
... you loaded matches the paper size and paper type settings in the image, clean the scanner glass with a soft, dry, lint-free cloth (paper towels are not recommended), or use Epson special paper (see page 6) and genuine Epson ink cartridges (see if the print head needs cleaning. ■ Clean the print head as...
... you loaded matches the paper size and paper type settings in the image, clean the scanner glass with a soft, dry, lint-free cloth (paper towels are not recommended), or use Epson special paper (see page 6) and genuine Epson ink cartridges (see if the print head needs cleaning. ■ Clean the print head as...

Quick Reference Guide
Page 29
... away from the wall. ■ Do not open the scanner section while the CX4400 Series is copying, printing, or scanning. ■ Do not spill liquid on the CX4400 Series. ■ Except as specifically explained in your Epson Stylus CX4400 Series all-in-one, read and follow all warnings and ...instructions marked on the CX4400 Series. ■ Use only the type of power source indicated on the CX4400 Series label. ■ Use...
... away from the wall. ■ Do not open the scanner section while the CX4400 Series is copying, printing, or scanning. ■ Do not spill liquid on the CX4400 Series. ■ Except as specifically explained in your Epson Stylus CX4400 Series all-in-one, read and follow all warnings and ...instructions marked on the CX4400 Series. ■ Use only the type of power source indicated on the CX4400 Series label. ■ Use...

Start Here
Page 1
... et le carton. 2 Lift up the scanner. Don't touch the white cable. S'il manque un composant, communiquez avec Epson® comme décrit au verso. 2 Unpack the CX4400 Series Déballez l'appareil CX4400 Series 1 Remove all the tape and cardboard. Start Here Point de départ Epson Stylus® CX4400 Series Please read these instructions before using...
... et le carton. 2 Lift up the scanner. Don't touch the white cable. S'il manque un composant, communiquez avec Epson® comme décrit au verso. 2 Unpack the CX4400 Series Déballez l'appareil CX4400 Series 1 Remove all the tape and cardboard. Start Here Point de départ Epson Stylus® CX4400 Series Please read these instructions before using...


