DuraBrite® Ultra Ink Technical Brief
Page 6
... and water-resistance, even on plain paper • Convenient individual ink cartridges DURABrite Ultra pigment ink is currently featured on the following Epson stand-alone printers and All-in-One printers: C88+ Printer C120...Epson Corporation. Epson DURABrite Ultra Pigment Ink Technical Brief Page 6 Other product names used herein are for the latest information on glossy papers. Epson, Epson Stylus, Epson UltraChrome Hi-Gloss, and PictureMate are registered trademarks and Epson Exceed Your Vision, Claria, and Epson UltraChrome K3 are registered trademarks of Epson America, Inc. Epson...
... and water-resistance, even on plain paper • Convenient individual ink cartridges DURABrite Ultra pigment ink is currently featured on the following Epson stand-alone printers and All-in-One printers: C88+ Printer C120...Epson Corporation. Epson DURABrite Ultra Pigment Ink Technical Brief Page 6 Other product names used herein are for the latest information on glossy papers. Epson, Epson Stylus, Epson UltraChrome Hi-Gloss, and PictureMate are registered trademarks and Epson Exceed Your Vision, Claria, and Epson UltraChrome K3 are registered trademarks of Epson America, Inc. Epson...
Product Information Guide
Page 1
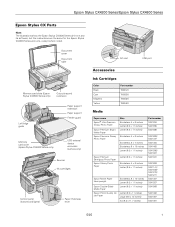
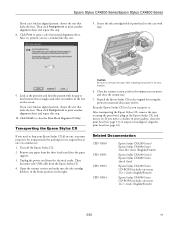
...support Feeder guard Memory card cover (Epson Stylus CX4800 Series only) USB external device connector (camera only) Scanner Ink cartridges Control panel (buttons and lights) Paper thickness lever AC inlet USB port Accessories Ink Cartridges Color Black Cyan Magenta Yellow Part number ...S041809 S041141/ S041649/ S041272/ S041271 S041467 S041257 S041568 S041062 S041067 S041061 5/05 1 Epson Stylus CX4200 Series/Epson Stylus CX4800 Series Epson Stylus CX Parts Note: The illustrations show the Epson Stylus CX4800 Series all-in-one and its software, but the instructions are the same ...
...support Feeder guard Memory card cover (Epson Stylus CX4800 Series only) USB external device connector (camera only) Scanner Ink cartridges Control panel (buttons and lights) Paper thickness lever AC inlet USB port Accessories Ink Cartridges Color Black Cyan Magenta Yellow Part number ...S041809 S041141/ S041649/ S041272/ S041271 S041467 S041257 S041568 S041062 S041067 S041061 5/05 1 Epson Stylus CX4200 Series/Epson Stylus CX4800 Series Epson Stylus CX Parts Note: The illustrations show the Epson Stylus CX4800 Series all-in-one and its software, but the instructions are the same ...
Product Information Guide
Page 2
... before purchasing large quantities or printing large jobs. Epson Stylus CX4200 Series/Epson Stylus CX4800 Series Specifications Printing Printing method On-demand ink jet Nozzle configuration Black: 90 nozzles Color: 270 nozzles (90 each cartridge: cyan, magenta, yellow) Print direction Bidirectional with the flap side down. 2 5/05 Do not use genuine Epson ink cartridges and do not refill them. Before printing...
... before purchasing large quantities or printing large jobs. Epson Stylus CX4200 Series/Epson Stylus CX4800 Series Specifications Printing Printing method On-demand ink jet Nozzle configuration Black: 90 nozzles Color: 270 nozzles (90 each cartridge: cyan, magenta, yellow) Print direction Bidirectional with the flap side down. 2 5/05 Do not use genuine Epson ink cartridges and do not refill them. Before printing...
Product Information Guide
Page 3
Epson Stylus CX4200 Series/Epson Stylus CX4800 Series Scanning Scanner type Photoelectric device Effective pixels Document size Scanning resolution Output resolution Scanning speed Image data Interface Light source Flatbed color CIS 10,200 × 14,040 pixels at 1200 ...color LED Mechanical Paper path Sheet feeder, top entry Sheet feeder capacity About 120 sheets at 24 lb (90 g/m²) Dimensions Width: 16.9 inches (430 mm) Depth: 13.9 inches (354 mm) Height: 7.1 inches (181 mm) (without the rubber feet or the paper support extended) Weight 15 lb (6.8 kg) without the ink cartridges...
Epson Stylus CX4200 Series/Epson Stylus CX4800 Series Scanning Scanner type Photoelectric device Effective pixels Document size Scanning resolution Output resolution Scanning speed Image data Interface Light source Flatbed color CIS 10,200 × 14,040 pixels at 1200 ...color LED Mechanical Paper path Sheet feeder, top entry Sheet feeder capacity About 120 sheets at 24 lb (90 g/m²) Dimensions Width: 16.9 inches (430 mm) Depth: 13.9 inches (354 mm) Height: 7.1 inches (181 mm) (without the rubber feet or the paper support extended) Weight 15 lb (6.8 kg) without the ink cartridges...
Product Information Guide
Page 13
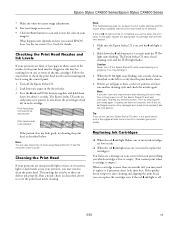
...four or five times, turn off . 5/05 13 Epson Stylus CX4200 Series/Epson Stylus CX4800 Series 7. Turn off the Epson Stylus CX and wait overnight. Press the B ink and P On buttons together and hold them , some of the ink cartridges may be running low in each cartridge: Print head does not need to be old or ...ink cartridges are faint, run a nozzle check (as described to the left in one or more of ink left ) to be cleaned. You'll also see a message on , you may need to be cleaned yet: Print head needs to verify that the print head needs to scan and restore the color...
...four or five times, turn off . 5/05 13 Epson Stylus CX4200 Series/Epson Stylus CX4800 Series 7. Turn off the Epson Stylus CX and wait overnight. Press the B ink and P On buttons together and hold them , some of the ink cartridges may be running low in each cartridge: Print head does not need to be old or ...ink cartridges are faint, run a nozzle check (as described to the left in one or more of ink left ) to be cleaned. You'll also see a message on , you may need to be cleaned yet: Print head needs to verify that the print head needs to scan and restore the color...
Product Information Guide
Page 14
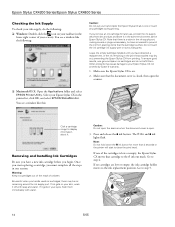
.... Go to step 5. 14 5/05 Epson Stylus CX4200 Series/Epson Stylus CX4800 Series Checking the Ink Supply To check your ink supply, do not refill them immediately with soap and water. Once you start to the _ ink out mark. there may cause damage to display information about it in -one or touch any cartridges during printing. Make sure that...
.... Go to step 5. 14 5/05 Epson Stylus CX4200 Series/Epson Stylus CX4800 Series Checking the Ink Supply To check your ink supply, do not refill them immediately with soap and water. Once you start to the _ ink out mark. there may cause damage to display information about it in -one or touch any cartridges during printing. Make sure that...
Product Information Guide
Page 15
.... Dispose of the cartridge. Place the new ink cartridge into the cartridge holder and push it down until it clicks into place. If ink gets into place. 6. This can damage the ink cartridge. 5. Close the ink cartridge cover and press it until it clicks into your hands, wash them immediately with soap and water. Epson Stylus CX4200 Series/Epson Stylus CX4800 Series Caution: Do...
.... Dispose of the cartridge. Place the new ink cartridge into the cartridge holder and push it down until it clicks into place. If ink gets into place. 6. This can damage the ink cartridge. 5. Close the ink cartridge cover and press it until it clicks into your hands, wash them immediately with soap and water. Epson Stylus CX4200 Series/Epson Stylus CX4800 Series Caution: Do...

Product Information Guide
Page 16
... an aligned pattern, choose the one minute. Press the B ink button again and reinstall the ink cartridge until it 's finished, the P On light stops flashing and remains on the screen and click Next. After it's printed, you see a window like this step. 6. Epson Stylus CX4200 Series/Epson Stylus CX4800 Series 11. Enter the number for that 's closest to...
... an aligned pattern, choose the one minute. Press the B ink button again and reinstall the ink cartridge until it 's finished, the P On light stops flashing and remains on the screen and click Next. After it's printed, you see a window like this step. 6. Epson Stylus CX4200 Series/Epson Stylus CX4800 Series 11. Enter the number for that 's closest to...
Product Information Guide
Page 17
...repeat this step. 8. Turn off the Epson Stylus CX. 2. Open the scanner section and make sure the ink cartridge holder is misaligned, align the print head (see page 16). Repack the Epson Stylus CX in the original box using the protective...color horizontal alignment sheet. Then click Realignment to print another alignment sheet and repeat this step. 10. Related Documentation CPD-19830 CPD-19831 CPD-19833 CPD-19834 Epson Stylus CX4200 Series/ Epson Stylus CX4800 Series Start Here sheet (English/French) Epson Stylus CX4200 Series/ Epson Stylus CX4800 Series Quick Guide Epson Stylus CX4200...
...repeat this step. 8. Turn off the Epson Stylus CX. 2. Open the scanner section and make sure the ink cartridge holder is misaligned, align the print head (see page 16). Repack the Epson Stylus CX in the original box using the protective...color horizontal alignment sheet. Then click Realignment to print another alignment sheet and repeat this step. 10. Related Documentation CPD-19830 CPD-19831 CPD-19833 CPD-19834 Epson Stylus CX4200 Series/ Epson Stylus CX4800 Series Start Here sheet (English/French) Epson Stylus CX4200 Series/ Epson Stylus CX4800 Series Quick Guide Epson Stylus CX4200...
Quick Reference Guide
Page 2
...Loading Paper 4 Copying a Photo or Document 6 Placing the Original on the Glass 6 Copying 8 Printing From a Memory Card (Epson Stylus CX4800 Series Only 11 Compatible Cards and Image Formats 12 Inserting the Card 13 Printing an Index Sheet to Select Photos 14 Printing ... Papers 25 Scanning a Photo or Document 26 Basic Scanning 26 Restoring Color in Faded Photos 28 Maintaining Your Epson Stylus CX All-in-One 29 Checking the Print Head Nozzles and Ink 29 Cleaning the Print Head 30 Replacing Ink Cartridges 31 Solving Problems 36 Error Indicators 36 Problems and Solutions 38 Where...
...Loading Paper 4 Copying a Photo or Document 6 Placing the Original on the Glass 6 Copying 8 Printing From a Memory Card (Epson Stylus CX4800 Series Only 11 Compatible Cards and Image Formats 12 Inserting the Card 13 Printing an Index Sheet to Select Photos 14 Printing ... Papers 25 Scanning a Photo or Document 26 Basic Scanning 26 Restoring Color in Faded Photos 28 Maintaining Your Epson Stylus CX All-in-One 29 Checking the Print Head Nozzles and Ink 29 Cleaning the Print Head 30 Replacing Ink Cartridges 31 Solving Problems 36 Error Indicators 36 Problems and Solutions 38 Where...

Quick Reference Guide
Page 29
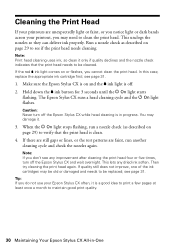
... head as described on the next page. The Epson Stylus CX turns on -screen User's Guide. Follow the steps below ) ■ "Cleaning the Print Head" on page 30 ■ "Replacing Ink Cartridges" on page 31 Checking the Print Head Nozzles and Ink If your printouts are faint or have gaps in... them down for about 3 seconds. Maintaining Your Epson Stylus CX All-in the sheet feeder. 3. Maintaining Your Epson Stylus CX All-in-One If you notice a ...
... head as described on the next page. The Epson Stylus CX turns on -screen User's Guide. Follow the steps below ) ■ "Cleaning the Print Head" on page 30 ■ "Replacing Ink Cartridges" on page 31 Checking the Print Head Nozzles and Ink If your printouts are faint or have gaps in... them down for about 3 seconds. Maintaining Your Epson Stylus CX All-in the sheet feeder. 3. Maintaining Your Epson Stylus CX All-in-One If you notice a ...
Quick Reference Guide
Page 30
...print head again. Make sure the Epson Stylus CX is clean. 4. Hold down the B ink button for 3 seconds until the P On light starts flashing. If quality still does not improve, one of the ink cartridges may damage it. 3. In this case, replace the appropriate ink cartridge first; If there are still ...gaps or lines, or the test patterns are unexpectedly light or faint, or you notice light or dark bands across your Epson Stylus CX often, it is in...
...print head again. Make sure the Epson Stylus CX is clean. 4. Hold down the B ink button for 3 seconds until the P On light starts flashing. If quality still does not improve, one of the ink cartridges may damage it. 3. In this case, replace the appropriate ink cartridge first; If there are still ...gaps or lines, or the test patterns are unexpectedly light or faint, or you notice light or dark bands across your Epson Stylus CX often, it is in...
Quick Reference Guide
Page 31
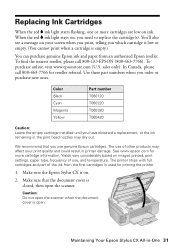
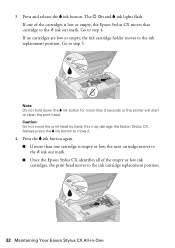
...Use these part numbers when you need to replace the cartridge(s). Color Black Cyan Magenta Yellow Part number T060120 T060220 T060320 T060420 Caution: Leave the empty cartridge installed until you have obtained a replacement, or the ink remaining in the print head nozzles may affect your ...-7766 for more cartridges are low on . 2. We recommend that the document cover is open the scanner. Maintaining Your Epson Stylus CX All-in printer damage. Replacing Ink Cartridges When the red B ink light starts flashing, one or more cartridge information. See www.epson.com for reseller ...
...Use these part numbers when you need to replace the cartridge(s). Color Black Cyan Magenta Yellow Part number T060120 T060220 T060320 T060420 Caution: Leave the empty cartridge installed until you have obtained a replacement, or the ink remaining in the print head nozzles may affect your ...-7766 for more cartridges are low on . 2. We recommend that the document cover is open the scanner. Maintaining Your Epson Stylus CX All-in printer damage. Replacing Ink Cartridges When the red B ink light starts flashing, one or more cartridge information. See www.epson.com for reseller ...
Quick Reference Guide
Page 32
... empty or low, the next cartridge moves to the _ ink out mark. ■ Once the Epson Stylus CX identifies all of the empty or low ink cartridges, the print head moves to the ink replacement position. Press and release the B ink button. If one cartridge is low or empty, the Epson Stylus CX moves that cartridge to move the print head by...
... empty or low, the next cartridge moves to the _ ink out mark. ■ Once the Epson Stylus CX identifies all of the empty or low ink cartridges, the print head moves to the ink replacement position. Press and release the B ink button. If one cartridge is low or empty, the Epson Stylus CX moves that cartridge to move the print head by...
Quick Reference Guide
Page 33
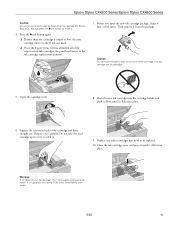
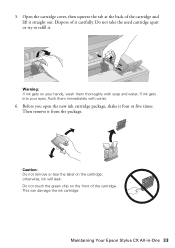
...Epson Stylus CX All-in-One 33 otherwise, ink will leak. Warning: If ink gets on the cartridge; Dispose of it . If ink gets into your hands, wash them immediately with soap and water. Do not touch the green chip on the front of the cartridge and lift it straight out. Before you open the new ink cartridge... package, shake it from the package. This can damage the ink cartridge. 5. Then remove it four or five times. Open the cartridge cover, then squeeze the tab at ...
...Epson Stylus CX All-in-One 33 otherwise, ink will leak. Warning: If ink gets on the cartridge; Dispose of it . If ink gets into your hands, wash them immediately with soap and water. Do not touch the green chip on the front of the cartridge and lift it straight out. Before you open the new ink cartridge... package, shake it from the package. This can damage the ink cartridge. 5. Then remove it four or five times. Open the cartridge cover, then squeeze the tab at ...
Quick Reference Guide
Page 34
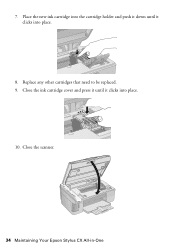
Place the new ink cartridge into the cartridge holder and push it down until it clicks into place. 10. 7. Close the scanner. 34 Maintaining Your Epson Stylus CX All-in-One Close the ink cartridge cover and press it until it clicks into place. 8. Replace any other cartridges that need to be replaced. 9.
Place the new ink cartridge into the cartridge holder and push it down until it clicks into place. 10. 7. Close the scanner. 34 Maintaining Your Epson Stylus CX All-in-One Close the ink cartridge cover and press it until it clicks into place. 8. Replace any other cartridges that need to be replaced. 9.
Quick Reference Guide
Page 35
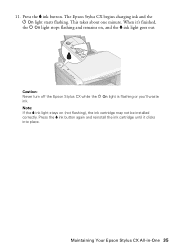
Maintaining Your Epson Stylus CX All-in-One 35 The Epson Stylus CX begins charging ink and the P On light starts flashing. Press the B ink button. This takes about one minute. Note: If the B ink light stays on , and the B ink light goes out. Caution: Never turn off the Epson Stylus CX while the P On light is flashing or you'll waste ink. When it clicks into place. Press the B ink button again and reinstall the ink cartridge until it 's finished, the P On light stops flashing and remains on (not flashing), the ink cartridge may not be installed correctly. 11.
Maintaining Your Epson Stylus CX All-in-One 35 The Epson Stylus CX begins charging ink and the P On light starts flashing. Press the B ink button. This takes about one minute. Note: If the B ink light stays on , and the B ink light goes out. Caution: Never turn off the Epson Stylus CX while the P On light is flashing or you'll waste ink. When it clicks into place. Press the B ink button again and reinstall the ink cartridge until it 's finished, the P On light stops flashing and remains on (not flashing), the ink cartridge may not be installed correctly. 11.
Quick Reference Guide
Page 36
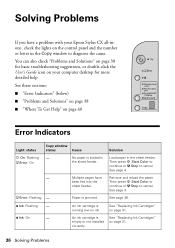
...problem with your Epson Stylus CX all-inone, check the lights on your computer desktop for basic troubleshooting suggestions, or double-click the User's Guide icon on the control panel and the number or letter in the Copy window to diagnose the cause. b Error: Flashing - An ink cartridge is loaded ...in the sheet feeder. See "Replacing Ink Cartridges" on page 31. Then press x Start Color to continue or y Stop to sheet feeder. See page 4. - been fed into the Then press x...
...problem with your Epson Stylus CX all-inone, check the lights on your computer desktop for basic troubleshooting suggestions, or double-click the User's Guide icon on the control panel and the number or letter in the Copy window to diagnose the cause. b Error: Flashing - An ink cartridge is loaded ...in the sheet feeder. See "Replacing Ink Cartridges" on page 31. Then press x Start Color to continue or y Stop to sheet feeder. See page 4. - been fed into the Then press x...
Quick Reference Guide
Page 39
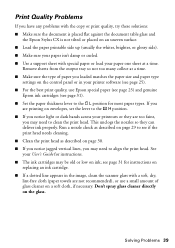
...sure the type of glass cleaner on a soft cloth, if necessary. This unclogs the nozzles so they are not recommended), or use Epson special paper (see page 25) and genuine Epson ink cartridges (see page 31). ■ Set the paper thickness lever to the m L position for most paper types. Run a nozzle ...Epson Stylus CX is not tilted or placed on page 30. ■ If you notice jagged vertical lines, you may need to clean the print head. see if the print head needs cleaning. ■ Clean the print head as described on page 29 to see page 31 for instructions. ■ The ink cartridges...
...sure the type of glass cleaner on a soft cloth, if necessary. This unclogs the nozzles so they are not recommended), or use Epson special paper (see page 25) and genuine Epson ink cartridges (see page 31). ■ Set the paper thickness lever to the m L position for most paper types. Run a nozzle ...Epson Stylus CX is not tilted or placed on page 30. ■ If you notice jagged vertical lines, you may need to clean the print head. see if the print head needs cleaning. ■ Clean the print head as described on page 29 to see page 31 for instructions. ■ The ink cartridges...

Quick Reference Guide
Page 42
... plugs unnecessary, but care is damaged; Ink Cartridge Safety Instructions ■ Keep ink cartridges out of the reach of according to prevent the ink from staining items that the cartridge touches. there may leak from the cartridge. ■ The lamp in the same environment as the Epson Stylus CX. Do not touch the ink cartridge ink supply port or surrounding area. 42...
... plugs unnecessary, but care is damaged; Ink Cartridge Safety Instructions ■ Keep ink cartridges out of the reach of according to prevent the ink from staining items that the cartridge touches. there may leak from the cartridge. ■ The lamp in the same environment as the Epson Stylus CX. Do not touch the ink cartridge ink supply port or surrounding area. 42...


