
Warranty Statement
Page 1
... serial number has been removed. 8) Any damage caused by using improper packaging materials or improper packaging and shipping. 9) Any damage caused by misuse, abuse (for a material breach of this Agreement will , at http://www.epson.com/cgi-bin/Store/jsp/pos/support.do not allow limits on Epson's tested media list. (Epson's list of media tested for use Epson standard configurations with factory-set switches, jumpers and operating systems. Customer data and...
... serial number has been removed. 8) Any damage caused by using improper packaging materials or improper packaging and shipping. 9) Any damage caused by misuse, abuse (for a material breach of this Agreement will , at http://www.epson.com/cgi-bin/Store/jsp/pos/support.do not allow limits on Epson's tested media list. (Epson's list of media tested for use Epson standard configurations with factory-set switches, jumpers and operating systems. Customer data and...
Setup Guide
Page 4
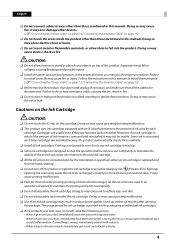
... this manual. Opening the cover may fall into your eyes, immediately flush them to maintain the printing and print head quality. ❏ Do not disassemble the ink cartridge. Doing so may also damage other devices. (U "Connecting the Power Cable" on page 12, "Connecting the Interface Cable" on the packaging of ink used by each time cartridges are installed because the product automatically checks their reliability. ❏ Install all the ink colors are removed and...
... this manual. Opening the cover may fall into your eyes, immediately flush them to maintain the printing and print head quality. ❏ Do not disassemble the ink cartridge. Doing so may also damage other devices. (U "Connecting the Power Cable" on page 12, "Connecting the Interface Cable" on the packaging of ink used by each time cartridges are installed because the product automatically checks their reliability. ❏ Install all the ink colors are removed and...
Setup Guide
Page 7
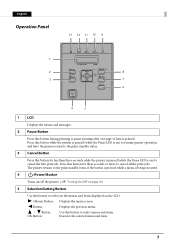
.... 4 (Power) Button Turns on/off the printer. (U "Turning On/Off" on page 10) 5 Selection/Setting Button Use this button to select/set the menus and items displayed on ) to cancel the first print job. Button: OK Button: Use this button while the printer is paused (while the Pause LED is printed. Button: Displays the previous menu. English Operation Panel 1 2 3 13 12 11 10 9 Status Pause Paper Ink K CM Y M/B Pause Back Feed 8 Menu Cancel OK Feed 7 Cut 6 4 5 1 LCD Displays the menus and messages. 2 Pause Button...
.... 4 (Power) Button Turns on/off the printer. (U "Turning On/Off" on page 10) 5 Selection/Setting Button Use this button to select/set the menus and items displayed on ) to cancel the first print job. Button: OK Button: Use this button while the printer is paused (while the Pause LED is printed. Button: Displays the previous menu. English Operation Panel 1 2 3 13 12 11 10 9 Status Pause Paper Ink K CM Y M/B Pause Back Feed 8 Menu Cancel OK Feed 7 Cut 6 4 5 1 LCD Displays the menus and messages. 2 Pause Button...
Setup Guide
Page 25
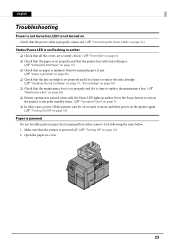
... Side" on page 6) ❏ Check that the paper is set cover. 25 Remove jammed paper, if any. (U "Paper is jammed" on page 25) ❏ Check that the ink cartridge is set properly and if it by following the steps below. 1. Press the Pause button to restore the printer to replace the ink cartridge. (U "Installing the Ink Cartridge" on page 13, "Ink cartridge" on page 30) ❏ Check that the printer is jammed but rather remove it is time to the print standby status. (U "Operation Panel" on page 7) ❏...
... Side" on page 6) ❏ Check that the paper is set cover. 25 Remove jammed paper, if any. (U "Paper is jammed" on page 25) ❏ Check that the ink cartridge is set properly and if it by following the steps below. 1. Press the Pause button to restore the printer to replace the ink cartridge. (U "Installing the Ink Cartridge" on page 13, "Ink cartridge" on page 30) ❏ Check that the printer is jammed but rather remove it is time to the print standby status. (U "Operation Panel" on page 7) ❏...

Technical Reference Guide
Page 3
... vibration from installation until printing, information regarding maintenance, and solutions to various kinds of trouble. For Safety This document explains the functions of and how to operate this product using Install Navi. WARNING Handling the product improperly by their level of importance, as specified in this manual when lifting up this manual. ("Location Appropriate for Installation" on page 38) While installing the printer, make sure that...
... vibration from installation until printing, information regarding maintenance, and solutions to various kinds of trouble. For Safety This document explains the functions of and how to operate this product using Install Navi. WARNING Handling the product improperly by their level of importance, as specified in this manual when lifting up this manual. ("Location Appropriate for Installation" on page 38) While installing the printer, make sure that...
Technical Reference Guide
Page 5
...Epson service center for advice. Never disassemble or repair this product. Doing so may cause fire. Do not connect cables in this product. Equipment may cause electric shock. Therefore, protect the printer with a cover or similar, or remove the paper and store it may fall into this manual... certification and has a power supply system (PE) terminal. otherwise it in a dust-free place. Do not allow anyone to leak. Using in a mechanical switch and a DC motor etc. Failure to install correctly may damage a cable, causing electric shock or...
...Epson service center for advice. Never disassemble or repair this product. Doing so may cause fire. Do not connect cables in this product. Equipment may cause electric shock. Therefore, protect the printer with a cover or similar, or remove the paper and store it may fall into this manual... certification and has a power supply system (PE) terminal. otherwise it in a dust-free place. Do not allow anyone to leak. Using in a mechanical switch and a DC motor etc. Failure to install correctly may damage a cable, causing electric shock or...
Technical Reference Guide
Page 6
... to maintain the printing and print head quality. Do not disassemble the ink cartridges or Maintenance box, or supply or replace ink. Also, it up within six months after washing it. There may not come off the product or open or close the Roll paper cover, Ink cartridge cover, or Maintenance box cover, or turn off the power. Do not turn off even after opening the package...
... to maintain the printing and print head quality. Do not disassemble the ink cartridges or Maintenance box, or supply or replace ink. Also, it up within six months after washing it. There may not come off the product or open or close the Roll paper cover, Ink cartridge cover, or Maintenance box cover, or turn off the power. Do not turn off even after opening the package...
Technical Reference Guide
Page 11
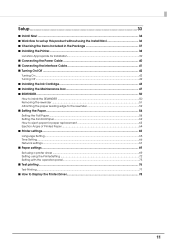
... to install the REWINDER ...50 Removing the rewinder ...51 Attaching the paper leading edge to the rewinder 52 ■ Setting the Paper ...54 Setting the Roll Paper...54 Setting the Fanfold Paper...62 How to eject paper for paper replacement 63 Ejection Angle of Printed Paper ...64 ■ Printer settings...65 Language Setting...65 Time Setting ...66 Network settings ...67 ■ Paper settings ...69 Set using a printer driver ...69 Setting using the PrinterSetting ...72 Setting with the operation panel...75 ■ Test printing ...76 Test Printing...77...
... to install the REWINDER ...50 Removing the rewinder ...51 Attaching the paper leading edge to the rewinder 52 ■ Setting the Paper ...54 Setting the Roll Paper...54 Setting the Fanfold Paper...62 How to eject paper for paper replacement 63 Ejection Angle of Printed Paper ...64 ■ Printer settings...65 Language Setting...65 Time Setting ...66 Network settings ...67 ■ Paper settings ...69 Set using a printer driver ...69 Setting using the PrinterSetting ...72 Setting with the operation panel...75 ■ Test printing ...76 Test Printing...77...
Technical Reference Guide
Page 16
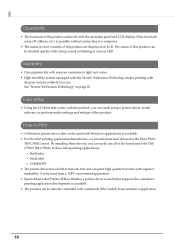
... be directly controlled with commands (ESC/Label) from customer's application. 16 Reliability • Uses pigment ink with superior resistance to light and water. • High reliability system equipped with the Nozzle Verification Technology makes printing with dropout nozzles unlikely to a computer. • The status or error contents of the TMC7500/TM-C7500G in these drivers, you can easily setup a printer driver, install software, or perform media settings and settings...
... be directly controlled with commands (ESC/Label) from customer's application. 16 Reliability • Uses pigment ink with superior resistance to light and water. • High reliability system equipped with the Nozzle Verification Technology makes printing with dropout nozzles unlikely to a computer. • The status or error contents of the TMC7500/TM-C7500G in these drivers, you can easily setup a printer driver, install software, or perform media settings and settings...
Technical Reference Guide
Page 17
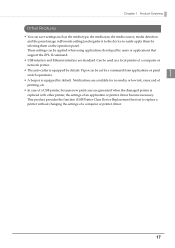
... media or low ink, error, end of printing, etc. • In case of a USB printer, because new print cues are standard. Chapter 1 Product Overview Other Features • You can save settings such as a local printer of a computer or network printer. • The auto-cutter is equipped by default. Paper can be cut by default. Can be used as the media type, the media size, the media source, media detection and the preset image in [Favorite setting...
... media or low ink, error, end of printing, etc. • In case of a USB printer, because new print cues are standard. Chapter 1 Product Overview Other Features • You can save settings such as a local printer of a computer or network printer. • The auto-cutter is equipped by default. Paper can be cut by default. Can be used as the media type, the media size, the media source, media detection and the preset image in [Favorite setting...
Technical Reference Guide
Page 29
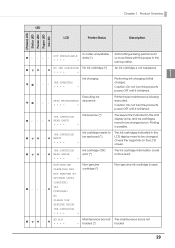
... not turn this product's power OFF until it is low and ink cartridges need to be changed . NON-GENUINE Non-genuine CARTRIDGE MAY cartridge (*) NOT PERFORM AT OPTIMUM LEVEL CONTINUE? Executing ink HEAD MAINTENANCE sequence * Printer head maintenance is being performed 2 or more times with the paper in the LCD display is finished. Check the target ink on the LCD screen. ● ▼● - NO PLEASE USE GENUINE EPSON INK CARTRIDGE * * * * * Non-genuine ink cartridge is not * loaded (*) loaded...
... not turn this product's power OFF until it is low and ink cartridges need to be changed . NON-GENUINE Non-genuine CARTRIDGE MAY cartridge (*) NOT PERFORM AT OPTIMUM LEVEL CONTINUE? Executing ink HEAD MAINTENANCE sequence * Printer head maintenance is being performed 2 or more times with the paper in the LCD display is finished. Check the target ink on the LCD screen. ● ▼● - NO PLEASE USE GENUINE EPSON INK CARTRIDGE * * * * * Non-genuine ink cartridge is not * loaded (*) loaded...
Technical Reference Guide
Page 36
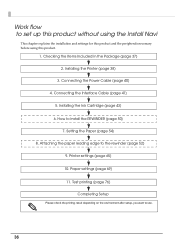
... install the REWINDER (page 50) 7. Installing the Printer (page 38) 3. How to set up this product without using the Install Navi This chapter explains the installation and settings for this product and the peripherals necessary before using this product. 1. Connecting the Interface Cable (page 41) 5. Attaching the paper leading edge to use. 36 Connecting the Power Cable (page 40) 4. Installing the Ink Cartridge (page 43) 6. Paper settings (page 69) 11. Setting the Paper (page 54) 8. Printer settings (page 65) 10. Test printing (page 76) Completing Setup Please check...
... install the REWINDER (page 50) 7. Installing the Printer (page 38) 3. How to set up this product without using the Install Navi This chapter explains the installation and settings for this product and the peripherals necessary before using this product. 1. Connecting the Interface Cable (page 41) 5. Attaching the paper leading edge to use. 36 Connecting the Power Cable (page 40) 4. Installing the Ink Cartridge (page 43) 6. Paper settings (page 69) 11. Setting the Paper (page 54) 8. Printer settings (page 65) 10. Test printing (page 76) Completing Setup Please check...
Technical Reference Guide
Page 117
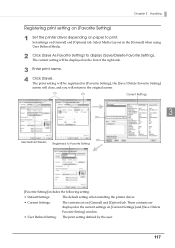
... Registering print setting on [Favorite Setting] 1 Set the printer driver depending on paper to display [Save/Delete Favorite Setting]. The current setting will be registered in [Favorite Setting], the [Save/Delete Favorite Setting] screen will close, and you will be displayed on the List of the right side. 3 Enter print name. 4 Click [Save]. These contents are displayed in the [General] when using User Defined Media. 2 Click [Save As Favorite Setting] to print. Set settings...
... Registering print setting on [Favorite Setting] 1 Set the printer driver depending on paper to display [Save/Delete Favorite Setting]. The current setting will be registered in [Favorite Setting], the [Save/Delete Favorite Setting] screen will close, and you will be displayed on the List of the right side. 3 Enter print name. 4 Click [Save]. These contents are displayed in the [General] when using User Defined Media. 2 Click [Save As Favorite Setting] to print. Set settings...
Technical Reference Guide
Page 133
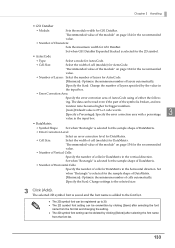
... error correction area of AztecCode using of the symbol is broken, and res- The data can be registered up to the selected size. 3 Click [Add]. toration ratio becomes higher for bigger numbers. [Auto]:Default value is 23%+3 code words. [Specify a Percentage]: Specify the error correction area with a percentage 3 value in the input box. • DataMatrix Symbol Shape: Set...
... error correction area of AztecCode using of the symbol is broken, and res- The data can be registered up to the selected size. 3 Click [Add]. toration ratio becomes higher for bigger numbers. [Auto]:Default value is 23%+3 code words. [Specify a Percentage]: Specify the error correction area with a percentage 3 value in the input box. • DataMatrix Symbol Shape: Set...
Technical Reference Guide
Page 149
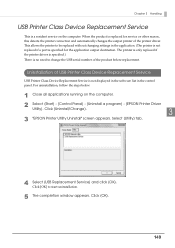
... reason, this detects the printer connection and automatically changes the output printer of the printer driver. This allows the printer to be replaced without changing settings in the control panel. Click [Uninstall/Change]. 3 3 "EPSON Printer Utility Uninstall" screen appears. Click [OK] to change the USB serial number of USB Printer Class Device Replacement Service USB Printer Class Device Replacement Service is not displayed in the software list in the application. (The printer is not replaced if a port is no need to start uninstallation. 5 The...
... reason, this detects the printer connection and automatically changes the output printer of the printer driver. This allows the printer to be replaced without changing settings in the control panel. Click [Uninstall/Change]. 3 3 "EPSON Printer Utility Uninstall" screen appears. Click [OK] to change the USB serial number of USB Printer Class Device Replacement Service USB Printer Class Device Replacement Service is not displayed in the software list in the application. (The printer is not replaced if a port is no need to start uninstallation. 5 The...
Technical Reference Guide
Page 157
... printer is different from the specified media type on page 215. Open the paper set cover. If there is any remaining paper. 3. Set a roll paper. 5. For instructions on how to change the settings for "Media position detection settings" to "Media detector and paper path settings when using the [Favorite setting] function on the operation panel, select the media that is compatible with the media type configured in [Favorite setting] on the operation panel or select the settings that is suitable for the loaded paper...
... printer is different from the specified media type on page 215. Open the paper set cover. If there is any remaining paper. 3. Set a roll paper. 5. For instructions on how to change the settings for "Media position detection settings" to "Media detector and paper path settings when using the [Favorite setting] function on the operation panel, select the media that is compatible with the media type configured in [Favorite setting] on the operation panel or select the settings that is suitable for the loaded paper...

Technical Reference Guide
Page 158
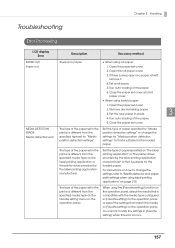
... printing If any paper remains in place. LCD display Error MEDIA SIZE ERROR L Media size error MEDIA SIZE ERROR W Media size error PAPER JAM ERR ## (##: D1 to D5, DC, 11 to 15, 21 to 25, 51, 61) Paper jam error PAPER OUT ERROR Paper out error PAPER PATH ERROR Paper path error Description Recovery method The paper size is inappropriate for the print area. (Paper feed direction) Set the paper whose size matches the print area or change the print area to that suitable for the loaded paper. The paper size is jammed inside printer...
... printing If any paper remains in place. LCD display Error MEDIA SIZE ERROR L Media size error MEDIA SIZE ERROR W Media size error PAPER JAM ERR ## (##: D1 to D5, DC, 11 to 15, 21 to 25, 51, 61) Paper jam error PAPER OUT ERROR Paper out error PAPER PATH ERROR Paper path error Description Recovery method The paper size is inappropriate for the print area. (Paper feed direction) Set the paper whose size matches the print area or change the print area to that suitable for the loaded paper. The paper size is jammed inside printer...

Technical Reference Guide
Page 175
... the USB ID Setting the IP Address Use EpsonNet Config or the panel switch and set the monochrome print mode, preset images will be color. Ethernet Interface Connect this product to the network. Connect this product to a computer used for settings via a USB cable. Chapter 4 Application Development Information Changing Printer Settings and Replacing the Printer When replacing from the printer using ZPL II commands without changing the installed applications and drivers, you printed a color background onto a pre-printed label paper in monochrome, perform settings using the...
... the USB ID Setting the IP Address Use EpsonNet Config or the panel switch and set the monochrome print mode, preset images will be color. Ethernet Interface Connect this product to the network. Connect this product to a computer used for settings via a USB cable. Chapter 4 Application Development Information Changing Printer Settings and Replacing the Printer When replacing from the printer using ZPL II commands without changing the installed applications and drivers, you printed a color background onto a pre-printed label paper in monochrome, perform settings using the...
Technical Reference Guide
Page 178
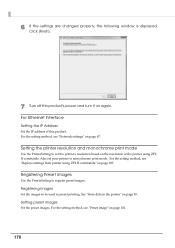
... settings are changed properly, the following window is displayed. Setting the printer resolution and monochrome print mode Use the PrinterSetting to set your printer to monochrome print mode. Also set the printer's resolution based on page 99. For the setting method, see "Replace settings from printer using ZPL II commands. Setting preset images Set the preset images. For the setting method, see "Network settings" on again. For the setting method, see "Preset image" on page 107. Registering images Set the images to register preset images...
... settings are changed properly, the following window is displayed. Setting the printer resolution and monochrome print mode Use the PrinterSetting to set your printer to monochrome print mode. Also set the printer's resolution based on page 99. For the setting method, see "Replace settings from printer using ZPL II commands. Setting preset images Set the preset images. For the setting method, see "Network settings" on again. For the setting method, see "Preset image" on page 107. Registering images Set the images to register preset images...
Technical Reference Guide
Page 180
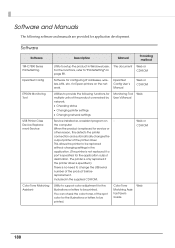
...; Checking status Changing printer settings Changing network settings Monitoring Tool Web User's Manual USB Printer Class Device Replacement Service Service installed as a resident program on the computer When the product is no need to be printed. For the functions, refer to be replaced without changing settings in the application. (The printer is not replaced if a port is specified for Epson printers on page 89. for the application output destination. You can check the color tones of the printer driver...
...; Checking status Changing printer settings Changing network settings Monitoring Tool Web User's Manual USB Printer Class Device Replacement Service Service installed as a resident program on the computer When the product is no need to be printed. For the functions, refer to be replaced without changing settings in the application. (The printer is not replaced if a port is specified for Epson printers on page 89. for the application output destination. You can check the color tones of the printer driver...


