
User Manual
Page 4
...prints the last few things you should know about printing on the first page. See Chapter 1 for paper that it normally asks you what printer you print your program doesn't have a lines-per page. Set your application program. When you are using single sheets or continuous paper. ...Note: To find the right lines-per-page setting for the right printer to choose. 2. This is not 8½ X 11, create a test document using your top and bottom margins to 0 and then create a...
...prints the last few things you should know about printing on the first page. See Chapter 1 for paper that it normally asks you what printer you print your program doesn't have a lines-per page. Set your application program. When you are using single sheets or continuous paper. ...Note: To find the right lines-per-page setting for the right printer to choose. 2. This is not 8½ X 11, create a test document using your top and bottom margins to 0 and then create a...
User Manual
Page 8
Contents Introduction 1 Features 1 Options 2 Finding Your Way Around 3 Warnings, Cautions, and Notes 3 Printer Parts 4 Chapter 1 Setting Up the Printer 1-1 Unpacking the Printer 1-2 Choosing a Place for the Printer 1-3 Assembling the Printer 1-5 Testing the Printer 1-10 Connecting the Printer to Your Computer 1-13 Configuring Your Software for the Printer 1-14 Chapter 2 Paper Handling 2-1 Selecting a Paper Feeding Method 2-2 Using Single Sheets 2-4 Using...
Contents Introduction 1 Features 1 Options 2 Finding Your Way Around 3 Warnings, Cautions, and Notes 3 Printer Parts 4 Chapter 1 Setting Up the Printer 1-1 Unpacking the Printer 1-2 Choosing a Place for the Printer 1-3 Assembling the Printer 1-5 Testing the Printer 1-10 Connecting the Printer to Your Computer 1-13 Configuring Your Software for the Printer 1-14 Chapter 2 Paper Handling 2-1 Selecting a Paper Feeding Method 2-2 Using Single Sheets 2-4 Using...
User Manual
Page 9
... 4-1 Cut-Sheet Feeders 4-2 Pull Tractor 4-12 Interface Cards 4-14 Chapter 5 Maintenance and Transportation 5-1 Cleaning the Printer 5-2 Replacing the Ribbon Cartridge 5-3 Transporting the Printer 5-4 Chapter 6 Troubleshooting Problems and Solutions Power Supply Printing Paper Handling Options 6-1 6-2 6-3 6-4 6-8 6-10 Chapter 7 Technical Specifications 7-1 Printer Specifications 7-2 Interface Specifications 7-10 Option Specifications 7-14 Initialization 7-16 Chapter 8 Command Summary 8-1 Using the...
... 4-1 Cut-Sheet Feeders 4-2 Pull Tractor 4-12 Interface Cards 4-14 Chapter 5 Maintenance and Transportation 5-1 Cleaning the Printer 5-2 Replacing the Ribbon Cartridge 5-3 Transporting the Printer 5-4 Chapter 6 Troubleshooting Problems and Solutions Power Supply Printing Paper Handling Options 6-1 6-2 6-3 6-4 6-8 6-10 Chapter 7 Technical Specifications 7-1 Printer Specifications 7-2 Interface Specifications 7-10 Option Specifications 7-14 Initialization 7-16 Chapter 8 Command Summary 8-1 Using the...
User Manual
Page 10
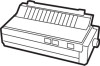
...front. Automatic paper loading. The printer supports the Epson ESC/P® commands widely used in 12 cpi draft mode. Epson ESC/P 2. Compatibility. The ActionPrinter 5000 and ActionPrinter 5500 are basically the same printer except for other Epson LQ and SQ printers. The ActionPrinter 5000 has a standard width ...written for the width of various sizes. Introduction Your new Epson" printer is an advanced 24-pin dot matrix printer that accommodates paper up to 254 mm (10 inches) wide. The ActionPrinter 5500 has a wide carriage that combines high performance with a wide...
...front. Automatic paper loading. The printer supports the Epson ESC/P® commands widely used in 12 cpi draft mode. Epson ESC/P 2. Compatibility. The ActionPrinter 5000 and ActionPrinter 5500 are basically the same printer except for other Epson LQ and SQ printers. The ActionPrinter 5000 has a standard width ...written for the width of various sizes. Introduction Your new Epson" printer is an advanced 24-pin dot matrix printer that accommodates paper up to 254 mm (10 inches) wide. The ActionPrinter 5500 has a wide carriage that combines high performance with a wide...
User Manual
Page 11
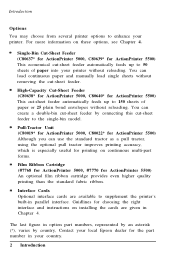
...load single sheets without removing the cut -sheet feeder automatically feeds up to supplement the printer's built-in Chapter 4. Pull-Tractor Unit (C80019* for ActionPrinter 5000, C80022* for ActionPrinter 5500) Although you can create a double-bin cut-sheet feeder by country, Contact your ... 25 plain bond envelopes without reloading. Introduction Options You may choose from several printer options to enhance your printer without reloading. The last figure in your local Epson dealer for ActionPrinter 5500) This cut -sheet feeder to the single-bin model. Single-Bin Cut...
...load single sheets without removing the cut -sheet feeder automatically feeds up to supplement the printer's built-in Chapter 4. Pull-Tractor Unit (C80019* for ActionPrinter 5000, C80022* for ActionPrinter 5500) Although you can create a double-bin cut-sheet feeder by country, Contact your ... 25 plain bond envelopes without reloading. Introduction Options You may choose from several printer options to enhance your printer without reloading. The last figure in your local Epson dealer for ActionPrinter 5500) This cut -sheet feeder to the single-bin model. Single-Bin Cut...

User Manual
Page 12
... contain important information and useful tips on options, general maintenance, specifications, and printer commands. CAUTIONS must be observed to avoid damage to read this manual for a glossary of printer terms and an index. Introduction Finding Your Way Around This manual provides fully ... include important information on unpacking, setting up and operating your equipment. Chapter 6 contains troubleshooting information. See the end of your printer. . Chapter 1 contains information on paper handling and day-to avoid bodily injury. Warnings, Cautions, and Notes WARNINGS must be...
... contain important information and useful tips on options, general maintenance, specifications, and printer commands. CAUTIONS must be observed to avoid damage to read this manual for a glossary of printer terms and an index. Introduction Finding Your Way Around This manual provides fully ... include important information on unpacking, setting up and operating your equipment. Chapter 6 contains troubleshooting information. See the end of your printer. . Chapter 1 contains information on paper handling and day-to avoid bodily injury. Warnings, Cautions, and Notes WARNINGS must be...

User Manual
Page 14
Chapter 1 Setting Up the Printer Unpacking the Printer 1-2 Checking the parts 1-2 Choosing a Place for the Printer 1-3 Assembling the Printer 1-5 Removing the protective materials 1-5 Installing the ribbon cartridge 1-6 Attaching the paper guide 1-9 Testing the Printer 1-10 Plugging in the printer 1-10 Running the self test 1-10 Connecting the Printer to Your Computer 1-13 Configuring Your Software for the Printer 1-14 Choosing from a menu 1-14 Setting Up the Printer 1-1
Chapter 1 Setting Up the Printer Unpacking the Printer 1-2 Checking the parts 1-2 Choosing a Place for the Printer 1-3 Assembling the Printer 1-5 Removing the protective materials 1-5 Installing the ribbon cartridge 1-6 Attaching the paper guide 1-9 Testing the Printer 1-10 Plugging in the printer 1-10 Running the self test 1-10 Connecting the Printer to Your Computer 1-13 Configuring Your Software for the Printer 1-14 Choosing from a menu 1-14 Setting Up the Printer 1-1
User Manual
Page 15
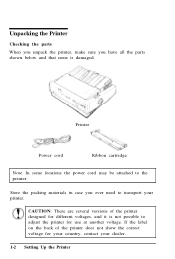
... it is damaged. If the label on the back of the printer designed for your country, contact your printer. Printer Power cord Ribbon cartridge Note: In some locations the power cord may be attached to transport your dealer. 1-2 Setting Up the Printer Store the packing materials in case you have all the parts shown...
... it is damaged. If the label on the back of the printer designed for your country, contact your printer. Printer Power cord Ribbon cartridge Note: In some locations the power cord may be attached to transport your dealer. 1-2 Setting Up the Printer Store the packing materials in case you have all the parts shown...
User Manual
Page 16
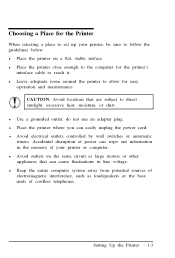
...CAUTION: Avoid locations that can cause fluctuations in the memory of cordless telephones. do not use an adapter plug. l Place the printer close enough to the computer for easy operation and maintenance. l Keep the entire computer system away from potential sources of power can... easily unplug the power cord. Choosing a Place for the Printer When selecting a place to set up your printer or computer. Setting Up the Printer 1-3 l Use a grounded outlet; Accidental disruption of electromagnetic interference, such as large motors or...
...CAUTION: Avoid locations that can cause fluctuations in the memory of cordless telephones. do not use an adapter plug. l Place the printer close enough to the computer for easy operation and maintenance. l Keep the entire computer system away from potential sources of power can... easily unplug the power cord. Choosing a Place for the Printer When selecting a place to set up your printer or computer. Setting Up the Printer 1-3 l Use a grounded outlet; Accidental disruption of electromagnetic interference, such as large motors or...
User Manual
Page 17
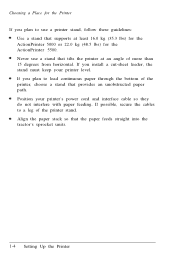
... you plan to use a stand that tilts the printer at least 16.0 kg (35.3 lbs) for the ActionPrinter 5000 or 22.0 kg (48.5 lbs) for the ActionPrinter 5500. Align the paper stack so that provides an unobstructed paper path. Position your printer level. Never use a printer stand, follow these guidelines: Use a stand that supports at an...
... you plan to use a stand that tilts the printer at least 16.0 kg (35.3 lbs) for the ActionPrinter 5000 or 22.0 kg (48.5 lbs) for the ActionPrinter 5500. Align the paper stack so that provides an unobstructed paper path. Position your printer level. Never use a printer stand, follow these guidelines: Use a stand that supports at an...

User Manual
Page 18
...from the paper-tension unit. Grasp both ends of the unit and then lift it off . Assembling the Printer Removing the protective materials During shipping, packing materials protect the printer and a locking clip protects the paper-tension unit. the clip with the other packing materials in case you... must remove the locking clip as described here: 1. Before you turn on the printer, you ever need to transport your printer. Remove the paper guide. lift up and off . 2. Setting Up the Printer 1-5 Lift the printer cover up the front of the clear plastic paper-tension unit;
...from the paper-tension unit. Grasp both ends of the unit and then lift it off . Assembling the Printer Removing the protective materials During shipping, packing materials protect the printer and a locking clip protects the paper-tension unit. the clip with the other packing materials in case you... must remove the locking clip as described here: 1. Before you turn on the printer, you ever need to transport your printer. Remove the paper guide. lift up and off . 2. Setting Up the Printer 1-5 Lift the printer cover up the front of the clear plastic paper-tension unit;
User Manual
Page 19
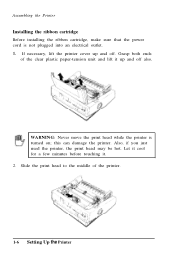
...Also, if you just used the printer, the print head may be hot. Grasp both ends of the printer. 1-6 Setting Up the Printer Let it cool for a few minutes before touching it up and off also, WARNING: Never move the print head while the printer is not plugged into an electrical ...outlet. 1. this can damage the printer. Assembling the Printer Installing the ribbon cartridge Before installing the ribbon cartridge, make sure that the power cord is turned...
...Also, if you just used the printer, the print head may be hot. Grasp both ends of the printer. 1-6 Setting Up the Printer Let it cool for a few minutes before touching it up and off also, WARNING: Never move the print head while the printer is not plugged into an electrical ...outlet. 1. this can damage the printer. Assembling the Printer Installing the ribbon cartridge Before installing the ribbon cartridge, make sure that the power cord is turned...
User Manual
Page 20
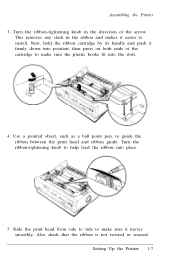
... not twisted or creased. Use a pointed object, such as a ball point pen, to make sure the plastic hooks fit into the slots. 4. Setting Up the Printer 1-7 This removes any slack in the direction of the cartridge to make sure it easier to help feed the ribbon into position; then press on...
... not twisted or creased. Use a pointed object, such as a ball point pen, to make sure the plastic hooks fit into the slots. 4. Setting Up the Printer 1-7 This removes any slack in the direction of the cartridge to make sure it easier to help feed the ribbon into position; then press on...
User Manual
Page 21
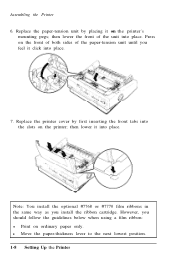
... it on the front of both sides of the unit into place. 7. l Move the paper-thickness lever to the next lowest position. 1-8 Setting Up the Printer Note: You install the optional #7768 or #7770 film ribbons in the same way as you feel it into the slots on ordinary paper only.... Assembling the Printer 6. then lower it click into place. then lower the front of the paper-tension unit until you install the ribbon cartridge. Replace the paper-tension...
... it on the front of both sides of the unit into place. 7. l Move the paper-thickness lever to the next lowest position. 1-8 Setting Up the Printer Note: You install the optional #7768 or #7770 film ribbons in the same way as you feel it into the slots on ordinary paper only.... Assembling the Printer 6. then lower it click into place. then lower the front of the paper-tension unit until you install the ribbon cartridge. Replace the paper-tension...
User Manual
Page 22
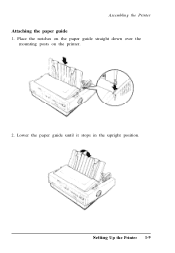
Lower the paper guide until it stops in the upright position. Setting Up the Printer 1-9 Assembling the Printer Attaching the paper guide 1. Place the notches on the paper guide straight down over the mounting posts on the printer. 2.
Lower the paper guide until it stops in the upright position. Setting Up the Printer 1-9 Assembling the Printer Attaching the paper guide 1. Place the notches on the paper guide straight down over the mounting posts on the printer. 2.
User Manual
Page 23
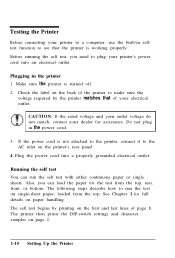
... outlet voltage do not match, contact your dealer for the test from the top. Do not plug in the printer 1. If the power cord is not attached to the printer, connect it to run the self test with either continuous paper or single sheets. The following steps describe how ...properly. See Chapter 2 for full details on page 2. 1-10 Setting Up the Printer Before running the self test, you can run the test on the printer's rear panel. 4. The self test begins by the printer matches that the printer is turned off. 2. Plug the power cord into an electrical outlet. Plugging in...
... outlet voltage do not match, contact your dealer for the test from the top. Do not plug in the printer 1. If the power cord is not attached to the printer, connect it to run the self test with either continuous paper or single sheets. The following steps describe how ...properly. See Chapter 2 for full details on page 2. 1-10 Setting Up the Printer Before running the self test, you can run the test on the printer's rear panel. 4. The self test begins by the printer matches that the printer is turned off. 2. Plug the power cord into an electrical outlet. Plugging in...
User Manual
Page 24
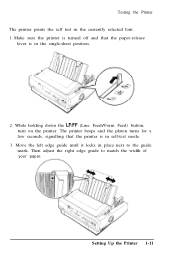
Make sure the printer is turned off and that the printer is in the currently selected font. 1. Move the left edge guide until it locks in self-test mode. 3. Then adjust the right edge guide to the guide mark. The printer beeps and the platen turns for a few seconds, signalling that the paper-release lever is in place next to match the width of your paper. Setting Up the Printer 1-11 Testing the Printer The printer prints the self test in the single-sheet position. 2. While holding down the LF/FF (Line Feed/Form Feed) button, turn on the printer.
Make sure the printer is turned off and that the printer is in the currently selected font. 1. Move the left edge guide until it locks in self-test mode. 3. Then adjust the right edge guide to the guide mark. The printer beeps and the platen turns for a few seconds, signalling that the paper-release lever is in place next to match the width of your paper. Setting Up the Printer 1-11 Testing the Printer The printer prints the self test in the single-sheet position. 2. While holding down the LF/FF (Line Feed/Form Feed) button, turn on the printer.
User Manual
Page 25
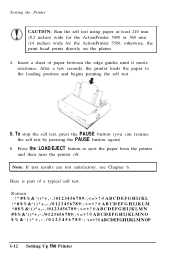
... from the printer and then turn the printer off. To stop the self test, press the PAUSE button (you can resume the self test by pressing the PAUSE button again). 6. Testing the Printer CAUTION: Run the self test using paper at least 210 mm (8.2 inches) wide for the ActionPrinter 5000 or ...360 mm (14 inches) wide for the ActionPrinter 5500; Note: If test results are not satisfactory, see Chapter 6. Press the ...
... from the printer and then turn the printer off. To stop the self test, press the PAUSE button (you can resume the self test by pressing the PAUSE button again). 6. Testing the Printer CAUTION: Run the self test using paper at least 210 mm (8.2 inches) wide for the ActionPrinter 5000 or ...360 mm (14 inches) wide for the ActionPrinter 5500; Note: If test results are not satisfactory, see Chapter 6. Press the ...
User Manual
Page 26
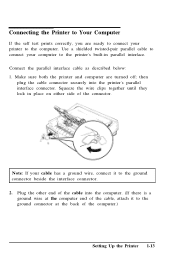
...wire at the back of the cable, attach it to the computer. Note: If your cable has a ground wire, connect it to the printer's built-in place on either side of the connector. Squeeze the wire clips together until they lock in parallel interface. Use a shielded twisted-...pair parallel cable to connect your printer to the ground connector beside the interface connector. 2. Connect the parallel interface cable as described below: 1. Plug the other end of the ...
...wire at the back of the cable, attach it to the computer. Note: If your cable has a ground wire, connect it to the printer's built-in place on either side of the connector. Squeeze the wire clips together until they lock in parallel interface. Use a shielded twisted-...pair parallel cable to connect your printer to the ground connector beside the interface connector. 2. Connect the parallel interface cable as described below: 1. Plug the other end of the ...
User Manual
Page 27
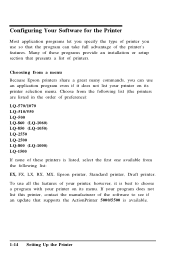
...it is best to see if an update that presents a list of these printers is available. 1-14 Setting Up the Printer Many of these programs provide an installation or setup section that supports the ActionPrinter 5000/5500 is listed, select the first one available from the following list (the...LQ-1050) LQ-2550 LQ-2500 LQ-800 (LQ-1000) LQ-1500 If none of printers. Choosing from the following list: EX, FX, LX, RX, MX, Epson printer, Standard printer, Draft printer. Choose from a menu Because Epson printers share a great many commands, you use so that the program can use all the ...
...it is best to see if an update that presents a list of these printers is available. 1-14 Setting Up the Printer Many of these programs provide an installation or setup section that supports the ActionPrinter 5000/5500 is listed, select the first one available from the following list (the...LQ-1050) LQ-2550 LQ-2500 LQ-800 (LQ-1000) LQ-1500 If none of printers. Choosing from the following list: EX, FX, LX, RX, MX, Epson printer, Standard printer, Draft printer. Choose from a menu Because Epson printers share a great many commands, you use so that the program can use all the ...


