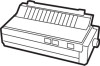

User Manual - Hi-Capacity Cut Sheet Feeder
Page 2
... liability is any means, mechanical, photocopying, recording, or otherwise, without the prior written permission of Seiko Epson Corporation. All rights reserved. While every precaution has been taken in any form or by Seiko Epson Corporation Nagano, Japan Copyright © 1991 by any liability assumed for errors or omissions. Neither is assumed...may be reproduced, stored in a retrival system, or transmitted in the preparation of the information contained herein. No part of this book, Seiko Epson Corporation assumes no responsibility for damages resulting from the use of Seiko...
... liability is any means, mechanical, photocopying, recording, or otherwise, without the prior written permission of Seiko Epson Corporation. All rights reserved. While every precaution has been taken in any form or by Seiko Epson Corporation Nagano, Japan Copyright © 1991 by any liability assumed for errors or omissions. Neither is assumed...may be reproduced, stored in a retrival system, or transmitted in the preparation of the information contained herein. No part of this book, Seiko Epson Corporation assumes no responsibility for damages resulting from the use of Seiko...
User Manual
Page 2
...Epson Products or Epson Approved Products by Seiko Epson Corporation. All rights reserved User's Manual Neither Seiko Epson Corporation nor its affiliates shall not be trademarks of their respective companies. Epson and Epson... and Epson ESC/P 2 is assumed with respect to the purchaser of this product. No part of this book, Seiko Epson Corporation ...assumes no responsibility for errors or omissions. No patent liability is a trademark of Seiko Epson Corporation. While... Epson Corporation. Seiko Epson Corporation and its affiliates shall be reproduced, stored in a...
...Epson Products or Epson Approved Products by Seiko Epson Corporation. All rights reserved User's Manual Neither Seiko Epson Corporation nor its affiliates shall not be trademarks of their respective companies. Epson and Epson... and Epson ESC/P 2 is assumed with respect to the purchaser of this product. No part of this book, Seiko Epson Corporation ...assumes no responsibility for errors or omissions. No patent liability is a trademark of Seiko Epson Corporation. While... Epson Corporation. Seiko Epson Corporation and its affiliates shall be reproduced, stored in a...

User Manual
Page 4
... are using standard 8½ X 11-inch paper, set the maximum lines per -page setting, try setting the form length at 10 inches. 5. Make sure you choose single sheets. you want. 4. If your printer prints the first page of numbered lines from one page onto the next. When you print your file... let you indicate whether you are a few lines from 1 to 0 and then create a file of your application program. Make sure you choose the correct printer. iii When you install an application program, it prints the last few things you should know about printing on the next page, or that is...
... are using standard 8½ X 11-inch paper, set the maximum lines per -page setting, try setting the form length at 10 inches. 5. Make sure you choose single sheets. you want. 4. If your printer prints the first page of numbered lines from one page onto the next. When you print your file... let you indicate whether you are a few lines from 1 to 0 and then create a file of your application program. Make sure you choose the correct printer. iii When you install an application program, it prints the last few things you should know about printing on the next page, or that is...
User Manual
Page 11
...-part forms. Film Ribbon Cartridge (#7768 for ActionPrinter 5000, #7770 for the part number in option part numbers, represented by an asterisk (*), varies by connecting this cut -sheet feeder automatically feeds up to 50 sheets of paper or 25 plain bond envelopes without reloading. The last figure in your local Epson dealer for ActionPrinter 5500...
...-part forms. Film Ribbon Cartridge (#7768 for ActionPrinter 5000, #7770 for the part number in option part numbers, represented by an asterisk (*), varies by connecting this cut -sheet feeder automatically feeds up to 50 sheets of paper or 25 plain bond envelopes without reloading. The last figure in your local Epson dealer for ActionPrinter 5500...
User Manual
Page 24
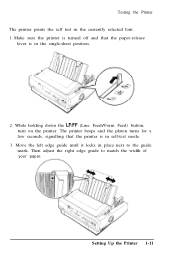
The printer beeps and the platen turns for a few seconds, signalling that the paper-release lever is in the single-sheet position. 2. Setting Up the Printer 1-11 Then adjust the right edge guide to the guide mark. Move the left edge guide until it locks in the currently selected font. 1. Testing the Printer The printer prints the self test in place next to match the width of your paper. While holding down the LF/FF (Line Feed/Form Feed) button, turn on the printer. Make sure the printer is turned off and that the printer is in self-test mode. 3.
The printer beeps and the platen turns for a few seconds, signalling that the paper-release lever is in the single-sheet position. 2. Setting Up the Printer 1-11 Then adjust the right edge guide to the guide mark. Move the left edge guide until it locks in the currently selected font. 1. Testing the Printer The printer prints the self test in place next to match the width of your paper. While holding down the LF/FF (Line Feed/Form Feed) button, turn on the printer. Make sure the printer is turned off and that the printer is in self-test mode. 3.

User Manual
Page 28
... and Single Sheets . . . 2-21 Switching to single sheets 2-21 Switching to continuous paper 2-22 Printing on Special Paper 2-23 Paper-thickness lever 2-23 Multi-part forms 2-24 Labels 2-25 Envelopes 2-26 Paper Handling 2-1
... and Single Sheets . . . 2-21 Switching to single sheets 2-21 Switching to continuous paper 2-22 Printing on Special Paper 2-23 Paper-thickness lever 2-23 Multi-part forms 2-24 Labels 2-25 Envelopes 2-26 Paper Handling 2-1

User Manual
Page 33
... single sheets from the front 1. Turn on . 2-6 Paper Handling Move the paper-release lever to lose the top-of-form position. If the platen turns but the printer doesn't load the paper, completely remove the paper and re-insert it to the single-sheet position and open the front cover. 2. Using Single... Sheets CAUTION: Use the knob on the right side of the printer only to clear paper jams when the printer is off Otherwise, you may damage the printer or cause it more firmly.
... single sheets from the front 1. Turn on . 2-6 Paper Handling Move the paper-release lever to lose the top-of-form position. If the platen turns but the printer doesn't load the paper, completely remove the paper and re-insert it to the single-sheet position and open the front cover. 2. Using Single... Sheets CAUTION: Use the knob on the right side of the printer only to clear paper jams when the printer is off Otherwise, you may damage the printer or cause it more firmly.

User Manual
Page 35
Otherwise, you may damage the printer or cause it more firmly. Note: The printer's built-in stacker in front of the paper guide can hold up to 50 sheets of the printer only to lose the top-of-form position. To eject the paper, press the LOAD/EJECT button. Using Single Sheets CAUTION: Use the knob on the right side of ejected paper. 2-8 Paper Handling If the platen turns but the printer doesn't load the paper, completely remove the paper and re-insert it to clear paper jams when the printer is off.
Otherwise, you may damage the printer or cause it more firmly. Note: The printer's built-in stacker in front of the paper guide can hold up to 50 sheets of the printer only to lose the top-of-form position. To eject the paper, press the LOAD/EJECT button. Using Single Sheets CAUTION: Use the knob on the right side of ejected paper. 2-8 Paper Handling If the platen turns but the printer doesn't load the paper, completely remove the paper and re-insert it to clear paper jams when the printer is off.
User Manual
Page 41
... any slack in place by pressing the LOAD/EJECT button. Turn on the printer. 9. Remove the paper from the push tractor 1. back-feeding too many sheets can also advance the paper to the middle of -form position. Slide both edge guides to the loading position by pushing the sprocket ...lock lever back. 8. Otherwise, you may damage the printer or cause it receives data. Press the LOAD/EJECT button to feed the paper...
... any slack in place by pressing the LOAD/EJECT button. Turn on the printer. 9. Remove the paper from the push tractor 1. back-feeding too many sheets can also advance the paper to the middle of -form position. Slide both edge guides to the loading position by pushing the sprocket ...lock lever back. 8. Otherwise, you may damage the printer or cause it receives data. Press the LOAD/EJECT button to feed the paper...
User Manual
Page 46
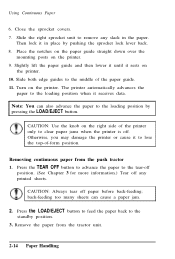
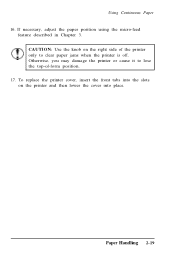
CAUTION: Use the knob on the printer and then lower the cover into the slots on the right side of -form position. 17. Otherwise, you may damage the printer or cause it to lose the top-of the printer only to clear paper jams when the printer is off. Paper Handling 2-19 Using Continuous Paper 16. If necessary, adjust the paper position using the micro-feed feature described in Chapter 3. To replace the printer cover, insert the front tabs into place.
CAUTION: Use the knob on the printer and then lower the cover into the slots on the right side of -form position. 17. Otherwise, you may damage the printer or cause it to lose the top-of the printer only to clear paper jams when the printer is off. Paper Handling 2-19 Using Continuous Paper 16. If necessary, adjust the paper position using the micro-feed feature described in Chapter 3. To replace the printer cover, insert the front tabs into place.
User Manual
Page 50
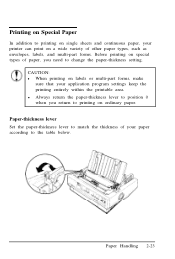
Paper-thickness lever Set the paper-thickness lever to match the thickness of paper, you return to printing on labels or multi-part forms, make sure that your paper according to the table below. CAUTION: l When printing on ordinary paper. Paper Handling 2-23 Printing on ...Special Paper In addition to printing on single sheets and continuous paper, your printer can print on a wide variety of other paper types, such as envelopes, labels, and multi-part forms. Before printing on special types of your application program settings keep the printing entirely within the...
Paper-thickness lever Set the paper-thickness lever to match the thickness of paper, you return to printing on labels or multi-part forms, make sure that your paper according to the table below. CAUTION: l When printing on ordinary paper. Paper Handling 2-23 Printing on ...Special Paper In addition to printing on single sheets and continuous paper, your printer can print on a wide variety of other paper types, such as envelopes, labels, and multi-part forms. Before printing on special types of your application program settings keep the printing entirely within the...
User Manual
Page 51
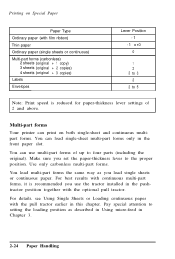
...use the tractor installed in the pushtractor position together with the pull tractor earlier in this chapter. You can load single-sheet multi-part forms only in Chapter 3. 2-24 Paper Handling For details, see Using Single Sheets or Loading continuous paper with the optional pull tractor. Use... front paper slot. Make sure you load single sheets or continuous paper. Pay special attention to the proper position. Multi-part forms Your printer can print on Special Paper Paper Type Ordinary paper (with film ribbon) Thin paper Ordinary paper (single sheets or continuous) Multi-part...
...use the tractor installed in the pushtractor position together with the pull tractor earlier in this chapter. You can load single-sheet multi-part forms only in Chapter 3. 2-24 Paper Handling For details, see Using Single Sheets or Loading continuous paper with the optional pull tractor. Use... front paper slot. Make sure you load single sheets or continuous paper. Pay special attention to the proper position. Multi-part forms Your printer can print on Special Paper Paper Type Ordinary paper (with film ribbon) Thin paper Ordinary paper (single sheets or continuous) Multi-part...
User Manual
Page 52
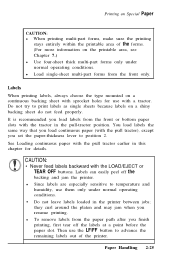
...choose the type mounted on the printable area, see Chapter 7.) l Use four-sheet thick multi-part forms only under normal operating conditions. • Do not leave labels loaded in the printer between jobs; l Since labels are especially sensitive to position 2. It is recommended you finish printing, first... LOAD/EJECT or TEAR OFF buttons. Printing on Special Paper CAUTION: l When printing multi-part forms, make sure the printing stays entirely within the printable area of the printer. they curl around the platen and may jam when you set the paper-thickness lever to temperature...
...choose the type mounted on the printable area, see Chapter 7.) l Use four-sheet thick multi-part forms only under normal operating conditions. • Do not leave labels loaded in the printer between jobs; l Since labels are especially sensitive to position 2. It is recommended you finish printing, first... LOAD/EJECT or TEAR OFF buttons. Printing on Special Paper CAUTION: l When printing multi-part forms, make sure the printing stays entirely within the printable area of the printer. they curl around the platen and may jam when you set the paper-thickness lever to temperature...

User Manual
Page 56
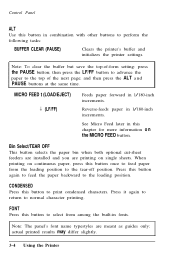
...the tear-off position, press this button to feed it backward to the standby position. LF/FF (line feed/form feed) Tap this button to temporarily stop printing. Using the Printer 3-3 Buttons PAUSE Press this button briefly to feed the paper forward one line. LOAD/EJECT Press this button ... -sheet feeder is already in the loading or tear-off position. You can also use this button again to resume printing. However, the printer normally loads paper automatically. TEAR OFF (yellow) On when you select condensed printing from the standby position to the loading position. If single-...
...the tear-off position, press this button to feed it backward to the standby position. LF/FF (line feed/form feed) Tap this button to temporarily stop printing. Using the Printer 3-3 Buttons PAUSE Press this button briefly to feed the paper forward one line. LOAD/EJECT Press this button ... -sheet feeder is already in the loading or tear-off position. You can also use this button again to resume printing. However, the printer normally loads paper automatically. TEAR OFF (yellow) On when you select condensed printing from the standby position to the loading position. If single-...
User Manual
Page 57
... are printing on continuous paper, press this chapter for more information o n the MICRO FEED button. actual printed results may differ slightly. 3-4 Using the Printer CONDENSED Press this button again to feed the paper backward to the loading position. FONT Press this button to select from the loading position to... bin when both optional cut-sheet feeders are installed and you are meant as guides only; Press it again to return to the top of -form setting: press the PAUSE button; and then press the ALT a n d PAUSE buttons at the same time. Press this button to the tear-off ...
... are printing on continuous paper, press this chapter for more information o n the MICRO FEED button. actual printed results may differ slightly. 3-4 Using the Printer CONDENSED Press this button again to feed the paper backward to the loading position. FONT Press this button to select from the loading position to... bin when both optional cut-sheet feeders are installed and you are meant as guides only; Press it again to return to the top of -form setting: press the PAUSE button; and then press the ALT a n d PAUSE buttons at the same time. Press this button to the tear-off ...
User Manual
Page 64
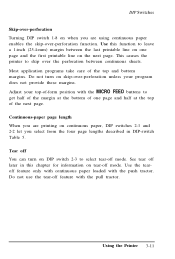
...Continuous-paper page length When you select from the four page lengths described in this function to skip over -perforation unless your top-of-form position with the MICRO FEED buttons to select tear-off feature with the push tractor. Use the tearoff feature only with continuous paper loaded ...the perforation between the last printable line on tear-off later in DIP-switch Table 5. This causes the printer to leave a 1-inch (25.4-mm) margin between continuous sheets. Using the Printer 3-11 Use this chapter for information on one page and half at the bottom of the top and bottom...
...Continuous-paper page length When you select from the four page lengths described in this function to skip over -perforation unless your top-of-form position with the MICRO FEED buttons to select tear-off feature with the push tractor. Use the tearoff feature only with continuous paper loaded ...the perforation between the last printable line on tear-off later in DIP-switch Table 5. This causes the printer to leave a 1-inch (25.4-mm) margin between continuous sheets. Using the Printer 3-11 Use this chapter for information on one page and half at the bottom of the top and bottom...
User Manual
Page 69
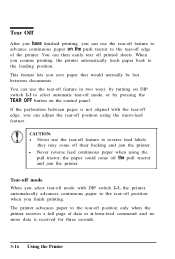
... by pressing the TEAR OFF button on the push tractor to the tear-off edge of data or a form-feed command and no more data is not aligned with DIP switch 2-3, the printer automatically advances continuous paper to the loading position. Tear-off mode When you select tear-off mode with the... tear-off edge, you can adjust the tear-off position using the pull tractor; The printer advances paper to the tear-off position only when the printer receives a full page of the printer. Tear Off After you have finished printing, you can use the tear-off feature to advance continuous...
... by pressing the TEAR OFF button on the push tractor to the tear-off edge of data or a form-feed command and no more data is not aligned with DIP switch 2-3, the printer automatically advances continuous paper to the loading position. Tear-off mode When you select tear-off mode with the... tear-off edge, you can adjust the tear-off position using the pull tractor; The printer advances paper to the tear-off position only when the printer receives a full page of the printer. Tear Off After you have finished printing, you can use the tear-off feature to advance continuous...

User Manual
Page 72
... DIP-switch functions in 2-point increments. Letter quality fonts produce fully-formed characters for fast printing. The minimum size of the following point sizes: 8, 10.5, 16, 22, 24, 28, and 32. With Epson's new ESC/P 2 printer control language, the Roman and Sans Serif fonts are letter quality (... FONT button on . You can select typestyles using the control panel, DIP switches, software commands, or your desired font comes on the printer's control panel until you can produce a wide range of the font in this chapter. ) All other enhancements. You can increase the ...
... DIP-switch functions in 2-point increments. Letter quality fonts produce fully-formed characters for fast printing. The minimum size of the following point sizes: 8, 10.5, 16, 22, 24, 28, and 32. With Epson's new ESC/P 2 printer control language, the Roman and Sans Serif fonts are letter quality (... FONT button on . You can select typestyles using the control panel, DIP switches, software commands, or your desired font comes on the printer's control panel until you can produce a wide range of the font in this chapter. ) All other enhancements. You can increase the ...
User Manual
Page 81
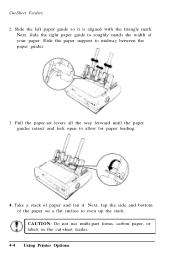
... until the paper guides retract and lock open to midway between the paper guides. 3. CAUTION: Do not use multi-part forms, carbon paper, or labels in the cut-sheet feeder. 4-4 Using Printer Options Slide the paper support to allow for paper loading. 4. Cut-Sheet Feeders 2. Slide the left paper guide so it...
... until the paper guides retract and lock open to midway between the paper guides. 3. CAUTION: Do not use multi-part forms, carbon paper, or labels in the cut-sheet feeder. 4-4 Using Printer Options Slide the paper support to allow for paper loading. 4. Cut-Sheet Feeders 2. Slide the left paper guide so it...
User Manual
Page 84
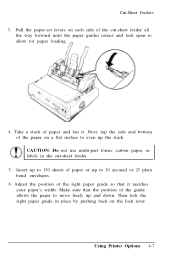
... 30 air-mail or 25 plain bond envelopes. 6. Adjust the position of paper and fan it matches your paper's width. Make sure that it . Using Printer Options 4-7 Next, tap the side and bottom of the paper on each side of the guide allows the paper to move freely up to 150... of paper or up and down. Pull the paper-set levers on a flat surface to allow for paper loading. 4. CAUTION: Do not use multi-part forms, carbon paper, or labels in place by pushing back on the lock lever. Then lock the right paper guide in the cut -sheet feeder all...
... 30 air-mail or 25 plain bond envelopes. 6. Adjust the position of paper and fan it matches your paper's width. Make sure that it . Using Printer Options 4-7 Next, tap the side and bottom of the paper on each side of the guide allows the paper to move freely up to 150... of paper or up and down. Pull the paper-set levers on a flat surface to allow for paper loading. 4. CAUTION: Do not use multi-part forms, carbon paper, or labels in place by pushing back on the lock lever. Then lock the right paper guide in the cut -sheet feeder all...

