
User Manual
Page 4
... paper, set the maximum lines per -page setting and you should know about printing on the first page. Make sure you choose the correct printer. When you install an application program, it prints the last few things you are using . You can simply change some of numbered lines from one page onto the next. iii Make sure you choose single sheets. TIPS FOR PRINTING ON SINGLE SHEETS There are a few lines...
... paper, set the maximum lines per -page setting and you should know about printing on the first page. Make sure you choose the correct printer. When you install an application program, it prints the last few things you are using . You can simply change some of numbered lines from one page onto the next. iii Make sure you choose single sheets. TIPS FOR PRINTING ON SINGLE SHEETS There are a few lines...
User Manual
Page 8
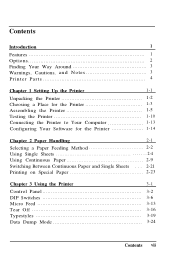
... Setting Up the Printer 1-1 Unpacking the Printer 1-2 Choosing a Place for the Printer 1-3 Assembling the Printer 1-5 Testing the Printer 1-10 Connecting the Printer to Your Computer 1-13 Configuring Your Software for the Printer 1-14 Chapter 2 Paper Handling 2-1 Selecting a Paper Feeding Method 2-2 Using Single Sheets 2-4 Using Continuous Paper 2-9 Switching Between Continuous Paper and Single Sheets . . . 2-21 Printing on Special Paper 2-23 Chapter 3 Using the Printer 3-1 Control Panel 3-2 DIP Switches 3-6 Micro Feed 3-13 Tear Off 3-16 Typestyles 3-19 Data Dump Mode...
... Setting Up the Printer 1-1 Unpacking the Printer 1-2 Choosing a Place for the Printer 1-3 Assembling the Printer 1-5 Testing the Printer 1-10 Connecting the Printer to Your Computer 1-13 Configuring Your Software for the Printer 1-14 Chapter 2 Paper Handling 2-1 Selecting a Paper Feeding Method 2-2 Using Single Sheets 2-4 Using Continuous Paper 2-9 Switching Between Continuous Paper and Single Sheets . . . 2-21 Printing on Special Paper 2-23 Chapter 3 Using the Printer 3-1 Control Panel 3-2 DIP Switches 3-6 Micro Feed 3-13 Tear Off 3-16 Typestyles 3-19 Data Dump Mode...
User Manual
Page 9
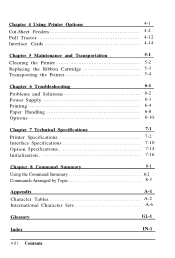
... Cards 4-14 Chapter 5 Maintenance and Transportation 5-1 Cleaning the Printer 5-2 Replacing the Ribbon Cartridge 5-3 Transporting the Printer 5-4 Chapter 6 Troubleshooting Problems and Solutions Power Supply Printing Paper Handling Options 6-1 6-2 6-3 6-4 6-8 6-10 Chapter 7 Technical Specifications 7-1 Printer Specifications 7-2 Interface Specifications 7-10 Option Specifications 7-14 Initialization 7-16 Chapter 8 Command Summary 8-1 Using the Command Summary 8-2 Commands Arranged by Topic 8-3 Appendix A-1 Character Tables A-2 International Character Sets...
... Cards 4-14 Chapter 5 Maintenance and Transportation 5-1 Cleaning the Printer 5-2 Replacing the Ribbon Cartridge 5-3 Transporting the Printer 5-4 Chapter 6 Troubleshooting Problems and Solutions Power Supply Printing Paper Handling Options 6-1 6-2 6-3 6-4 6-8 6-10 Chapter 7 Technical Specifications 7-1 Printer Specifications 7-2 Interface Specifications 7-10 Option Specifications 7-14 Initialization 7-16 Chapter 8 Command Summary 8-1 Using the Command Summary 8-2 Commands Arranged by Topic 8-3 Appendix A-1 Character Tables A-2 International Character Sets...
User Manual
Page 11
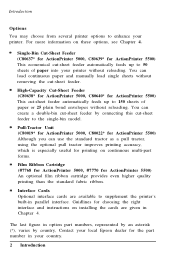
... interface and instructions on installing the cards are available to the single-bin model. You can create a double-bin cut-sheet feeder by country, Contact your local Epson dealer for ActionPrinter 5500) An optional film ribbon cartridge provides even higher quality printing than the standard fabric ribbon. Pull-Tractor Unit (C80019* for ActionPrinter 5000, C80022* for ActionPrinter 5500) Although you can load continuous paper and manually load single sheets without reloading...
... interface and instructions on installing the cards are available to the single-bin model. You can create a double-bin cut-sheet feeder by country, Contact your local Epson dealer for ActionPrinter 5500) An optional film ribbon cartridge provides even higher quality printing than the standard fabric ribbon. Pull-Tractor Unit (C80019* for ActionPrinter 5000, C80022* for ActionPrinter 5500) Although you can load continuous paper and manually load single sheets without reloading...

User Manual
Page 33
The OPERATE light on the control panel comes on the printer. If the platen turns but the printer doesn't load the paper, completely remove the paper and re-insert it to lose the top-of the printer only to the single-sheet position and open the front cover. 2. To eject the paper, press the LOAD/EJECT button. Loading single sheets from the front 1. Using Single Sheets CAUTION: Use the knob on the right side of...
The OPERATE light on the control panel comes on the printer. If the platen turns but the printer doesn't load the paper, completely remove the paper and re-insert it to lose the top-of the printer only to the single-sheet position and open the front cover. 2. To eject the paper, press the LOAD/EJECT button. Loading single sheets from the front 1. Using Single Sheets CAUTION: Use the knob on the right side of...

User Manual
Page 35
If the platen turns but the printer doesn't load the paper, completely remove the paper and re-insert it to clear paper jams when the printer is off. Using Single Sheets CAUTION: Use the knob on the right side of ejected paper. 2-8 Paper Handling Note: The printer's built-in stacker in front of the paper guide can hold up to 50 sheets of the printer only to lose the top-of-form position. To eject the paper, press the LOAD/EJECT button. Otherwise, you may damage the printer or cause it more firmly.
If the platen turns but the printer doesn't load the paper, completely remove the paper and re-insert it to clear paper jams when the printer is off. Using Single Sheets CAUTION: Use the knob on the right side of ejected paper. 2-8 Paper Handling Note: The printer's built-in stacker in front of the paper guide can hold up to 50 sheets of the printer only to lose the top-of-form position. To eject the paper, press the LOAD/EJECT button. Otherwise, you may damage the printer or cause it more firmly.
User Manual
Page 38
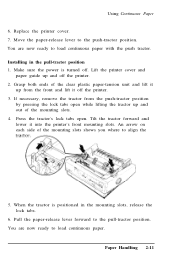
... tabs open . Paper Handling 2-11 Replace the printer cover. 7. You are now ready to align the 5. Installing in the mounting slots, release the lock tabs. 6. If necessary, remove the tractor from the front and lift it into the printer's front mounting slots. Tilt the tractor forward and lower it off the printer. 2. When the tractor is turned off. Using Continuous Paper 6. Make sure the power...
... tabs open . Paper Handling 2-11 Replace the printer cover. 7. You are now ready to align the 5. Installing in the mounting slots, release the lock tabs. 6. If necessary, remove the tractor from the front and lift it into the printer's front mounting slots. Tilt the tractor forward and lower it off the printer. 2. When the tractor is turned off. Using Continuous Paper 6. Make sure the power...
User Manual
Page 41
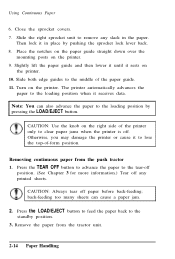
... printer. Slightly lift the paper guide and then lower it until it receives data. The printer automatically advances the paper to lose the top-of-form position. Removing continuous paper from the tractor unit. 2-14 Paper Handling back-feeding too many sheets can also advance the paper to remove any printed sheets. Turn on the printer. 9. Remove the paper from the push tractor 1. Press the TEAR OFF button to advance the paper...
... printer. Slightly lift the paper guide and then lower it until it receives data. The printer automatically advances the paper to lose the top-of-form position. Removing continuous paper from the tractor unit. 2-14 Paper Handling back-feeding too many sheets can also advance the paper to remove any printed sheets. Turn on the printer. 9. Remove the paper from the push tractor 1. Press the TEAR OFF button to advance the paper...

User Manual
Page 49
... guides to continuous paper in the paper path, press the LOAD/EJECT button to the loading position when it . 2. Switching to continuous paper To switch from single sheets back to the middle of your paper. The printer automatically advances the continuous paper to eject it receives data. 2-22 Paper Handling If a single sheet is in the push tractor, follow the steps below. 1. Lift the paper guide until it stops...
... guides to continuous paper in the paper path, press the LOAD/EJECT button to the loading position when it . 2. Switching to continuous paper To switch from single sheets back to the middle of your paper. The printer automatically advances the continuous paper to eject it receives data. 2-22 Paper Handling If a single sheet is in the push tractor, follow the steps below. 1. Lift the paper guide until it stops...
User Manual
Page 51
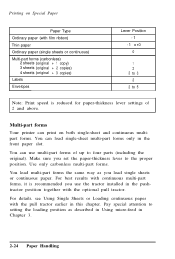
... printer can print on Special Paper Paper Type Ordinary paper (with film ribbon) Thin paper Ordinary paper (single sheets or continuous) Multi-part forms (carbonless) 2 sheets (original + 1 copy) 3 sheets (original + 2 copies) 4 sheets (original + 3 copies) Labels Envelopes Lever Position -1 -1 or0 0 1 2 2 to 3 2 2 to 5 Note: Print speed is recommended you set the paper-thickness lever to the proper position. Use only carbonless multi-part forms. You load multi-part forms the same way as described in Using micro-feed...
... printer can print on Special Paper Paper Type Ordinary paper (with film ribbon) Thin paper Ordinary paper (single sheets or continuous) Multi-part forms (carbonless) 2 sheets (original + 1 copy) 3 sheets (original + 2 copies) 4 sheets (original + 3 copies) Labels Envelopes Lever Position -1 -1 or0 0 1 2 2 to 3 2 2 to 5 Note: Print speed is recommended you set the paper-thickness lever to the proper position. Use only carbonless multi-part forms. You load multi-part forms the same way as described in Using micro-feed...
User Manual
Page 79
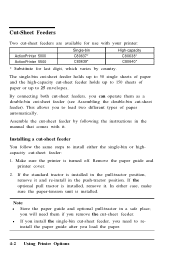
By connecting both cut-sheet feeders, you load the paper. 4-2 Using Printer Options Remove the paper guide and printer cover. 2. If the standard tractor is installed. Cut-Sheet Feeders Two cut-sheet feeders are available for use with your printer: Single-bin High-capacity ActionPrinter 5000 C80637* C80638* ActionPrinter 5500 C80639* C80640* * Substitute for last digit, which varies by following the instructions in the manual that comes with it. This allows you to 25 envelopes. Note...
By connecting both cut-sheet feeders, you load the paper. 4-2 Using Printer Options Remove the paper guide and printer cover. 2. If the standard tractor is installed. Cut-Sheet Feeders Two cut-sheet feeders are available for use with your printer: Single-bin High-capacity ActionPrinter 5000 C80637* C80638* ActionPrinter 5500 C80639* C80640* * Substitute for last digit, which varies by following the instructions in the manual that comes with it. This allows you to 25 envelopes. Note...

User Manual
Page 80
... side. Hold the cut-sheet feeder in the cut -sheet feeder as follows: 1. You are now ready to load paper with the single-bin cut-sheet feeder Load paper using the single-bin cut -sheet feeder over the mounting posts on the printer. 5. Loading paper with your cut -sheet feeder is in the single-sheet position. 4. Replace the printer cover. Removing a cut -sheet feeder. Make sure the paper-release lever is the reverse of the steps above. Using Printer Options 4-3 Turn...
... side. Hold the cut-sheet feeder in the cut -sheet feeder as follows: 1. You are now ready to load paper with the single-bin cut-sheet feeder Load paper using the single-bin cut -sheet feeder over the mounting posts on the printer. 5. Loading paper with your cut -sheet feeder is in the single-sheet position. 4. Replace the printer cover. Removing a cut -sheet feeder. Make sure the paper-release lever is the reverse of the steps above. Using Printer Options 4-3 Turn...

User Manual
Page 88
... paper path, press the LOAD/EJECT button to continuous paper 1. Press the LOAD/EJECT button. CAUTION: Never feed labels backward. Cut-Sheet Feeders Switching between continuous paper and the cut-sheet feeder You can easily come off the printed pages. 3. Switching to eject them. 2. This helps the printer feed the printed pages properly and prevents paper jams. Switching to the tear-off position. 2. If any single sheets are using labels, remove the labels from below the printer cover. The paper...
... paper path, press the LOAD/EJECT button to continuous paper 1. Press the LOAD/EJECT button. CAUTION: Never feed labels backward. Cut-Sheet Feeders Switching between continuous paper and the cut-sheet feeder You can easily come off the printed pages. 3. Switching to eject them. 2. This helps the printer feed the printed pages properly and prevents paper jams. Switching to the tear-off position. 2. If any single sheets are using labels, remove the labels from below the printer cover. The paper...
User Manual
Page 90
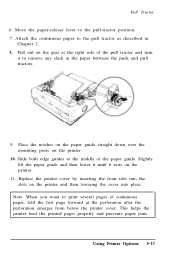
... below the printer cover. Replace the printer cover by inserting the front tabs into place. Pull Tractor 6. Note: When you want to remove any slack in Chapter 2. 8. Slightly lift the paper guide and then lower it until it to print several pages of continuous paper, fold the first page forward at the right side of the paper guide. This helps the printer feed the printed pages properly and prevents paper jams. Using Printer Options...
... below the printer cover. Replace the printer cover by inserting the front tabs into place. Pull Tractor 6. Note: When you want to remove any slack in Chapter 2. 8. Slightly lift the paper guide and then lower it until it to print several pages of continuous paper, fold the first page forward at the right side of the paper guide. This helps the printer feed the printed pages properly and prevents paper jams. Using Printer Options...

User Manual
Page 99
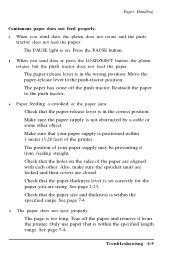
See page 6-5. See page 6-8. l When using the cut-sheet feeder, the paper does not feed properly. See page 6-10. See page 6-11. 6-2 Troubleshooting Problems and Solutions This chapter describes problems you have a printer problem, find it in printed characters or graphics. l Printed characters are missing in the list below and then see the appropriate page for the solution. l The print position is not being supplied. See page 6-6. l Continuous paper does not feed properly...
See page 6-5. See page 6-8. l When using the cut-sheet feeder, the paper does not feed properly. See page 6-10. See page 6-11. 6-2 Troubleshooting Problems and Solutions This chapter describes problems you have a printer problem, find it in printed characters or graphics. l Printed characters are missing in the list below and then see the appropriate page for the solution. l The print position is not being supplied. See page 6-6. l Continuous paper does not feed properly...

User Manual
Page 101
... several times, and the printer stops abruptly. l The printer sounds like it stops printing abruptly. See Setting the paper-thickness lever in Chapter 5. the printer resumes printing automatically when the print head cools. 6-4 Troubleshooting Check both the printer and computer specifications. Check that the software is installed properly for a paper jam, a ribbon jam, or other problems. If the printer still does not print correctly, contact your printer. Make sure your cable is a shielded twisted-pair parallel cable. The print head is printed. Load paper...
... several times, and the printer stops abruptly. l The printer sounds like it stops printing abruptly. See Setting the paper-thickness lever in Chapter 5. the printer resumes printing automatically when the print head cools. 6-4 Troubleshooting Check both the printer and computer specifications. Check that the software is installed properly for a paper jam, a ribbon jam, or other problems. If the printer still does not print correctly, contact your printer. Make sure your cable is a shielded twisted-pair parallel cable. The print head is printed. Load paper...
User Manual
Page 104
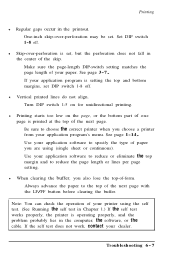
... dealer. Turn DIP switch 1-5 on the page, or the bottom part of o n e page is operating properly, and the problem probably lies in the center of the skip. l Skip-over -perforation may be set. l Vertical printed lines do not align. See page 1-14. Always advance the paper to specify the type of paper you choose a printer from your application program is set DIP switch 1-8 off . Troubleshooting 6-7 Use your application software to the...
... dealer. Turn DIP switch 1-5 on the page, or the bottom part of o n e page is operating properly, and the problem probably lies in the center of the skip. l Skip-over -perforation may be set. l Vertical printed lines do not align. See page 1-14. Always advance the paper to specify the type of paper you choose a printer from your application program is set DIP switch 1-8 off . Troubleshooting 6-7 Use your application software to the...
User Manual
Page 106
l When you send data or press the LOAD/EJECT button, the platen rotates, but the push tractor does not feed the paper. The paper has come off the paper and remove it from the printer. l Paper feeding is crooked or the paper jams. Check that the paper size and thickness is within the specified length range. Check that the paper-release lever is on the sides of the paper are aligned with each...
l When you send data or press the LOAD/EJECT button, the platen rotates, but the push tractor does not feed the paper. The paper has come off the paper and remove it from the printer. l Paper feeding is crooked or the paper jams. Check that the paper size and thickness is within the specified length range. Check that the paper-release lever is on the sides of the paper are aligned with each...
User Manual
Page 108
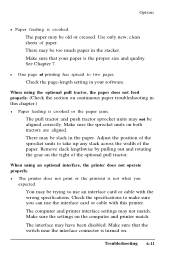
... sprocket units on continuous paper troubleshooting in this printer. Troubleshooting 6-11 The paper may be aligned correctly. Check the page-length setting in the paper. You may be old or creased. There may be trying to take up any slack across the width of the sprocket units to use the interface card or cable with the wrong specifications. Make sure that your software. Options l Paper feeding is crooked or the paper jams...
... sprocket units on continuous paper troubleshooting in this printer. Troubleshooting 6-11 The paper may be aligned correctly. Check the page-length setting in the paper. You may be old or creased. There may be trying to take up any slack across the width of the sprocket units to use the interface card or cable with the wrong specifications. Make sure that your software. Options l Paper feeding is crooked or the paper jams...
User Manual
Page 120
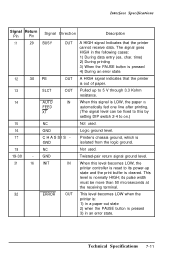
... this level becomes LOW, the printer controller is reset to its pulse width must be fixed to this by setting DIP switch 2-4 to 5 V through 3.3 Kohm resistance. 14 AUTO IN When this signal is cleared. time) 2) During printing 3) When the PAUSE button is pressed 4) During an error state. 12 30 PE OUT A HIGH signal indicates that the printer cannot receive data. Technical Specifications 7-11 XT (The signal level can...
... this level becomes LOW, the printer controller is reset to its pulse width must be fixed to this by setting DIP switch 2-4 to 5 V through 3.3 Kohm resistance. 14 AUTO IN When this signal is cleared. time) 2) During printing 3) When the PAUSE button is pressed 4) During an error state. 12 30 PE OUT A HIGH signal indicates that the printer cannot receive data. Technical Specifications 7-11 XT (The signal level can...


