User Manual
Page 9
... 4-1 Cut-Sheet Feeders 4-2 Pull Tractor 4-12 Interface Cards 4-14 Chapter 5 Maintenance and Transportation 5-1 Cleaning the Printer 5-2 Replacing the Ribbon Cartridge 5-3 Transporting the Printer 5-4 Chapter 6 Troubleshooting Problems and Solutions Power Supply Printing Paper Handling Options 6-1 6-2 6-3 6-4 6-8 6-10 Chapter 7 Technical Specifications 7-1 Printer Specifications 7-2 Interface Specifications 7-10 Option Specifications 7-14 Initialization 7-16 Chapter 8 Command Summary 8-1 Using the Command...
... 4-1 Cut-Sheet Feeders 4-2 Pull Tractor 4-12 Interface Cards 4-14 Chapter 5 Maintenance and Transportation 5-1 Cleaning the Printer 5-2 Replacing the Ribbon Cartridge 5-3 Transporting the Printer 5-4 Chapter 6 Troubleshooting Problems and Solutions Power Supply Printing Paper Handling Options 6-1 6-2 6-3 6-4 6-8 6-10 Chapter 7 Technical Specifications 7-1 Printer Specifications 7-2 Interface Specifications 7-10 Option Specifications 7-14 Initialization 7-16 Chapter 8 Command Summary 8-1 Using the Command...
User Manual
Page 11
... choose from several printer options to enhance your local Epson dealer for choosing the right interface and instructions on installing the cards are available to 50 sheets of paper or 25 plain bond envelopes without reloading. For more information on continuous multi-part forms. Film Ribbon Cartridge (#7768 for ActionPrinter 5000, #7770 for ActionPrinter 5500) This...
... choose from several printer options to enhance your local Epson dealer for choosing the right interface and instructions on installing the cards are available to 50 sheets of paper or 25 plain bond envelopes without reloading. For more information on continuous multi-part forms. Film Ribbon Cartridge (#7768 for ActionPrinter 5000, #7770 for ActionPrinter 5500) This...

User Manual
Page 14
Chapter 1 Setting Up the Printer Unpacking the Printer 1-2 Checking the parts 1-2 Choosing a Place for the Printer 1-3 Assembling the Printer 1-5 Removing the protective materials 1-5 Installing the ribbon cartridge 1-6 Attaching the paper guide 1-9 Testing the Printer 1-10 Plugging in the printer 1-10 Running the self test 1-10 Connecting the Printer to Your Computer 1-13 Configuring Your Software for the Printer 1-14 Choosing from a menu 1-14 Setting Up the Printer 1-1
Chapter 1 Setting Up the Printer Unpacking the Printer 1-2 Checking the parts 1-2 Choosing a Place for the Printer 1-3 Assembling the Printer 1-5 Removing the protective materials 1-5 Installing the ribbon cartridge 1-6 Attaching the paper guide 1-9 Testing the Printer 1-10 Plugging in the printer 1-10 Running the self test 1-10 Connecting the Printer to Your Computer 1-13 Configuring Your Software for the Printer 1-14 Choosing from a menu 1-14 Setting Up the Printer 1-1
User Manual
Page 15
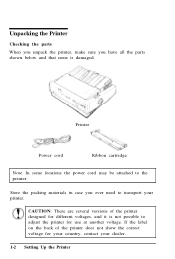
Printer Power cord Ribbon cartridge Note: In some locations the power cord may be attached to adjust the printer for use at another voltage. CAUTION: There are several versions of the printer does not show the correct voltage for different voltages, and it is damaged. If the label on the back of the printer... designed for your country, contact your printer. Store the packing materials in case you have all the parts shown below and that none is not possible to the printer. Unpacking the Printer Checking the parts When you unpack the printer, make sure you...
Printer Power cord Ribbon cartridge Note: In some locations the power cord may be attached to adjust the printer for use at another voltage. CAUTION: There are several versions of the printer does not show the correct voltage for different voltages, and it is damaged. If the label on the back of the printer... designed for your country, contact your printer. Store the packing materials in case you have all the parts shown below and that none is not possible to the printer. Unpacking the Printer Checking the parts When you unpack the printer, make sure you...
User Manual
Page 19
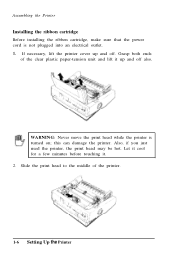
... print head to the middle of the clear plastic paper-tension unit and lift it . 2. If necessary, lift the printer cover up and off . Assembling the Printer Installing the ribbon cartridge Before installing the ribbon cartridge, make sure that the power cord is turned on; Let it cool for a few minutes before touching it...
... print head to the middle of the clear plastic paper-tension unit and lift it . 2. If necessary, lift the printer cover up and off . Assembling the Printer Installing the ribbon cartridge Before installing the ribbon cartridge, make sure that the power cord is turned on; Let it cool for a few minutes before touching it...
User Manual
Page 20
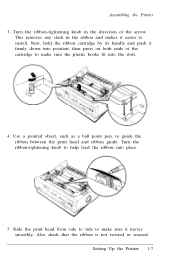
... both ends of the arrow. Also check that the ribbon is not twisted or creased. Setting Up the Printer 1-7 Next, hold the ribbon cartridge by its handle and push it moves smoothly. Turn the ribbon-tightening knob to guide the ribbon between the print head and ribbon guide. Use a pointed object, such as a ball point pen...
... both ends of the arrow. Also check that the ribbon is not twisted or creased. Setting Up the Printer 1-7 Next, hold the ribbon cartridge by its handle and push it moves smoothly. Turn the ribbon-tightening knob to guide the ribbon between the print head and ribbon guide. Use a pointed object, such as a ball point pen...
User Manual
Page 21
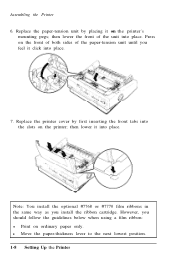
...on ordinary paper only. Note: You install the optional #7768 or #7770 film ribbons in the same way as you should follow the guidelines below when using a film ribbon: l Print on the printer; Replace the paper-tension unit by first inserting the front tabs into place. ...Assembling the Printer 6. l Move the paper-thickness lever to the next lowest position. 1-8 Setting Up the Printer Press on the printer's mounting pegs; then lower it click into place. However, you install the ribbon cartridge. Replace the printer cover by placing it on the ...
...on ordinary paper only. Note: You install the optional #7768 or #7770 film ribbons in the same way as you should follow the guidelines below when using a film ribbon: l Print on the printer; Replace the paper-tension unit by first inserting the front tabs into place. ...Assembling the Printer 6. l Move the paper-thickness lever to the next lowest position. 1-8 Setting Up the Printer Press on the printer's mounting pegs; then lower it click into place. However, you install the ribbon cartridge. Replace the printer cover by placing it on the ...
User Manual
Page 44
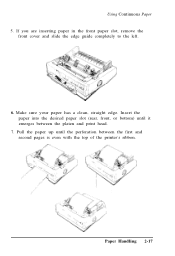
Using Continuous Paper 5. Insert the paper into the desired paper slot (rear, front, or bottom) until the perforation between the platen and print head. 7. If you are inserting paper in the front paper slot, remove the front cover and slide the edge guide completely to the left. 6. Pull the paper up until it emerges between the first and second pages is even with the top of the printer's ribbon. Paper Handling 2-17 Make sure your paper has a clean, straight edge.
Using Continuous Paper 5. Insert the paper into the desired paper slot (rear, front, or bottom) until the perforation between the platen and print head. 7. If you are inserting paper in the front paper slot, remove the front cover and slide the edge guide completely to the left. 6. Pull the paper up until it emerges between the first and second pages is even with the top of the printer's ribbon. Paper Handling 2-17 Make sure your paper has a clean, straight edge.
User Manual
Page 51
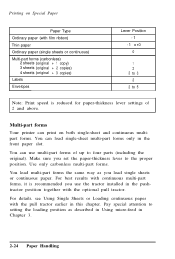
..., it is reduced for paper-thickness lever settings of up to four parts (including the original). Multi-part forms Your printer can print on Special Paper Paper Type Ordinary paper (with the optional pull tractor. Printing on both single-sheet and continuous... multipart forms. You can use the tractor installed in the pushtractor position together with film ribbon) Thin paper Ordinary paper (single sheets or continuous) Multi-part forms (carbonless) 2 sheets (original + 1 copy) 3 sheets (original + 2 copies) 4 sheets...
..., it is reduced for paper-thickness lever settings of up to four parts (including the original). Multi-part forms Your printer can print on Special Paper Paper Type Ordinary paper (with the optional pull tractor. Printing on both single-sheet and continuous... multipart forms. You can use the tractor installed in the pushtractor position together with film ribbon) Thin paper Ordinary paper (single sheets or continuous) Multi-part forms (carbonless) 2 sheets (original + 1 copy) 3 sheets (original + 2 copies) 4 sheets...
User Manual
Page 94
Chapter 5 Maintenance and Transportation Cleaning the Printer 5-2 Replacing the Ribbon Cartridge 5-3 Transporting the Printer 5-4 Maintenance and Transportation 5-1
Chapter 5 Maintenance and Transportation Cleaning the Printer 5-2 Replacing the Ribbon Cartridge 5-3 Transporting the Printer 5-4 Maintenance and Transportation 5-1
User Manual
Page 96
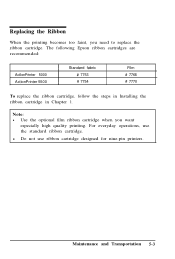
The following Epson ribbon cartridges are recommended: ActIonPrinter 5000 ActionPrinter 5500 Standard fabric # 7753 # 7754 Film # 7768 # 7770 To replace the ribbon cartridge, follow the steps in Installing the ribbon cartridge in Chapter 1. Replacing the Ribbon When the printing becomes too faint, you want especially high quality printing. Maintenance and Transportation 5-3 l Do not use the standard ribbon cartridge. For everyday...
The following Epson ribbon cartridges are recommended: ActIonPrinter 5000 ActionPrinter 5500 Standard fabric # 7753 # 7754 Film # 7768 # 7770 To replace the ribbon cartridge, follow the steps in Installing the ribbon cartridge in Chapter 1. Replacing the Ribbon When the printing becomes too faint, you want especially high quality printing. Maintenance and Transportation 5-3 l Do not use the standard ribbon cartridge. For everyday...
User Manual
Page 97
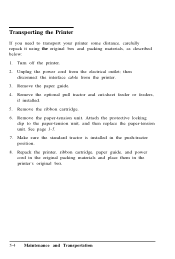
... disconnect the interface cable from the electrical outlet; Remove the ribbon cartridge. 6. Make sure the standard tractor is installed in the printer's original box. 5-4 Maintenance and Transportation Transporting the Printer If you need to the paper-tension unit, and then replace the paper-tension unit. ... locking clip to transport your printer some distance, carefully repack it using the original box and packing materials, as described below: 1. Remove the optional pull tractor and cut-sheet feeder or feeders, if installed. 5. Repack the printer, ribbon cartridge, paper guide, and ...
... disconnect the interface cable from the electrical outlet; Remove the ribbon cartridge. 6. Make sure the standard tractor is installed in the printer's original box. 5-4 Maintenance and Transportation Transporting the Printer If you need to the paper-tension unit, and then replace the paper-tension unit. ... locking clip to transport your printer some distance, carefully repack it using the original box and packing materials, as described below: 1. Remove the optional pull tractor and cut-sheet feeder or feeders, if installed. 5. Repack the printer, ribbon cartridge, paper guide, and ...

User Manual
Page 101
...built-in parallel interface, be incorrect. Turn off but nothing is printed. Wait a few minutes; The ribbon cartridge may be sure your dealer. • The PAUSE light is flickering and the printer does not print, or it is printing, but nothing is overheated. l The PAPER OUT light is a.... Check that the software is installed properly for a paper jam, a ribbon jam, or other problems. If the printer still does not print correctly, contact your cable is on . l The PAUSE light is off the printer and check for your interface cable meets both ends of the interface cable ...
...built-in parallel interface, be incorrect. Turn off but nothing is printed. Wait a few minutes; The ribbon cartridge may be sure your dealer. • The PAUSE light is flickering and the printer does not print, or it is printing, but nothing is overheated. l The PAPER OUT light is a.... Check that the software is installed properly for a paper jam, a ribbon jam, or other problems. If the printer still does not print correctly, contact your cable is on . l The PAUSE light is off the printer and check for your interface cable meets both ends of the interface cable ...
User Manual
Page 102
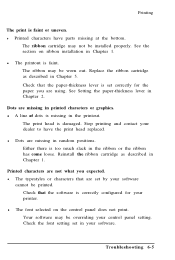
... or uneven. Check the font setting set in your printer. See the section on the control panel does not print. Dots are missing in printed characters or graphics. l Dots are missing in random positions. l Printed characters have the print head replaced. The ribbon may not be worn out. See Setting the paper...
... or uneven. Check the font setting set in your printer. See the section on the control panel does not print. Dots are missing in printed characters or graphics. l Dots are missing in random positions. l Printed characters have the print head replaced. The ribbon may not be worn out. See Setting the paper...
User Manual
Page 113
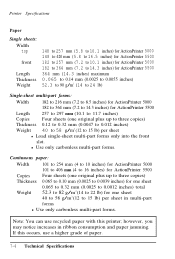
... 58 g/m2 (12 to 15 lb) per sheet in ribbon consumption and paper jamming. If this printer; Printer Specifications Paper Single sheets: Width top front Length Thickness Weight 148 to 257 mm (5.8 to 10.1 inches) for ActionPrinter 5000 148 to 420 mm (5.8 to 16.5 inches) for ActionPrinter 5500 182 to 257 mm (7.2 to 10.1 inches) for...
... 58 g/m2 (12 to 15 lb) per sheet in ribbon consumption and paper jamming. If this printer; Printer Specifications Paper Single sheets: Width top front Length Thickness Weight 148 to 257 mm (5.8 to 10.1 inches) for ActionPrinter 5000 148 to 420 mm (5.8 to 16.5 inches) for ActionPrinter 5500 182 to 257 mm (7.2 to 10.1 inches) for...
User Manual
Page 116
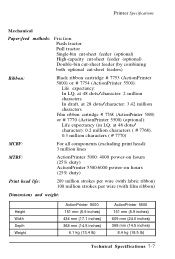
Printer Specifications Mechanical Paper-feed methods: Friction Push tractor Pull tractor Single-bin cut-sheet feeder (optional) High-capacity cut-sheet feeder (optional) Double-bin cut-sheet feeder (by combining both optional cut-sheet feeders) Ribbon: Black ribbon cartridge # 7753 (ActionPrinter 5000) or # 7754 (ActionPrinter 5500): Life expectancy: In LQ, at 48 dots/character: 2 million characters In...
Printer Specifications Mechanical Paper-feed methods: Friction Push tractor Pull tractor Single-bin cut-sheet feeder (optional) High-capacity cut-sheet feeder (optional) Double-bin cut-sheet feeder (by combining both optional cut-sheet feeders) Ribbon: Black ribbon cartridge # 7753 (ActionPrinter 5000) or # 7754 (ActionPrinter 5500): Life expectancy: In LQ, at 48 dots/character: 2 million characters In...
User Manual
Page 152
... materials replacing, 5-4 removing, 1-5 Pull tractor, 2-3, 2-11, 2-15, 4-12 Push tractor, 2-3, 2-10, 2-12 R Ribbon cartridge fabric, 1-2, 5-3, 7-7 film, 2, 5-3, 7-7 installing, 1-6 specifications, 7-7 S Safety instructions, v Scalable fonts, 3-19 Self test, 1-10 Single sheets, 2-4-8 Skip-over-perforation, 3-7, 3-11 Special paper, 2-23 Specifications, 7-1 Tractor, 2-9 installing, 2-9-11 position, 2-9 Transporting the printer, 5-4 Troubleshooting, 6-1-12 Typestyles, 3-19 U Unidirectional printing, 3-7, 3-10 Unpacking the...
... materials replacing, 5-4 removing, 1-5 Pull tractor, 2-3, 2-11, 2-15, 4-12 Push tractor, 2-3, 2-10, 2-12 R Ribbon cartridge fabric, 1-2, 5-3, 7-7 film, 2, 5-3, 7-7 installing, 1-6 specifications, 7-7 S Safety instructions, v Scalable fonts, 3-19 Self test, 1-10 Single sheets, 2-4-8 Skip-over-perforation, 3-7, 3-11 Special paper, 2-23 Specifications, 7-1 Tractor, 2-9 installing, 2-9-11 position, 2-9 Transporting the printer, 5-4 Troubleshooting, 6-1-12 Typestyles, 3-19 U Unidirectional printing, 3-7, 3-10 Unpacking the...


