
Technical Brief (Impact Printers)
Page 5
... 8.5mm Manual Rear : 14 inch Manual Rear : 8.5mm Help: Select printer Font. Manual Front : 17 inch Manual Front : 8.5mm Print Direction : Bi-d Skip over hold : OFF Interface mode : Auto I/F interval : 10s Input Buffer : ON Auto Tear off : OFF Auto Line Feed : OFF Control Code : ESC/P 0 slash : OFF Buzzer : ON Roll Paper : OFF F1 : Execute F10: Previous F2 : Quit CR : Select item F3 : Default F4 : Change Port Printer Status Monitor Utility The Printer Status Monitor provides Windows 95/98 users with automatic error messaging for direct printer to each printer L EPSON...
... 8.5mm Manual Rear : 14 inch Manual Rear : 8.5mm Help: Select printer Font. Manual Front : 17 inch Manual Front : 8.5mm Print Direction : Bi-d Skip over hold : OFF Interface mode : Auto I/F interval : 10s Input Buffer : ON Auto Tear off : OFF Auto Line Feed : OFF Control Code : ESC/P 0 slash : OFF Buzzer : ON Roll Paper : OFF F1 : Execute F10: Previous F2 : Quit CR : Select item F3 : Default F4 : Change Port Printer Status Monitor Utility The Printer Status Monitor provides Windows 95/98 users with automatic error messaging for direct printer to each printer L EPSON...

Product Brochure
Page 1
... same printer. Windows NT 3.51/4.0 printer drivers • Optional Ethernet and Type B interface cards Easy connectivity to an Ethernet network or a Type B device. It can print up to 480 cps, making it to popular networks for use within a multi-platform environment. • MTBF rating of the fastest 24 pin impact printers around. The EPSON LQ-2180 can print at draft speeds of up to go right out of single sheet, continuous forms, labels, checks, multiple-size...
... same printer. Windows NT 3.51/4.0 printer drivers • Optional Ethernet and Type B interface cards Easy connectivity to an Ethernet network or a Type B device. It can print up to 480 cps, making it to popular networks for use within a multi-platform environment. • MTBF rating of the fastest 24 pin impact printers around. The EPSON LQ-2180 can print at draft speeds of up to go right out of single sheet, continuous forms, labels, checks, multiple-size...
Product Brochure
Page 2
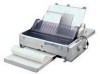
... change without notice. EPSON is a servicemark of their respective companies. "The World Leader in Impact Printing" is a trademark and Epson Connection is a registered trademark of any and all rights in the U.S. CPD-7513 50K 1/99 Printed on hours (POH) @25% duty Print head life 400 million strokes/wire Ribbon life 8 million characters (48 dots/character) Control Panel Buttons Operate, Pause, Load/Eject, LF/FF, Tear Off/Bin, Font, Pitch selection Indicators Pause, Paper Out, Micro Adjust, Tear...
... change without notice. EPSON is a servicemark of their respective companies. "The World Leader in Impact Printing" is a trademark and Epson Connection is a registered trademark of any and all rights in the U.S. CPD-7513 50K 1/99 Printed on hours (POH) @25% duty Print head life 400 million strokes/wire Ribbon life 8 million characters (48 dots/character) Control Panel Buttons Operate, Pause, Load/Eject, LF/FF, Tear Off/Bin, Font, Pitch selection Indicators Pause, Paper Out, Micro Adjust, Tear...
Product Information Guide
Page 1
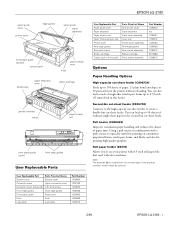
... User Replaceable Part Paper guide cover Paper separator Paper tension unit Paper thickness lever cap Printer cover Rear edge guides Rear push tractor Ribbon cartridge Tractor (pull or front push) Parts Price List Name Rear printer cover Paper separator Paper eject assembly Lever cap Printer cover assembly Rear edge guides Rear tractor assembly Ribbon cartridge Front tractor assembly Part Number 1028340 n/a 1039457 1039412 1025024 1039459 1039012 S015086 1039013 Options Paper Handling Options High-capacity cut-sheet feeder (C80673V) Feeds up to 150 sheets of ordinary single-sheet paper...
... User Replaceable Part Paper guide cover Paper separator Paper tension unit Paper thickness lever cap Printer cover Rear edge guides Rear push tractor Ribbon cartridge Tractor (pull or front push) Parts Price List Name Rear printer cover Paper separator Paper eject assembly Lever cap Printer cover assembly Rear edge guides Rear tractor assembly Ribbon cartridge Front tractor assembly Part Number 1028340 n/a 1039457 1039412 1025024 1039459 1039012 S015086 1039013 Options Paper Handling Options High-capacity cut-sheet feeder (C80673V) Feeds up to 150 sheets of ordinary single-sheet paper...
Product Information Guide
Page 2
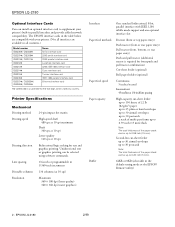
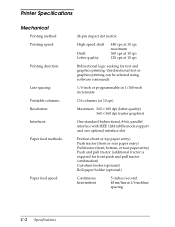
... card 32KB IEEE-488 interface card Coax interface card Twinax interface card IEEE-1284 parallel interface card Ethernet interface card The asterisk (V) is required for front push and pull tractor combination) Cut-sheet feeder (optional) Roll paper holder (optional) Paper feed speed Continuous 5 inches/second Intermittent 45 ms/line at 10 cpi Bidirectional logic seeking for the last digit, which varies by country. EPSON LQ-2180 2/99 Printer Specifications Mechanical Printing method Printing speed Printing direction Line spacing Printable columns Resolution 24-pin impact dot matrix High...
... card 32KB IEEE-488 interface card Coax interface card Twinax interface card IEEE-1284 parallel interface card Ethernet interface card The asterisk (V) is required for front push and pull tractor combination) Cut-sheet feeder (optional) Roll paper holder (optional) Paper feed speed Continuous 5 inches/second Intermittent 45 ms/line at 10 cpi Bidirectional logic seeking for the last digit, which varies by country. EPSON LQ-2180 2/99 Printer Specifications Mechanical Printing method Printing speed Printing direction Line spacing Printable columns Resolution 24-pin impact dot matrix High...
Product Information Guide
Page 16
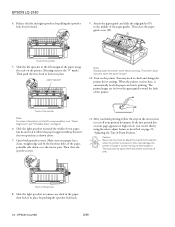
... first printed line on page 5. 6. EPSON LQ-2180 2/99 Release the left margin position, see "Paper Alignment" and "Printable Area" on your paper, but do not lock it in the paper; The printed pages are fed over the tractor pins. Then close the printer cover before printing. this by pushing the sprocket lock back. 16 - Slide the left sprocket to check and change the printer driver settings. paper support Note: Always close the sprocket covers. 11. The knob can fix...
... first printed line on page 5. 6. EPSON LQ-2180 2/99 Release the left margin position, see "Paper Alignment" and "Printable Area" on your paper, but do not lock it in the paper; The printed pages are fed over the tractor pins. Then close the printer cover before printing. this by pushing the sprocket lock back. 16 - Slide the left sprocket to check and change the printer driver settings. paper support Note: Always close the sprocket covers. 11. The knob can fix...

Product Information Guide
Page 19
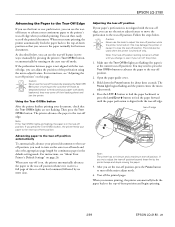
..., remove the front paper guide. Attach the printer cover and close the printer cover before printing. The printer does not print when the cover is turned off only. If you use the micro adjust feature, see "Adjusting the Top-of -form position. edge guides Load paper in place by pressing the LF/FF button or using the micro adjust feature. (To use the rear slot, replace the paper guide and make sure the edge guides are fed over the tractor pins on ; then lock it...
..., remove the front paper guide. Attach the printer cover and close the printer cover before printing. The printer does not print when the cover is turned off only. If you use the micro adjust feature, see "Adjusting the Top-of -form position. edge guides Load paper in place by pressing the LF/FF button or using the micro adjust feature. (To use the rear slot, replace the paper guide and make sure the edge guides are fed over the tractor pins on ; then lock it...
Product Information Guide
Page 22
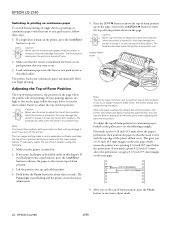
... edge of -form position, the printer also beeps and stops moving the paper. The Pause light starts flashing and the printer enters the micro adjust mode. 5. To adjust the top-of -form position using your printing appears too high or low on the page where the printer will start printing. If you mark a point 0.22 inch (5.5 mm) above the paper's perforation; Note: Your top-of -form position down the Pause button for continuous paper loaded on the...
... edge of -form position, the printer also beeps and stops moving the paper. The Pause light starts flashing and the printer enters the micro adjust mode. 5. To adjust the top-of -form position using your printing appears too high or low on the page where the printer will start printing. If you mark a point 0.22 inch (5.5 mm) above the paper's perforation; Note: Your top-of -form position down the Pause button for continuous paper loaded on the...
Product Information Guide
Page 23
... micro adjust mode. 6. EPSON LQ-2180 Advancing the Paper to the Tear-Off Edge If you use the front or rear push tractor, you can then easily tear off the printed document. Caution: Never use the tearoff feature to advance your paper's perforation is aligned with labels backward; Hold down the Pause button for continuous paper in two ways: manually by pressing the printer's Tear Off/Bin button, or automatically by turning on the auto tear...
... micro adjust mode. 6. EPSON LQ-2180 Advancing the Paper to the Tear-Off Edge If you use the front or rear push tractor, you can then easily tear off the printed document. Caution: Never use the tearoff feature to advance your paper's perforation is aligned with labels backward; Hold down the Pause button for continuous paper in two ways: manually by pressing the printer's Tear Off/Bin button, or automatically by turning on the auto tear...
Product Information Guide
Page 26
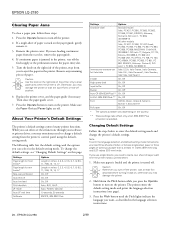
... language selection instructions (one page). 3. EPSON LQ-2180 Clearing Paper Jams To clear a paper jam, follow these functions through your software or printer driver, you to load a new sheet of letter- Turn the knob on the printer. Press the Operate button to turn off . Press the Operate button to enter the default-setting mode and change the default settings, see "Changing Default Settings" on the printer. Changing Default Settings Follow the steps below to turn on this page. Make sure paper is loaded and the printer is jammed in the printer, tear off Auto line feed Print...
... language selection instructions (one page). 3. EPSON LQ-2180 Clearing Paper Jams To clear a paper jam, follow these functions through your software or printer driver, you to load a new sheet of letter- Turn the knob on the printer. Press the Operate button to turn off . Press the Operate button to enter the default-setting mode and change the default settings, see "Changing Default Settings" on the printer. Changing Default Settings Follow the steps below to turn on this page. Make sure paper is loaded and the printer is jammed in the printer, tear off Auto line feed Print...
Product Information Guide
Page 27
... how the control panel lights help you press the Operate button to turn off the printer and exit the default-setting mode. Follow the instructions to print the remaining sets of continuous paper that are satisfactory, the printer is printed. To perform a self test, follow these instructions to load a new sheet of paper each set of characters is working properly and the problem probably results from your printer driver settings, application settings, computer, or interface cable. (Be sure to stop the self test, press the...
... how the control panel lights help you press the Operate button to turn off the printer and exit the default-setting mode. Follow the instructions to print the remaining sets of continuous paper that are satisfactory, the printer is printed. To perform a self test, follow these instructions to load a new sheet of paper each set of characters is working properly and the problem probably results from your printer driver settings, application settings, computer, or interface cable. (Be sure to stop the self test, press the...
User Manual
Page 9
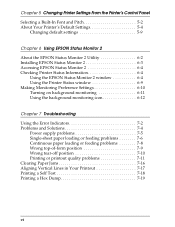
... Using the Printer Status window 6-9 Making Monitoring Preference Settings 6-10 Turning on background monitoring 6-11 Using the background monitoring icon 6-12 Chapter 7 Troubleshooting Using the Error Indicators 7-2 Problems and Solutions 7-4 Power supply problems 7-5 Single-sheet paper loading or feeding problems 7-6 Continuous paper loading or feeding problems 7-8 Wrong top-of-form position 7-9 Wrong tear-off position 7-10 Printing or printout quality problems 7-11 Clearing Paper Jams 7-16 Aligning Vertical Lines in Your Printout 7-17 Printing a Self Test 7-18 Printing a Hex...
... Using the Printer Status window 6-9 Making Monitoring Preference Settings 6-10 Turning on background monitoring 6-11 Using the background monitoring icon 6-12 Chapter 7 Troubleshooting Using the Error Indicators 7-2 Problems and Solutions 7-4 Power supply problems 7-5 Single-sheet paper loading or feeding problems 7-6 Continuous paper loading or feeding problems 7-8 Wrong top-of-form position 7-9 Wrong tear-off position 7-10 Printing or printout quality problems 7-11 Clearing Paper Jams 7-16 Aligning Vertical Lines in Your Printout 7-17 Printing a Self Test 7-18 Printing a Hex...
User Manual
Page 100
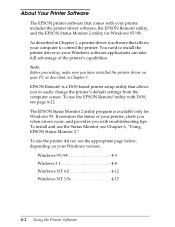
... EPSON Remote! utility, and the EPSON Status Monitor 2 utility for Windows 95. To use the printer driver, see Chapter 6, "Using EPSON Status Monitor 2." It monitors the status of the printer's capabilities. Note: Before proceeding, make sure you have installed the printer driver on your printer, alerts you when errors occur, and provides you to control the printer. To use the Status Monitor, see the appropriate page below, depending on your computer to easily change the printer's default settings...
... EPSON Remote! utility, and the EPSON Status Monitor 2 utility for Windows 95. To use the printer driver, see Chapter 6, "Using EPSON Status Monitor 2." It monitors the status of the printer's capabilities. Note: Before proceeding, make sure you have installed the printer driver on your printer, alerts you when errors occur, and provides you to control the printer. To use the Status Monitor, see the appropriate page below, depending on your computer to easily change the printer's default settings...

User Manual
Page 155
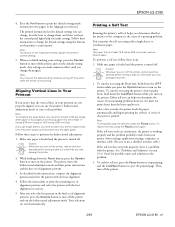
... Printer's Default Settings" in Chapter 1. The ribbon is printed on the auto line feed setting using the printer's default-setting mode or the EPSON Remote! Replace the ribbon cartridge as described in Chapter 4. Also, other parts of the printer must be checked when the print head is replaced. 7 All the text is worn out. Utility" in Chapter 1. Remove any slack in the ribbon by turning the ribbon-tightening knob, or reinstall the ribbon cartridge as described in Chapter 5 or "Using the EPSON Remote! Troubleshooting...
... Printer's Default Settings" in Chapter 1. The ribbon is printed on the auto line feed setting using the printer's default-setting mode or the EPSON Remote! Replace the ribbon cartridge as described in Chapter 4. Also, other parts of the printer must be checked when the print head is replaced. 7 All the text is worn out. Utility" in Chapter 1. Remove any slack in the ribbon by turning the ribbon-tightening knob, or reinstall the ribbon cartridge as described in Chapter 5 or "Using the EPSON Remote! Troubleshooting...
User Manual
Page 156
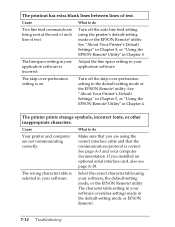
... Two line feed commands are not communicating correctly. The line space setting in the default-setting mode or the EPSON Remote! The printout has extra blank lines between lines of text. Turn off the auto line feed setting using the correct interface cable and that you installed an optional serial interface card, also see page A-18. Utility" in Chapter 4. See page A-3 and your software overrides settings made in your computer documentation. The character table setting in the default-setting mode or EPSON Remote!. 7-14 Troubleshooting
... Two line feed commands are not communicating correctly. The line space setting in the default-setting mode or the EPSON Remote! The printout has extra blank lines between lines of text. Turn off the auto line feed setting using the correct interface cable and that you installed an optional serial interface card, also see page A-18. Utility" in Chapter 4. See page A-3 and your software overrides settings made in your computer documentation. The character table setting in the default-setting mode or EPSON Remote!. 7-14 Troubleshooting
User Manual
Page 186
... can be selected using software commands. 1/6-inch or programmable in 1/360-inch increments 136 columns (at 1/6-inch line spacing C-2 Specifications Printer Specifications Mechanical Printing method: Printing speed: Printing direction: Line spacing: Printable columns: Resolution: Interfaces: Paper feed methods: Paper feed speed: 24-pin impact dot matrix High speed draft Draft Letter quality 480 cps at 10 cpi maximum 360 cps at 10 cpi 120 cps at 10 cpi Bidirectional logic seeking for front push and pull tractor combination) Cut-sheet feeder (optional) Roll paper holder (optional...
... can be selected using software commands. 1/6-inch or programmable in 1/360-inch increments 136 columns (at 1/6-inch line spacing C-2 Specifications Printer Specifications Mechanical Printing method: Printing speed: Printing direction: Line spacing: Printable columns: Resolution: Interfaces: Paper feed methods: Paper feed speed: 24-pin impact dot matrix High speed draft Draft Letter quality 480 cps at 10 cpi maximum 360 cps at 10 cpi 120 cps at 10 cpi Bidirectional logic seeking for front push and pull tractor combination) Cut-sheet feeder (optional) Roll paper holder (optional...
User Manual
Page 222
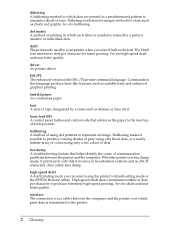
... letter quality. halftoning A method of the ESC/P2 printer command language. interface The connection (via a cable) between the printer and the computer. See also halftoning. Dithering works best for faster printing. ESC/P2 The enhanced version of using the printer's default-setting mode or the EPSON Remote! font A style of type designated by your printer when you can select using dot patterns to simulate a shade or tone. Also called data dump. driver See printer driver. utility.
... letter quality. halftoning A method of the ESC/P2 printer command language. interface The connection (via a cable) between the printer and the computer. See also halftoning. Dithering works best for faster printing. ESC/P2 The enhanced version of using the printer's default-setting mode or the EPSON Remote! font A style of type designated by your printer when you can select using dot patterns to simulate a shade or tone. Also called data dump. driver See printer driver. utility.
User Manual
Page 227
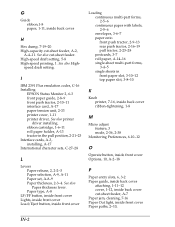
speed draft setting. See also High- I IBM 2391 Plus emulation codes, C-16 Installing EPSON Status Monitor 2, 6-3 front paper guide, 2-8-9 front push tractor, 2-10-11 interface card, A-17 paper tension unit, 2-33 printer cover, 1-11 printer driver, See also printer driver installing. Paper type, A-8 LF/FF button, inside front cover Lights, inside front cover Load/Eject button, inside front cover Loading continuous multi-part forms, 2-5-6 continuous paper with labels, 2-5-6 envelopes, 3-6-7 paper onto front push tractor, 2-9-13 rear push tractor, 2-16-19 pull tractor, 2-23-28 ...
speed draft setting. See also High- I IBM 2391 Plus emulation codes, C-16 Installing EPSON Status Monitor 2, 6-3 front paper guide, 2-8-9 front push tractor, 2-10-11 interface card, A-17 paper tension unit, 2-33 printer cover, 1-11 printer driver, See also printer driver installing. Paper type, A-8 LF/FF button, inside front cover Lights, inside front cover Load/Eject button, inside front cover Loading continuous multi-part forms, 2-5-6 continuous paper with labels, 2-5-6 envelopes, 3-6-7 paper onto front push tractor, 2-9-13 rear push tractor, 2-16-19 pull tractor, 2-23-28 ...
User Manual
Page 229
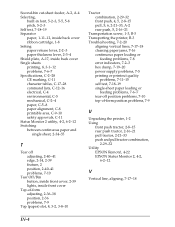
... printer, B-3 Troubleshooting, 7-2-20 aligning vertical lines, 7-17-18 cleaning paper jams, 7-16 continuous paper loading or feeding problems, 7-8 error indicators, 7-2-3 hex dump, 7-19-20 power supply problems, 7-5 printing or printout quality problems, 7-11-15 self test, 7-18-19 single-sheet paper loading or feeding problems, 7-6-7 tear-off position problems, 7-10 top-of-form position problems, 7-9 U Unpacking the printer, 1-2 Using front push tractor, 2-8-15 rear push tractor, 2-16-21 pull tractor, 2-21-33 push and pull tractor combination, 2-29-32 Utility EPSON Remote!, 4-22 EPSON Status...
... printer, B-3 Troubleshooting, 7-2-20 aligning vertical lines, 7-17-18 cleaning paper jams, 7-16 continuous paper loading or feeding problems, 7-8 error indicators, 7-2-3 hex dump, 7-19-20 power supply problems, 7-5 printing or printout quality problems, 7-11-15 self test, 7-18-19 single-sheet paper loading or feeding problems, 7-6-7 tear-off position problems, 7-10 top-of-form position problems, 7-9 U Unpacking the printer, 1-2 Using front push tractor, 2-8-15 rear push tractor, 2-16-21 pull tractor, 2-21-33 push and pull tractor combination, 2-29-32 Utility EPSON Remote!, 4-22 EPSON Status...
Service Manual
Page 33
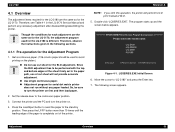
... sheet firmly set in the paper path, use cut sheet will perform Uni-D print instead of cut sheet for the Adjustment Program 1. E P S O N S ID M P r in e Figure 4-1. The following sections. 4.1.1 Pre-operation for the Bi-D adjustment. Therefore, observe the instructions given in the LQ-2170 Service Manual and perform any paper loaded. Set the release lever to the stand-by position. Move the cursor to turn the printer on first and then load paper. 2. Therefore, see Table...
... sheet firmly set in the paper path, use cut sheet will perform Uni-D print instead of cut sheet for the Adjustment Program 1. E P S O N S ID M P r in e Figure 4-1. The following sections. 4.1.1 Pre-operation for the Bi-D adjustment. Therefore, observe the instructions given in the LQ-2170 Service Manual and perform any paper loaded. Set the release lever to the stand-by position. Move the cursor to turn the printer on first and then load paper. 2. Therefore, see Table...


