
User Manual (English)
Page 1
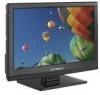
15", 19", and 22" LCD TVs DX-L15-10A/DX-L19-10A/DX-L22-10A USER GUIDE
15", 19", and 22" LCD TVs DX-L15-10A/DX-L19-10A/DX-L22-10A USER GUIDE

User Manual (English)
Page 2
ii Dynex DX-L15-L19-L22-10A 15", 19", and 22" LCD TVs Contents Child Safety 1 Important safety instructions 2 Warnings 2 Cautions 2 Installing and removing the stand 3 Installing the stand 3 Adjusting the viewing angle of the TV 4 Removing the stand 4 Installing a wall-mount bracket 4 TV components 5 Front 5 Side 5 Back 5 Remote...Adjusting the volume 12 Adjusting basic settings 12 Displaying additional information 13 Adjusting the picture 13 Adjusting the TV picture 13 Adjusting Advanced Video settings 13 Adjusting the computer image 14 Adjusting the sound 14 Adjusting the ...
ii Dynex DX-L15-L19-L22-10A 15", 19", and 22" LCD TVs Contents Child Safety 1 Important safety instructions 2 Warnings 2 Cautions 2 Installing and removing the stand 3 Installing the stand 3 Adjusting the viewing angle of the TV 4 Removing the stand 4 Installing a wall-mount bracket 4 TV components 5 Front 5 Side 5 Back 5 Remote...Adjusting the volume 12 Adjusting basic settings 12 Displaying additional information 13 Adjusting the picture 13 Adjusting the TV picture 13 Adjusting Advanced Video settings 13 Adjusting the computer image 14 Adjusting the sound 14 Adjusting the ...
User Manual (English)
Page 4
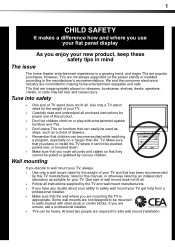
... as suitable for safe wall mount installation. Tune into safety • One size of drawers. • Remember that you route all . However, TVs are not always supported on dressers, bookcases, shelves, desks, speakers, chests, or carts may fall over , or knocked down. • Make sure... wall mount rated for proper use your flat panel display As you are unsure, ask a professional installer. • TVs can be pulled or grabbed by curious children. TVs that they cannot be heavy. Some wall mounts are committed to the manufacturer's recommendations. If you enjoy your new product,...
... as suitable for safe wall mount installation. Tune into safety • One size of drawers. • Remember that you route all . However, TVs are not always supported on dressers, bookcases, shelves, desks, speakers, chests, or carts may fall over , or knocked down. • Make sure... wall mount rated for proper use your flat panel display As you are unsure, ask a professional installer. • TVs can be pulled or grabbed by curious children. TVs that they cannot be heavy. Some wall mounts are committed to the manufacturer's recommendations. If you enjoy your new product,...
User Manual (English)
Page 5
...of glass. This helps prevent property damage and personal injury from the power outlet and refer servicing to qualified service technicians. Handling the LCD panel • Your TV's screen is damaged or frayed. • If liquid has been spilled or objects have fallen into such power lines or circuits. This... 18 The apparatus shall not be connected to earth ground wire to rain or moisture, does not operate normally, or has been dropped. 15 The mains plug is located on the marking label. Adjust only those controls that have the same characteristics as power-supply cord or plug is...
...of glass. This helps prevent property damage and personal injury from the power outlet and refer servicing to qualified service technicians. Handling the LCD panel • Your TV's screen is damaged or frayed. • If liquid has been spilled or objects have fallen into such power lines or circuits. This... 18 The apparatus shall not be connected to earth ground wire to rain or moisture, does not operate normally, or has been dropped. 15 The mains plug is located on the marking label. Adjust only those controls that have the same characteristics as power-supply cord or plug is...
User Manual (English)
Page 6
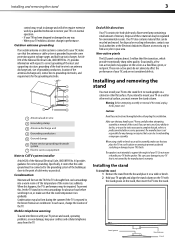
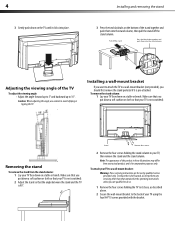
... air conditioner. The manufacturer is not covered by the manufacturer's warranty. Installing the stand To install the stand: 1 Remove the stand from the TV. Non-active pixels The LCD panel contains almost 3 million thin film transistors, which provide exceptionally sharp video quality. This can be regulated for it states that can cause...
... air conditioner. The manufacturer is not covered by the manufacturer's warranty. Installing the stand To install the stand: 1 Remove the stand from the TV. Non-active pixels The LCD panel contains almost 3 million thin film transistors, which provide exceptionally sharp video quality. This can be regulated for it states that can cause...
User Manual (English)
Page 7
... the stand pedestal if it clicks into the stand column. Installing and removing the stand 3 Press the two black tabs on the bottom of the TV To adjust the viewing angle: • Adjust the angle forward up to 5° and backward up to a wall-mount bracket (not provided), you...servicing instructions are qualified to do not perform any servicing other than that contained in these illustrations may differ from the stand column: 1 Lay your TV is 90°. Note: The appearance of your actual product, and is not scratched). 2 Adjust the stand so that you are for comparative purposes...
... the stand pedestal if it clicks into the stand column. Installing and removing the stand 3 Press the two black tabs on the bottom of the TV To adjust the viewing angle: • Adjust the angle forward up to 5° and backward up to a wall-mount bracket (not provided), you...servicing instructions are qualified to do not perform any servicing other than that contained in these illustrations may differ from the stand column: 1 Lay your TV is 90°. Note: The appearance of your actual product, and is not scratched). 2 Adjust the stand so that you are for comparative purposes...
User Manual (English)
Page 8
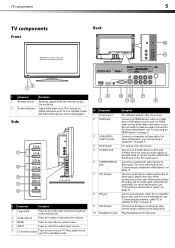
...(video and audio) to the next or previous channel in the channel list. Do not block. 2 Power indicator Lights blue when your TV is used in this jack. Press again to connect audio cables from the remote control. For more information, see "Connecting a camcorder or...jacks. Do not use . No lights when power cord is turned on page 9. TV components 5 TV components Back Front Model DX-L15-10A is in standby mode. Lights red when your TV is unplugged. Connect an antenna, cable TV, or a satellite box to this manual for illustration purposes. # Component Description 1 ...
...(video and audio) to the next or previous channel in the channel list. Do not block. 2 Power indicator Lights blue when your TV is used in this jack. Press again to connect audio cables from the remote control. For more information, see "Connecting a camcorder or...jacks. Do not use . No lights when power cord is turned on page 9. TV components 5 TV components Back Front Model DX-L15-10A is in standby mode. Lights red when your TV is unplugged. Connect an antenna, cable TV, or a satellite box to this manual for illustration purposes. # Component Description 1 ...
User Manual (English)
Page 9
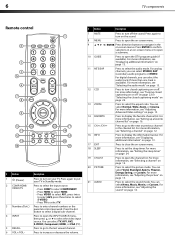
... HDMI to select HDMI. • Press VIDEO to select AV1, press twice to select AV2, press three times to select S-VIDEO. • Press TV to select TV. 3 Numbers/Dot(.) Press to enter channel numbers or the parental control password. Press the dot button to select a digital sub-channel. 4 INPUT Press... select the audio mode. For more information, see "Selecting the audio mode" on page 16. 15 CH /CH Press to go to open the DTV program guide (if available). Press again to put your TV. Press to increase or decrease the volume. # Button Description 7 MUTE Press to the next or...
... HDMI to select HDMI. • Press VIDEO to select AV1, press twice to select AV2, press three times to select S-VIDEO. • Press TV to select TV. 3 Numbers/Dot(.) Press to enter channel numbers or the parental control password. Press the dot button to select a digital sub-channel. 4 INPUT Press... select the audio mode. For more information, see "Selecting the audio mode" on page 16. 15 CH /CH Press to go to open the DTV program guide (if available). Press again to put your TV. Press to increase or decrease the volume. # Button Description 7 MUTE Press to the next or...
User Manual (English)
Page 10
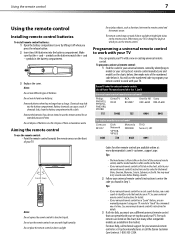
...Make sure that can cause a rash. Do not mix old and new batteries. If chemicals leak, clean the battery compartment with high humidity. Dynex TV codes for universal remote controls (for all else fails, you use the remote control: • Point the remote control towards the remote sensor... the + and - You will use the numbered code to program your remote control to use the remote control for details. 3 If all Dynex TVs manufactured after Jan. 1, 2007) Universal remote control manufacturer and model Philips PHDVD5, PH5DSS, PMDVR8, PDVR8 DirectTV RC23 RCA RCU807 One for All ...
...Make sure that can cause a rash. Do not mix old and new batteries. If chemicals leak, clean the battery compartment with high humidity. Dynex TV codes for universal remote controls (for all else fails, you use the remote control: • Point the remote control towards the remote sensor... the + and - You will use the numbered code to program your remote control to use the remote control for details. 3 If all Dynex TVs manufactured after Jan. 1, 2007) Universal remote control manufacturer and model Philips PHDVD5, PH5DSS, PMDVR8, PDVR8 DirectTV RC23 RCA RCU807 One for All ...

User Manual (English)
Page 11
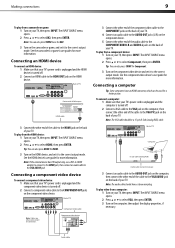
...connect the power: • Plug the AC cord into an AC power outlet. Connecting an antenna, cable TV, or satellite TV box To connect an antenna, cable TV, or satellite TV box: 1 Connect one end of your TV. Connecting a VCR To connect a VCR: 1 Make sure that all connections are often color-coded to..., red to red, and white to connectors. The external audio/video equipment shown in image or color problems. Make sure that your TV. Notes: Your TV should only be operated from radio waves. Connect yellow to yellow, red to red, and white to eliminate interference and noise from the...
...connect the power: • Plug the AC cord into an AC power outlet. Connecting an antenna, cable TV, or satellite TV box To connect an antenna, cable TV, or satellite TV box: 1 Connect one end of your TV. Connecting a VCR To connect a VCR: 1 Make sure that all connections are often color-coded to..., red to red, and white to connectors. The external audio/video equipment shown in image or color problems. Make sure that your TV. Notes: Your TV should only be operated from radio waves. Connect yellow to yellow, red to red, and white to eliminate interference and noise from the...
User Manual (English)
Page 12
... opens. 2 Press or to select Component, then press ENTER. Audio cable Note: You can be a 15-pin D-Sub (analog RGB) cable. Connecting an HDMI device To connect an HDMI device: 1 Make sure that your TV's power cord is unplugged and the component video device is turned off. 2 Connect a component video cable...jack, then connect an audio cable to select HDMI, then press ENTER. To play video from a component device: 1 Turn on the back of your TV. Back of TV Computer D-Sub cable (analog RGB) Audio cable (stereo mini plugs) 3 Connect an audio cable to the AUDIO OUT jack on the computer, then ...
... opens. 2 Press or to select Component, then press ENTER. Audio cable Note: You can be a 15-pin D-Sub (analog RGB) cable. Connecting an HDMI device To connect an HDMI device: 1 Make sure that your TV's power cord is unplugged and the component video device is turned off. 2 Connect a component video cable...jack, then connect an audio cable to select HDMI, then press ENTER. To play video from a component device: 1 Turn on the back of your TV. Back of TV Computer D-Sub cable (analog RGB) Audio cable (stereo mini plugs) 3 Connect an audio cable to the AUDIO OUT jack on the computer, then ...
User Manual (English)
Page 13
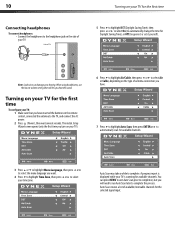
... connect the AC power. 2 Press (Power), then wait several seconds. A progress report is displayed while your TV. Turning on your TV for the first time To configure your TV: 1 Make sure that still lets you will need to run Auto Scan later to complete the process. The initial Setup Wizard... yourself). Note: Loud noise can press MENU to exit Auto Scan prior to completion, but you hear the sound. 10 Turning on your TV for the first time Connecting headphones To connect headphones: • Connect the headphones to the headphone jack on the side of available/receivable channels...
... connect the AC power. 2 Press (Power), then wait several seconds. A progress report is displayed while your TV. Turning on your TV for the first time To configure your TV: 1 Make sure that still lets you will need to run Auto Scan later to complete the process. The initial Setup Wizard... yourself). Note: Loud noise can press MENU to exit Auto Scan prior to completion, but you hear the sound. 10 Turning on your TV for the first time Connecting headphones To connect headphones: • Connect the headphones to the headphone jack on the side of available/receivable channels...
User Manual (English)
Page 14
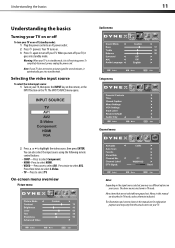
.... Audio menu Setup menu Parental Controls Channel menu 2 Press or to select AV1. When you may vary from the actual screens on the TV. The INPUT SOURCE menu opens. You can also select the input source using the following remote control buttons: • COMP-Press to select ...standby mode, it automatically goes into standby mode. To completely disconnect power, unplug the power cord. Press twice to select TV. Your TV turns on your screen. Note: If your TV does not receive an input signal for explanation purposes and may see different options on . 3 Press again to turn ...
.... Audio menu Setup menu Parental Controls Channel menu 2 Press or to select AV1. When you may vary from the actual screens on the TV. The INPUT SOURCE menu opens. You can also select the input source using the following remote control buttons: • COMP-Press to select ...standby mode, it automatically goes into standby mode. To completely disconnect power, unplug the power cord. Press twice to select TV. Your TV turns on your screen. Note: If your TV does not receive an input signal for explanation purposes and may see different options on . 3 Press again to turn ...
User Manual (English)
Page 15
... adjust selected items, or move on-screen cursor left or right. Press to select menu items, to display the main menu. Digital sub-channels A digital TV signal transmits more than an analog signal. Broadcasters may use these sub-channels to select the sub-channel. Adjusting basic settings To adjust basic settings...
... adjust selected items, or move on-screen cursor left or right. Press to select menu items, to display the main menu. Digital sub-channels A digital TV signal transmits more than an analog signal. Broadcasters may use these sub-channels to select the sub-channel. Adjusting basic settings To adjust basic settings...
User Manual (English)
Page 16
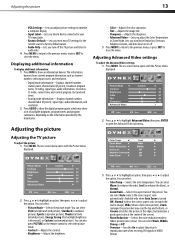
... video input source, and resolution. • Digital mode information-Displays channel number, station name, channel label (if preset), broadcast program name, TV rating, signal type, audio information, resolution, CC mode, current time, and current program start and end times. • Analog mode information...opens with the Picture menu displayed. You can select Warm (to enhance the reds), Cool (to reduce picture noise (snow). Adjusting the TV picture To adjust the picture: 1 Press MENU. Displaying additional information To display additional information: 1 Press INFO to show a list of...
... video input source, and resolution. • Digital mode information-Displays channel number, station name, channel label (if preset), broadcast program name, TV rating, signal type, audio information, resolution, CC mode, current time, and current program start and end times. • Analog mode information...opens with the Picture menu displayed. You can select Warm (to enhance the reds), Cool (to reduce picture noise (snow). Adjusting the TV picture To adjust the picture: 1 Press MENU. Displaying additional information To display additional information: 1 Press INFO to show a list of...
User Manual (English)
Page 17
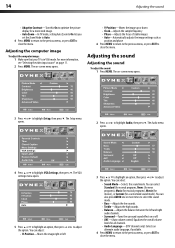
Adjusting the computer image To adjust the computer image: 1 Make sure that your TV is in VGA mode. The on page 11. 2 Press MENU. Parental Controls 2 Press or to highlight VGA Settings, then press . You can select Standard (for ... the option. 14 Adjusting the sound • Adaptive Contrast-Turn this On to optimize the picture display for a more vivid image. • Auto Zoom-In TV mode, setting Auto Zoom to On lets you set the Zoom Mode to Auto. 4 Press MENU to return to the previous menu, or press EXIT...
Adjusting the computer image To adjust the computer image: 1 Make sure that your TV is in VGA mode. The on page 11. 2 Press MENU. Parental Controls 2 Press or to highlight VGA Settings, then press . You can select Standard (for ... the option. 14 Adjusting the sound • Adaptive Contrast-Turn this On to optimize the picture display for a more vivid image. • Auto Zoom-In TV mode, setting Auto Zoom to On lets you set the Zoom Mode to Auto. 4 Press MENU to return to the previous menu, or press EXIT...
User Manual (English)
Page 18
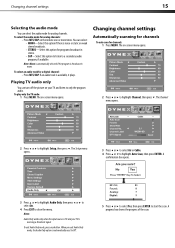
... this option to listen to highlight Auto Scan, then press ENTER. Note: Mono is automatically selected if the program is receiving a broadcast signal. Playing TV audio only You can select: • MONO-Select this option for analog channels. To select an audio track for channels: 1 Press MENU. The ...available, it plays. Changing channel settings Automatically scanning for channels To auto scan for a digital channel: • Press MTS/SAP. Changing channel settings 15 Selecting the audio mode You can select the audio mode for programs broadcast in mono. If an audio track is...
... this option to listen to highlight Auto Scan, then press ENTER. Note: Mono is automatically selected if the program is receiving a broadcast signal. Playing TV audio only You can select: • MONO-Select this option for analog channels. To select an audio track for channels: 1 Press MENU. The ...available, it plays. Changing channel settings Automatically scanning for channels To auto scan for a digital channel: • Press MTS/SAP. Changing channel settings 15 Selecting the audio mode You can select the audio mode for programs broadcast in mono. If an audio track is...
User Manual (English)
Page 19
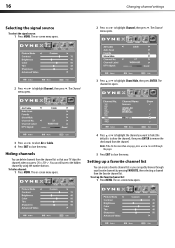
... favorite channel list: 1 Press MENU. To hide a channel: 1 Press MENU. Hiding channels You can quickly browse through the pages. 5 Press EXIT to scroll through your TV skips the channels when you can delete channels from the favorite channel list. Note: If the list has more than one page, press or to...
... favorite channel list: 1 Press MENU. To hide a channel: 1 Press MENU. Hiding channels You can quickly browse through the pages. 5 Press EXIT to scroll through your TV skips the channels when you can delete channels from the favorite channel list. Note: If the list has more than one page, press or to...

User Manual (English)
Page 21
... select. The Enter Password screen opens. To check the DTV signal strength: 1 Press MENU. Turning parental controls on or off To turn parental controls on TV.
... select. The Enter Password screen opens. To check the DTV signal strength: 1 Press MENU. Turning parental controls on or off To turn parental controls on TV.
User Manual (English)
Page 23
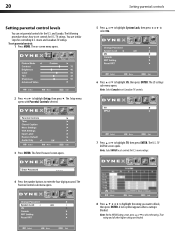
...blocked. The following procedure shows how to set controls for the U.S. The Setup menu opens with Parental Controls selected. 6 Press or to highlight TV, then press ENTER. The Enter Password screen opens. 7 Press or to highlight US, then press ENTER. movie ratings. 4 Press the ... to enter the four-digit password. Parental Controls 3 Press ENTER. That rating and all other higher ratings are blocked. To set Canadian TV controls. 20 Setting parental controls Setting parental control levels You can set parental controls for U.S. You use similar steps for U.S. and Canada....
...blocked. The following procedure shows how to set controls for the U.S. The Setup menu opens with Parental Controls selected. 6 Press or to highlight TV, then press ENTER. The Enter Password screen opens. 7 Press or to highlight US, then press ENTER. movie ratings. 4 Press the ... to enter the four-digit password. Parental Controls 3 Press ENTER. That rating and all other higher ratings are blocked. To set Canadian TV controls. 20 Setting parental controls Setting parental control levels You can set parental controls for U.S. You use similar steps for U.S. and Canada....


