User Manual (English)
Page 4
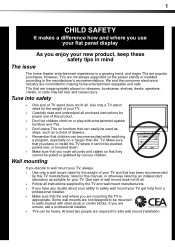
... cannot be pushed, pulled over and cause injury. Some wall mounts are not always supported on a "larger-than-life" TV. 1 CHILD SAFETY It makes a difference how and where you use of this manual, or otherwise listed by this TV manufacturer, listed in mind The issue The home theater entertainment experience is appropriate. However...
... cannot be pushed, pulled over and cause injury. Some wall mounts are not always supported on a "larger-than-life" TV. 1 CHILD SAFETY It makes a difference how and where you use of this manual, or otherwise listed by this TV manufacturer, listed in mind The issue The home theater entertainment experience is appropriate. However...
User Manual (English)
Page 8
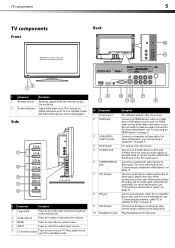
... . Connect an S-Video device to this jack. Connect an antenna, cable TV, or a satellite box to this jack. Plug headphones into this manual for audio left). For service only. For more information, see "Connecting an antenna, cable TV, or satellite TV box" on page 8. Connect an AV device (video and audio) to ..., see "Connecting an HDMI device" on page 9. For more information, see "Connecting a computer" on page 9. Do not block. 2 Power indicator Lights blue when your TV in standby mode. TV components 5 TV components Back Front Model DX-L15-10A is turned on.
... . Connect an S-Video device to this jack. Connect an antenna, cable TV, or a satellite box to this jack. Plug headphones into this manual for audio left). For service only. For more information, see "Connecting an antenna, cable TV, or satellite TV box" on page 8. Connect an AV device (video and audio) to ..., see "Connecting an HDMI device" on page 9. For more information, see "Connecting a computer" on page 9. Do not block. 2 Power indicator Lights blue when your TV in standby mode. TV components 5 TV components Back Front Model DX-L15-10A is turned on.
User Manual (English)
Page 10
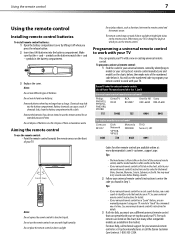
...remote control to work with a cloth. You will use the remote control. Dynex TV codes for universal remote controls (for all else fails, you can manually program it using your TV remote to work with your TV You can cause a rash. Do not place objects, such as hazardous waste.... See your universal remote control's instructions for details. 3 If all Dynex TVs manufactured after Jan. 1, 2007) Universal ...
...remote control to work with a cloth. You will use the remote control. Dynex TV codes for universal remote controls (for all else fails, you can manually program it using your TV remote to work with your TV You can cause a rash. Do not place objects, such as hazardous waste.... See your universal remote control's instructions for details. 3 If all Dynex TVs manufactured after Jan. 1, 2007) Universal ...

User Manual (English)
Page 11
... satellite RF jack RF coaxial cable (75 ohm) 2 Connect the other end of the cable to the S-Video jack instead of using your TV. Back of TV AV1 IN AUDI-L and AUDIO-R jacks AV1 IN VIDEO Note: Cables are tight and secure. For a better picture, you can connect an S-Video cable ... to connectors. The INPUT SOURCE menu opens. 2 Press or to white. Connecting a camcorder or game Tip: Some game consoles have questions, refer to the user manual that all connections are often color-coded to the AV2 IN VIDEO, AUDIO-L, and AUDIO-R jacks on the back of your equipment. Connect yellow to...
... satellite RF jack RF coaxial cable (75 ohm) 2 Connect the other end of the cable to the S-Video jack instead of using your TV. Back of TV AV1 IN AUDI-L and AUDIO-R jacks AV1 IN VIDEO Note: Cables are tight and secure. For a better picture, you can connect an S-Video cable ... to connectors. The INPUT SOURCE menu opens. 2 Press or to white. Connecting a camcorder or game Tip: Some game consoles have questions, refer to the user manual that all connections are often color-coded to the AV2 IN VIDEO, AUDIO-L, and AUDIO-R jacks on the back of your equipment. Connect yellow to...
User Manual (English)
Page 14
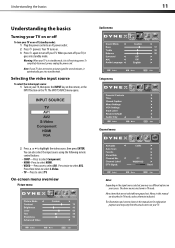
... press the INPUT key on the remote, or the INPUT button on the TV. Menus in this manual are shown in TV mode, unless otherwise indicated. To completely disconnect power, unplug the power cord. Press twice to select AV1. When you may vary from the actual screens ... once to select AV2. The illustrations and screens shown in standby mode, it is in the manual are grayed out. Understanding the basics 11 Understanding the basics Turning your TV on or off To turn your TV, it goes into standby mode. Audio menu Setup menu Parental Controls Channel menu 2 Press or to...
... press the INPUT key on the remote, or the INPUT button on the TV. Menus in this manual are shown in TV mode, unless otherwise indicated. To completely disconnect power, unplug the power cord. Press twice to select AV1. When you may vary from the actual screens ... once to select AV2. The illustrations and screens shown in standby mode, it is in the manual are grayed out. Understanding the basics 11 Understanding the basics Turning your TV on or off To turn your TV, it goes into standby mode. Audio menu Setup menu Parental Controls Channel menu 2 Press or to...
User Manual (English)
Page 27
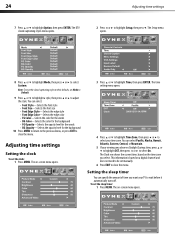
... styles to adjust the style. The on a digital channel and does not need to close the menu. The on the time zone you want your TV to highlight Option, then press ENTER. 24 Adjusting time settings 7 Press or to wait before it automatically turns off. Note: To reset the closed .... The time setting menu opens. 4 Press or to highlight Time Zone, then press or to select Custom. Adjusting time settings Setting the clock To set manually. 6 Press EXIT to be set the clock: 1 Press MENU. You can select: • Font Style-Selects the font style • Font Size-Selects the font...
... styles to adjust the style. The on a digital channel and does not need to close the menu. The on the time zone you want your TV to highlight Option, then press ENTER. 24 Adjusting time settings 7 Press or to wait before it automatically turns off. Note: To reset the closed .... The time setting menu opens. 4 Press or to highlight Time Zone, then press or to select Custom. Adjusting time settings Setting the clock To set manually. 6 Press EXIT to be set the clock: 1 Press MENU. You can select: • Font Style-Selects the font style • Font Size-Selects the font...


