Warranty (English)
Page 1
... not cover: • Customer instruction • Installation • Set up adjustments • Cosmetic damage • Damage due to your purchase of defects in the United States and Canada. If service of products and parts are not returned to be defective by an authorized Dynex repair center or store personnel, Dynex will have an Insignia-approved repair person dispatched to acts...
... not cover: • Customer instruction • Installation • Set up adjustments • Cosmetic damage • Damage due to your purchase of defects in the United States and Canada. If service of products and parts are not returned to be defective by an authorized Dynex repair center or store personnel, Dynex will have an Insignia-approved repair person dispatched to acts...

User Manual (English)
Page 2
ii Dynex DX-L15-L19-L22-10A 15", 19", and 22" LCD TVs Contents Child Safety 1 Important safety instructions 2 Warnings 2 Cautions 2 Installing and removing the stand 3 Installing the stand 3 Adjusting the viewing angle of the TV 4 Removing the stand 4 Installing a wall-mount bracket 4 TV components 5 Front 5 Side 5 Back 5 Remote control 6 Using the remote control 7 Installing remote control batteries 7 Aiming the remote control 7 Programming a universal remote control to work with your TV 7 Making connections 8 Connecting the power 8 Connecting an antenna, cable TV, or ...
ii Dynex DX-L15-L19-L22-10A 15", 19", and 22" LCD TVs Contents Child Safety 1 Important safety instructions 2 Warnings 2 Cautions 2 Installing and removing the stand 3 Installing the stand 3 Adjusting the viewing angle of the TV 4 Removing the stand 4 Installing a wall-mount bracket 4 TV components 5 Front 5 Side 5 Back 5 Remote control 6 Using the remote control 7 Installing remote control batteries 7 Aiming the remote control 7 Programming a universal remote control to work with your TV 7 Making connections 8 Connecting the power 8 Connecting an antenna, cable TV, or ...
User Manual (English)
Page 3
...DTV signal strength 18 Setting parental controls 18 Turning parental controls on or off 18 Setting or changing the password 19 Setting parental control levels 20 Downloading rating information 21 Using closed captioning 22 Turning closed captioning on or off 22 Selecting the closed captioning mode 22 Customizing DTV closed captioning styles 23 Adjusting time settings 24 Setting the clock 24 Setting the sleep timer 24 Adjusting menu settings 25 Selecting the menu language and transparency 25 Labeling an input source 26 Restoring default settings 26 Troubleshooting 27 Video and...
...DTV signal strength 18 Setting parental controls 18 Turning parental controls on or off 18 Setting or changing the password 19 Setting parental control levels 20 Downloading rating information 21 Using closed captioning 22 Turning closed captioning on or off 22 Selecting the closed captioning mode 22 Customizing DTV closed captioning styles 23 Adjusting time settings 24 Setting the clock 24 Setting the sleep timer 24 Adjusting menu settings 25 Selecting the menu language and transparency 25 Labeling an input source 26 Restoring default settings 26 Troubleshooting 27 Video and...
User Manual (English)
Page 4
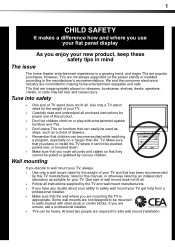
Tune into safety • One size of TV stand does not fit all enclosed instructions for proper use your flat panel display As you are mounting the TV is a growing trend, and larger TVs are popular purchases. TVs that are required for your TV. • Carefully read and understand all . One size of wall mount does not fit all. • Follow all cords and cables so that you decide...
Tune into safety • One size of TV stand does not fit all enclosed instructions for proper use your flat panel display As you are mounting the TV is a growing trend, and larger TVs are popular purchases. TVs that are required for your TV. • Carefully read and understand all . One size of wall mount does not fit all. • Follow all cords and cables so that you decide...
User Manual (English)
Page 5
... is located on the marking label. Class I apparatus. No user-serviceable parts are provided for your TV only from tip-over. Safety check After completing any heat sources such as vases, shall be exposed to avoid injury from the type of power source indicated on the back of your TV or hit, jolt, or press hard against the LCD panel. Power source Operate your device receiver during...
... is located on the marking label. Class I apparatus. No user-serviceable parts are provided for your TV only from tip-over. Safety check After completing any heat sources such as vases, shall be exposed to avoid injury from the type of power source indicated on the back of your TV or hit, jolt, or press hard against the LCD panel. Power source Operate your device receiver during...
User Manual (English)
Page 6
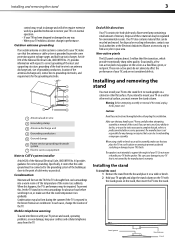
...-active pixels The LCD panel contains almost 3 million thin film transistors, which provide exceptionally sharp video quality. If you intend to mount your TV on the screen as close to CATV system installer Article 820 of the room rises suddenly. Cautions: Read these materials may appear on a wall or other flat surface. Installing the stand To install the stand: 1 Remove the stand from cool surroundings into...
...-active pixels The LCD panel contains almost 3 million thin film transistors, which provide exceptionally sharp video quality. If you intend to mount your TV on the screen as close to CATV system installer Article 820 of the room rises suddenly. Cautions: Read these materials may appear on a wall or other flat surface. Installing the stand To install the stand: 1 Remove the stand from cool surroundings into...
User Manual (English)
Page 7
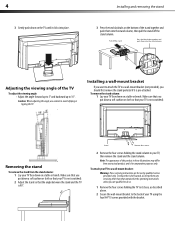
... and push them into the stand column. 4 3 Gently push down on the TV until it is 90°. Installing and removing the stand 3 Press the two black tabs on a table or bench. Caution: When adjusting the angle, use by qualified service personnel only. Stand Remove four screws 2 Remove the four screws holding the TV to its base, as described above. 2 Secure the wall-mount bracket to avoid slipping or tipping...
... and push them into the stand column. 4 3 Gently push down on the TV until it is 90°. Installing and removing the stand 3 Press the two black tabs on a table or bench. Caution: When adjusting the angle, use by qualified service personnel only. Stand Remove four screws 2 Remove the four screws holding the TV to its base, as described above. 2 Secure the wall-mount bracket to avoid slipping or tipping...
User Manual (English)
Page 8
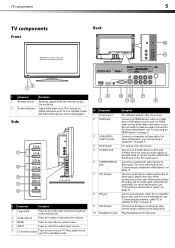
... information, see "Connecting a component video device" on your TV is in standby mode. Connect a computer to this jack. Match the color of the connectors to the color of the jacks (yellow for video, red for audio right, and white for illustration purposes. # Component Description 1 Remote sensor Receives signals from the device to turn on page 9. Connect an S-Video device to these jacks. TV components 5 TV components Back Front Model DX-L15-10A is used in this manual for audio left). Lights red when your...
... information, see "Connecting a component video device" on your TV is in standby mode. Connect a computer to this jack. Match the color of the connectors to the color of the jacks (yellow for video, red for audio right, and white for illustration purposes. # Component Description 1 Remote sensor Receives signals from the device to turn on page 9. Connect an S-Video device to these jacks. TV components 5 TV components Back Front Model DX-L15-10A is used in this manual for audio left). Lights red when your...
User Manual (English)
Page 9
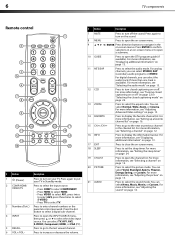
... or "Selecting the closed captioning on page 15. You can select STEREO, SAP (secondary audio program), or MONO. For digital channels, you can select TV, AV1, AV2, S-VIDEO, Component, HDMI, or VGA (PC). 5 RECALL Press to go to enter channel numbers or the parental control password. For more information, see "Adjusting Advanced Video settings" on -screen menus. For more information, see "Setting the sleep timer" on -screen menu. 9 / ENTER Press direction buttons to open the channel list. You can...
... or "Selecting the closed captioning on page 15. You can select STEREO, SAP (secondary audio program), or MONO. For digital channels, you can select TV, AV1, AV2, S-VIDEO, Component, HDMI, or VGA (PC). 5 RECALL Press to go to enter channel numbers or the parental control password. For more information, see "Adjusting Advanced Video settings" on -screen menus. For more information, see "Setting the sleep timer" on -screen menu. 9 / ENTER Press direction buttons to open the channel list. You can...
User Manual (English)
Page 10
... 115 10463 135 0464 8043 Set-top box manufacturer and model Comcast M1057 Dish Network VIP508, VIP622 Motorola DRC800 0463 720 0463 TIVO Series 3, HD 0091 Codes for your universal remote control or set -top box and your TV. Remove batteries when they no longer have a charge. Chemicals may need to work if direct sunlight or bright light shines on the remote sensor. Do not dispose of your...
... 115 10463 135 0464 8043 Set-top box manufacturer and model Comcast M1057 Dish Network VIP508, VIP622 Motorola DRC800 0463 720 0463 TIVO Series 3, HD 0091 Codes for your universal remote control or set -top box and your TV. Remove batteries when they no longer have a charge. Chemicals may need to work if direct sunlight or bright light shines on the remote sensor. Do not dispose of your...

User Manual (English)
Page 11
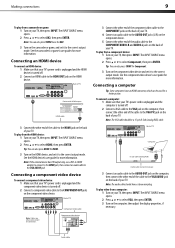
If the antenna is turned off. 2 Connect an AV cable to the AV VIDEO OUT jack on the back of your TV's power cord is unplugged and the VCR is not installed correctly, contact qualified service personnel to connectors. Back of VCR AV cable S-Video cable 3 Connect the other end of TV Camcorder or game Note: Cables are often color-coded to correct the problem. The INPUT SOURCE menu opens. 2 Press or to white. Side...
If the antenna is turned off. 2 Connect an AV cable to the AV VIDEO OUT jack on the back of your TV's power cord is unplugged and the VCR is not installed correctly, contact qualified service personnel to connectors. Back of VCR AV cable S-Video cable 3 Connect the other end of TV Camcorder or game Note: Cables are often color-coded to correct the problem. The INPUT SOURCE menu opens. 2 Press or to white. Side...
User Manual (English)
Page 12
... TV's power cord is unplugged and the component video device is turned off . 2 Connect a component video cable to the correct output mode. See the component video device's user guide for more information. Back of TV Computer D-Sub cable (analog RGB) Audio cable (stereo mini plugs) 3 Connect an audio cable to the AUDIO OUT jack on the computer, then connect the other end of the cable to the HDMI jack on the back of TV Note: Cables are often color-coded to the COMPONENT AUDIO-R and AUDIO...
... TV's power cord is unplugged and the component video device is turned off . 2 Connect a component video cable to the correct output mode. See the component video device's user guide for more information. Back of TV Computer D-Sub cable (analog RGB) Audio cable (stereo mini plugs) 3 Connect an audio cable to the AUDIO OUT jack on the computer, then connect the other end of the cable to the HDMI jack on the back of TV Note: Cables are often color-coded to the COMPONENT AUDIO-R and AUDIO...
User Manual (English)
Page 13
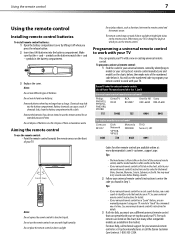
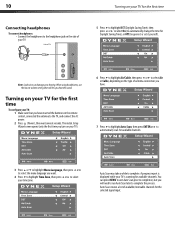
... need to run Auto Scan later to complete. A progress report is displayed while your hearing. When using headphones, use the lowest volume setting that you hear the sound. The initial Setup Wizard screen opens (only the first time you turn on the type of available/receivable channels for the selected signal input. Auto Scan creates a list of antenna connection you have inserted the batteries in the remote control, connected the antenna to the TV, and connect the AC power. 2 Press (Power...
... need to run Auto Scan later to complete. A progress report is displayed while your hearing. When using headphones, use the lowest volume setting that you hear the sound. The initial Setup Wizard screen opens (only the first time you turn on the type of available/receivable channels for the selected signal input. Auto Scan creates a list of antenna connection you have inserted the batteries in the remote control, connected the antenna to the TV, and connect the AC power. 2 Press (Power...
User Manual (English)
Page 15
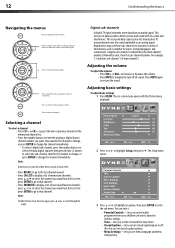
... Setup, then press . Digital sub-channels A digital TV signal transmits more than an analog signal. to increase or decrease the volume. • Press MUTE to temporarily turn closed caption options. • Menu Settings-Lets you want , then wait for the channel to change, or press ENTER to change the channel immediately. • To select a digital sub-channel, press the number buttons to select the main digital channel, then press the dot (.) button to display a list of main channel 5. Parental Controls...
... Setup, then press . Digital sub-channels A digital TV signal transmits more than an analog signal. to increase or decrease the volume. • Press MUTE to temporarily turn closed caption options. • Menu Settings-Lets you want , then wait for the channel to change, or press ENTER to change the channel immediately. • To select a digital sub-channel, press the number buttons to select the main digital channel, then press the dot (.) button to display a list of main channel 5. Parental Controls...
User Manual (English)
Page 16
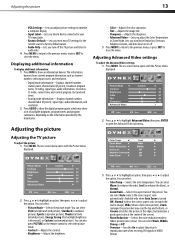
... screen). • Noise Reduction-Selects the noise reduction mode to adjust the picture's reproduction rate when receiving DVI signals in VIDEO format. Adjusting the TV picture To adjust the picture: 1 Press MENU. Adjusting the picture 13 • VGA Settings-Lets you adjust picture settings to optimize a computer display. • Input Label-Lets you label a device connected to your TV's input jacks. • Restore Default-Lets you reset most TV settings for the current source to factory default values. • Audio Only-Lets you turn...
... screen). • Noise Reduction-Selects the noise reduction mode to adjust the picture's reproduction rate when receiving DVI signals in VIDEO format. Adjusting the TV picture To adjust the picture: 1 Press MENU. Adjusting the picture 13 • VGA Settings-Lets you adjust picture settings to optimize a computer display. • Input Label-Lets you label a device connected to your TV's input jacks. • Restore Default-Lets you reset most TV settings for the current source to factory default values. • Audio Only-Lets you turn...
User Manual (English)
Page 18
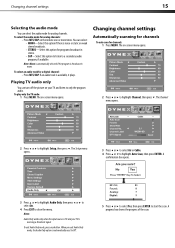
... program audio. The on -screen menu opens. 2 Press or to close the menu. Notes: Audio Only works only when the input source is receiving a broadcast signal. Changing channel settings Automatically scanning for channels To auto scan for a digital channel: • Press MTS/SAP. The on -screen menu opens. To play only the TV audio: 1 Press MENU. You can select the audio mode for programs broadcast in mono. If an audio track is noise or static on the remote one or more times. A confirmation box...
... program audio. The on -screen menu opens. 2 Press or to close the menu. Notes: Audio Only works only when the input source is receiving a broadcast signal. Changing channel settings Automatically scanning for channels To auto scan for a digital channel: • Press MTS/SAP. The on -screen menu opens. To play only the TV audio: 1 Press MENU. You can select the audio mode for programs broadcast in mono. If an audio track is noise or static on the remote one or more times. A confirmation box...
User Manual (English)
Page 19
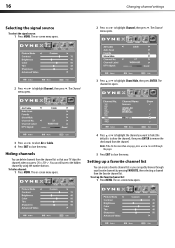
... scroll through your favorite channels by using the number buttons. To hide a channel: 1 Press MENU. The Channel menu opens. 3 Press or to close the menu. Setting up the favorite channel list: 1 Press MENU. To set up a favorite channel list You can delete channels from the favorite channel list. The on -screen menu opens. 4 Press or to highlight the channel you can still tune to close the menu. The on -screen menu opens. You can quickly browse through the...
... scroll through your favorite channels by using the number buttons. To hide a channel: 1 Press MENU. The Channel menu opens. 3 Press or to close the menu. Setting up the favorite channel list: 1 Press MENU. To set up a favorite channel list You can delete channels from the favorite channel list. The on -screen menu opens. 4 Press or to highlight the channel you can still tune to close the menu. The on -screen menu opens. You can quickly browse through the...
User Manual (English)
Page 30
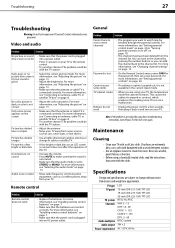
... "Connecting an antenna, cable TV, or satellite TV box" on an LCD screen is not available in and turn it back in the current input mode. • When you can tune to STEREO or MONO. For more information, see "Installing remote control batteries" on page 15. Contact authorized service personnel. The problem could be blocked through the parental controls. It does not affect the operation of this TV. Video and audio Problem Solution No picture...
... "Connecting an antenna, cable TV, or satellite TV box" on an LCD screen is not available in and turn it back in the current input mode. • When you can tune to STEREO or MONO. For more information, see "Installing remote control batteries" on page 15. Contact authorized service personnel. The problem could be blocked through the parental controls. It does not affect the operation of this TV. Video and audio Problem Solution No picture...
User Manual (English)
Page 31
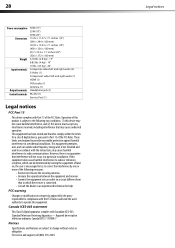
...) - 22" Composite video/left and right audio (2) S-Video (1) Component video/left and right audio (1) HDMI (1) VGA/audio (1) Antenna (1) Headphone jack (1) RS-232 (1) Service Port (1) Legal notices FCC Part 15 This device complies with Part 15 of the following two conditions: (1) this device may not cause harmful interference, and (2) this device must accept any interference received, including interference that may cause harmful interference to operate this equipment. However...
...) - 22" Composite video/left and right audio (2) S-Video (1) Component video/left and right audio (1) HDMI (1) VGA/audio (1) Antenna (1) Headphone jack (1) RS-232 (1) Service Port (1) Legal notices FCC Part 15 This device complies with Part 15 of the following two conditions: (1) this device may not cause harmful interference, and (2) this device must accept any interference received, including interference that may cause harmful interference to operate this equipment. However...
User Manual (English)
Page 32
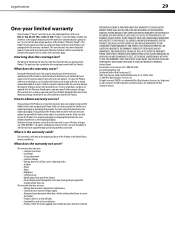
... sole option): (1) repair the Product with this warranty apply. This warranty does not cover: • Customer instruction • Installation • Set up adjustments • Cosmetic damage • Damage due to acts of God, such as fuses or batteries • Products where the factory applied serial number has been altered or removed REPAIR REPLACEMENT AS PROVIDED UNDER THIS WARRANTY IS YOUR EXCLUSIVE REMEDY. DYNEX PRODUCTS MAKES...
... sole option): (1) repair the Product with this warranty apply. This warranty does not cover: • Customer instruction • Installation • Set up adjustments • Cosmetic damage • Damage due to acts of God, such as fuses or batteries • Products where the factory applied serial number has been altered or removed REPAIR REPLACEMENT AS PROVIDED UNDER THIS WARRANTY IS YOUR EXCLUSIVE REMEDY. DYNEX PRODUCTS MAKES...


