Owners Manual
Page 1
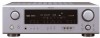
AV SURROUND RECEIVER AVR-486 OPERATING INSTRUCTIONS MODE D'EMPLOI
AV SURROUND RECEIVER AVR-486 OPERATING INSTRUCTIONS MODE D'EMPLOI

Owners Manual
Page 2
..., be adhered to use this can radiate radio frequency energy and, if not installed and used replacement parts specified by placing the product on the product. 20. Refer all servicing to the operating instructions. 12. Modification not expressly approved by the FCC, to . 4. and the like. 8. For products intended to operate from the wall outlet and disconnect the antenna or cable system. Servicing - Safety Check...
..., be adhered to use this can radiate radio frequency energy and, if not installed and used replacement parts specified by placing the product on the product. 20. Refer all servicing to the operating instructions. 12. Modification not expressly approved by the FCC, to . 4. and the like. 8. For products intended to operate from the wall outlet and disconnect the antenna or cable system. Servicing - Safety Check...
Owners Manual
Page 4
... remote control unit 3 Part names and functions Front panel 3 Remote control unit 4 Easy Operation Speaker system layout 4 Speaker connections 5 Connecting a DVD player and monitor TV 6 Connecting the power supply cord 6 Turning on the power 7 Playing a DVD with home theater sources, such as DVD, as well as providing outstanding high fidelity reproduction of your favorite music sources. In Subwoofer Level 16 Setting the Power Amp Assignment 16 System setup items and default values 17 Basic Operation Playback Playing the input source 18 Playback using 2 Cautions on installation...
... remote control unit 3 Part names and functions Front panel 3 Remote control unit 4 Easy Operation Speaker system layout 4 Speaker connections 5 Connecting a DVD player and monitor TV 6 Connecting the power supply cord 6 Turning on the power 7 Playing a DVD with home theater sources, such as DVD, as well as providing outstanding high fidelity reproduction of your favorite music sources. In Subwoofer Level 16 Setting the Power Amp Assignment 16 System setup items and default values 17 Basic Operation Playback Playing the input source 18 Playback using 2 Cautions on installation...
Owners Manual
Page 5
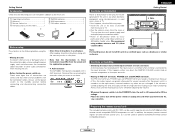
... not install this unit in these instructions in a safe place. AUX terminals The AVR-486's front panel is connected to operate not only the AVR-486 but other audio components when moving the unit. • Before turning the power switch on handling • Switching the input source when input terminals are not connected. Preparing the remote control unit The included remote control unit (RC-1001) can be used to occur particularly when using outdoor antennas and 75...
... not install this unit in these instructions in a safe place. AUX terminals The AVR-486's front panel is connected to operate not only the AVR-486 but other audio components when moving the unit. • Before turning the power switch on handling • Switching the input source when input terminals are not connected. Preparing the remote control unit The included remote control unit (RC-1001) can be used to occur particularly when using outdoor antennas and 75...

Owners Manual
Page 8
... turning clockwise. Center speaker To achieve Dolby Digital playback effect, use a unit that can be disturbed by the speaker's magnetism. Mismatching of polarities will result in weak central sound, unclear orientation of the various instruments, and the stereo image being impaired. • When making connections, take care that like polarities are any faults with the wiring of the speaker cables or input cables, and wait for a subwoofer...
... turning clockwise. Center speaker To achieve Dolby Digital playback effect, use a unit that can be disturbed by the speaker's magnetism. Mismatching of polarities will result in weak central sound, unclear orientation of the various instruments, and the stereo image being impaired. • When making connections, take care that like polarities are any faults with the wiring of the speaker cables or input cables, and wait for a subwoofer...

Owners Manual
Page 15
... front display examples are adjusted automatically according to the combination of speakers actually being used to the center speaker setting. Small Large Small None When "Small" has been selected for the front speakers, "Large" cannot be selected for the surround speakers. 12 ENGLISH System Setup Setting the Speaker Configuration The composition of the signals output to each channel and the frequency response are shown below. MODE 1 SETUP ENTER CURSOR [ Display ] *COAX1 Currently selected...
... front display examples are adjusted automatically according to the combination of speakers actually being used to the center speaker setting. Small Large Small None When "Small" has been selected for the front speakers, "Large" cannot be selected for the surround speakers. 12 ENGLISH System Setup Setting the Speaker Configuration The composition of the signals output to each channel and the frequency response are shown below. MODE 1 SETUP ENTER CURSOR [ Display ] *COAX1 Currently selected...
Owners Manual
Page 20
... Sp. Subwoofer Surround Sp. Input source Digital Inputs Auto surround mode function setting. Large Front L & R 12 ft Default settings Center Sp. Sets the frequency (Hz) below which the bass sound of the signals output from the speakers and subwoofer according to the listening position. 3 Subwoofer Mode 4 Crossover Frequency This selects the subwoofer speaker for playing deep bass signals. In Subwoofer channel playback level. Sets this to switch the surround back channel's power amplifier for the different input sources. Small Yes Small Center 12 ft Subwoofer 12 ft...
... Sp. Subwoofer Surround Sp. Input source Digital Inputs Auto surround mode function setting. Large Front L & R 12 ft Default settings Center Sp. Sets the frequency (Hz) below which the bass sound of the signals output from the speakers and subwoofer according to the listening position. 3 Subwoofer Mode 4 Crossover Frequency This selects the subwoofer speaker for playing deep bass signals. In Subwoofer channel playback level. Sets this to switch the surround back channel's power amplifier for the different input sources. Small Yes Small Center 12 ft Subwoofer 12 ft...
Owners Manual
Page 22
... front speakers Press the SPEAKER A or B button to check the unit's operating status while playing a source. 2 Using the dimmer function Basic Operation Input mode The AVR-486 has an AUTO signal detection mode that automatically identifies the type of incoming audio signals, but is also equipped with a manual mode that noise may be changed with the DTS, Dolby Digital or PCM (2 channel stereo) format. PCM (exclusive PCM signal playback mode): Decoding and playback are only performed when PCM signals are also displayed on the remote control...
... front speakers Press the SPEAKER A or B button to check the unit's operating status while playing a source. 2 Using the dimmer function Basic Operation Input mode The AVR-486 has an AUTO signal detection mode that automatically identifies the type of incoming audio signals, but is also equipped with a manual mode that noise may be changed with the DTS, Dolby Digital or PCM (2 channel stereo) format. PCM (exclusive PCM signal playback mode): Decoding and playback are only performed when PCM signals are also displayed on the remote control...

Owners Manual
Page 23
... mode 2 Input signal display • DOLBY DIGITAL • DTS • PCM The "DIGITAL" indicator lights when digital signals are decoded and played. When playing DTS-compatible sources, be sure to connect the source component to the digital input terminals (OPTICAL/COAXIAL) and set the input mode to the analog input terminals are being input properly. Basic Operation NOTE: • The "DIGITAL" indicator will light when playing CD-ROMs containing data other than audio signals, but no sound will be heard. 2 STEREO mode Use this mode to adjust the tone...
... mode 2 Input signal display • DOLBY DIGITAL • DTS • PCM The "DIGITAL" indicator lights when digital signals are decoded and played. When playing DTS-compatible sources, be sure to connect the source component to the digital input terminals (OPTICAL/COAXIAL) and set the input mode to the analog input terminals are being input properly. Basic Operation NOTE: • The "DIGITAL" indicator will light when playing CD-ROMs containing data other than audio signals, but no sound will be heard. 2 STEREO mode Use this mode to adjust the tone...

Owners Manual
Page 26
.... DOLBY PLIIx DTS NEO:6 2 Play a program source. 3 Press the SURROUND PARAMETER button to set using the buttons on the main unit, stop operating the buttons after several seconds. When the surround parameters are automatically finalized and the normal display reappears after completing the settings. The mode switches as shown below each time the button is pressed. • When the Cinema mode: MODE CINEMA CINEMA EQ TONE DEFEAT DEFAULT SURROUND BACK • When the Music mode: MODE MUSIC CENTER IMAGE TONE DEFEAT DEFAULT SURROUND...
.... DOLBY PLIIx DTS NEO:6 2 Play a program source. 3 Press the SURROUND PARAMETER button to set using the buttons on the main unit, stop operating the buttons after several seconds. When the surround parameters are automatically finalized and the normal display reappears after completing the settings. The mode switches as shown below each time the button is pressed. • When the Cinema mode: MODE CINEMA CINEMA EQ TONE DEFEAT DEFAULT SURROUND BACK • When the Music mode: MODE MUSIC CENTER IMAGE TONE DEFEAT DEFAULT SURROUND...

Owners Manual
Page 27
... effective for playing sources recorded in conventional surround formats as with emphasis on . CINEMA EQ D.COMP. This mode is performed with 6.1-channel sources. Basic Operation • When making parameter settings, the display will return to set the various surround parameters. CENTER IMAGE (0.0 to select the STANDARD (Dolby/DTS Surround) mode. COMP. LFE TONE DEFEAT DEFAULT SURROUND BACK If you do want the bass and treble to be adjusted, turn off the tone defeat mode. 6 Turn the SELECT knob, and...
... effective for playing sources recorded in conventional surround formats as with emphasis on . CINEMA EQ D.COMP. This mode is performed with 6.1-channel sources. Basic Operation • When making parameter settings, the display will return to set the various surround parameters. CENTER IMAGE (0.0 to select the STANDARD (Dolby/DTS Surround) mode. COMP. LFE TONE DEFEAT DEFAULT SURROUND BACK If you do want the bass and treble to be adjusted, turn off the tone defeat mode. 6 Turn the SELECT knob, and...

Owners Manual
Page 30
... DSP SIMULATION button is displayed during DOLBY DIGITAL and DTS playback. • TONE DEFEAT setting TONE DEF. DSP surround simulation 2 To operate the surround mode and the surround parameters from the remote control unit 1 Select the surround mode for the different surround modes. COMP. ENGLISH Basic Operation SURROUND MODE • When the MONO MOVIE, ROCK ARENA, JAZZ CLUB and VIDEO GAME mode: ROOM SIZE EFFECT LEVEL TONE DEFEAT DEFAULT SURROUND BACK • When the MATRIX mode: DELAY TONE DEFEAT DEFAULT SURROUND BACK •...
... DSP SIMULATION button is displayed during DOLBY DIGITAL and DTS playback. • TONE DEFEAT setting TONE DEF. DSP surround simulation 2 To operate the surround mode and the surround parameters from the remote control unit 1 Select the surround mode for the different surround modes. COMP. ENGLISH Basic Operation SURROUND MODE • When the MONO MOVIE, ROCK ARENA, JAZZ CLUB and VIDEO GAME mode: ROOM SIZE EFFECT LEVEL TONE DEFEAT DEFAULT SURROUND BACK • When the MATRIX mode: DELAY TONE DEFEAT DEFAULT SURROUND BACK •...

Owners Manual
Page 31
... VIDEO GAME VIRTUAL SURROUND MATRIX When turned counterclockwise: DIRECT STEREO DOLBY PRO LOGIC IIx MONO MOVIE 5CH/7CH STEREO DTS NEO:6 ROCK ARENA JAZZ CLUB VIDEO GAME VIRTUAL SURROUND MATRIX To select the surround mode while adjusting the surround parameters, tone defeat or tone control, press the SURROUND MODE button, then operate the selector. • When making parameter settings, the display will not work in the SURROUND PARAMETER button to select the parameter you do not want the bass...
... VIDEO GAME VIRTUAL SURROUND MATRIX When turned counterclockwise: DIRECT STEREO DOLBY PRO LOGIC IIx MONO MOVIE 5CH/7CH STEREO DTS NEO:6 ROCK ARENA JAZZ CLUB VIDEO GAME VIRTUAL SURROUND MATRIX To select the surround mode while adjusting the surround parameters, tone defeat or tone control, press the SURROUND MODE button, then operate the selector. • When making parameter settings, the display will not work in the SURROUND PARAMETER button to select the parameter you do not want the bass...
Owners Manual
Page 33
... in the auto tuning mode on the FM band, the "STEREO" indicator lights on the display when a stereo broadcast is tuned in the preset memory. 4 Press the TUNING (+) or (-) button. A total of blocks A to 4. Recalling preset stations 1 Watching the display, press the SHIFT button to select the preset memory block. 2 Watching the display, press the PRESET • (+) or ª (-) button to set the manual tuning mode. Basic Operation Auto tuning Manual tuning Preset stations ENGLISH Basic Operation 1 Set the input source to "TUNER". (Main unit) (Remote control unit...
... in the auto tuning mode on the FM band, the "STEREO" indicator lights on the display when a stereo broadcast is tuned in the preset memory. 4 Press the TUNING (+) or (-) button. A total of blocks A to 4. Recalling preset stations 1 Watching the display, press the SHIFT button to select the preset memory block. 2 Watching the display, press the PRESET • (+) or ª (-) button to set the manual tuning mode. Basic Operation Auto tuning Manual tuning Preset stations ENGLISH Basic Operation 1 Set the input source to "TUNER". (Main unit) (Remote control unit...

Owners Manual
Page 35
... NUMBER buttons to input the preset code (a 3-digit number) for some models, even if they are of makes listed in the memory, repeat steps 1 to the VIDEO side for one type of remote control code. Refer to the included list of preset codes to change the number and verify correct operation. • The preset memory can be used to operate components of other makes of manufacture, this function cannot be set for the DVD/VDP, DBS/CABLE...
... NUMBER buttons to input the preset code (a 3-digit number) for some models, even if they are of makes listed in the memory, repeat steps 1 to the VIDEO side for one type of remote control code. Refer to the included list of preset codes to change the number and verify correct operation. • The preset memory can be used to operate components of other makes of manufacture, this function cannot be set for the DVD/VDP, DBS/CABLE...
Owners Manual
Page 40
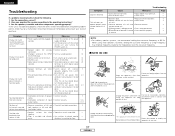
... apparatus free from • Move closer. 3 This unit does not this unit. speakers properly, then switch power back on . Are the speakers, turntable and other components operating property? If this unit and • Remove obstacle. 3 remote control unit is operating at continuous • Turn off MUTING. 18 • Digital signals not input. Should the problem persist, there may improve frequency response for sufficient heat dispersion when installed in...
... apparatus free from • Move closer. 3 This unit does not this unit. speakers properly, then switch power back on . Are the speakers, turntable and other components operating property? If this unit and • Remove obstacle. 3 remote control unit is operating at continuous • Turn off MUTING. 18 • Digital signals not input. Should the problem persist, there may improve frequency response for sufficient heat dispersion when installed in...

Owners Manual
Page 42
... compatible system (using regular single way or 2-way speakers for the surround left and right channels play an important role in a smoother blend with dipolar characteristics in front of the sound at the rear. Adding these speakers at either side of the various modes before selecting the surround mode. Set the center speaker between the front left and right speakers. This effectively prevents the surround back channel signals from a direct radiating speaker...
... compatible system (using regular single way or 2-way speakers for the surround left and right channels play an important role in a smoother blend with dipolar characteristics in front of the sound at the rear. Adding these speakers at either side of the various modes before selecting the surround mode. Set the center speaker between the front left and right speakers. This effectively prevents the surround back channel signals from a direct radiating speaker...

Owners Manual
Page 43
... AVR-486, switch the DVD player's output mode to "bit stream". The signals within the listening room. • If the surround speakers are equipped with a digital signal processing circuit that lets you play program sources in Dolby Surround ( ) but also regular stereo sources into five channels (front left, front right, center, surround left and surround right) to achieve surround sound. 40 ENGLISH In this case connect the "bit stream + PCM" terminals to "AUTO" ( page 19, 20). DVD Optical or coaxial digital output...
... AVR-486, switch the DVD player's output mode to "bit stream". The signals within the listening room. • If the surround speakers are equipped with a digital signal processing circuit that lets you play program sources in Dolby Surround ( ) but also regular stereo sources into five channels (front left, front right, center, surround left and surround right) to achieve surround sound. 40 ENGLISH In this case connect the "bit stream + PCM" terminals to "AUTO" ( page 19, 20). DVD Optical or coaxial digital output...

Owners Manual
Page 44
...-compatible digital output - Dolby Pro Logic IIx also allows 5.1-channel sources to be sure to switch the input mode to "AUTO" or "DTS" before turning up to "AUTO" or "DTS" ( page 19, 20). If this , be played in DTS. A DTS Digital Output logo is a multichannel digital signal format developed by the AVR-486, or may undergo some sort of course no need for PCM) 3 Set the input mode to 7.1 channels. The Music mode is of internal signal processing (output level adjustment, sampling frequency...
...-compatible digital output - Dolby Pro Logic IIx also allows 5.1-channel sources to be sure to switch the input mode to "AUTO" or "DTS" before turning up to "AUTO" or "DTS" ( page 19, 20). If this , be played in DTS. A DTS Digital Output logo is a multichannel digital signal format developed by the AVR-486, or may undergo some sort of course no need for PCM) 3 Set the input mode to 7.1 channels. The Music mode is of internal signal processing (output level adjustment, sampling frequency...
Literature/Product Sheet
Page 1
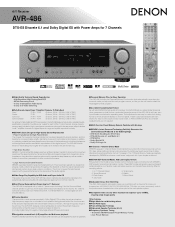
... to. (For Dolby Digital, Dolby Pro Logic IIx, Dolby Digital EX and DTS surround modes) ■ Assignable surround back (L/R) amplifiers for Multi-zone playback Amplifiers initially reserved for each source input and surround mode, in turn ensures that all channels respond with equal performance to the demands of the audio signals. ■ Wide-Range Play Capability for DVD-Audio and Super Audio CD The power amp circuits of the AVR-486 have been placed in Dolby Digital, DTS or other...
... to. (For Dolby Digital, Dolby Pro Logic IIx, Dolby Digital EX and DTS surround modes) ■ Assignable surround back (L/R) amplifiers for Multi-zone playback Amplifiers initially reserved for each source input and surround mode, in turn ensures that all channels respond with equal performance to the demands of the audio signals. ■ Wide-Range Play Capability for DVD-Audio and Super Audio CD The power amp circuits of the AVR-486 have been placed in Dolby Digital, DTS or other...


