
User's Guide
Page 2
... replacing supplies 12 Ordering ink cartridges...12 Replacing ink cartridges...13 Recycling Dell products...14 Using the printer control panel buttons and menus 16 Replacing the language sheet...16 Using the printer control panel...17 Changing the Sleep timeout...19 Saving paper and energy...19 Restoring factory default settings...19 Using shortcuts 21 What...
... replacing supplies 12 Ordering ink cartridges...12 Replacing ink cartridges...13 Recycling Dell products...14 Using the printer control panel buttons and menus 16 Replacing the language sheet...16 Using the printer control panel...17 Changing the Sleep timeout...19 Saving paper and energy...19 Restoring factory default settings...19 Using shortcuts 21 What...

User's Guide
Page 3
...40 Tips for printing...40 Printing basic documents...40 Printing specialty documents...43 Working with photos...46 Printing on both sides of the paper (duplexing 48 Managing print jobs...51 Copying...55 Tips for copying...55 Making copies...55 Copying an ID card...56 Enlarging or ...reducing images...56 Adjusting copy quality...57 Making a copy lighter or darker...57 Collating copies using the printer control panel 57 Placing separator sheets between copies 58 Copying multiple pages on one sheet...58 Placing an overlay message on each page 58 Removing the background of a copy...59 Making...
...40 Tips for printing...40 Printing basic documents...40 Printing specialty documents...43 Working with photos...46 Printing on both sides of the paper (duplexing 48 Managing print jobs...51 Copying...55 Tips for copying...55 Making copies...55 Copying an ID card...56 Enlarging or ...reducing images...56 Adjusting copy quality...57 Making a copy lighter or darker...57 Collating copies using the printer control panel 57 Placing separator sheets between copies 58 Copying multiple pages on one sheet...58 Placing an overlay message on each page 58 Removing the background of a copy...59 Making...
User's Guide
Page 4
... Installing the printer on a wireless network 95 Advanced wireless setup...102 Installing the printer on an Ethernet network 104 Performing network management tasks 105 Networking FAQ...110 Maintaining the printer 124 Maintaining ink cartridges...124 Cleaning the exterior of the printer...125 Cleaning ...the scanner glass...126 Moving the printer to another location 126 Troubleshooting 128 Before you troubleshoot...128 If Troubleshooting does not solve your problem 128 Setup troubleshooting...128 Understanding printer messages...133 Clearing paper jams...141 ...
... Installing the printer on a wireless network 95 Advanced wireless setup...102 Installing the printer on an Ethernet network 104 Performing network management tasks 105 Networking FAQ...110 Maintaining the printer 124 Maintaining ink cartridges...124 Cleaning the exterior of the printer...125 Cleaning ...the scanner glass...126 Moving the printer to another location 126 Troubleshooting 128 Before you troubleshoot...128 If Troubleshooting does not solve your problem 128 Setup troubleshooting...128 Understanding printer messages...133 Clearing paper jams...141 ...
User's Guide
Page 7
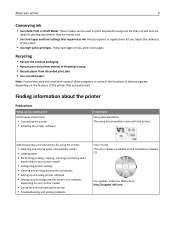
...you check the latest updates on track fast. After all, you are continually improving our printers to make sure it better. Minimizing your printer model). • Preview print jobs before printing. Wireless/network printers allow you find something we want to reduce their environmental impact. The Pages per Sheet ...learn how to protecting the environment and are the reason we do what we do encounter any problems along the way, one side of the paper. By selecting certain printer settings or tasks, you 're satisfied. We've worked hard to make sure you may be printed. • ...
...you check the latest updates on track fast. After all, you are continually improving our printers to make sure it better. Minimizing your printer model). • Preview print jobs before printing. Wireless/network printers allow you find something we want to reduce their environmental impact. The Pages per Sheet ...learn how to protecting the environment and are the reason we do what we do encounter any problems along the way, one side of the paper. By selecting certain printer settings or tasks, you 're satisfied. We've worked hard to make sure you may be printed. • ...
User's Guide
Page 8
... instructions: • Connecting the printer • Installing the printer software Find it away. • Recycle paper from discarded print jobs. • Use recycled paper. For updates, check our Web site at http://support.dell.com. Additional setup and instructions for using the printer: • Selecting and storing paper and specialty media • Loading paper • Performing printing, copying...
... instructions: • Connecting the printer • Installing the printer software Find it away. • Recycle paper from discarded print jobs. • Use recycled paper. For updates, check our Web site at http://support.dell.com. Additional setup and instructions for using the printer: • Selecting and storing paper and specialty media • Loading paper • Performing printing, copying...
User's Guide
Page 10
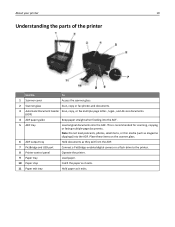
... ADF. 7 PictBridge and USB port Connect a PictBridge‑enabled digital camera or a flash drive to the printer. 8 Printer control panel Operate the printer. 9 Paper tray Load paper. 10 Paper stop Catch the paper as it exits. 11 Paper exit tray Hold paper as magazine clippings) into the ADF. Note: Do not load postcards, photos, small items, or thin media...
... ADF. 7 PictBridge and USB port Connect a PictBridge‑enabled digital camera or a flash drive to the printer. 8 Printer control panel Operate the printer. 9 Paper tray Load paper. 10 Paper stop Catch the paper as it exits. 11 Paper exit tray Hold paper as magazine clippings) into the ADF. Note: Do not load postcards, photos, small items, or thin media...
User's Guide
Page 11
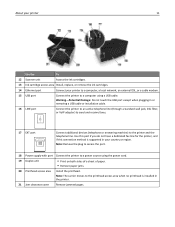
... remove the ink cartridges. 14 Ethernet port Connect your country or region. Use this port if you do not have a dedicated fax line for the printer, and if this connection method is installed in or removing a USB cable or installation cable. 16 LINE port Connect the... port Connect additional devices (telephone or answering machine) to a computer using the power cord. 19 Duplex unit • Print on both sides of a sheet of paper. • Remove paper jams. 20 Printhead access area Install the printhead.
... remove the ink cartridges. 14 Ethernet port Connect your country or region. Use this port if you do not have a dedicated fax line for the printer, and if this connection method is installed in or removing a USB cable or installation cable. 16 LINE port Connect the... port Connect additional devices (telephone or answering machine) to a computer using the power cord. 19 Duplex unit • Print on both sides of a sheet of paper. • Remove paper jams. 20 Printhead access area Install the printhead.
User's Guide
Page 17
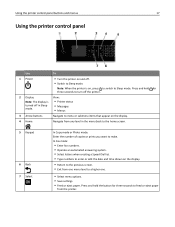
... display. • Return to the previous screen. • Exit from one . • Select menu options. • Save settings. • Feed or eject paper. Press and hold the button for three seconds to turn off the printer. 2 Display View: Note: The display is on, press to switch ... Sleep mode. Using the printer control panel buttons and menus 17 Using the printer control panel Use To 1 Power • Turn the printer on and off. • Switch to feed or eject paper from the printer. Note: When the printer is turned off in Sleep mode. • Printer status • Messages &#...
... display. • Return to the previous screen. • Exit from one . • Select menu options. • Save settings. • Feed or eject paper. Press and hold the button for three seconds to turn off the printer. 2 Display View: Note: The display is on, press to switch ... Sleep mode. Using the printer control panel buttons and menus 17 Using the printer control panel Use To 1 Power • Turn the printer on and off. • Switch to feed or eject paper from the printer. Note: When the printer is turned off in Sleep mode. • Printer status • Messages &#...
User's Guide
Page 19
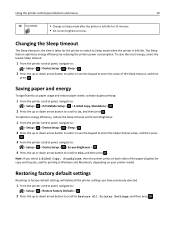
... default settings Resetting to factory default settings will delete all the printer settings you select 2‑Sided Copy, Standalone, then the printer prints on your printer model. Saving paper and energy To significantly cut paper usage and reduce paper waste, activate duplex printing: 1 From the printer control panel, navigate to: > Setup > > Print Mode Setup > > 2‑Sided Copy...
... default settings Resetting to factory default settings will delete all the printer settings you select 2‑Sided Copy, Standalone, then the printer prints on your printer model. Saving paper and energy To significantly cut paper usage and reduce paper waste, activate duplex printing: 1 From the printer control panel, navigate to: > Setup > > Print Mode Setup > > 2‑Sided Copy...
User's Guide
Page 26
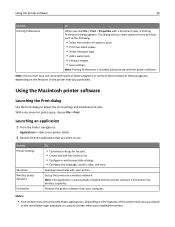
...paper type. • Add a watermark. • Enhance images. • Save settings. Note: Printing Preferences is automatically installed with these programs, depending on a wireless network. Speed up the printer on the features of the printer that you purchased. Remove the printer software from your printer..., country, date, and time. With a document or photo open , a Printing Preferences dialog appears. Use the Printer Settings Shortcuts Wireless Setup Assistant Uninstaller To • Customize settings for the print job, such as the following: • Select the...
...paper type. • Add a watermark. • Enhance images. • Save settings. Note: Printing Preferences is automatically installed with these programs, depending on a wireless network. Speed up the printer on the features of the printer that you purchased. Remove the printer software from your printer..., country, date, and time. With a document or photo open , a Printing Preferences dialog appears. Use the Printer Settings Shortcuts Wireless Setup Assistant Uninstaller To • Customize settings for the print job, such as the following: • Select the...
User's Guide
Page 29
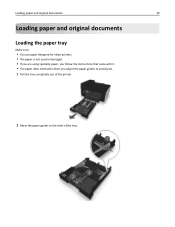
Loading paper and original documents 29 Loading paper and original documents Loading the paper tray Make sure: • You use paper designed for inkjet printers. • The paper is not used or damaged. • If you are using specialty paper, you follow the instructions that came with it. • The paper does not buckle when you adjust the paper guides to avoid jams. 1 Pull the tray completely out of the printer. 2 Move the paper guides to the sides of the tray.
Loading paper and original documents 29 Loading paper and original documents Loading the paper tray Make sure: • You use paper designed for inkjet printers. • The paper is not used or damaged. • If you are using specialty paper, you follow the instructions that came with it. • The paper does not buckle when you adjust the paper guides to avoid jams. 1 Pull the tray completely out of the printer. 2 Move the paper guides to the sides of the tray.
User's Guide
Page 30
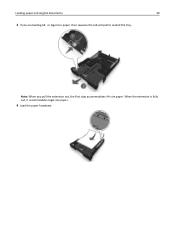
Loading paper and original documents 30 3 If you pull the extension out, the first stop accommodates A4‑size paper. When the extension is fully out, it accommodates legal‑size paper. 4 Load the paper facedown. Note: When you are loading A4‑ or legal‑size paper, then squeeze the tab and pull to extend the tray.
Loading paper and original documents 30 3 If you pull the extension out, the first stop accommodates A4‑size paper. When the extension is fully out, it accommodates legal‑size paper. 4 Load the paper facedown. Note: When you are loading A4‑ or legal‑size paper, then squeeze the tab and pull to extend the tray.
User's Guide
Page 31
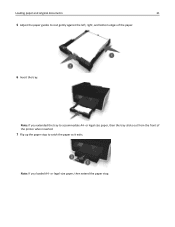
or legal-size paper, then the tray sticks out from the front of the paper. 6 Insert the tray. Note: If you loaded A4‑ or legal‑size paper, then extend the paper stop to catch the paper as it exits. Loading paper and original documents 31 5 Adjust the paper guides to accommodate A4- Note: If you extended the tray to rest gently against the left, right, and bottom edges of the printer when inserted. 7 Flip up the paper stop .
or legal-size paper, then the tray sticks out from the front of the paper. 6 Insert the tray. Note: If you loaded A4‑ or legal‑size paper, then extend the paper stop to catch the paper as it exits. Loading paper and original documents 31 5 Adjust the paper guides to accommodate A4- Note: If you extended the tray to rest gently against the left, right, and bottom edges of the printer when inserted. 7 Flip up the paper stop .
User's Guide
Page 32
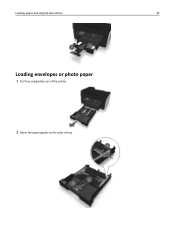
Loading paper and original documents 32 Loading envelopes or photo paper 1 Pull tray completely out of the printer. 2 Move the paper guides to the sides of tray.
Loading paper and original documents 32 Loading envelopes or photo paper 1 Pull tray completely out of the printer. 2 Move the paper guides to the sides of tray.
User's Guide
Page 33
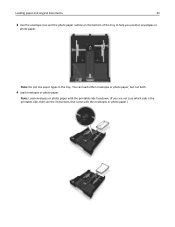
Loading paper and original documents 33 3 Use the envelope icon and the photo paper outline on the bottom of the tray to help you are not sure which side is the printable side, then see the instructions that came with the envelopes or photo paper.) Note: Do not mix paper types in the tray. Note: Load envelopes or photo paper with the printable side facedown. (If you position envelopes or photo paper. You can load either envelopes or photo paper, but not both. 4 Load envelopes or photo paper.
Loading paper and original documents 33 3 Use the envelope icon and the photo paper outline on the bottom of the tray to help you are not sure which side is the printable side, then see the instructions that came with the envelopes or photo paper.) Note: Do not mix paper types in the tray. Note: Load envelopes or photo paper with the printable side facedown. (If you position envelopes or photo paper. You can load either envelopes or photo paper, but not both. 4 Load envelopes or photo paper.
User's Guide
Page 34
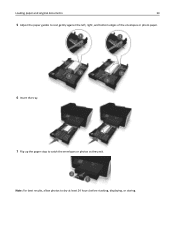
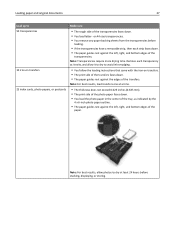
Note: For best results, allow photos to catch the envelopes or photos as they exit. Loading paper and original documents 34 5 Adjust the paper guides to rest gently against the left, right, and bottom edges of the envelopes or photo paper. 6 Insert the tray. 7 Flip up the paper stop to dry at least 24 hours before stacking, displaying, or storing.
Note: For best results, allow photos to catch the envelopes or photos as they exit. Loading paper and original documents 34 5 Adjust the paper guides to rest gently against the left, right, and bottom edges of the envelopes or photo paper. 6 Insert the tray. 7 Flip up the paper stop to dry at least 24 hours before stacking, displaying, or storing.
User's Guide
Page 35
... needed, but do not exceed the maximum amount for use with inkjet printers. • The paper guides rest against the left, right, and bottom edges of the paper. • The glossy or printable side of the paper faces down. (If you are not sure which side is the printable side, then see the instructions that...
... needed, but do not exceed the maximum amount for use with inkjet printers. • The paper guides rest against the left, right, and bottom edges of the paper. • The glossy or printable side of the paper faces down. (If you are not sure which side is the printable side, then see the instructions that...

User's Guide
Page 36
.... Notes: • Do not load envelopes with areas exposed by the icon. Loading paper and original documents 36 Load up to 10 envelopes Make sure 25 sheets of labels • The envelopes are designed for use with inkjet printers. • The print side of the envelopes faces down with the flap to the... left as shown. • You load the envelopes in the center of the tray as indicated by missing labels) may cause labels to the back of the tray. • You print the envelopes in a paper jam...
.... Notes: • Do not load envelopes with areas exposed by the icon. Loading paper and original documents 36 Load up to 10 envelopes Make sure 25 sheets of labels • The envelopes are designed for use with inkjet printers. • The print side of the envelopes faces down with the flap to the... left as shown. • You load the envelopes in the center of the tray as indicated by missing labels) may cause labels to the back of the tray. • You print the envelopes in a paper jam...
User's Guide
Page 37
.... • You load letter‑ or A4‑size transparencies. • You remove any paper backing sheets from the transparencies before stacking, displaying, or storing. Note: Transparencies require more drying time. Note: For best results, load transfers one at least 24 hours before loading. • If the transparencies have a removable strip, then...
.... • You load letter‑ or A4‑size transparencies. • You remove any paper backing sheets from the transparencies before stacking, displaying, or storing. Note: Transparencies require more drying time. Note: For best results, load transfers one at least 24 hours before loading. • If the transparencies have a removable strip, then...
User's Guide
Page 38
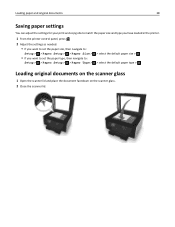
...jobs to match the paper size and type you have loaded in the printer. 1 From the printer control panel, press . 2 Adjust the settings as needed: • If you want to set the paper size, then navigate to: Setup > > Paper Setup > > Paper Size > •...; If you want to set the paper type, then navigate to: Setup > > Paper Setup > > Paper Type > > select the default paper size > > select the default paper...
...jobs to match the paper size and type you have loaded in the printer. 1 From the printer control panel, press . 2 Adjust the settings as needed: • If you want to set the paper size, then navigate to: Setup > > Paper Setup > > Paper Size > •...; If you want to set the paper type, then navigate to: Setup > > Paper Setup > > Paper Type > > select the default paper size > > select the default paper...


