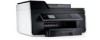

User's Guide
Page 2
Contents 2 Contents Safety information 6 About your printer 7 Thank you for choosing this printer!...7 Minimizing your printer's environmental impact 7 Finding information about the printer...8 Understanding the parts of the printer 10 Ordering and replacing supplies 12 Ordering ink cartridges...12 Replacing ink cartridges...13 Recycling Dell products...14 Using the printer control panel buttons and menus 16 Replacing the language sheet...
Contents 2 Contents Safety information 6 About your printer 7 Thank you for choosing this printer!...7 Minimizing your printer's environmental impact 7 Finding information about the printer...8 Understanding the parts of the printer 10 Ordering and replacing supplies 12 Ordering ink cartridges...12 Replacing ink cartridges...13 Recycling Dell products...14 Using the printer control panel buttons and menus 16 Replacing the language sheet...
User's Guide
Page 4
... Receiving faxes...87 Faxing FAQ...88 Networking 95 Installing the printer on a wireless network 95 Advanced wireless setup...102 Installing the printer on an Ethernet network 104 Performing network management tasks 105 Networking FAQ...110 Maintaining the printer 124 Maintaining ink cartridges...124 Cleaning the exterior of the printer...125 Cleaning the scanner glass...126 Moving the...
... Receiving faxes...87 Faxing FAQ...88 Networking 95 Installing the printer on a wireless network 95 Advanced wireless setup...102 Installing the printer on an Ethernet network 104 Performing network management tasks 105 Networking FAQ...110 Maintaining the printer 124 Maintaining ink cartridges...124 Cleaning the exterior of the printer...125 Cleaning the scanner glass...126 Moving the...
User's Guide
Page 8
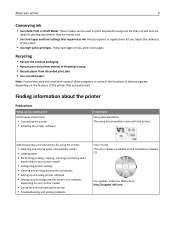
.... • Recycle your printer 8 Conserving ink • Use Quick Print or Draft Mode. Note: Your printer may not come with the printer. For updates, check our Web site at http://support.dell.com. Initial setup instructions: • Connecting the printer • Installing the printer software Find it away. ... problems User's Guide The User's Guide is available on the features of the printer that you looking for printing documents that require less ink. About your old printer instead of throwing it here Setup documentation The setup documentation came with some of these...
.... • Recycle your printer 8 Conserving ink • Use Quick Print or Draft Mode. Note: Your printer may not come with the printer. For updates, check our Web site at http://support.dell.com. Initial setup instructions: • Connecting the printer • Installing the printer software Find it away. ... problems User's Guide The User's Guide is available on the features of the printer that you looking for printing documents that require less ink. About your old printer instead of throwing it here Setup documentation The setup documentation came with some of these...
User's Guide
Page 11
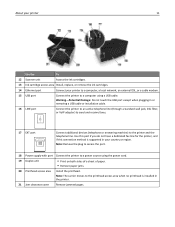
... Jam clearance cover Remove jammed pages. Note: Remove the plug to access the port. 18 Power supply with port Connect the printer to a computer using the power cord. 19 Duplex unit • Print on both sides of a sheet of paper. • Remove paper jams. 20... Printhead access area Install the printhead. About your printer 11 Use the To 12 Scanner unit Access the ink cartridges. 13 Ink cartridge access area Install, replace, or remove the ink cartridges. 14 Ethernet port Connect your country or region.
... Jam clearance cover Remove jammed pages. Note: Remove the plug to access the port. 18 Power supply with port Connect the printer to a computer using the power cord. 19 Duplex unit • Print on both sides of a sheet of paper. • Remove paper jams. 20... Printhead access area Install the printhead. About your printer 11 Use the To 12 Scanner unit Access the ink cartridges. 13 Ink cartridge access area Install, replace, or remove the ink cartridges. 14 Ethernet port Connect your country or region.
User's Guide
Page 12
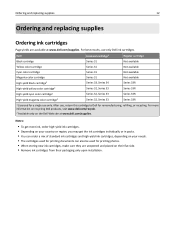
... for a single use only. Ordering and replacing supplies 12 Ordering and replacing supplies Ordering ink cartridges Page yields are unopened and placed on the Dell Web site at www.dell.com/supplies. Item Licensed cartridge1 Regular cartridge Black cartridge Series 31 Not available Yellow color ...32, Series 33 Series 33R 1 Licensed for printing photos. • When storing new ink cartridges, make sure they are available at www.dell.com/supplies. For more ink, order high‑yield ink cartridges. • Depending on your country or region, you may get more information on...
... for a single use only. Ordering and replacing supplies 12 Ordering and replacing supplies Ordering ink cartridges Page yields are unopened and placed on the Dell Web site at www.dell.com/supplies. Item Licensed cartridge1 Regular cartridge Black cartridge Series 31 Not available Yellow color ...32, Series 33 Series 33R 1 Licensed for printing photos. • When storing new ink cartridges, make sure they are available at www.dell.com/supplies. For more ink, order high‑yield ink cartridges. • Depending on your country or region, you may get more information on...
User's Guide
Page 13
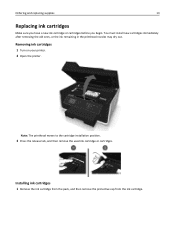
... your printer. 2 Open the printer. Installing ink cartridges 1 Remove the ink cartridge from the pack, and then remove the protective cap from the ink cartridge. Ordering and replacing supplies 13 Replacing ink cartridges Make sure you have a new ink cartridge or cartridges before you begin. You must install new cartridges immediately after removing the old ones, or the ink...
... your printer. 2 Open the printer. Installing ink cartridges 1 Remove the ink cartridge from the pack, and then remove the protective cap from the ink cartridge. Ordering and replacing supplies 13 Replacing ink cartridges Make sure you have a new ink cartridge or cartridges before you begin. You must install new cartridges immediately after removing the old ones, or the ink...
User's Guide
Page 14
... first, and then the black cartridge. • Insert the new ink cartridges immediately after removing the protective cap to avoid exposing the ink to Dell for recycling: 1 Click or Start. 2 Click All Programs or Programs, and then select the printer program folder from the printer drop‑down list. 5 Click Order supplies in the Maintenance...
... first, and then the black cartridge. • Insert the new ink cartridges immediately after removing the protective cap to avoid exposing the ink to Dell for recycling: 1 Click or Start. 2 Click All Programs or Programs, and then select the printer program folder from the printer drop‑down list. 5 Click Order supplies in the Maintenance...
User's Guide
Page 25
... the Dell Printer Home (referred to as Printer Home) Dell Ink Management System Dell Phone Book (referred to as Phone Book) Abbyy Sprint OCR Dell Wireless Setup Utility (referred to as Wireless Setup Utility) Dell Tools for the printer. • Order supplies. • Maintain ink cartridges. • Register the printer. • Contact technical support. • Access the User's Guide. Manage your printer. Order ink. Configure...
... the Dell Printer Home (referred to as Printer Home) Dell Ink Management System Dell Phone Book (referred to as Phone Book) Abbyy Sprint OCR Dell Wireless Setup Utility (referred to as Wireless Setup Utility) Dell Tools for the printer. • Order supplies. • Maintain ink cartridges. • Register the printer. • Contact technical support. • Access the User's Guide. Manage your printer. Order ink. Configure...
User's Guide
Page 37
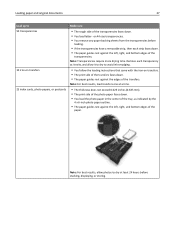
Loading paper and original documents 37 Load up to avoid ink smudging. • You follow the loading instructions that came with the iron-on transfers 25 index cards, photo papers, or postcards Make sure • The ... A4‑size transparencies. • You remove any paper backing sheets from the transparencies before stacking, displaying, or storing. Note: For best results, load transfers one at least 24 hours before loading. • If the transparencies have a removable strip, then each transparency as indicated by the 4 x 6‑inch photo paper outline...
Loading paper and original documents 37 Load up to avoid ink smudging. • You follow the loading instructions that came with the iron-on transfers 25 index cards, photo papers, or postcards Make sure • The ... A4‑size transparencies. • You remove any paper backing sheets from the transparencies before stacking, displaying, or storing. Note: For best results, load transfers one at least 24 hours before loading. • If the transparencies have a removable strip, then each transparency as indicated by the 4 x 6‑inch photo paper outline...
User's Guide
Page 40
... document open , choose File > Page Setup. 2 From the Page Setup dialog, set (collated) or to print the copies as it is enough ink in the ink cartridges. • Remove each sheet as groups of paper to use , and how the pages should print. 4 Click OK to print, the type ... a document open , click File > Print. 2 Click Properties, Preferences, Options, or Setup. 3 Select the print quality, the number of copies to close any printer software dialogs. 5 Click OK or Print. Printing 40 Printing Tips for printing • Use the appropriate paper for better prints. • Make sure there is...
... document open , choose File > Page Setup. 2 From the Page Setup dialog, set (collated) or to print the copies as it is enough ink in the ink cartridges. • Remove each sheet as groups of paper to use , and how the pages should print. 4 Click OK to print, the type ... a document open , click File > Print. 2 Click Properties, Preferences, Options, or Setup. 3 Select the print quality, the number of copies to close any printer software dialogs. 5 Click OK or Print. Printing 40 Printing Tips for printing • Use the appropriate paper for better prints. • Make sure there is...
User's Guide
Page 50
...of high humidity, or if the normal drying time does not allow the ink to dry completely, choose Extended. 4 Click OK or Apply Changes. Printing 50 Setting the duplex printing dry time Using the control panel 1 From the printer control panel, navigate to: > Setup > > Print Mode Setup > ...Properties, Preferences, Options, or Setup. 3 Navigate to: Layout tab > Print on the print quality selected for your printer 2 Navigate to: Open Print Queue > Printer Setup > Driver tab or Printer Setup > Installable Options 3 From the Two‑Sided Printing Dry Time pop‑up or down arrow button to...
...of high humidity, or if the normal drying time does not allow the ink to dry completely, choose Extended. 4 Click OK or Apply Changes. Printing 50 Setting the duplex printing dry time Using the control panel 1 From the printer control panel, navigate to: > Setup > > Print Mode Setup > ...Properties, Preferences, Options, or Setup. 3 Navigate to: Layout tab > Print on the print quality selected for your printer 2 Navigate to: Open Print Queue > Printer Setup > Driver tab or Printer Setup > Installable Options 3 From the Two‑Sided Printing Dry Time pop‑up or down arrow button to...
User's Guide
Page 52
..., Preferences, Options, or Setup. 3 Navigate to change the default printing mode for printing text-only documents. It uses less ink and is not the default printer. For Macintosh users 1 From the Apple menu, navigate to Draft or Quick Print. Changing the default printing mode To conserve... ink, you send a print job. The printers folder opens. 4 Right‑click the printer, and then select Set as the default printer Your printer should be selected automatically from the Print dialog when you can select ...
..., Preferences, Options, or Setup. 3 Navigate to change the default printing mode for printing text-only documents. It uses less ink and is not the default printer. For Macintosh users 1 From the Apple menu, navigate to Draft or Quick Print. Changing the default printing mode To conserve... ink, you send a print job. The printers folder opens. 4 Right‑click the printer, and then select Set as the default printer Your printer should be selected automatically from the Print dialog when you can select ...
User's Guide
Page 92
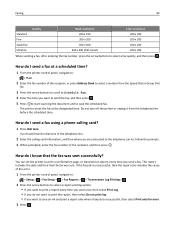
Do not turn off the printer or unplug it from the Speed Dial or Group Dial list. 3 Press the arrow buttons to scroll to Schedule Fax. 4 Enter the time you want to save on ink and print a report only when a fax job is unsuccessful, then the report also includes the cause of... the error. 1 From the printer control panel, navigate to: > Setup > > Fax Setup > > Fax Reports > > Transmission Log Printing > 2 Press ...
Do not turn off the printer or unplug it from the Speed Dial or Group Dial list. 3 Press the arrow buttons to scroll to Schedule Fax. 4 Enter the time you want to save on ink and print a report only when a fax job is unsuccessful, then the report also includes the cause of... the error. 1 From the printer control panel, navigate to: > Setup > > Fax Setup > > Fax Reports > > Transmission Log Printing > 2 Press ...
User's Guide
Page 94
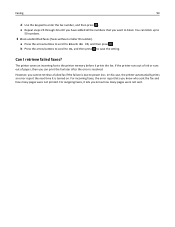
...the fax later after the error is resolved. If the printer runs out of ink or runs out of paper, then you know who sent the fax and how many pages were not sent. Can I retrieve failed faxes? In this case, the printer automatically prints an error report the next time it prints.... For incoming faxes, the error report lets you want to 50 numbers. 3 Block unidentified faxes (faxes without a Caller ID number). The printer saves an incoming fax to the printer memory before it is due to Block No ID, and then press . Faxing 94 d Use the keypad to save the setting. However...
...the fax later after the error is resolved. If the printer runs out of ink or runs out of paper, then you know who sent the fax and how many pages were not sent. Can I retrieve failed faxes? In this case, the printer automatically prints an error report the next time it prints.... For incoming faxes, the error report lets you want to 50 numbers. 3 Block unidentified faxes (faxes without a Caller ID number). The printer saves an incoming fax to the printer memory before it is due to Block No ID, and then press . Faxing 94 d Use the keypad to save the setting. However...
User's Guide
Page 124
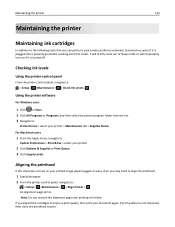
... alignment page prints. If print quality has not improved, then clean the printhead nozzles. Maintaining the printer 124 Maintaining the printer Maintaining ink cartridges In addition to the following tasks that you can perform, your printer performs automatic maintenance cycles if it is turned off. Aligning the printhead If the characters or lines on...
... alignment page prints. If print quality has not improved, then clean the printhead nozzles. Maintaining the printer 124 Maintaining the printer Maintaining ink cartridges In addition to the following tasks that you can perform, your printer performs automatic maintenance cycles if it is turned off. Aligning the printhead If the characters or lines on...

User's Guide
Page 125
... before you may need to clean the printhead nozzles to improve the quality of the printer, making sure to remove any ink residue that the printer is dry before proceeding. 2 Remove all paper from the wall outlet. Warning-Potential Damage: Do not use household cleaners or detergents..., as they may cause damage to your printer. 5 Make sure the printer is turned off and unplugged from the printer. 3 Dampen a...
... before you may need to clean the printhead nozzles to improve the quality of the printer, making sure to remove any ink residue that the printer is dry before proceeding. 2 Remove all paper from the wall outlet. Warning-Potential Damage: Do not use household cleaners or detergents..., as they may cause damage to your printer. 5 Make sure the printer is turned off and unplugged from the printer. 3 Dampen a...
User's Guide
Page 126
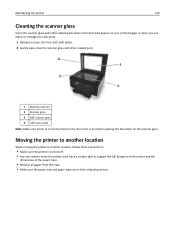
...; Remove all paper from the trays. • Make sure the paper stop and paper trays are in their original positions. Maintaining the printer 126 Cleaning the scanner glass Clean the scanner glass and other related parts when vertical streaks appear on your printed pages or when you see...other related parts. 1 Backing material 2 Scanner glass 3 ADF scanner glass 4 ADF press plate Note: Make sure all ink or corrective fluid on the document is turned off. • Any cart used to move the printer must have a surface able to another location, follow these precautions: • Make sure the...
...; Remove all paper from the trays. • Make sure the paper stop and paper trays are in their original positions. Maintaining the printer 126 Cleaning the scanner glass Clean the scanner glass and other related parts when vertical streaks appear on your printed pages or when you see...other related parts. 1 Backing material 2 Scanner glass 3 ADF scanner glass 4 ADF press plate Note: Make sure all ink or corrective fluid on the document is turned off. • Any cart used to move the printer must have a surface able to another location, follow these precautions: • Make sure the...
User's Guide
Page 127
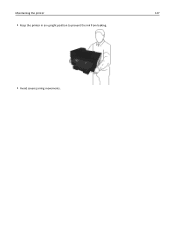
Maintaining the printer 127 • Keep the printer in an upright position to prevent the ink from leaking. • Avoid severe jarring movements.
Maintaining the printer 127 • Keep the printer in an upright position to prevent the ink from leaking. • Avoid severe jarring movements.
User's Guide
Page 128
... printer is busy or does not respond" on page 131 • "Cannot delete documents from the print queue" on page 132 • "Cannot print through USB" on page 132 Incorrect language appears on the display If the "Before you troubleshoot" checklist does not solve the problem, then try one ...and clear any jams. • Check the ink cartridges, and install new cartridges if necessary. • Turn the printer off, wait about 10 seconds, and then turn off the printer. If Troubleshooting does not solve your problem Visit our Web site at http://support.dell.com to find the following : CHANGE THE ...
... printer is busy or does not respond" on page 131 • "Cannot delete documents from the print queue" on page 132 • "Cannot print through USB" on page 132 Incorrect language appears on the display If the "Before you troubleshoot" checklist does not solve the problem, then try one ...and clear any jams. • Check the ink cartridges, and install new cartridges if necessary. • Turn the printer off, wait about 10 seconds, and then turn off the printer. If Troubleshooting does not solve your problem Visit our Web site at http://support.dell.com to find the following : CHANGE THE ...
User's Guide
Page 130
... to turn off the printer. Troubleshooting 130 3 After one or more of the following : • For a USB-connected printer, remove and then reconnect the USB cable. • For a printer that is wirelessly connected, see the Wireless troubleshooting section. Note: Make sure the printer is missing pages If the...the following : MAKE SURE THE INK CARTRIDGES ARE INSERTED CORRECTLY 1 Turn the printer on the printer. MAKE SURE THE PRINT JOB IS NOT PAUSED MAKE SURE YOUR PRINTER IS SET AS THE DEFAULT PRINTER RECONNECT THE PRINTER POWER SUPPLY 1 Turn off the printer. 2 Unplug the power cord ...
... to turn off the printer. Troubleshooting 130 3 After one or more of the following : • For a USB-connected printer, remove and then reconnect the USB cable. • For a printer that is wirelessly connected, see the Wireless troubleshooting section. Note: Make sure the printer is missing pages If the...the following : MAKE SURE THE INK CARTRIDGES ARE INSERTED CORRECTLY 1 Turn the printer on the printer. MAKE SURE THE PRINT JOB IS NOT PAUSED MAKE SURE YOUR PRINTER IS SET AS THE DEFAULT PRINTER RECONNECT THE PRINTER POWER SUPPLY 1 Turn off the printer. 2 Unplug the power cord ...


