User Manual
Page 12
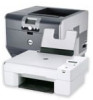
... installed in the printer. Connect the printer to the power cord. 20 Duplex unit • Print on the ADF tray to the width of paper. • Clear paper jams. 21 Printhead access area Install the printhead. Note: Remove the plug to a computer using a USB cable. Connect the printer to access the port. ... or installation cable. Warning-Potential Damage: Do not touch the USB port except when plugging in your printer Use the 13 ADF paper guide 12 To Keep paper straight when feeding it into the ADF. Use the 14 Scanner cover 15 Scanner glass 16 EXT port 17 USB port 18 LINE...
... installed in the printer. Connect the printer to the power cord. 20 Duplex unit • Print on the ADF tray to the width of paper. • Clear paper jams. 21 Printhead access area Install the printhead. Note: Remove the plug to a computer using a USB cable. Connect the printer to access the port. ... or installation cable. Warning-Potential Damage: Do not touch the USB port except when plugging in your printer Use the 13 ADF paper guide 12 To Keep paper straight when feeding it into the ADF. Use the 14 Scanner cover 15 Scanner glass 16 EXT port 17 USB port 18 LINE...

User Manual
Page 13
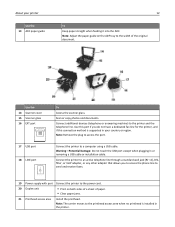
About your printer 13 Use the To 22 Jam clearance cover Access and clear paper jams. 23 Ink cartridge access area Install, replace, or remove ink cartridges. 24 Scanner unit • Access the ink cartridges and printhead. • Clear paper jams.
About your printer 13 Use the To 22 Jam clearance cover Access and clear paper jams. 23 Ink cartridge access area Install, replace, or remove ink cartridges. 24 Scanner unit • Access the ink cartridges and printhead. • Clear paper jams.
User Manual
Page 38
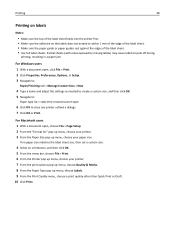
...the settings as needed to create a custom size, and then click OK. 5 Navigate to: Paper type list > select the created custom type 6 Click OK to peel off during printing, resulting in a paper jam. Partial sheets (with areas exposed by missing labels) may cause labels to close any printer software... dialogs. 7 Click OK or Print. If no paper size matches the label sheet size, then set a custom size. 4 Select...
...the settings as needed to create a custom size, and then click OK. 5 Navigate to: Paper type list > select the created custom type 6 Click OK to peel off during printing, resulting in a paper jam. Partial sheets (with areas exposed by missing labels) may cause labels to close any printer software... dialogs. 7 Click OK or Print. If no paper size matches the label sheet size, then set a custom size. 4 Select...
User Manual
Page 121
... delete documents from the print queue" on page 125 • "Cannot print through USB" on page 125 Incorrect language appears on . Press and hold for paper jam messages, and clear any errors. • Check for three seconds to turn off , wait about 10 seconds, and then turn the printer back on the... display If the "Before you want, and then press . If Troubleshooting does not solve your problem Visit our Web site at http://support.dell.com to the language you troubleshoot" checklist does not solve the problem, then try one or more of the following: CHANGE THE LANGUAGE USING THE...
... delete documents from the print queue" on page 125 • "Cannot print through USB" on page 125 Incorrect language appears on . Press and hold for paper jam messages, and clear any errors. • Check for three seconds to turn off , wait about 10 seconds, and then turn the printer back on the... display If the "Before you want, and then press . If Troubleshooting does not solve your problem Visit our Web site at http://support.dell.com to the language you troubleshoot" checklist does not solve the problem, then try one or more of the following: CHANGE THE LANGUAGE USING THE...
User Manual
Page 133
... the duplex unit" on page 136 • "Paper jam in the ADF (select models only)" on page 137 • "Paper or specialty media misfeeds" on page 140 Paper jam in the tray or on the paper support. • Cancel the current print job. For more information, visit http://support.dell.com. USB Hub Not Supported Remove the...
... the duplex unit" on page 136 • "Paper jam in the ADF (select models only)" on page 137 • "Paper or specialty media misfeeds" on page 140 Paper jam in the tray or on the paper support. • Cancel the current print job. For more information, visit http://support.dell.com. USB Hub Not Supported Remove the...
User Manual
Page 134
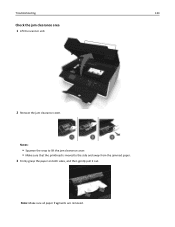
Troubleshooting 134 Check the jam clearance area 1 Lift the scanner unit. 2 Remove the jam clearance cover. Note: Make sure all paper fragments are removed. Notes: • Squeeze the snap to lift the jam clearance cover. • Make sure that the printhead is moved to the side and away from the jammed paper. 3 Firmly grasp the paper on both sides, and then gently pull it out.
Troubleshooting 134 Check the jam clearance area 1 Lift the scanner unit. 2 Remove the jam clearance cover. Note: Make sure all paper fragments are removed. Notes: • Squeeze the snap to lift the jam clearance cover. • Make sure that the printhead is moved to the side and away from the jammed paper. 3 Firmly grasp the paper on both sides, and then gently pull it out.
User Manual
Page 135
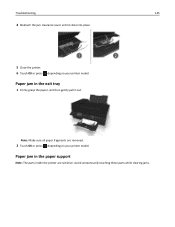
Troubleshooting 135 4 Reattach the jam clearance cover until it out. Paper jam in the paper support Note: The parts inside the printer are removed. 2 Touch OK or press , depending on your printer model. Note: Make sure all paper fragments are sensitive. Avoid unnecessarily touching these parts while clearing jams. Paper jam in the exit tray 1 Firmly grasp the paper, and then gently pull it clicks into place. 5 Close the printer. 6 Touch OK or press , depending on your printer model.
Troubleshooting 135 4 Reattach the jam clearance cover until it out. Paper jam in the paper support Note: The parts inside the printer are removed. 2 Touch OK or press , depending on your printer model. Note: Make sure all paper fragments are sensitive. Avoid unnecessarily touching these parts while clearing jams. Paper jam in the exit tray 1 Firmly grasp the paper, and then gently pull it clicks into place. 5 Close the printer. 6 Touch OK or press , depending on your printer model.

User Manual
Page 136
Paper jam in the duplex unit Note: The parts inside the printer are removed. 3 Reattach the paper support until it out. Troubleshooting 136 1 Remove the paper support. 2 Firmly grasp the paper, and then gently pull it clicks into place. 4 Touch OK or press , depending on your printer model. Note: Make sure all paper fragments are sensitive. Avoid unnecessarily touching these parts while clearing jams.
Paper jam in the duplex unit Note: The parts inside the printer are removed. 3 Reattach the paper support until it out. Troubleshooting 136 1 Remove the paper support. 2 Firmly grasp the paper, and then gently pull it clicks into place. 4 Touch OK or press , depending on your printer model. Note: Make sure all paper fragments are sensitive. Avoid unnecessarily touching these parts while clearing jams.
User Manual
Page 137
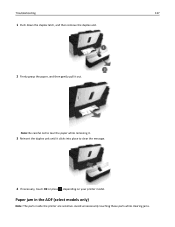
Troubleshooting 137 1 Push down the duplex latch, and then remove the duplex unit. 2 Firmly grasp the paper, and then gently pull it clicks into place to clear the message. 4 If necessary, touch OK or press , depending on your printer model. Note: Be careful not to tear the paper while removing it. 3 Reinsert the duplex unit until it out. Paper jam in the ADF (select models only) Note: The parts inside the printer are sensitive. Avoid unnecessarily touching these parts while clearing jams.
Troubleshooting 137 1 Push down the duplex latch, and then remove the duplex unit. 2 Firmly grasp the paper, and then gently pull it clicks into place to clear the message. 4 If necessary, touch OK or press , depending on your printer model. Note: Be careful not to tear the paper while removing it. 3 Reinsert the duplex unit until it out. Paper jam in the ADF (select models only) Note: The parts inside the printer are sensitive. Avoid unnecessarily touching these parts while clearing jams.
User Manual
Page 171
...802.1X 98 Auto Answer when to turn on 83 Automatic Document Feeder (ADF) 11 clearing a paper jam in 137 exit tray 11 exit tray extension 11 loading documents 33 paper capacity 33 paper guide 12 tray 11 automatic fax conversion setting 76 171 B background, removing 52 backing material cleaning ...software 148 cannot scan to computer over a network 144 cannot send faxes 146 certificate requests 98 Change to [Size] [Type] Paper 126 Change to [Size] Paper 126 changing default printing mode 46 changing page order 35 changing print order 35 changing Sleep timeout 22 changing wireless settings after ...
...802.1X 98 Auto Answer when to turn on 83 Automatic Document Feeder (ADF) 11 clearing a paper jam in 137 exit tray 11 exit tray extension 11 loading documents 33 paper capacity 33 paper guide 12 tray 11 automatic fax conversion setting 76 171 B background, removing 52 backing material cleaning ...software 148 cannot scan to computer over a network 144 cannot send faxes 146 certificate requests 98 Change to [Size] [Type] Paper 126 Change to [Size] Paper 126 changing default printing mode 46 changing page order 35 changing print order 35 changing Sleep timeout 22 changing wireless settings after ...
User Manual
Page 173
... setup instructions 94 Freebox 94 frequently asked questions USB cable 108 G greeting cards 31 Group Dial setting up 78 H heavyweight matte paper 30 I ID cards copying 50 improving scan quality 60 incorrect language appears on display 121 index cards 31 information finding 9 information ..., assigning 115 iron‑on transfers 32 J jam clearance cover 13 jams and misfeeds troubleshooting paper jam in the ADF 137 paper jam in the duplex unit 136 paper jam in the exit tray 135 paper jam in the paper support 135 paper jam in the printer 133 paper or specialty media 140 junk faxes blocking 87
... setup instructions 94 Freebox 94 frequently asked questions USB cable 108 G greeting cards 31 Group Dial setting up 78 H heavyweight matte paper 30 I ID cards copying 50 improving scan quality 60 incorrect language appears on display 121 index cards 31 information finding 9 information ..., assigning 115 iron‑on transfers 32 J jam clearance cover 13 jams and misfeeds troubleshooting paper jam in the ADF 137 paper jam in the duplex unit 136 paper jam in the exit tray 135 paper jam in the paper support 135 paper jam in the printer 133 paper or specialty media 140 junk faxes blocking 87

User Manual
Page 174
... paper 32 plain paper 30 postcards 31 transparencies 32 paper default settings saving 32 paper exit tray 11 paper feed guard 11 paper guide adjustment lever 11 paper guides 11 paper jam in the ADF 137 paper jam in the duplex unit 136 paper jam in the exit tray 135 paper jam in the paper support 135 paper jam in the printer 133 paper or specialty media misfeeds 140 paper...
... paper 32 plain paper 30 postcards 31 transparencies 32 paper default settings saving 32 paper exit tray 11 paper feed guard 11 paper guide adjustment lever 11 paper guides 11 paper jam in the ADF 137 paper jam in the duplex unit 136 paper jam in the exit tray 135 paper jam in the paper support 135 paper jam in the printer 133 paper or specialty media misfeeds 140 paper...
User Manual
Page 176
...printer printing blank pages 124 printhead error 129 software did not install 122 shared printing 103 sharing printer in Windows 102 Short Paper 133 signal strength finding 110 Sleep timeout changing 22 software did not install 122 software, optional finding, installing 27 speaker ...faxes 146 error messages, printer control panel 148 troubleshooting, jams and misfeeds paper jam in the ADF 137 paper jam in the duplex unit 136 paper jam in the exit tray 135 paper jam in the paper support 135 paper jam in the printer 133 paper or specialty media 140 troubleshooting, print cannot delete documents ...
...printer printing blank pages 124 printhead error 129 software did not install 122 shared printing 103 sharing printer in Windows 102 Short Paper 133 signal strength finding 110 Sleep timeout changing 22 software did not install 122 software, optional finding, installing 27 speaker ...faxes 146 error messages, printer control panel 148 troubleshooting, jams and misfeeds paper jam in the ADF 137 paper jam in the duplex unit 136 paper jam in the exit tray 135 paper jam in the paper support 135 paper jam in the printer 133 paper or specialty media 140 troubleshooting, print cannot delete documents ...


