

Product Manual
Page 2
Contents Package Contents 3 Introduction 4 Hardware Installation 9 Security 10 Using the Setup Wizard 11 DCS-900 Configuration 16 Installing the DCS-900 Behind a Router 23 IPView Lite Application Installation 37 IPView Lite 42 Uninstall IPView Lite Application 72 Appendix (FAQ, Troubleshooting, How to Ping your IP Address, Time Zone Table, Active X Installation). ........74 Technical Specifications 87 Contacting Technical Support 89 Warranty 90 Registration 93 2
Contents Package Contents 3 Introduction 4 Hardware Installation 9 Security 10 Using the Setup Wizard 11 DCS-900 Configuration 16 Installing the DCS-900 Behind a Router 23 IPView Lite Application Installation 37 IPView Lite 42 Uninstall IPView Lite Application 72 Appendix (FAQ, Troubleshooting, How to Ping your IP Address, Time Zone Table, Active X Installation). ........74 Technical Specifications 87 Contacting Technical Support 89 Warranty 90 Registration 93 2
Product Manual
Page 3
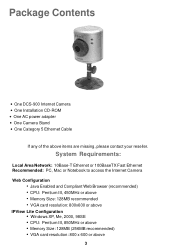
System Requirements: Local Area Network: 10Base-T Ethernet or 100BaseTX Fast Ethernet Recommended: PC, Mac or Notebook to access the Internet Camera Web Configuration • Java Enabled and Compliant Web Browser (recommended) • CPU: Pentium III, 450MHz or above • Memory ... recommended) • VGA card resolution: 800 x 600 or above items are missing, please contact your reseller. Package Contents • One DCS-900 Internet Camera • One Installation CD-ROM • One AC power adapter • One Camera Stand • One Category 5 Ethernet Cable If any of the above 3
System Requirements: Local Area Network: 10Base-T Ethernet or 100BaseTX Fast Ethernet Recommended: PC, Mac or Notebook to access the Internet Camera Web Configuration • Java Enabled and Compliant Web Browser (recommended) • CPU: Pentium III, 450MHz or above • Memory ... recommended) • VGA card resolution: 800 x 600 or above items are missing, please contact your reseller. Package Contents • One DCS-900 Internet Camera • One Installation CD-ROM • One AC power adapter • One Camera Stand • One Category 5 Ethernet Cable If any of the above 3

Product Manual
Page 4
... or Fast Ethernet network. The DCS-900 works with your existing network environment. Unlike a PC Camera, the DCS-900 is a stand-alone system with current Web browser software. The simple installation procedure and intuitive web-based interface offer easy integration with a 10Mbps Ethernet based network or 100Mbps Fast Ethernet based network. 4 Supports a Variety of the DCS-900 Internet Camera! The DCS-900 can be accessed...
... or Fast Ethernet network. The DCS-900 works with your existing network environment. Unlike a PC Camera, the DCS-900 is a stand-alone system with current Web browser software. The simple installation procedure and intuitive web-based interface offer easy integration with a 10Mbps Ethernet based network or 100Mbps Fast Ethernet based network. 4 Supports a Variety of the DCS-900 Internet Camera! The DCS-900 can be accessed...

Product Manual
Page 9
...Installation Attach the Swivel Stand Locate the stand connector on the bottom panel of the DCS-900 and screw on the swivel stand to the base of the lens on the DCS-900 is illuminated. Network Connectivity is confirmed when the orange LED Indicator on the rear panel of the DCS-900 and attach it to the network.... Note: Power source is illuminated. 9 Connect the Ethernet Cable Connect the included Ethernet cable to the network cable connector located on the back panel of the DCS-900 and connect it to your local power...
...Installation Attach the Swivel Stand Locate the stand connector on the bottom panel of the DCS-900 and screw on the swivel stand to the base of the lens on the DCS-900 is illuminated. Network Connectivity is confirmed when the orange LED Indicator on the rear panel of the DCS-900 and attach it to the network.... Note: Power source is illuminated. 9 Connect the Ethernet Cable Connect the included Ethernet cable to the network cable connector located on the back panel of the DCS-900 and connect it to your local power...
Product Manual
Page 11
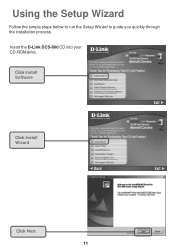
Using the Setup Wizard Follow the simple steps below to run the Setup Wizard to guide you quickly through the installation process. Insert the D-Link DCS-900 CD into your CD-ROM drive. Click Install Software Click Install Wizard Click Next 11
Using the Setup Wizard Follow the simple steps below to run the Setup Wizard to guide you quickly through the installation process. Insert the D-Link DCS-900 CD into your CD-ROM drive. Click Install Software Click Install Wizard Click Next 11

Product Manual
Page 21
...ActiveX) plug-in .ocx format, for example: http://www..com/ xplug.ocx where must be applied after 1 minute. The default setting for installing ActiveX from the driver CD is off . ƒ Dummy Power - In Dummy Mode, the LEDs are both OFF during active monitoring. ... flexibility for discreet camera operation in this manual. Instructions for the LED control is ON flashing randomly. Please refer to customize the LEDs for surveillance activity. LED indicator is present, the LED indicator will be replaced with your company's DNS server. LAN - DCS-900 Configuration (continued) ...
...ActiveX) plug-in .ocx format, for example: http://www..com/ xplug.ocx where must be applied after 1 minute. The default setting for installing ActiveX from the driver CD is off . ƒ Dummy Power - In Dummy Mode, the LEDs are both OFF during active monitoring. ... flexibility for discreet camera operation in this manual. Instructions for the LED control is ON flashing randomly. Please refer to customize the LEDs for surveillance activity. LED indicator is present, the LED indicator will be replaced with your company's DNS server. LAN - DCS-900 Configuration (continued) ...
Product Manual
Page 22
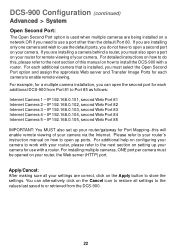
...set up your router/gateway for each camera to open a port on your camera via the Internet. For installing multiple cameras, ONE port per camera must be opened on your router for each additional DCS-900 from the DCS-900. 22 Please refer to your router...'s instruction manual on setting up ports. IP 192.168.0.103, second Web Port 83 Internet Camera 4 - IP 192.168.0.104, second Web Port 84 Internet Camera 5 - For each additional camera that is used when multiple cameras are being installed on a network...
...set up your router/gateway for each camera to open a port on your camera via the Internet. For installing multiple cameras, ONE port per camera must be opened on your router for each additional DCS-900 from the DCS-900. 22 Please refer to your router...'s instruction manual on setting up ports. IP 192.168.0.103, second Web Port 83 Internet Camera 4 - IP 192.168.0.104, second Web Port 84 Internet Camera 5 - For each additional camera that is used when multiple cameras are being installed on a network...

Product Manual
Page 23
DCS-900 Configuration (continued) Installing the DCS-900 Behind a Router Single Camera Installation If you are installing a single camera on your network the installation is an easy 4-step procedure: 1) Identify Your Camera on the Network 2) Assign a Local IP Address for Your Camera 3) Determine Your Router's WAN IP Address (Enable Remote Viewing) 4) Open Virtual Server Ports for Your Router (Enable Remote Viewing) Multiple Camera Installation If you are...
DCS-900 Configuration (continued) Installing the DCS-900 Behind a Router Single Camera Installation If you are installing a single camera on your network the installation is an easy 4-step procedure: 1) Identify Your Camera on the Network 2) Assign a Local IP Address for Your Camera 3) Determine Your Router's WAN IP Address (Enable Remote Viewing) 4) Open Virtual Server Ports for Your Router (Enable Remote Viewing) Multiple Camera Installation If you are...

Product Manual
Page 24
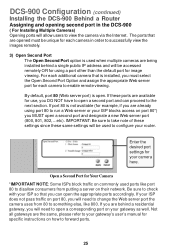
... Address 24 DCS-900 Configuration (continued) Installing the DCS-900 Behind a Router 1) Identify Your Camera on the Network Once you are installing several cameras on your network. If you wish to use the default camera IP Address of your router's Local IP Address(i.e.192.168.0.1 if you are logged into the camera via a Web browser on your network PC,click on Your Network 2) Assign...
... Address 24 DCS-900 Configuration (continued) Installing the DCS-900 Behind a Router 1) Identify Your Camera on the Network Once you are installing several cameras on your network. If you wish to use the default camera IP Address of your router's Local IP Address(i.e.192.168.0.1 if you are logged into the camera via a Web browser on your network PC,click on Your Network 2) Assign...
Product Manual
Page 25
...the appropriate ports accordingly. For each additional camera that are being installed behind a residential gateway, you must be accessed remotely OR for each camera in the DCS-900 ( For Installing Multiple Cameras) Opening ports will need to open . Open a Second Port for Your Camera *IMPORTANT NOTE: Some ISPs block traffic on... commonly used when multiple cameras are opened must select the Open Second Port Option and assign the appropriate Web server port for using port 80 to run a Web server or your ISP does not pass traffic on their network. If port 80 is open...
...the appropriate ports accordingly. For each additional camera that are being installed behind a residential gateway, you must be accessed remotely OR for each camera in the DCS-900 ( For Installing Multiple Cameras) Opening ports will need to open . Open a Second Port for Your Camera *IMPORTANT NOTE: Some ISPs block traffic on... commonly used when multiple cameras are opened must select the Open Second Port Option and assign the appropriate Web server port for using port 80 to run a Web server or your ISP does not pass traffic on their network. If port 80 is open...

Product Manual
Page 26
... be more convenient for more information. 26 DCS-900 Configuration (continued) Installing the DCS-900 Behind a Router ROUTER SET-UP AND INSTALLATION The following steps generally apply to P.20 for you have on your ISP, you may want to access your camera from a remote location. The D-Link DI-614+ is a fixed IP address ...that you to use DDNS to obtain an IP address, please refer to any router that will not change from time to time depending on your network.
... be more convenient for more information. 26 DCS-900 Configuration (continued) Installing the DCS-900 Behind a Router ROUTER SET-UP AND INSTALLATION The following steps generally apply to P.20 for you have on your ISP, you may want to access your camera from a remote location. The D-Link DI-614+ is a fixed IP address ...that you to use DDNS to obtain an IP address, please refer to any router that will not change from time to time depending on your network.
Product Manual
Page 27
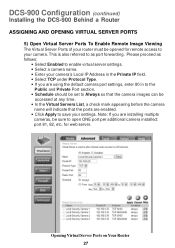
... on Your Router 27 DCS-900 Configuration (continued) Installing the DCS-900 Behind a Router ASSIGNING AND OPENING VIRTUAL SERVER PORTS 5) Open Virtual Server Ports To Enable Remote Image Viewing The Virtual Server Ports of your router must be opened for web server. for remote access to open ONE port per additional camera installed: port 81, 82, etc...
... on Your Router 27 DCS-900 Configuration (continued) Installing the DCS-900 Behind a Router ASSIGNING AND OPENING VIRTUAL SERVER PORTS 5) Open Virtual Server Ports To Enable Remote Image Viewing The Virtual Server Ports of your router must be opened for web server. for remote access to open ONE port per additional camera installed: port 81, 82, etc...
Product Manual
Page 28
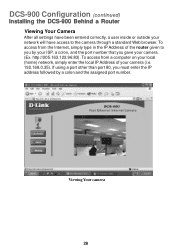
... from the Internet, simply type in the IP Address of your camera (i.e. 192.168.0.35). http://205.163.122.96:83). DCS-900 Configuration (continued) Installing the DCS-900 Behind a Router Viewing Your Camera After all settings have been entered correctly, a user inside or outside your network will have access to you by your ISP, a colon, and...number that you must enter the IP address followed by a colon and the assigned port number. To access from a computer on your local (home) network, simply enter the local IP Address of the router given to the camera through a standard Web browser.
... from the Internet, simply type in the IP Address of your camera (i.e. 192.168.0.35). http://205.163.122.96:83). DCS-900 Configuration (continued) Installing the DCS-900 Behind a Router Viewing Your Camera After all settings have been entered correctly, a user inside or outside your network will have access to you by your ISP, a colon, and...number that you must enter the IP address followed by a colon and the assigned port number. To access from a computer on your local (home) network, simply enter the local IP Address of the router given to the camera through a standard Web browser.

Product Manual
Page 35
... or from settings you have made manually. The date/time of the DCS-900 will be displayed in the top bar located above the camera image when the Camera Name field is to position the DCS-900 and adjust the focus, by manually turning the lens clockwise or counter-...clockwise to the Appendix for instructions on ActiveX in the Home screen, and the following screen appears below: Camera Name The Camera name will be displayed according to install...
... or from settings you have made manually. The date/time of the DCS-900 will be displayed in the top bar located above the camera image when the Camera Name field is to position the DCS-900 and adjust the focus, by manually turning the lens clockwise or counter-...clockwise to the Appendix for instructions on ActiveX in the Home screen, and the following screen appears below: Camera Name The Camera name will be displayed according to install...
Product Manual
Page 37
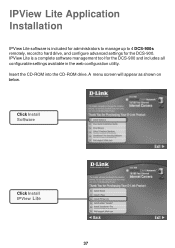
IPView Lite is included for administrators to manage up to 4 DCS-900s remotely, record to hard drive, and configure advanced settings for the DCS-900 and includes all configurable settings available in the web configuration utility. Click Install Software Click Install IPView Lite 37 A menu screen will appear as shown on below. Insert the CD-ROM into the CD-ROM drive. IPView Lite Application Installation IPView Lite software is a complete software management tool for the DCS-900.
IPView Lite is included for administrators to manage up to 4 DCS-900s remotely, record to hard drive, and configure advanced settings for the DCS-900 and includes all configurable settings available in the web configuration utility. Click Install Software Click Install IPView Lite 37 A menu screen will appear as shown on below. Insert the CD-ROM into the CD-ROM drive. IPView Lite Application Installation IPView Lite software is a complete software management tool for the DCS-900.

Product Manual
Page 39
Click No 39 IPView Lite Application Installation (continued) Click Next If your sound card or video card has not passed Windows Logo testing, this window will appear. Click Continue Anyway If there are previously installed target files that are newer than the source files, do NOT overwrite them.
Click No 39 IPView Lite Application Installation (continued) Click Next If your sound card or video card has not passed Windows Logo testing, this window will appear. Click Continue Anyway If there are previously installed target files that are newer than the source files, do NOT overwrite them.

Product Manual
Page 40
Click OK 40 Enter the default User Name: admin into the application. To start running the IPView Lite click on OK to \Programs\IPViewLite Directory. IPView Lite Application Installation (continued) Click Finish After successfully installing the IPView Lite, the application program for the DCS-900 is automatically installed to log into the respective field and click on windows Start > Programs > IPViewLite > IPViewLite.
Click OK 40 Enter the default User Name: admin into the application. To start running the IPView Lite click on OK to \Programs\IPViewLite Directory. IPView Lite Application Installation (continued) Click Finish After successfully installing the IPView Lite, the application program for the DCS-900 is automatically installed to log into the respective field and click on windows Start > Programs > IPViewLite > IPViewLite.

Product Manual
Page 41
IPView Lite Application Installation (continued) Once logged in, the IPView Lite application is executed and the IPView Lite interface will appear in the default List View format: 41
IPView Lite Application Installation (continued) Once logged in, the IPView Lite application is executed and the IPView Lite interface will appear in the default List View format: 41
Product Manual
Page 43
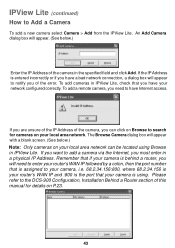
... incorrectly or if you of the camera, you have a bad network connection, a dialog box will need to Add a Camera To add a new camera select Camera > Add from the IPView Lite. If you are unsure of the IP Address of the error. If the IP Address is assigned to the DCS-900 Configuration, Installation Behind a Router section of the...
... incorrectly or if you of the camera, you have a bad network connection, a dialog box will need to Add a Camera To add a new camera select Camera > Add from the IPView Lite. If you are unsure of the IP Address of the error. If the IP Address is assigned to the DCS-900 Configuration, Installation Behind a Router section of the...

Product Manual
Page 44
... entered. Alternatively, you can double-click on the camera you wish to add and click on Add. Click on the local area network. The camera will detect and search for all the available cameras that are installed on Add, and the camera will automatically be added into the IPView Lite list ...view. 192.168.0.20 44 IPView Lite (continued) How to Add a Camera Click on Add. IPView Lite...
... entered. Alternatively, you can double-click on the camera you wish to add and click on Add. Click on the local area network. The camera will detect and search for all the available cameras that are installed on Add, and the camera will automatically be added into the IPView Lite list ...view. 192.168.0.20 44 IPView Lite (continued) How to Add a Camera Click on Add. IPView Lite...

